2. Basic Lesson
2.1 Go Forward
2.1.1 Preparation
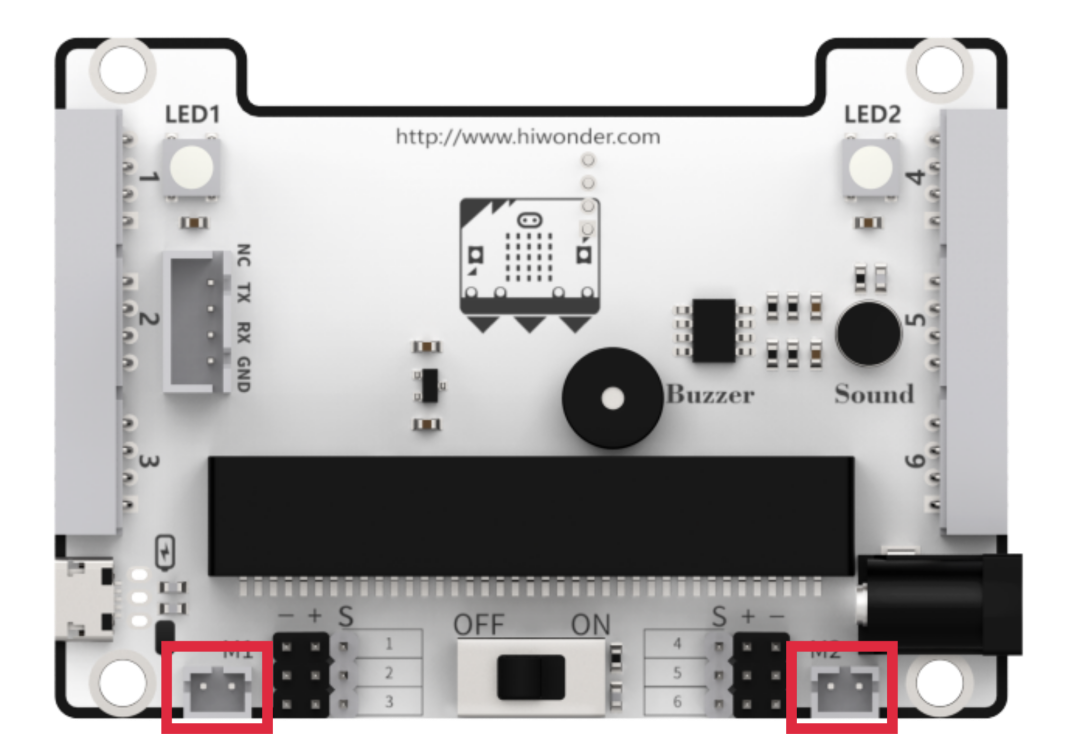
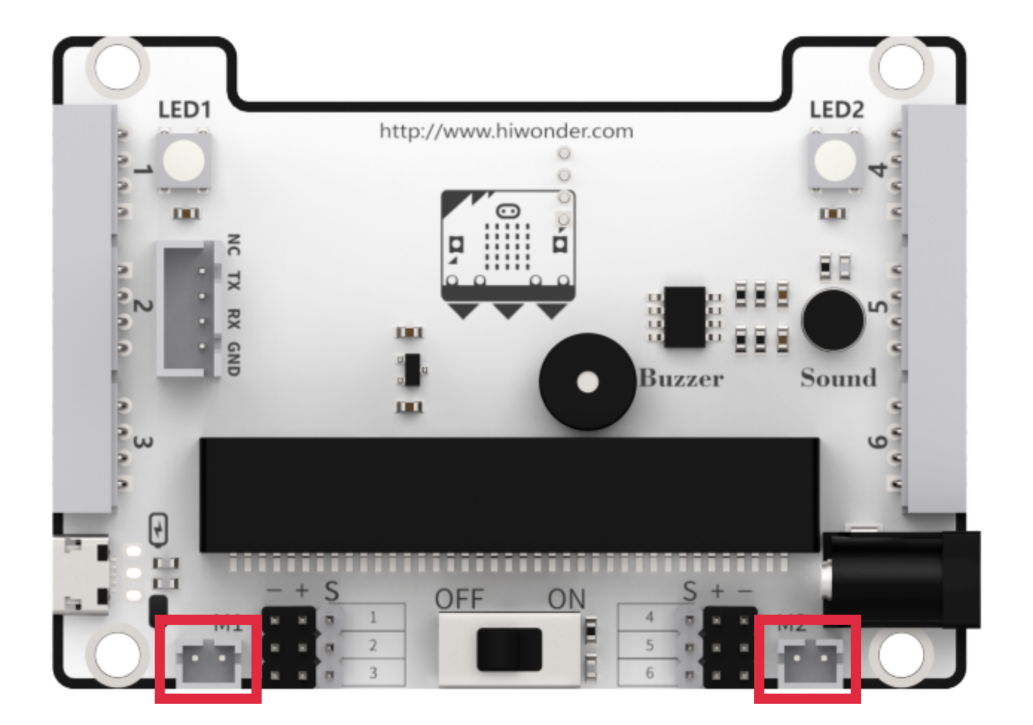
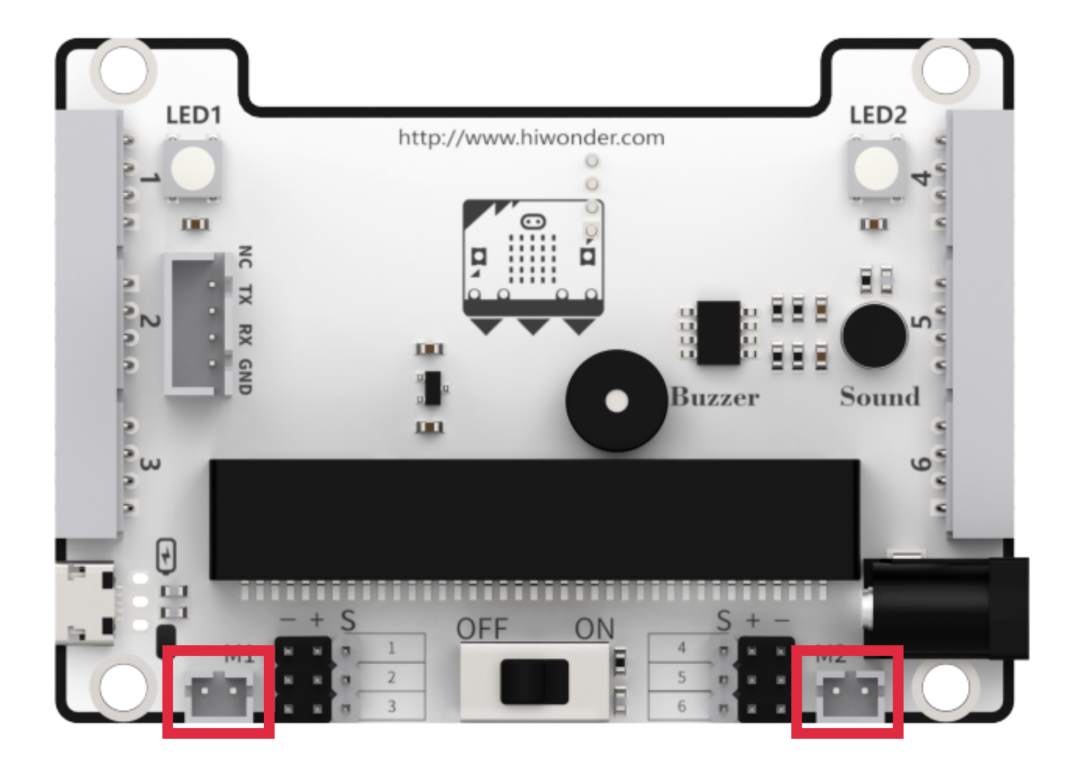
The motor ports on Qtruck are shown in the picture below. Please connect the motor cable to the motor port on the same side.
2.1.2 Learning Objective
(1) Learn how to use motor block coding.
(2) Program Qtruck to go forward.
2.1.3 Project Logic
The Qtruck robot is equipped with two geared motors, which can be controlled through programming to drive the motors and achieve forward movement.
2.1.4 Program Writing
Extension Package adding method
Online programming: click https://makecode.microbit.org/ to enter the programming interface. After creating a new project, click Extensions to add the Hiwonder software package for programming.
Add https://github.com/Hiwonder/Startbit for micor:bit V1.5.
Add https://github.com/Hiwonder/StartbitV2 for micro:bit V2.0.
Note
Please select the expansion package corresponding to the version of micro:bit. The version of micro:bit can be viewed at the lower right corner of the board.
Block Coding Learning
| Block Coding | Class | Function |
|---|---|---|
 |
 |
Preparation for hardware device |
 |
Set PWM servo rotation and angle, and carry out central position calibration. | |
 |
Set the speed of motor 1 and motor 2. The value ranges -100 to 100. When it is 0, motor stop working. | |
 |
 |
Delay coding block. Program will execute a specific program at setting time. |
Block Coding Combination
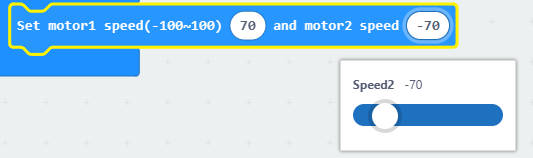
The value setting method is as follows:
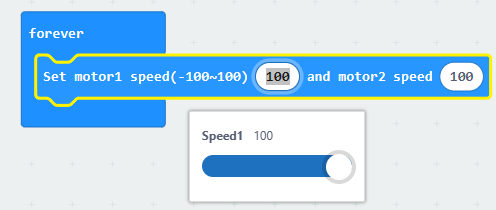
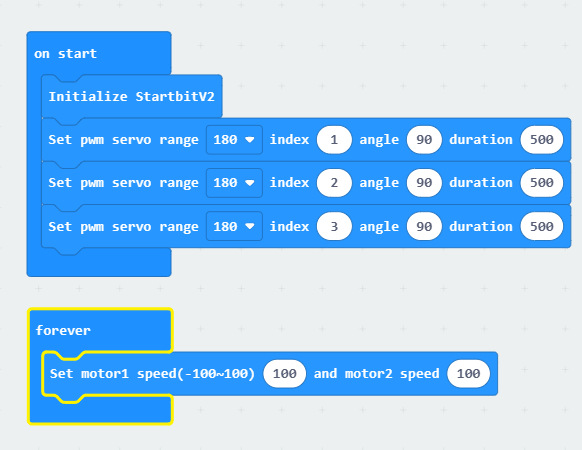
The program is as follows:
2.1.5 Project Outcome
Connect the micro:bit board only to your computer. After the program is transferred to micro:bit, insert it into the expansion board. Turn on micro:bit, and you will see Qtruck going forward.
2.2 Turning
2.2.1 Preparation
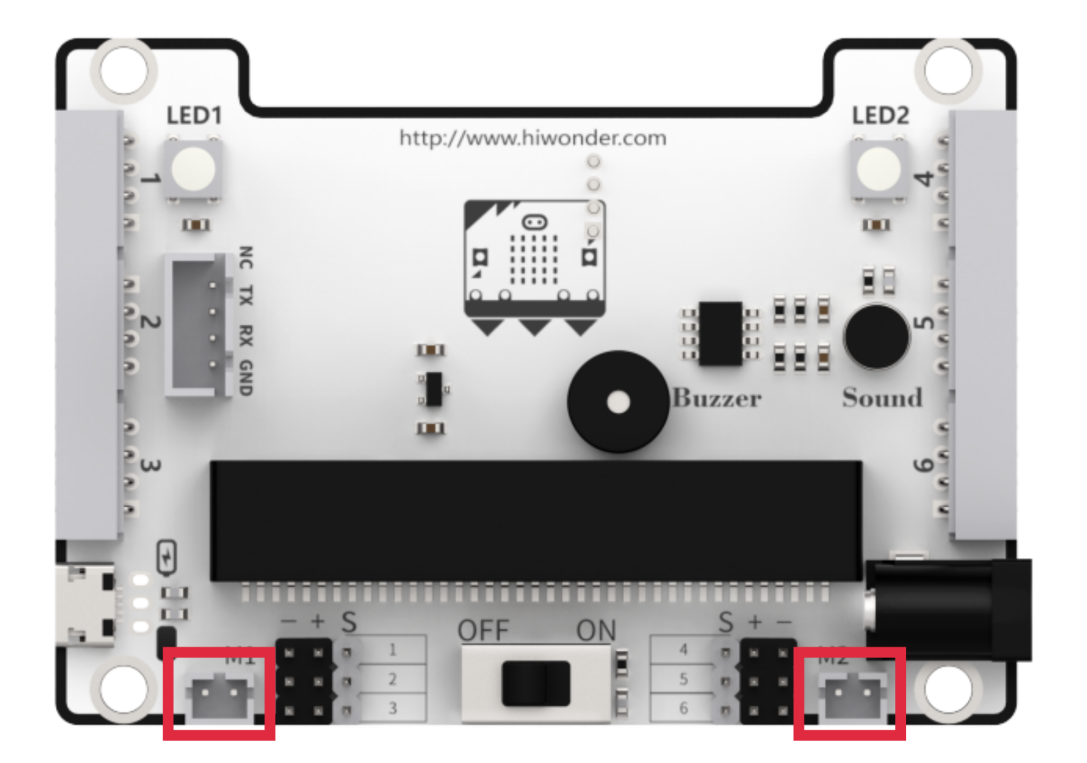
The motor ports on Qtruck are shown in the picture below. Please connect the motor cable to the motor port on the same side.
2.2.2 Learning Objective
(1) Learn about the logic of this feature and related block coding.
(2) Program Qtruck to turn.
2.2.3 Project Logic
There are two geared motors on Qtruck. Set the value of one of the servos to a negative value to implement turning.
For example, set the motor 2 speed to a negative number, Qtruck turns right.
2.2.4 Program Writing
Extension Package adding method
Online programming: click https://makecode.microbit.org/ to enter the programming interface. After creating a new project, click Extensions to add the Hiwonder software package for programming.
Add https://github.com/Hiwonder/Startbit for micor:bit V1.5.
Add https://github.com/Hiwonder/StartbitV2 for micro:bit V2.0.
Note
Please select the expansion package corresponding to the version of micro:bit. The version of micro:bit can be viewed at the lower right corner of the board.
Block Coding Learning
| Coding Block | Class | Function |
|---|---|---|
 |
 |
Preparation for hardware device |
 |
Set the speed of motor 1 and motor 2. The value ranges -100 to 100. When it is 0, motor stop working. | |
 |
 |
Delay coding block. Program will execute a specific program at setting time. |
Block Coding Combination
The program is as follows:

2.2.5 Project Outcome
Connect the micro:bit board only to your computer. After the program is transferred to micro:bit, insert it into the expansion board. When you place Qtruck on a flat surface and turn it on, Qtruck will turn right.
2.3 Driving
2.3.1 Preparation
The motor ports on Qtruck are shown in the picture below. Please connect the motor cable to the motor port on the same side.
2.3.2 Learning Objective
(1) Learn about the logic of this game and related block coding.
(2) Program Qtruck to realize driving.
2.3.3 Project Logic
By combining the motor’s forward motion and turning, and setting pause durations, you can achieve a “square path” driving pattern.
2.3.4 Program Writing
Extension Package adding method
Online programming: click https://makecode.microbit.org/ to enter the programming interface. After creating a new project, click Extensions to add the Hiwonder software package for programming.
Add https://github.com/Hiwonder/Startbit for micor:bit V1.5.
Add https://github.com/Hiwonder/StartbitV2 for micro:bit V2.0.
Note
Please select the expansion package corresponding to the version of micro:bit. The version of micro:bit can be viewed at the lower right corner of the board.
Block Coding Learning
| Coding Block | Class | Function |
|---|---|---|
 |
 |
Set the speed of motor 1 and motor 2. The value ranges -100 to 100, which can control Qtruck's movement. |
 |
 |
If two inputs are True, the result is True. |


|
Create a variable and assign it as 0. |
Block Coding
The value setting method is as follows:

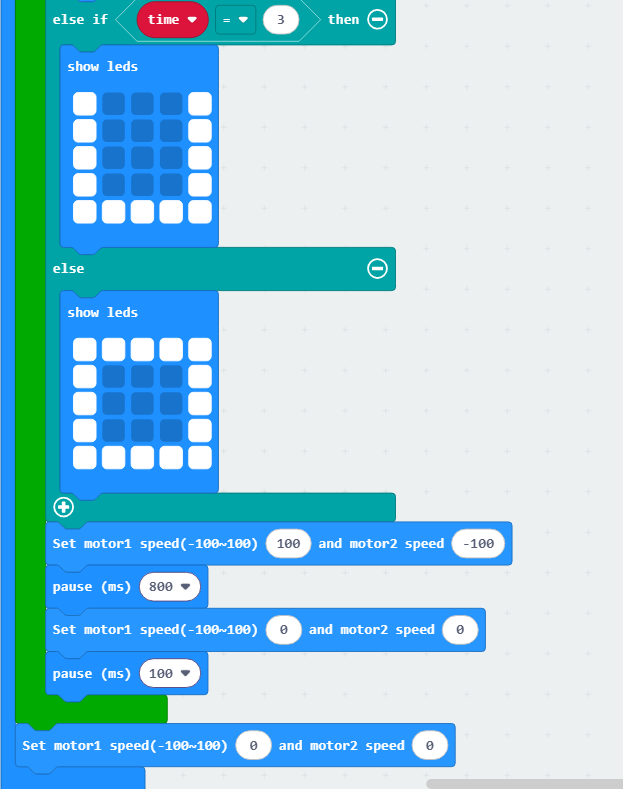
2.3.5 Project Outcome
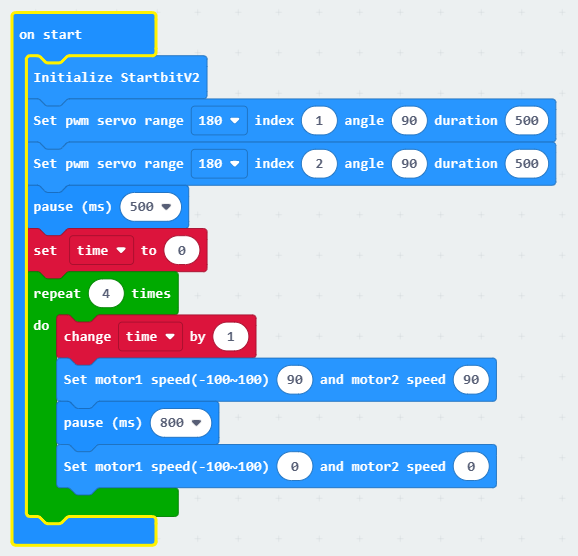
Connect the micro:bit board only to your computer. After the program is transferred to micro:bit, insert it into the expansion board. Turn on Qtruck, it will go forward first, then turn left, and repeat this action four times.
2.4 Speed Adjustment
2.4.1 Preparation
The motor ports on Qtruck are shown in the picture below. Please connect the motor cable to the motor port on the same side.
2.4.2 Learning Objective
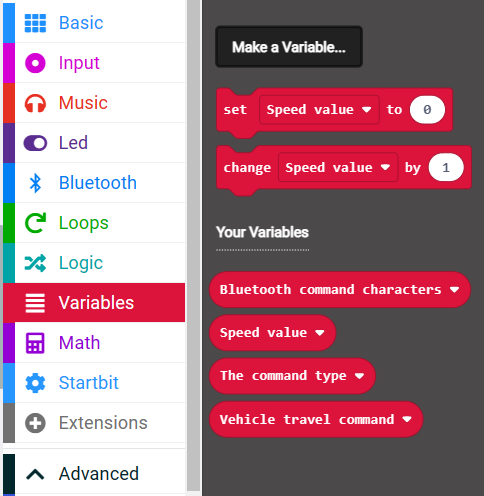
(1) Learn how to create variable.
(2) Program Qtruck to automatically adjust speed while driving.
2.4.3 Project Logic
There are two geared motors on Qtruck, you can control motor rotation by programming.
2.4.4 Program Writing
Extension Package adding method
Online programming: click https://makecode.microbit.org/ to enter the programming interface. After creating a new project, click Extensions to add the Hiwonder software package for programming.
Add https://github.com/Hiwonder/Startbit for micor:bit V1.5.
Add https://github.com/Hiwonder/StartbitV2 for micro:bit V2.0.
Note
Please select the expansion package corresponding to the version of micro:bit. The version of micro:bit can be viewed at the lower right corner of the board.
Block Coding Learning
| Coding Block | Class | Function |
|---|---|---|
 |
 |
Preparation for hardware device |
 |
Set the speed of motor 1 and motor 2. The value ranges -100 to 100. When it is 0, motor stop working. | |
 |
 |
Delay coding block. Program will execute a specific program at setting time. |
Block Coding Combination
Create variables:
The program is as follows:
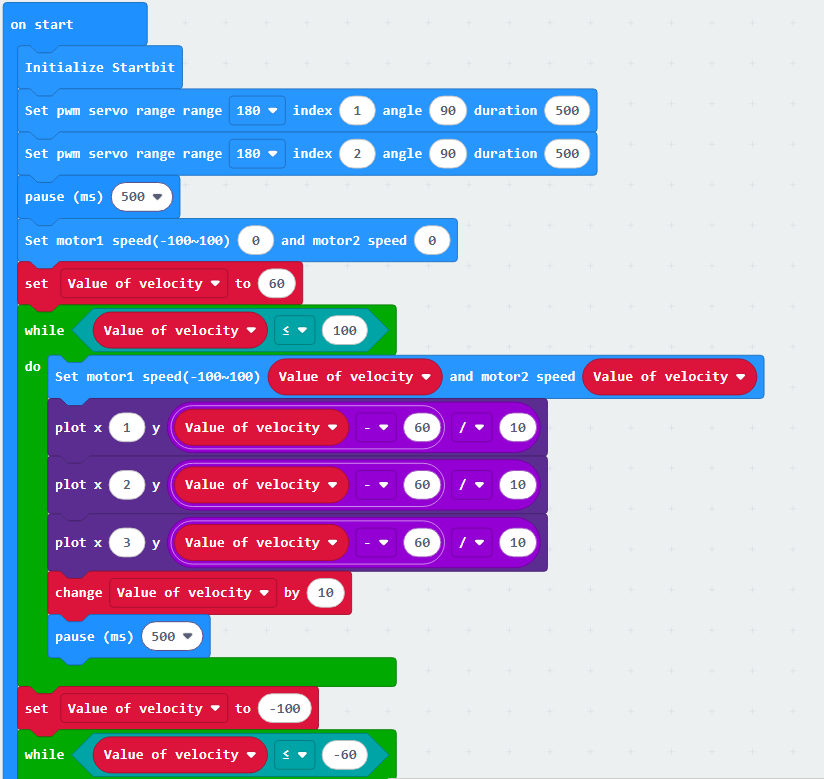
2.4.5 Project Outcome
Connect the micro:bit board to your computer. After the program is transferred to micro:bit, insert it into the expansion board. Turn on Qtruck, it will go forward at different speeds and go backward at different speeds, then stop moving.