6. Intelligent Transport Course
6.1 Intelligent Transport
Note
This section is only applicable to users who have purchased the advanced version. The demonstration effect can be viewed in the folder for this section.
6.1.1 Purpose
The robot will sequentially transport sponge blocks on the map to the corresponding AprilTag marker positions until all the blocks are transported.
6.1.2 Principle
In the Industry 4.0 era, robots are widely used in the field of intelligent logistics. They can efficiently manage operations, improve the service level of the logistics industry, and consequently reduce costs while decreasing the consumption of natural and social resources.
We are going to learn how TonyPi robot realizes the function of AI Transport in this section. There are two stages: recognition stage and transport stage.
The first stage is recognition. Program TonyPi to search the recognized object on the map through walking and head rotation.
When a recognizable color appears in the visual range, TonyPi starts to process the object color recognition. Convert the image to Lab, image binarization, and then perform operations such as expansion and corrosion to obtain an outline containing only the target color.
The second stage is transport. According to the processing of the image feedback information, TonyPi will judge the distance of the items when multiple items appear. And then move the items according to the distance.Control the robot to approach and, upon reaching the set range, lift the object up to head level.
At the same time, the corresponding AprilTag tag can be matched according to the color of the item, i.e., determining the endpoint position for transporting the item.Then, by controlling the pan-tilt and body movements, scanning is performed on the map. When a tag is detected, different actions are executed based on whether it is the target tag or not.
If the detected tag is the target tag, the robot will directly transport the item to the target point and then place the item down.
If another tag is detected, the robot will determine the position of the target tag based on the detected tag. Then, it will control the robot to turn towards the target until the target tag is scanned. After that, it will transport the item to the target point and place the item down.
6.1.3 Preparation
(1) The function of this section should be operated on the provided map. The right side is the items placement zone and the left side is the receiving space.
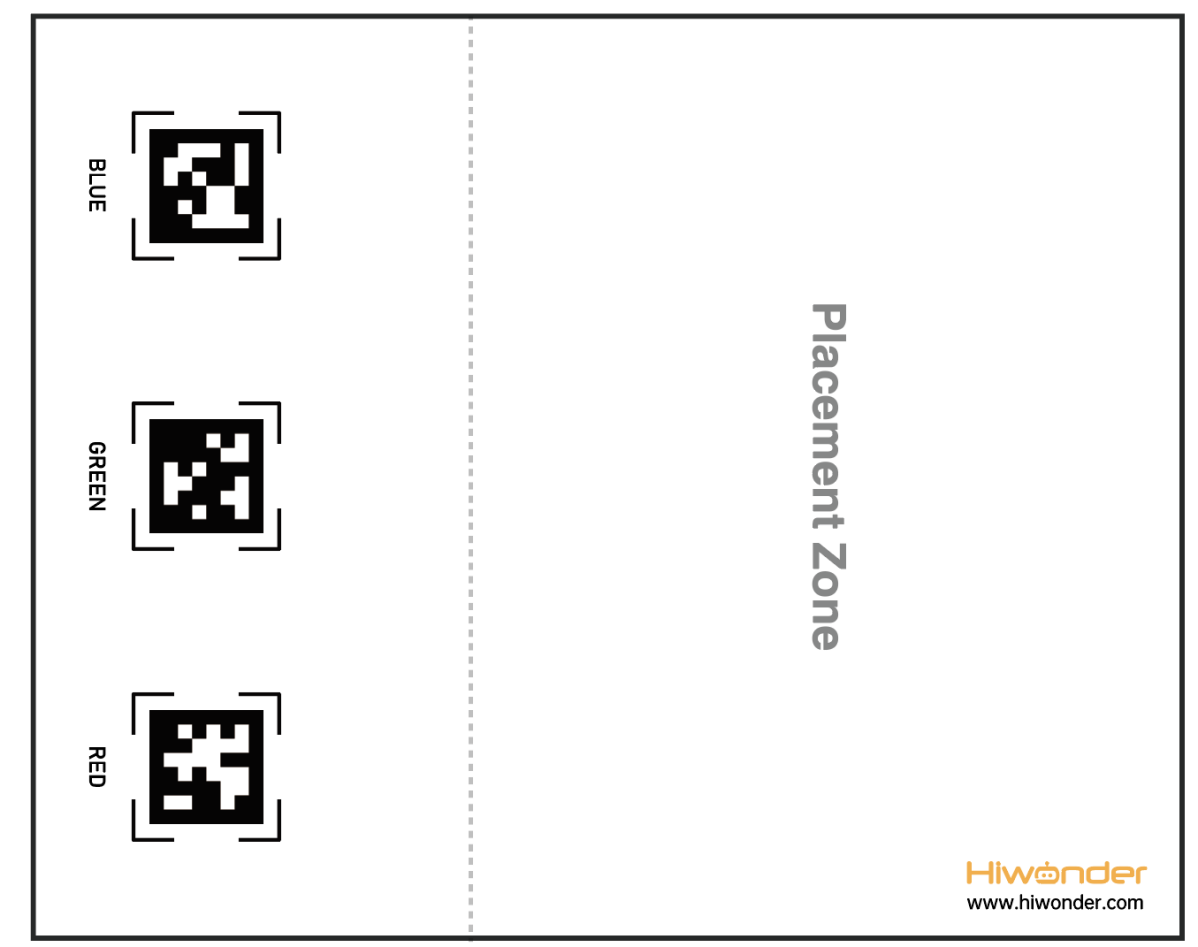
(2) Place the map on the smooth floor. Place the TonyPi and color blocks in the placement zone.
(3) Turn on robot and connect to Raspberry Pi desktop with VNC.
6.1.4 Operation Steps
Note
Pay attention to the text format in the input of instructions.
(1) Power on the robot and use VNC Viewer to connect to the remote desktop.
(2) Double-click “Terminator” icon  in the Raspberry Pi desktop and open command line.
(3) Input “cd TonyPi/Functions” and press Enter to locate to the directory where the program is stored.
cd TonyPi/Functions/
(4) Input command, then press Enter to start the game.
python3 Transport.py
(5) If you want to exit the game programming, press “Ctrl+C” in the LX terminal interface. If the exit fails, please try it few more times.
6.1.5 Project Outcome
Note
It is recommended to place the map on a flat and open surface for optimal performance.
Place the robot and sponge blocks of red, green, and blue colors randomly within the placement area of the map. After starting the intelligent transportation gameplay, the robot will sequentially transport sponge blocks to the corresponding AprilTag markers based on their proximity until all three blocks are transported.
6.1.6 Program Parameter Instruction
The source code of this program is located in: “/home/pi/TonyPi/Functions/Transport.py”
Transport color and preset position parameters
In this game, set up objects of three colors: red, green, and blue, and transport them to their corresponding tag positions, as shown in the pictured:
134 | color_list = ['red', 'green', 'blue'] |
68 69 70 71 72 | # 颜色对应的tag编号(the tag numbers corresponding to each color) color_tag = {'red': 1, 'green': 2, 'blue': 3 } |
Detect transported object
(1) detect adjustment
At the beginning, the robot adjusts its left and right direction to find the objects to be transported. The specific settings are as shown in the following image:
533 534 535 536 537 538 539 540 | if not __isRunning or stop_detect: if step == 5: object_center_x = 0 elif step == 6: find_box = not find_box object_center_x = -2 step = 1 stop_detect = False |
386 387 388 389 390 391 392 393 394 395 396 397 398 399 400 401 | # 头回中(return the head to the center) ctl.set_pwm_servo_pulse(1, servo_data['servo1'], 500) ctl.set_pwm_servo_pulse(2, servo_data['servo2'], 500) time.sleep(0.6) elif step == 1: # 左右调整,保持在正中(adjust left and right to stay centered) x_dis = servo_data['servo2'] y_dis = servo_data['servo1'] turn = '' haved_find_tag = False if (object_center_x - CENTER_X) > 170 and object_center_y > 330: AGC.runActionGroup(back, lock_servos=lock_servos) elif object_center_x - CENTER_X > 80: # 不在中心,根据方向让机器人转向一步(if not centered, instruct the robot to turn one step in the appropriate direction) AGC.runActionGroup(turn_right, lock_servos=lock_servos) elif object_center_x - CENTER_X < -80: AGC.runActionGroup(turn_left, lock_servos=lock_servos) |
(2) color detection parameter
To detect the objects for transportation based on their color, the following code is used.
545 | color, color_center_x, color_center_y, color_angle = colorDetect(img) # 颜色检测,返回颜色,中心坐标,角度(color detection, return color, center coordinates, angle) |
The main process involved in detecting object colors is as follows:
① Before converting the image to the LAB color space, noise reduction processing is required. The “GaussianBlur()” function is used for Gaussian filtering as pictured:
227 | frame_gb = cv2.GaussianBlur(frame_resize, (3, 3), 3) |
The first parameter frame_resize is inputting image.
The second parameter (3, 3) is the size of the Gaussian kernel. A larger kernel size typically results in a greater degree of filtering, making the output image more blurry, and it also increases computational complexity.
The third parameter 3 is the standard deviation of the Gaussian function along the X direction. In the Gaussian filter, it is used to control the variation near its mean. If this value is increased, the allowable range of variation around the mean is also increased; if decreased, the allowable range of variation around the mean is reduced.
② By using the inRange function to perform binaryzation on the input image as pictured:
234 235 236 237 238 239 240 241 | frame_mask = cv2.inRange(frame_lab, (lab_data[i]['min'][0], lab_data[i]['min'][1], lab_data[i]['min'][2]), (lab_data[i]['max'][0], lab_data[i]['max'][1], lab_data[i]['max'][2])) #对原图像和掩模进行位运算(operate bitwise operation to original image and mask) eroded = cv2.erode(frame_mask, cv2.getStructuringElement(cv2.MORPH_RECT, (3, 3))) #腐蚀(corrosion) |
③ To reduce interference and make the image smoother, it is necessary to perform erosion and dilation operations on the image as pictured:
241 242 | eroded = cv2.erode(frame_mask, cv2.getStructuringElement(cv2.MORPH_RECT, (3, 3))) #腐蚀(corrosion) dilated = cv2.dilate(eroded, cv2.getStructuringElement(cv2.MORPH_RECT, (3, 3))) #膨胀(dilation) |
In the processing, the getStructuringElement function is used to generate structuring elements of different shapes.
The first parameter cv2.MORPH_RECT is the shape of the kernel, which is a rectangle in this case.
The second parameter (3, 3) is the size of the rectangle, which is 3x3 in this case.
④ Find out the largest contour of the object as pictured:
246 247 248 249 250 251 252 253 254 255 | if area_max > 500: # 有找到最大面积(thr maximal area is found) rect = cv2.minAreaRect(areaMaxContour)#最小外接矩形(the minimum bounding rectangle) angle_ = rect[2] box = np.int0(cv2.boxPoints(rect))#最小外接矩形的四个顶点(the four vertices of the minimum bounding rectangle) for j in range(4): box[j, 0] = int(Misc.map(box[j, 0], 0, size[0], 0, img_w)) box[j, 1] = int(Misc.map(box[j, 1], 0, size[1], 0, img_h)) cv2.drawContours(img, [box], -1, (0,255,255), 2)#画出四个点组成的矩形(draw the rectangle formed by the four points) |
To avoid interference, the if area_max > 500 instruction is used to ensure that only contours with an area greater than 500 are considered valid for the largest area.
⑤ When the robot detects colored objects, use the cv2.drawContours() function to draw the contours of the colored objects as pictured:
246 247 248 249 250 251 252 253 254 255 | if area_max > 500: # 有找到最大面积(thr maximal area is found) rect = cv2.minAreaRect(areaMaxContour)#最小外接矩形(the minimum bounding rectangle) angle_ = rect[2] box = np.int0(cv2.boxPoints(rect))#最小外接矩形的四个顶点(the four vertices of the minimum bounding rectangle) for j in range(4): box[j, 0] = int(Misc.map(box[j, 0], 0, size[0], 0, img_w)) box[j, 1] = int(Misc.map(box[j, 1], 0, size[1], 0, img_h)) cv2.drawContours(img, [box], -1, (0,255,255), 2)#画出四个点组成的矩形(draw the rectangle formed by the four points) |
The first parameter img is the input image.
The second parameter [box] is the contour itself, represented as a list in Python.
The third parameter -1 is the index of the contour, where the numerical value represents drawing all contours within the list.
The fourth parameter (0, 255, 255) is the contour color, with the order being B, G, R, where (0, 255, 255) represents yellow in this case.
The fifth parameter 2 is the contour width. If set to -1, it means to fill the contour with the specified color.
⑥ After the robot detects the colored object, use the “cv2.circle()” function to draw the center point of the colored object on the feedback screen as pictured:
261 | cv2.circle(img, (center_x_, center_y_), 5, (0, 255, 255), -1)#画出中心点(draw the center point) |
The first parameter img is the input image, which is the image of the detected colored object in this case.
The second parameter (centerX, centerY) is the coordinates of the center point of the circle to be drawn (determined based on the detected object).
The third parameter 5 is the radius of the circle to be drawn.
The fourth parameter (0, 255, 255) is the color of the circle to be drawn, with the order being B, G, R, and in this case, it represents yellow.
The fifth parameter -1 indicates that the circle should be filled with the color specified in parameter 4. If it is a number, it represents the line width of the circle to be drawn.
Start transporting
After detecting a colored object, the robot starts transporting the object, which can be divided into several steps: approaching the object, picking up the object, finding the transportation location, transporting the object, and putting down the object.
(1) approach the object
Before starting the transport, first control the robot to gradually approach the object to be transported as pictured:
547 548 549 550 551 552 553 | # 如果是搬运阶段(if it is transportation stage) if find_box: object_color, object_center_x, object_center_y, object_angle = color, color_center_x, color_center_y, color_angle else: tag_data = apriltagDetect(img) # apriltag检测(apriltag detection) if tag_data[color_tag[object_color] - 1][0] != -1: # 如果检测到目标arpiltag(if the target apriltag is detected) |
405 406 407 408 409 410 411 412 413 414 | step = 2 elif step == 2: # 接近物体(approach the object) if 330 < object_center_y: AGC.runActionGroup(back, lock_servos=lock_servos) if find_box: if object_center_x - CENTER_X > 150: AGC.runActionGroup(right_move_large, lock_servos=lock_servos) elif object_center_x - CENTER_X < -150: AGC.runActionGroup(left_move_large, lock_servos=lock_servos) elif -10 > object_angle > -45:# 不在中心,根据方向让机器人转向一步(if not centered, instruct the robot to turn one step in the appropriate direction) |
439 440 441 442 443 444 445 446 447 448 449 450 | elif step == 3: if 340 < object_center_y: AGC.runActionGroup(back, lock_servos=lock_servos) elif 0 < object_center_y <= 250: AGC.runActionGroup(go_forward, lock_servos=lock_servos) elif object_center_x - CENTER_X >= 40: # 不在中心,根据位置让机器人左右移动一步(if not centered, instruct the robot to turn one step in the appropriate position) AGC.runActionGroup(right_move_large, lock_servos=lock_servos) elif object_center_x - CENTER_X <= -40: AGC.runActionGroup(left_move_large, lock_servos=lock_servos) elif 20 <= object_center_x - CENTER_X < 40: AGC.runActionGroup(right_move, lock_servos=lock_servos) elif -40 < object_center_x - CENTER_X < -20: |
454 455 456 457 458 459 460 461 462 463 464 465 466 | elif step == 4: #靠近物体(approach the object) if 280 < object_center_y <= 340: AGC.runActionGroup('go_forward_one_step', lock_servos=lock_servos) time.sleep(0.2) elif 0 <= object_center_y <= 280: AGC.runActionGroup(go_forward, lock_servos=lock_servos) else: if object_center_y >= 370: go_step = 2 else: go_step = 3 if abs(object_center_x - CENTER_X) <= 40: stop_detect = True |
(2) pick up the object
After approaching the object, control the robot to pick up the object to be transported as pictured:
470 471 472 473 474 475 | elif step == 5: # 拿起或者放下物体(pick up or put down the object) if find_box: AGC.runActionGroup('go_forward_one_step', times=2) AGC.runActionGroup('stand', lock_servos=lock_servos) AGC.runActionGroup('move_up') lock_servos = LOCK_SERVOS |
(3) find the transportation location
After approaching the object, control the robot to pick up the object to be transported as pictured:
551 | tag_data = apriltagDetect(img) # apriltag检测(apriltag detection) |
The main control parameters involved in the process are as follows:
① After obtaining the information of the four corner points of the tag code, use the “cv2.drawContours()” function to draw the contour of the tag as pictured:
281 282 283 | for detection in detections: corners = np.rint(detection.corners) # 获取四个角点(retrieve the four corner points) cv2.drawContours(img, [np.array(corners, int)], -1, (0, 255, 255), 2) |
② After the robot detects the tag, use the cv2.circle() function to draw the center point of the tag on the feedback screen as pictured:
            object_center_x, object_center_y = int(detection.center[0]), int(detection.center[1])  # 中心点(center point)
            cv2.circle(frame, (object_center_x, object_center_y), 5, (0, 255, 255), -1)
(4) transport object
After picking up the object, transport the object to the corresponding position as pictured:
553 554 555 | if tag_data[color_tag[object_color] - 1][0] != -1: # 如果检测到目标arpiltag(if the target apriltag is detected) object_center_x, object_center_y, object_angle = tag_data[color_tag[object_color] - 1] else: # 如果没有检测到目标arpiltag,就通过其他arpiltag来判断相对位置(if the target apriltag is not detected, determine relative position through other apriltag) |
470 471 472 473 474 475 | elif step == 5: # 拿起或者放下物体(pick up or put down the object) if find_box: AGC.runActionGroup('go_forward_one_step', times=2) AGC.runActionGroup('stand', lock_servos=lock_servos) AGC.runActionGroup('move_up') lock_servos = LOCK_SERVOS |
536 537 538 539 540 | elif step == 6: find_box = not find_box object_center_x = -2 step = 1 stop_detect = False |
After picking up the object, set “step = 1”, then control the robot to adjust its left and right position to face the tag position as pictured:
389 390 391 392 393 394 395 396 397 398 | time.sleep(0.6) elif step == 1: # 左右调整,保持在正中(adjust left and right to stay centered) x_dis = servo_data['servo2'] y_dis = servo_data['servo1'] turn = '' haved_find_tag = False if (object_center_x - CENTER_X) > 170 and object_center_y > 330: AGC.runActionGroup(back, lock_servos=lock_servos) elif object_center_x - CENTER_X > 80: # 不在中心,根据方向让机器人转向一步(if not centered, instruct the robot to turn one step in the appropriate direction) |
Then, gradually set “step = 2”, “step = 3”, “step = 4” to control the robot to transport the object to the tag position as pictured:
405 406 407 408 409 410 411 412 413 414 415 416 417 418 419 420 421 422 | step = 2 elif step == 2: # 接近物体(approach the object) if 330 < object_center_y: AGC.runActionGroup(back, lock_servos=lock_servos) if find_box: if object_center_x - CENTER_X > 150: AGC.runActionGroup(right_move_large, lock_servos=lock_servos) elif object_center_x - CENTER_X < -150: AGC.runActionGroup(left_move_large, lock_servos=lock_servos) elif -10 > object_angle > -45:# 不在中心,根据方向让机器人转向一步(if not centered, instruct the robot to turn one step in the appropriate direction) AGC.runActionGroup(turn_left, lock_servos=lock_servos) elif -80 < object_angle <= -45: AGC.runActionGroup(turn_right, lock_servos=lock_servos) elif object_center_x - CENTER_X > 40: AGC.runActionGroup(right_move_large, lock_servos=lock_servos) elif object_center_x - CENTER_X < -40: AGC.runActionGroup(left_move_large, lock_servos=lock_servos) else: |
454 455 456 457 458 459 460 461 462 463 464 465 466 | elif step == 4: #靠近物体(approach the object) if 280 < object_center_y <= 340: AGC.runActionGroup('go_forward_one_step', lock_servos=lock_servos) time.sleep(0.2) elif 0 <= object_center_y <= 280: AGC.runActionGroup(go_forward, lock_servos=lock_servos) else: if object_center_y >= 370: go_step = 2 else: go_step = 3 if abs(object_center_x - CENTER_X) <= 40: stop_detect = True |
During the transportation process, if the target tag is not detected, use other tags to determine the relative position as pictured:
556 557 558 559 560 | turn = getTurn(color_tag[object_color], tag_data) if turn == 'None': object_center_x, object_center_y, object_angle = -1, -1, 0 else: # 完全没有检测到apriltag(if the apriltag is completely not detected) object_center_x, object_center_y, object_angle = -3, -1, 0 |
303 304 305 306 307 308 309 310 311 312 313 314 315 316 317 318 319 320 321 322 323 324 325 326 327 | # 通过其他apriltag判断目标apriltag位置(determine the position of the target AprilTag through other AprilTags) # apriltag摆放位置:红(tag36h11_1),绿(tag36h11_2),蓝(tag36h11_3)(aprilTag placement: red (tag36h11_1), green (tag36h11_2), blue (tag36h11_3)) def getTurn(tag_id, tag_data): tag_1 = tag_data[0] tag_2 = tag_data[1] tag_3 = tag_data[2] if tag_id == 1: # 目标apriltag为1(the apriltag target is 1) if tag_2[0] == -1: # 没有检测到apriltag 2(apriltag 2 is not detected) if tag_3[0] != -1: # 检测到apriltag 3, 则apriltag 1在apriltag 3左边,所以左转(apriltag 3 is detected, in this case, aprilTag 1 is to the left of aprilTag 3, so turn left) return 'left' else: # 检测到apriltag 2,则则apriltag 1在apriltag 2左边,所以左转(apriltag 2 is detected, in this case, apriltag 1 is to the left of apriltag 2, so turn left) return 'left' elif tag_id == 2: if tag_1[0] == -1: if tag_3[0] != -1: return 'left' else: return 'right' elif tag_id == 3: if tag_1[0] == -1: if tag_2[0] != -1: return 'right' else: return 'right' |
(5) put down object
After completing the transportation, put down the object as pictured:
470 471 472 473 474 475 476 477 478 479 480 481 482 483 484 485 | elif step == 5: # 拿起或者放下物体(pick up or put down the object) if find_box: AGC.runActionGroup('go_forward_one_step', times=2) AGC.runActionGroup('stand', lock_servos=lock_servos) AGC.runActionGroup('move_up') lock_servos = LOCK_SERVOS step = 6 else: AGC.runActionGroup('go_forward_one_step', times=go_step, lock_servos=lock_servos) AGC.runActionGroup('stand', lock_servos=lock_servos) AGC.runActionGroup('put_down') AGC.runActionGroup(back, times=5, with_stand=True) color_list.remove(object_color) if color_list == []: color_list = ['red', 'green', 'blue'] lock_servos = '' |
6.2 Object Tracking
6.2.1 Program Logic
The robot recognizes colors, and its body can move according to the movement of the target color.
Distinguished from the color tracking effect in “5. AI Vision Projects” here is the effect of the body movement.
First, program TonyPi to recognize colors with Lab color space. Convert the RGB color space to Lab, image binarization, and then perform operations such as expansion and corrosion to obtain an outline containing only the target color. Use circles to frame the color outline to realize object color recognition.
Next, the traversal algorithm compares all correctly recognized colored objects and selects the object with the largest contour area as the target.
Finally, the servo is called to perform real-time tracking, while the body is driven to perform follow-up actions through action groups, thus completing the object tracking function.
The source code of the program is located in: /home/pi/TonyPi/Functions/Follow.py
6.2.2 Operation Steps
Note
Instructions must be entered with strict attention to case sensitivity and spacing.
(1) Turn on robot and connect to Raspberry Pi desktop with VNC.
(2) Double-click “Terminator” icon  in the Raspberry Pi desktop and open command line. Then input
 cd TonyPi/Functions/ and press Enter to locate the directory where the program is stored.
cd TonyPi/Functions/
(3) Input command, then press Enter to start the game.
python3 Follow.py
(4) If you want to exit the game programming, press “Ctrl+C”. If the exit fails, please try it few more times.
6.2.3 Project Outcome
After the gameplay is started, slowly move the red sponge block by hand or place the block on a movable carrier. The TonyPi robot will move along with the movement of the target color.
6.2.4 Programming Instruction
The source code of this program is locate in: /home/pi/TonyPi/Functions/Follow.py
Import parameter module
| Import module | function |
|---|---|
| import sys | The Python "sys" module has been imported for accessing system-related functions and variables. |
| import os | The Python "os" module has been imported, providing functions and methods for interacting with the operating system. |
| import cv2 | The OpenCV library has been imported for image processing and computer vision-related functionalities |
| import time | The Python "time" module has been imported for time-related functionalities, such as delay operations. |
| import math | The "math" module provides low-level access to mathematical operations, including many commonly used mathematical functions and constants. |
| import threading | Provides an environment for running multiple threads concurrently. |
| import np | The NumPy library has been imported. It is an open-source numerical computing extension for Python, used for handling array and matrix operations. |
| import hiwonder.TTS as TTS | Import speech recognition library |
| import hiwonder.Camera as Camera | Import camera library |
| from hiwonder.Misc import Misc | The "Misc" module has been imported for handling recognized rectangular data. |
| import hiwonder.ros_robot_controller_sdk as rrc | The robot's underlying control library has been imported for controlling servos, motors, RGB lights, and other hardware. |
| from hiwonder.controller import Controller | Import action group execution library |
| import hiwonder.ActionGroupControl as AGC | Import action group execution library |
| import common.yaml_handle | Contains functionalities or tools related to processing YAML format files. |
Color detection parameter
In the object tracking program, the detected object color is red.
287 288 289 290 | if __name__ == '__main__': init() start() __target_color = ('red') |
The main detection parameters involved in the detection process are as follows:
(1) Before converting the image to the LAB color space, noise reduction processing is required. The GaussianBlur() function is used for Gaussian filtering as pictured:
205 | frame_gb = cv2.GaussianBlur(frame_resize, (3, 3), 3) |
The first parameter frame_resize is inputting image.
The second parameter (3, 3) is the size of the Gaussian kernel. A larger kernel size typically results in a greater degree of filtering, making the output image more blurry, and it also increases computational complexity.
The third parameter 3 is the standard deviation of the Gaussian function along the X direction. In the Gaussian filter, it is used to control the variation near its mean. If this value is increased, the allowable range of variation around the mean is also increased; if decreased, the allowable range of variation around the mean is reduced.
(2) By using the inRange function to perform binaryzation on the input image as pictured:
213 214 215 216 217 218 219 | frame_mask = cv2.inRange(frame_lab, (lab_data[i]['min'][0], lab_data[i]['min'][1], lab_data[i]['min'][2]), (lab_data[i]['max'][0], lab_data[i]['max'][1], lab_data[i]['max'][2])) #对原图像和掩模进行位运算(operate bitwise operation to original image and mask) |
(3) To reduce interference and make the image smoother, it is necessary to perform erosion and dilation operations on the image as pictured:
220 221 | eroded = cv2.erode(frame_mask, cv2.getStructuringElement(cv2.MORPH_RECT, (3, 3))) #腐蚀(corrosion) dilated = cv2.dilate(eroded, cv2.getStructuringElement(cv2.MORPH_RECT, (3, 3))) #膨胀(dilation) |
In the processing, the getStructuringElement function is used to generate structuring elements of different shapes.
The first parameter cv2.MORPH_RECT is the shape of the kernel, which is a rectangle in this case.
The second parameter (3, 3) is the size of the rectangle, which is 3x3 in this case.
(4) Find out the largest contour of the object as pictured:
223 224 225 226 | areaMaxContour, area_max = getAreaMaxContour(contours) # 找出最大轮廓(find out the contour with the largest area) if areaMaxContour is not None and area_max > 100: # 有找到最大面积(the maximal area is found) rect = cv2.minAreaRect(areaMaxContour)#最小外接矩形(the minimum bounding rectangle) box = np.int0(cv2.boxPoints(rect))#最小外接矩形的四个顶点(the four vertices of the minimum bounding rectangle) |
To avoid interference, the if area_max_contour is not None and area_max > 100 instruction is used to ensure that only contours with an area greater than 100 are considered valid for the largest area.
Color recognition parameter
The main control parameters involved in the color recognition process are as follows:
(1) When the robot detects a colored object, use the cv2.drawContours() function to draw the contour of the colored object as pictured:
231 | cv2.drawContours(img, [box], -1, (0,255,255), 2)#画出四个点组成的矩形(draw the rectangle formed by the four points) |
The first parameter img is inputting image.
The second parameter [box] is the contour itself, represented as a list in Python.
The third parameter -1 is the index of the contour, where the numerical value represents drawing all contours within the list.
The fourth parameter (0, 255, 255) is the contour color, with the order being B, G, R, and in this case, it represents yellow.
The fifth parameter 2 is the contour width. If set to -1, it means to fill the contour with the specified color.
(2) After the robot detects a colored object, use the cv2.circle() function to draw the center point of the colored object on the feedback screen as pictured:
237 | cv2.circle(img, (centerX, centerY), 5, (0, 255, 255), -1)#画出中心点(draw the center point) |
The first parameter img is the input image, which is the image of the detected colored object in this case.
The second parameter (centerX, centerY) is the coordinates of the center point of the circle to be drawn (determined based on the detected object).
The third parameter 5 is the radius of the circle to be drawn.
The fourth parameter (0, 255, 255) is the color of the circle to be drawn, with the order being B, G, R, and in this case, it represents yellow.
The fifth parameter -1 indicates that the circle should be filled with the color specified in parameter 4. If it is a number, it represents the line width of the circle to be drawn.
Perform motion parameter
(1) After detecting a red object, control servo 1 and servo 2 of the robot to move the upper camera with the movement of the red object.
256 257 258 259 260 261 262 263 264 265 266 267 268 269 270 271 272 273 274 275 276 277 278 279 280 281 | # 计算使用时间(calculate use time) use_time = abs(dx*0.00025) x_dis += dx #输出(output) # 将控制头部水平移动的舵机位置限制在预设范围内(limit the position of the servo controlling horizontal movement of the head within a predefined range) x_dis = servo_data['servo2'] - 400 if x_dis < servo_data['servo2'] - 400 else x_dis x_dis = servo_data['servo2'] + 400 if x_dis > servo_data['servo2'] + 400 else x_dis # 设置垂直舵机位置PID的目标值为图像高度的一半(set the target value of the PID for the vertical servo position to half of the image height) y_pid.SetPoint = img_h/2 y_pid.update(centerY) dy = int(y_pid.output) # 计算使用时间(calculate use time) use_time = round(max(use_time, abs(dy*0.00025)), 5) y_dis += dy # 将控制头部垂直移动的舵机位置限制在预设范围内(limit the position of the servo controlling vertical movement of the head within a predefined range) y_dis = servo_data['servo1'] if y_dis < servo_data['servo1'] else y_dis y_dis = 2000 if y_dis > 2000 else y_dis ctl.set_pwm_servo_pulse(1, y_dis, use_time*1000) ctl.set_pwm_servo_pulse(2, x_dis, use_time*1000) time.sleep(use_time) else: centerX, centerY = -1, -1 |
Take code ctl.set_pwm_servo_pulse(1, vertical_servo_position,use_time*1000) as example:
The first parameter 1 represents controlling servo ID 1.
The second parameter vertical_servo_position represents the pulse width of servo ID 1.
The third parameter use_time*1000 represents the movement time of the servo, in milliseconds.
(2) After detecting the red ball, the robot calls the action group file in the /home/pi/TonyPi/ActionGroups directory to control the robot to move along with the red object as pictured:
167 168 169 170 171 172 173 174 175 176 177 178 179 180 181 182 183 184 | #执行动作组(perform action group) def move(): while True: if __isRunning: if centerX >= 0: if centerX - CENTER_X > 100 or x_dis - servo_data['servo2'] < -80: # 不在中心,根据方向让机器人转向一步(if not centered, instruct the robot to turn one step in the appropriate direction) AGC.runActionGroup('turn_right_small_step') elif centerX - CENTER_X < -100 or x_dis - servo_data['servo2'] > 80: AGC.runActionGroup('turn_left_small_step') elif 100 > circle_radius > 0: AGC.runActionGroup('go_forward') elif 180 < circle_radius: AGC.runActionGroup('back_fast') else: time.sleep(0.01) else: time.sleep(0.01) |
6.2.5 Function Extension
Modify Default Recognition Color
Blue, red and green are the built-in colors in the motion tracking program and red is the default color. In the following steps, we’re going to modify the tracking color as green.
(1) Enter command to the directory where the game program is located.
cd TonyPi/Functions/
(2) Enter command to go into the game program through vi editor.
vim Follow.py
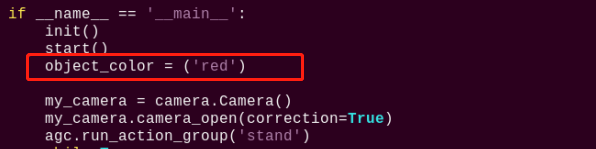
(3) Find the code object_color = ('red').
Note
After entering the code position number on the keyboard, press “Shift+G” to directly locate to the corresponding location. This section aims to introduce quick location methods, so the code position number is for reference only. Please rely on actual positions.
(4) Press “i” to enter the editing mode, then modify red in “_target_color = (‘red’)” to green.

(5) Press “Esc” to enter last line command mode. Input “:wq” to save the file and exit the editor.
:wq
Add Recognized Color
In addition to the built-in recognized colors, you can set other recognized colors in the programming. Take orange as example:
(1) Open VNC, input command “vim TonyPi/lab_config.yaml” to open Lab color setting document.
vim lab_config.yaml
It is recommended to use screenshot to record the initial value.
(2) Click the debugging tool icon in the system desktop. Choose “Run” in the pop-up window.

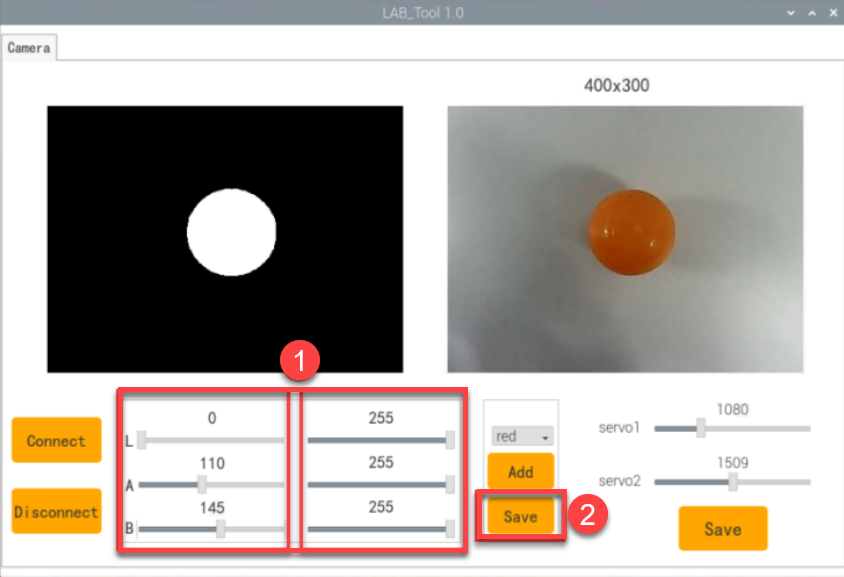
(3) Click “Connect” button in the lower left hand. When the interface display the camera returned image, the connection is successful. Select “red” in the right box first.
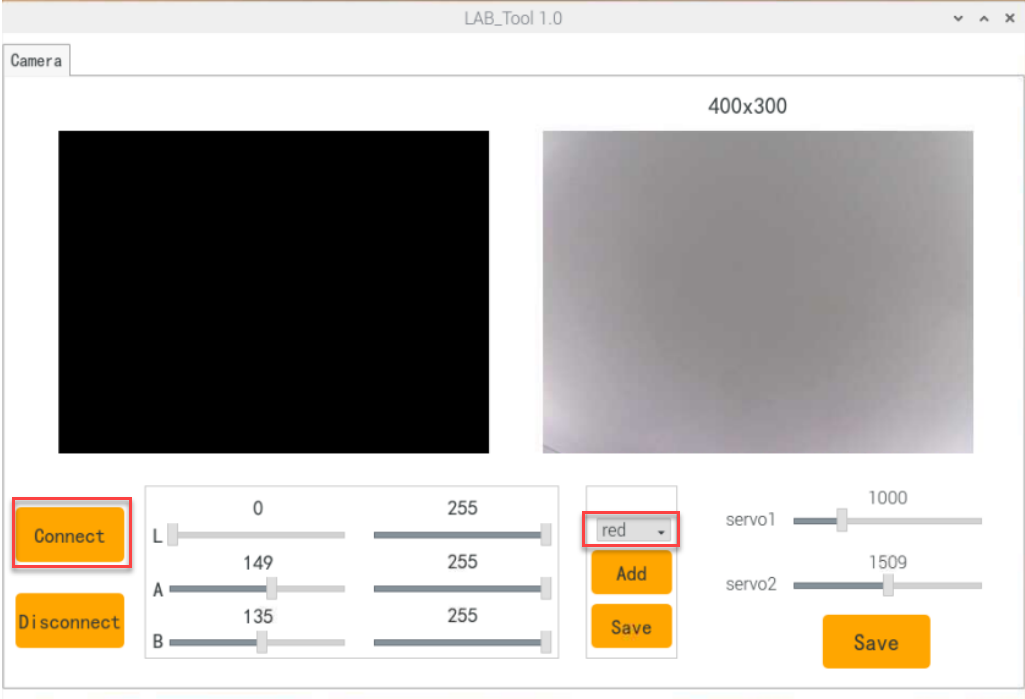
(4) Drag the corresponding sliders of L, A, and B until the color area to be recognized in the left screen becomes white and other areas become black.
For example, if you want to recognize orange, you can put the orange ball in the camera’s field of view. Adjust the corresponding sliders of L, A, and B
until the blue part of the left screen becomes white and other colors become black, and then click “Save” button to keep the modified data.
For the game’s performance, it’s recommended to use the LAB_Tool tool to modify the value back to the initial value after the modification is completed.
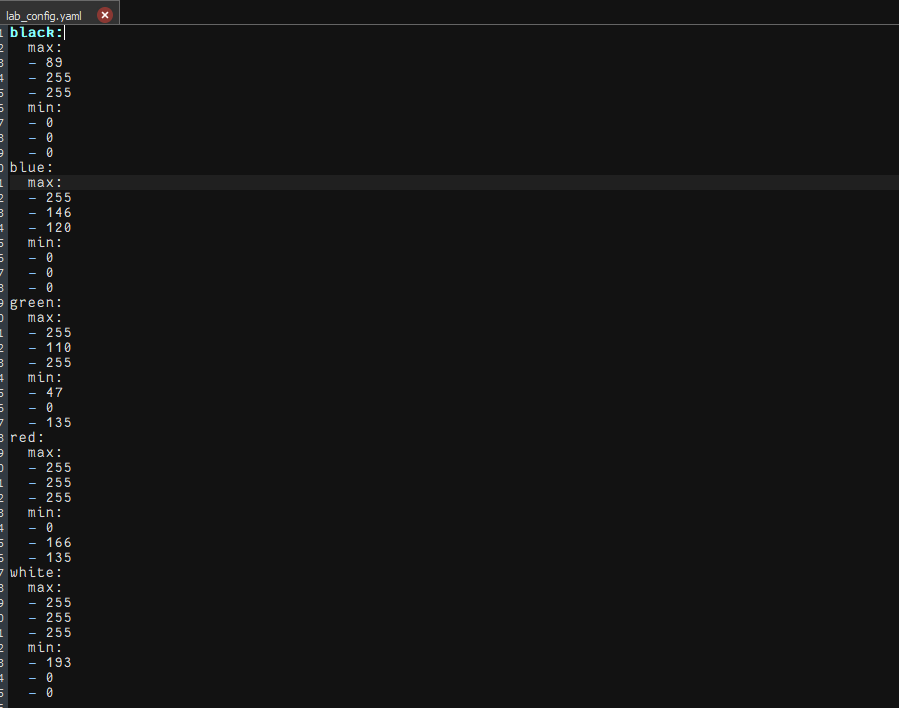
(5) After the modification is completed, check whether the modified data was successfully written in. Enter the command again “vim TonyPi/lab_config.yaml” to check the color setting parameters.
vim lab_config.yaml
(6) Check the data in red frame. If the edited value was written in the program, press “Esc” and enter “:wq” to save it and exit.
:wq
(7) The default tracking color can be set as black according to the “7.2.5 Function Extension -> Modify Default Recognition Color” in this text.