5. Firmware Development
5.1 WonderEcho Firmware Development
This lesson covers the creation and flashing of firmware for the WonderEcho module.
5.1.1 Notification
The module comes pre-programmed with speech recognition firmware from the factory. This factory firmware file is available within the same directory as this document. Follow the provided instructions to rebuild the firmware if custom creation is necessary.
5.1.2 Firmware Creation and Flashing
Navigate to the official firmware creation website at https://aiplatform.chipintelli.com/home/index.html. The platform interface defaults to Chinese, so utilization of the browser translation feature is recommended to switch the language to English for easier navigation.
Access the ChipIntelli Voice AI Platform, click Platform Features in the top menu, and select In-depth development of product Firmware & SDK under the Product Development section.

A login prompt will appear. Since standard registration requires a specific regional mobile number, a shared account is provided for international developers:
Username: 18033085495
Password: hiwonderUpon successful login, click Offline speech recognition large model application to enter the development section.
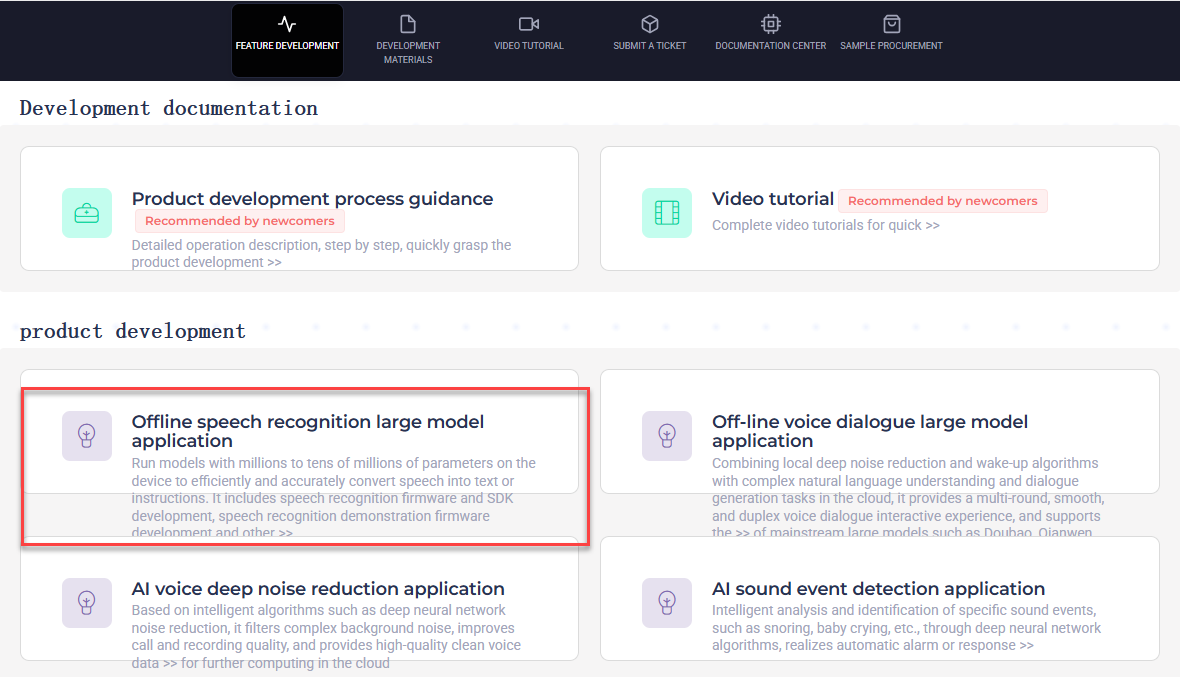
Click Speech recognition firmware and SDK development in the submenu to access the corresponding section.

Click New projects in the left sidebar to initialize a new project.

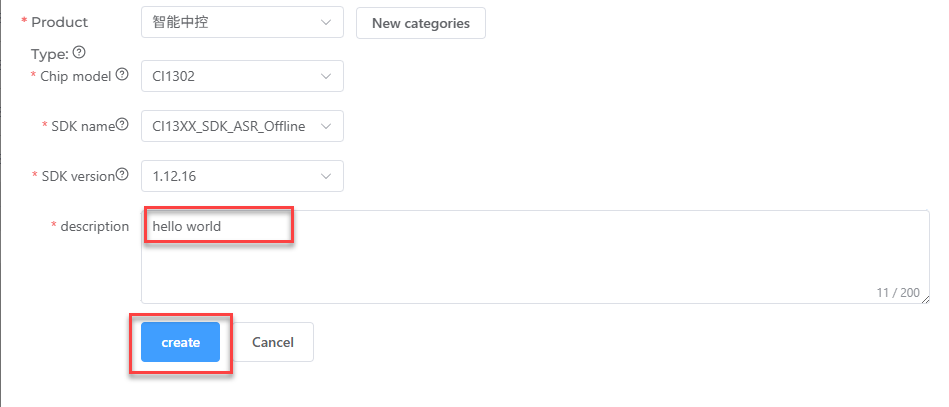
Input a customized Product Name and Description. For the remaining fields, apply the options indicated by the red box, specifically selecting General and then Intelligent central control for the Product Type. Click Create once these configurations are complete.


Set the project language next. Select English under Language Type to configure English voice recognition. Click Continue to proceed after selecting the appropriate options.


Important adjustments are required within the firmware configuration interface. Begin by enabling the Echo Cancellation feature under Algorithm Settings.

Set the oscillator source to Internal RC and disable the Baud Rate Calibration function under Hardware Settings.


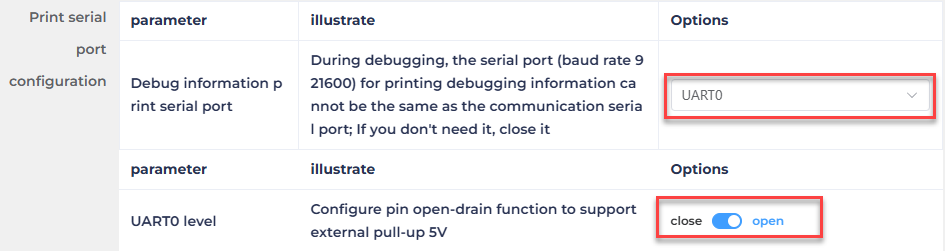
Configure UART0 to Open-Drain Mode within the UART Print Settings, ensuring support for an external 5V pull-up.
For Communication UART Settings, set the Baud Rate to 115200 and configure UART1 to Open-Drain Mode, also supporting external 5V pull-up. After adjusting these settings, click Continue to move forward.

The subsequent step involves command word configuration. A voice output must be selected for the wake-up command. Select Dane - English Male Voice as the output voice for this example. The choice between Chinese and English voices depends entirely on the language settings configured previously.

Upload the command word attachment by locating the file named Command Phrase and Playback Protocol List and dragging it directly onto the webpage.

The command data populates the table below automatically after the file uploads.
Note
The English firmware version exclusively supports English wake words, and mixed-language wake words are invalid. Furthermore, English wake words must be written in uppercase letters to ensure proper functionality.

Enable switching Self-learning and select Designated study. The system automatically generates four self-learning commands, which require no changes during this step.

Click Submit now and allow a few minutes for the firmware generation process to complete. Click Download once finished to obtain the customized firmware.


Extract the downloaded archive. The resulting folder contains a .bin file, representing the custom firmware generated from the uploaded Command Phrase and Playback Protocol List file. Proceed to the 5.1.3 Firmware Flashing section in this document to deploy the firmware to the module.


5.1.3 Firmware Flashing
Connect the voice interaction module to the computer using a Type-C data cable.

Launch Firmware Development Tool\PACK_UPDATE_TOOL.exe located within the same directory as this document, choose the CI1302 chip, and click Update.

Click Select firmware, then locate the .bin firmware created in the previous steps. Here, the factory firmware CI1302_English_SingleMic_V00729_UART1_115200_2M.bin in the same directory as this document is used as an example.

Locate the appropriate serial port and select it.

Press the RST button on the voice interaction module to enter flashing mode, then wait for the process to complete successfully.

5.2 Modifying Functional Phrase Entries
The procedure for modifying functional phrase entries is outlined below.
Open the Command Phrase and Playback Protocol List spreadsheet located in the same directory as this document.
Locate the functional phrase entries in the spreadsheet, which correspond to the first 10 items. These initial 10 functional phrases are fixed entries that do not support additions, meaning only modifications are permitted.

As an example, modify the wake word response phrase. Originally, the module plays back I’m here when HELLO-HI-WONDER is recognized. Change the playback phrase to Hiwonder is here.

The wake word itself is also customizable. For example, set the wake word to HELLO-ROBOT and configure the module to play back I’m here upon activation.

Save the spreadsheet after completing the modifications. Follow the steps detailed in 5.1 WonderEcho Firmware Development to upload the spreadsheet to the website. If firmware was created previously, click Inheritance within the existing project to reuse the configuration and bypass parameter setup.

Rebuild the firmware and flash it to the voice interaction module to apply the updated functional phrase entries.
5.3 Adding New Command Words
The procedure for adding new command words is outlined below.
Open the Command Phrase and Playback Protocol List spreadsheet located in the same directory as this document.
Add a new command word at the bottom of the spreadsheet, such as SHOW-RED-LIGHT.

Set the function type to Command Word and the playback mode to Auto. This ensures that when SHOW-RED-LIGHT is recognized, the module will automatically play back It’s a red light now.
Note
In the spreadsheet, select “命令词” for command word type and “主” for auto mode.

Review the sending protocol. The first and second bytes form the data frame header and require no modification. For command words, the third byte must be set to 00 to distinguish between a command word and a playback phrase.

The fourth byte represents the command word ID in hexadecimal. If the previous command word ID was B4, this new command word should be assigned B5. In special cases, IDs can be duplicated when two command words need to produce the same result.

The fifth byte in the protocol is fixed at “FB” and does not require modification. Ensure that the sending and receiving protocols match in the spreadsheet.

Save the spreadsheet after implementing these changes. Follow the steps in 5.1 WonderEcho Firmware Creation to upload the spreadsheet to the platform. If firmware was generated previously, click Inheritance in the existing project to reuse the configuration and skip parameter setup.

Rebuild the firmware and flash it to the voice interaction module to deploy the new command word functionality.
5.4 Adding New Playback Phrases
The procedure for adding new playback phrases is outlined below.
Open the Command Word and Playback Protocol List spreadsheet located in the same directory as this document.
Add a new entry at the bottom of the spreadsheet, such as the playback phrase It’s a green light now.

Set the function type to Playback Phrase and the playback mode to Passive.
Note
Note that 播报语 must be selected for the playback phrase type and 被 for the passive mode within the spreadsheet.

Review the sending protocol. The first and second bytes represent the data frame header and require no modification. For playback phrases, the third byte must be set to FF to classify the instruction specifically as a playback phrase.

The fourth byte represents the command word or playback phrase ID in hexadecimal. If the previous playback phrase ID was 2E, this new phrase must be assigned 2F.
The fifth byte in the protocol is fixed at FB and requires no modification. Ensure the sending and receiving protocols match exactly within the spreadsheet.

Save the spreadsheet after applying these changes. Follow the steps in 5.1 WonderEcho Firmware Creation to upload the spreadsheet to the website. If firmware was developed previously, click Inheritance in the existing project to reuse the configuration and skip parameter setup.

Rebuild the firmware and flash it to the voice interaction module to enable the new playback phrase functionality.