4. Jetson Nano Development Tutorial
4.1 Getting Started
4.1.1 Wiring Instruction
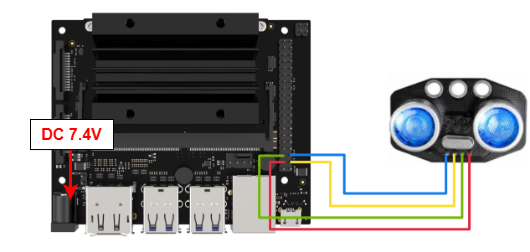
This section uses DuPont wires to connect glowy ultrasonic sensor. For wiring instructions, refer to the figure below:
Note
Before powering on, ensure that no metal objects are touching the controller. Otherwise, the exposed pins at the bottom of the board may cause a short circuit and damage the controller.
4.1.2 Environment Configuration
Install NoMachine on your computer. The software package is located under “2 Software Tools & Programs -> 01 Software Installation Package -> Remote Desktop Connection Tool”. For the detailed operations of NoMachine, please refer to the relevant tutorials.
Drag the program into the Jetson Nano system image, taking placing it on the desktop as an example.
Open the terminal and enter the command to navigate to the program directory, enter:
cd Desktop/
4.2 Test Case
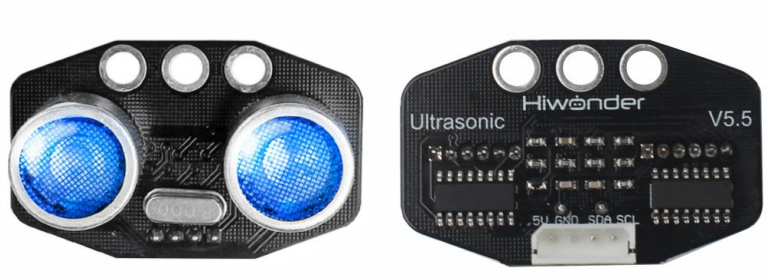
This case demonstrates that the glowy ultrasonic module detects distance and changes color accordingly.
4.2.1 Program Execution
Run the program by entering:
python3 ultrasonic_sonar.py
4.2.2 Project Outcome
The glowy ultrasonic module will print the detected target distance on the terminal, while the RGB lights on the module will change color gradually.
4.2.3 Program Brief Analysis
Import Libraries
from sonar import Sonar
import time
Sonar: An initialized object used to configure the light mode and color.
time: A library related to time functions, used for setting timers and calculating time intervals.
Instantiation Class
def main():
    S = Sonar()
    # Set RGB mode: 0 = user direct color control, 1 = breathing cycle (超声波的灯光有两种模式,模式0 用户直接控制灯光发出某种颜色, 模式1控制灯光周期变化)
    S.set_rgb_mode(0)  # Set to mode 0 (设置为模式0)
    # Set color for left/right LEDs: 0 = left, 1 = right (超声波的两个"眼睛" 对应两个灯用0, 1 表示)
    S.set_color(0, 0xFF0000)  # Set light 0 to red, 0xFF0000 is the RGB value of the light to be emitted (0 号灯设为 红色 0xFF0000 是要发出的灯光的RGB值)
    S.set_color(1, 0x00FF00) # Set light 1 to green (1号灯设为 绿色 )
    time.sleep(2)

    S.set_rgb_mode(1)  # Set to mode 1 (设置为 模式1)

    # Configure breathing cycles for LED 0
    S.set_breath_cycle(0, 0, 0) # Red channel off  (将0号灯的红色设置的呼吸亮灭周期设为0, 就是完全熄灭)
    S.set_breath_cycle(0, 1, 0)  # Green channel off (将0号灯的绿色设置的呼吸亮灭周期设为0, 就是完全熄灭)
    S.set_breath_cycle(0, 2, 1000) # Blue channel 1000ms cycle (将0号灯的色蓝色设置的呼吸亮灭周期设为1000毫秒)

    time.sleep(2)

    # Configure breathing cycles for LED 1
    S.set_breath_cycle(1, 0, 500) # Red channel 500ms cycle(将1号灯的红色设置的呼吸亮灭周期设为500毫秒)
    S.set_breath_cycle(1, 1, 0) #Green channel off(将1号灯的绿色设置的呼吸亮灭周期设为0,  就是完全熄灭)
    S.set_breath_cycle(1, 2, 1000) #Blue channel 1000ms cycle (将1号灯的色蓝色设置的呼吸亮灭周期设为1000毫秒)

    time.sleep(2)


    #Start RGB light symphony(此外可以使用start_symphony来让rgb灯自行幻彩变化)
    S.start_symphony()
Instantiate the glowy ultrasonic class, and define its related attributes, such as detected distance, RGB color and breathing light mode.
Get Detection Distance
distance = None
    last_print_time = time.time()
    while True:
        d = S.get_distance()  # Read distance in mm (读取超声波的距离,单位mm)

        # # Simple filtering to reduce sudden jumps (我们可以做点简单的滤波应对可能出现的跳变和错误数据)
        if distance is None:
            distance = d
        else:
            distance = distance * 0.6 + d * 0.4 ## Weight: 0.4 new, 0.6 previous(这次测量的距离权重0.4, 之前数值权重0.6)
Call get_distance to read the ultrasonic module’s I2C pins, obtain the current distance to the obstacle, and return the value.
Print Detection Distance Data
 # Print distance once per second (每秒打印一次数据)
        if last_print_time < time.time():
            last_print_time = time.time() + 1
            print(distance)

        #Read ultrasonic data every 0.1s (每0.1秒读取一次超声波数据)
        time.sleep(0.1)
In the loop, the terminal continuously prints the obstacle distance detected by the ultrasonic module.