11. Large AI Model Courses
11.1 Large Models Basic Courses
11.1.1 Large Language Model Courses
Overview of Large Language Model
A Large Language Model (LLM) is an advanced artificial intelligence model developed to comprehend and generate human language.

(1) Basic Concept
A Large Language Model (LLM) is a deep learning model trained on extensive text data, designed to either generate natural language text or comprehend the meaning of language. LLM is capable of performing various natural language tasks, such as text classification, question answering, and dialogue, making them a crucial step toward achieving advanced artificial intelligence. Unlike smaller models, LLM leverages a similar Transformer architecture and pretraining objectives (like Language Modeling), but are distinguished by their larger model size, greater training data, and enhanced computational resources.
(2) Features
Massive Scale: LLM are characterized by their vast parameter sizes, often reaching billions or even trillions of parameters. This immense scale allows them to capture a wealth of linguistic knowledge and complex syntactic structures.
Pretraining and Fine-tuning: LLM utilize a two-stage learning process: pretraining and fine-tuning. Initially, they are pretrained on large-scale, unlabeled text data, learning general language representations and knowledge. Subsequently, they are fine-tuned using labeled data to specialize in specific tasks, allowing them to excel across a wide range of NLP applications.
Contextual Awareness: LLM demonstrate exceptional contextual awareness, with their ability to understand and generate language deeply dependent on preceding text. This enables them to perform exceptionally well in tasks like dialogue, article generation, and contextual comprehension.
Multilingual Capabilities: LLM support multiple languages, extending beyond just English. This multilingual proficiency enables them to power cross-lingual and cross-cultural applications, enhancing their versatility and global reach.
Multimodal Support: Some LLMs have expanded to handle multimodal data, including text, images, and speech. This capability allows them to understand and generate content across various media types, opening up more diverse application possibilities.
Emergent Properties: LLM exhibit remarkable emergent properties, where performance improvements become apparent in large models but are absent in smaller ones. This makes them adept at handling more complex tasks and challenges.
Cross-domain Applications: LLM have been widely adopted across numerous fields, including text generation, machine translation, information retrieval, summarization, chatbots, and virtual assistants. Their influence is profound, impacting both daily life and work in significant ways.
Ethical and Risk Considerations: While LLM showcase impressive capabilities, they also raise important ethical and risk-related concerns, such as the potential generation of harmful content, privacy violations, and cognitive biases. As such, the development and deployment of LLM must be approached with careful consideration and caution.
(3) Working Principle
Large Language Model (LLM) are built on deep learning principles and are trained using massive datasets and substantial computational resources to develop neural networks with billions of parameters. Through iterative training and parameter optimization, these models learn to perform a wide range of tasks with high accuracy. The “large” in LLM reflects their immense scale—encompassing a vast number of parameters, extensive training data, and significant computational demands. This scale enables advanced models to achieve superior generalization capabilities and deliver increasingly accurate results, even in highly specialized domains.
Today, some of the most popular applications revolve around generative AI, such as language generation tools (e.g., ChatGPT) and image generation platforms (e.g., Midjourney). At the core of these applications is the concept of generation—the model’s ability to predict and produce coherent content based on a given input.
(4) Application Scenarios
① Text Generation
Large Language Models are capable of generating diverse types of text, including news articles, stories, poems, and more. These capabilities make them well-suited for applications in content creation, creative writing, and automated storytelling.
② Text Classification
Large Language Models can classify text into various categories, such as sentiment analysis and topic identification. These capabilities are especially valuable in scenarios like public opinion analysis, information retrieval, and content moderation.
③ Machine Translation
Large Language Models excel at machine translation, enabling the conversion of text from one language to another. These capabilities are essential for cross-language communication, localization, and global collaboration.
④ Question-Answering Systems
Large Language Models can be used to build question-answering systems that respond to user queries. These applications are particularly valuable in areas such as intelligent customer support, knowledge retrieval, and information lookup.
Large Language Model Deployment
Note
This section outlines the steps to register on the official OpenAI website and obtain the API key for the Large Language Model.
(1) OpenAI Account Registration and Setup
① Copy the following URL: https://platform.openai.com/docs/overvie
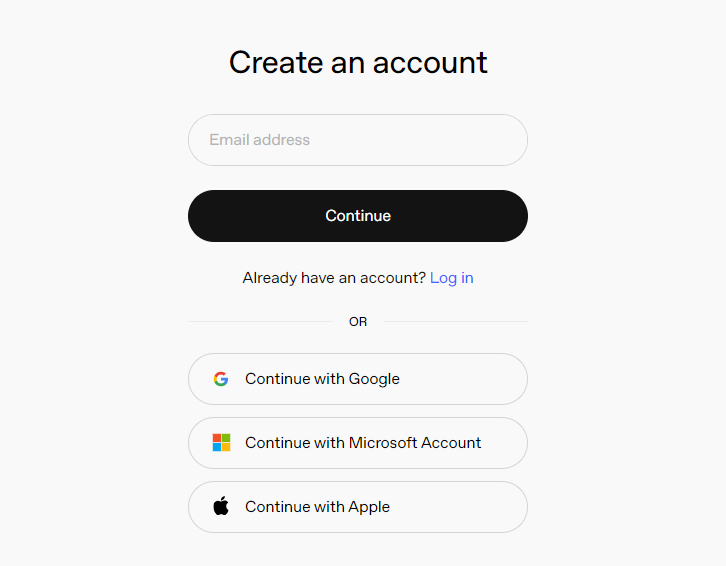
Open the OpenAI website and click on the “Sign Up” button in the top right corner.

② Follow the prompts to register and log in using your Google, Microsoft, or Apple account.
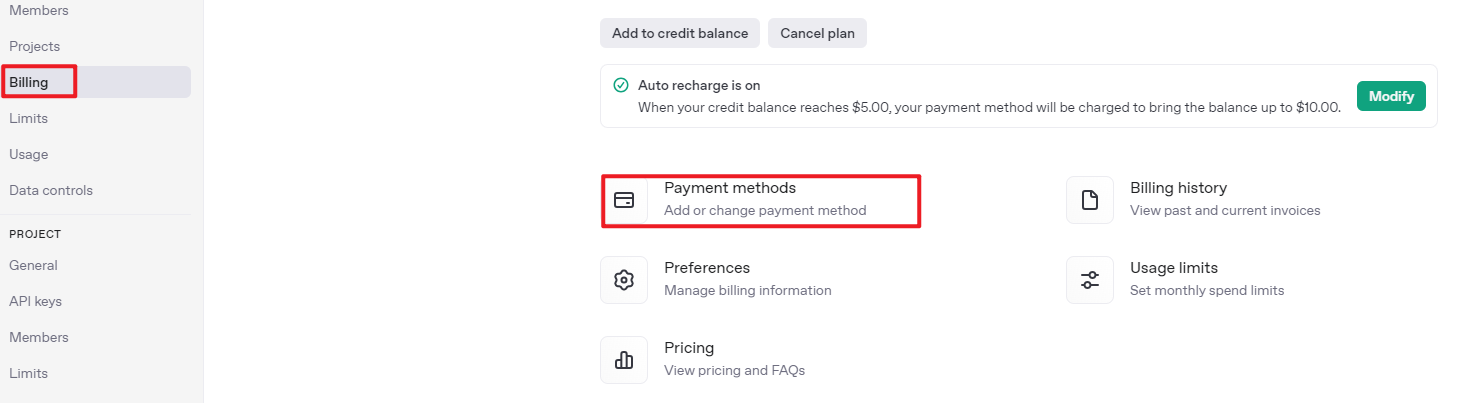
③ Click on the settings icon, then select Billing, followed by Payment Methods, to link your payment method. Recharge your account to purchase tokens.

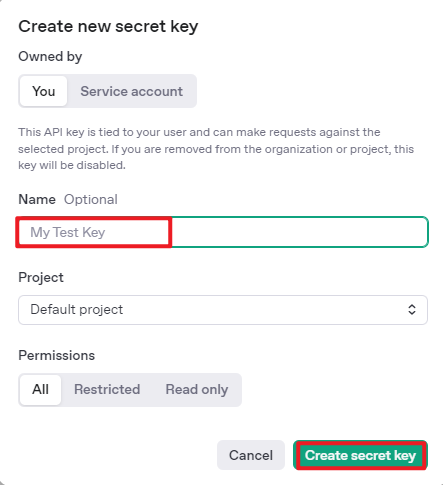
④ After completing the setup, click on API Keys, then select Create New Secret Key. Follow the prompts to fill in the required information. Once the key is created, make sure to save it for future use.


⑤ With these steps, the large model has been successfully created and deployed. You can now use the API in the upcoming lessons.
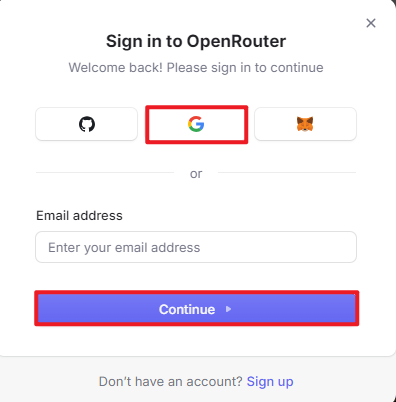
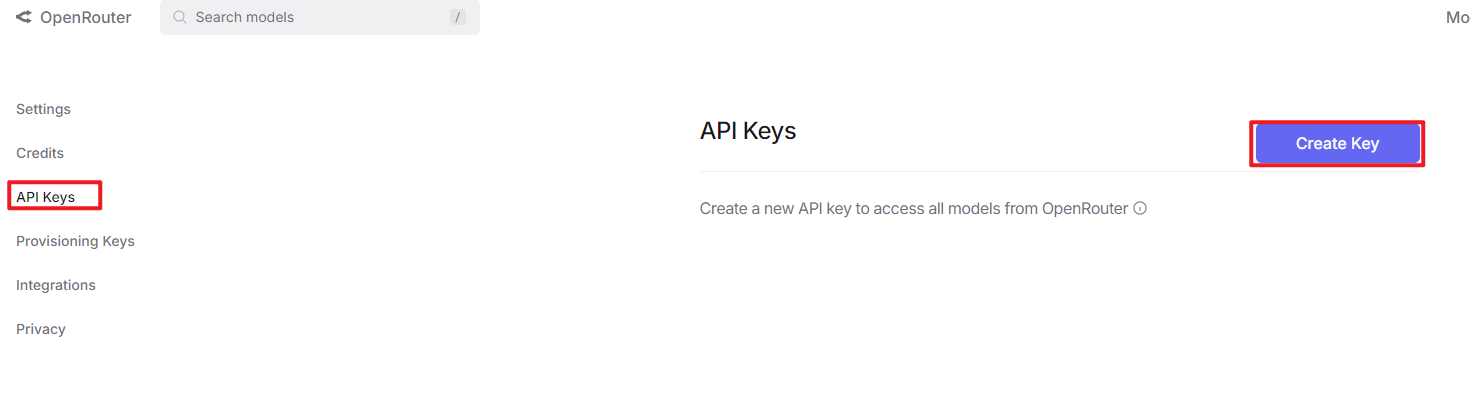
(2) OpenRouter Account Registration and Setup
① Copy the following URL: https://openrouter.ai/
Open the webpage in your browser and click “Sign In”. Register using your Google account or another available login option.


② After logging in, click the icon in the top-right corner and select “Credits” to link your payment method.
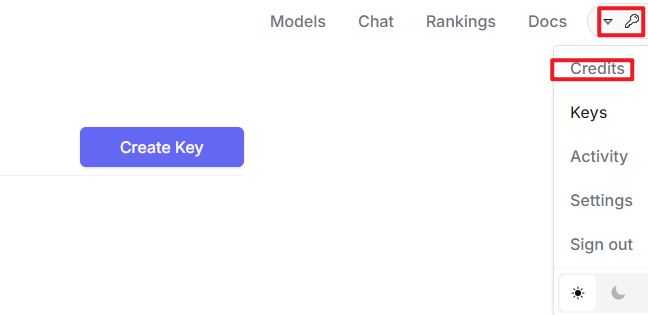

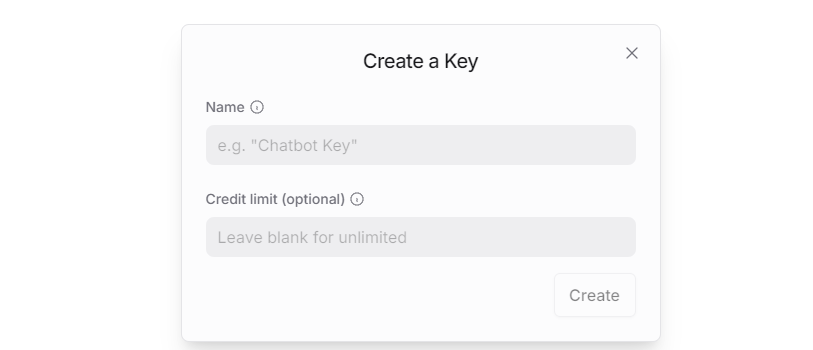
③ To create an API key, go to “API Keys”, then click “Create Key”. Follow the prompts to complete the process. Once the key is generated, make sure to save it for future use.

④ At this point, the large model is successfully created and deployed. You can now use the API in the upcoming lessons.
Large Language Model Accessing
Note
To proceed with this section, you will need to register on the appropriate website and obtain the API key for the large model (please refer to the file “11.1.1 Large Language Model Courses -> Large Language Model Deployment”).
It is important to ensure a stable network connection for the development board. For optimal performance, we also recommend connecting the main controller to a wired network for enhanced stability.

(1) Environment Configuration
Note
If you have purchased a robot from our company with built-in large model functionality, the environment is already pre-configured in the robot’s image. You can directly proceed to Section 3 of this document to configure the API key.
Install Vim and Gedit by running the corresponding commands. Install the necessary software packages and audio libraries required for PyAudio.
sudo apt update
sudo apt install vim
sudo apt install gedit
sudo apt install python3 python3-pip python3-all-dev python3-pyaudio portaudio11-dev libsndfile1

(2) Importing the Large Model Program Directory
① In this section, locate the ‘Appendix -> Source Code’ folder within the same directory as this tutorial document.

② Using the MobaXterm remote connection tool (as outlined in the ‘5.5 Remote Access and File Transfer’ tutorial), drag the folder into the root directory of the main controller. The software installation package can be found in the ‘Appendix -> Remote Access and File Transfer’ directory.
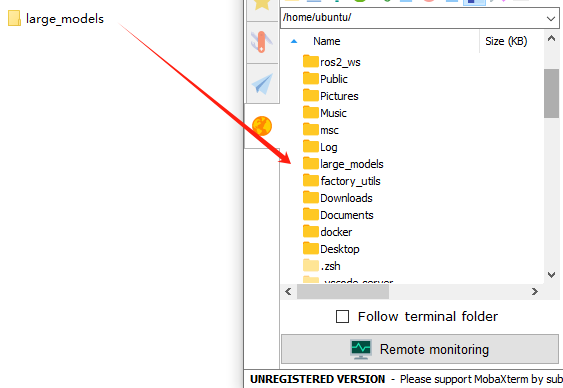
③ Next, execute the command to navigate to the ‘speech_pkg’ directory.
cd ~/large_models/speech_pkg/
④ Execute the following commands to install the necessary third-party libraries.
pip3 install -r requirements.txt --break-system-packages
pip3 install dashscope --break-system-packages
pip3 install opencv-python --break-system-packages
pip3 install sympy==1.13.1 --break-system-packages
pip3 install torch --break-system-packages
⑤ Then, use the command in the terminal to navigate to the ‘speech’ directory.
cd ~/large_models/speech_pkg/speech
⑥ Run the command to list the files in the ‘speech’ directory.
ls

⑦ Depending on the type of main controller and Python version you’re using, switch to the appropriate folder for packaging and distribution. This tutorial uses the Jetson Orin controller as an example.
| Type of main controller | Python version |
|---|---|
| jetson_nano | 3.6 |
| jetson_orin | 3.10 |
| rpi5 | 3.11 |
| rpi5_docker | 3.8 |
⑧ Execute the following command to navigate to the Jetson Orin folder.
cd jetson_orin/
⑨ Enter the command to copy the ‘speech.so’ file to the parent directory.
cp -r speech.so ..
⑩ Enter the command to navigate to the parent directory.
cd ../..
⑪ Execute the command to package the speech file for the Python environment.
pip3 install .
⑫ Enter the command to install and update the OpenAI Python library.
pip3 install openai -U
(3) Key Configuration
① Open the terminal and enter the following command to navigate to the directory for configuring the large model keys:
cd ~/large_models
② Then, open the configuration file by running:
vim config.py
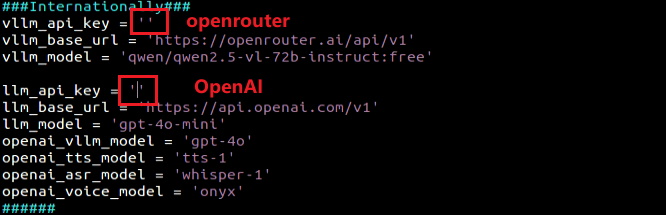
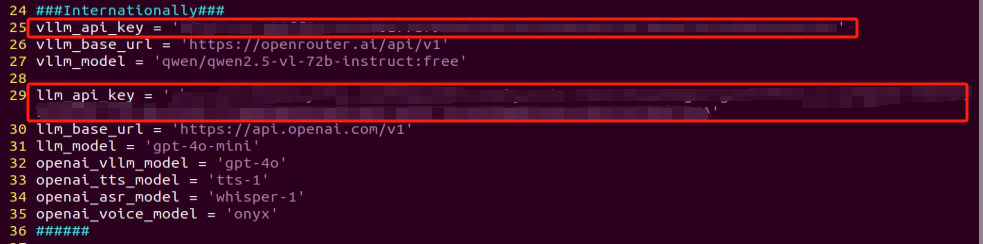
③ Once the file is open, configure the OpenAI and OpenRouter keys by filling in the llm_api_key and vllm_api_key parameters, respectively (you can obtain these keys from the ‘11.1.1 Large Language Model Courses -> Large Language Model Deployment’ course).

For instance, copy the key created in Section 1.2 of this chapter and paste it into the appropriate field. To paste the key, place the cursor between the quotation marks, hold the “Shift” key, right-click, and select “Paste” .
Note
Do not mix keys from different models, as this may cause the functionality to malfunction

④ After pasting, press the ‘Esc’ key, then type the following command and press Enter to save the file:
:wq
(4) Running the Demo Program
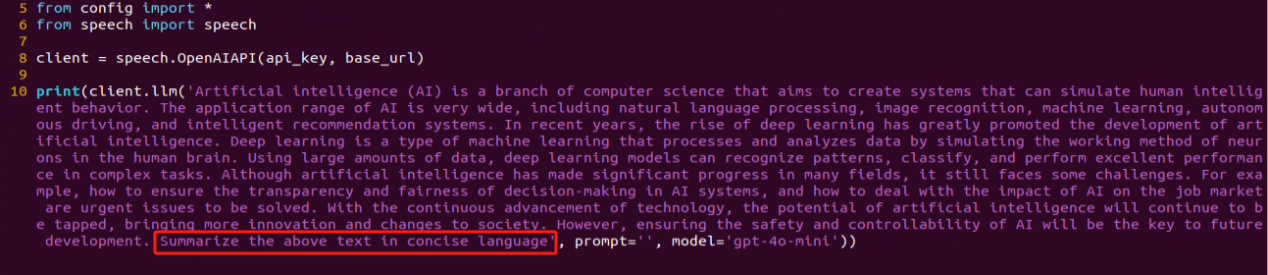
Once the keys are configured, you can run the demo program (openai_llm_demo.py) to experience the text generation capabilities of the large model. For example, the program’s prompt might be: ‘Write a 50-word article about how technology is changing life.’

① To run the demo, enter the following command in the terminal:
python3 openai_llm_demo.py
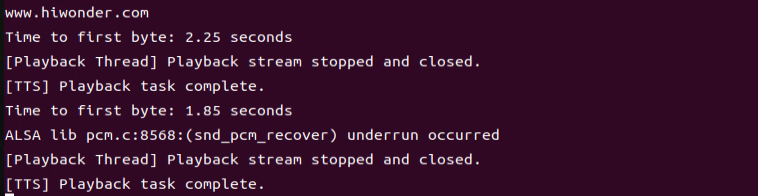
② After running the program, the output will appear as shown in the image below.

Semantic Understanding with Large Language Model
Before starting this section, make sure you have completed the API key configuration outlined in the file 11.1.1 Large Language Model Courses -> Large Language Model Accessing.
In this lesson, we’ll use a large language model to analyze and summarize short passages of text.
(1) Start by opening a new terminal window, then navigate to the large model project directory:
cd large_models/
(2) Next, run the demo program with the following command:
python3 openai_llm_nlu_demo.py
(3) As shown in the output, the model demonstrates strong summarization abilities.

(4) The result matches the prompt defined in the program — where a passage of text is provided to the model, and it generates a concise summary.
Emotional Perception with Large Language Model
To proceed with this section, ensure that you have completed the API key configuration as described in the file 11.1.1 Language Model Courses -> Large Language Model Accessing.
In this lesson, we will use a large language model to assess its ability to perceive emotions based on descriptive words. We’ll provide the model with emotional expressions and evaluate its response.
(1) Start by opening a new terminal window, then navigate to the large model project directory:
cd large_models/
(2) Next, run the demo program with the following command:
python3 openai_llm_er_demo.py
(3) From the output, you will see that the model successfully identifies and understands the emotions conveyed, providing a text-based response accordingly.

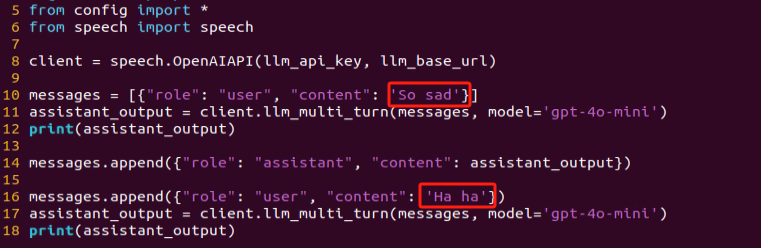
(4) In this program, we send two emotional expressions to the model: the first is an expression of sadness, “So Sad”. After the model responds, we then send an expression of happiness, “Ha Ha”, and observe how the model reacts.
11.1.2 Large Speech Model Courses
Overview of Large Speech Model
(1) What is a Large Speech Model?
A Speech Large Model (LSM) refers to a machine learning model that uses deep learning techniques to process and understand speech data. These models can be applied in a variety of tasks, such as speech recognition, speech synthesis, speech translation, and emotional analysis of speech. The design and training of these models typically require large amounts of speech data and substantial computational resources, which is why they are referred to as “large models”.
(2) Why Do We Need Large Speech Model?
With the advancement of artificial intelligence and deep learning, traditional speech processing methods face many limitations. Large models leverage vast amounts of data and deep neural networks to learn and understand the complex features within speech, thereby improving the accuracy and naturalness of speech recognition and generation.
Their advantages include:
① High Accuracy: They maintain a high recognition rate even in noisy environments and with various accents.
② Naturalness: Speech generated by synthesis models is more natural, closely resembling human speech.
③ Versatility: These models support a wide range of languages and tasks, such as multilingual speech recognition, speech-to-text (STT), text-to-speech (TTS), and emotion recognition.
(3) Development of Speech Recognition Technology
Word-Level Speech Recognition: At this stage, speech recognition systems could only recognize individual words
Phrase-Level Speech Recognition: With the expansion of data and advancements in algorithms, speech recognition systems gradually gained the ability to recognize longer phrases, such as “Please turn on my computer”.
Sentence-Level Speech Recognition: In recent years, with the emergence of AI large models, speech recognition systems have become capable of recognizing entire sentences and understanding their underlying meaning.
(4) Differences Between Large Speech Model and Traditional Speech Processing Technologies
① Processing Methods
Traditional Speech Processing Technologies: These typically rely on manual feature extraction and shallow models, such as Gaussian Mixture Models (GMM) and Hidden Markov Models (HMM), to process speech signals.
Large Speech Model: These use end-to-end learning, directly mapping raw speech waveforms to target outputs (such as text or another speech signal), reducing the reliance on manual feature extraction. They are typically based on deep learning architectures, such as Convolutional Neural Networks (CNN), Recurrent Neural Networks (RNN), and Transformers.
② Model Complexity
Traditional Speech Processing Technologies: These models are relatively simple, with fewer parameters.
Large Speech Model: These models have complex structures and a large number of parameters, enabling them to capture more subtle speech features and contextual information.
③ Recognition Capability
Traditional Speech Processing Technologies: These are highly adaptable to specific scenarios and conditions, but their recognition capability is limited when encountering new, unseen data.
Large Speech Model: Due to their large number of parameters and powerful learning ability, they offer superior recognition capabilities and can adapt to a wider variety of speech data and environments.
④Training Data Requirements
Traditional Speech Processing Technologies: These typically require less data for training, but the data must be highly annotated and of high quality.
Large Speech Model: These require vast amounts of training data to fully learn the complexities of speech, often necessitating large quantities of annotated data or the use of unsupervised/self-supervised learning methods.
(5) Core Technologies of Speech Large Model
① Automatic Speech Recognition (ASR)
ASR is the technology that converts human speech into text. The core steps of a speech recognition system include feature extraction, acoustic modeling, and language modeling.
② Text-to-Speech (TTS)
TTS is the technology that converts text into speech. Common speech synthesis models include the Tacotron series, FastSpeech, and VITS.
③ Speech Enhancement and Noise Reduction
Speech enhancement techniques are used to improve the quality of speech signals, typically for eliminating background noise and echoes. This is crucial for speech recognition applications in noisy environments.
(6) Applications of Speech Large Model
Intelligent Voice Assistants: For instance, Amazon Alexa and Google Home, which engage with users through voice interactions.
Customer Service Chatbots: In the customer service sector, speech large models assist businesses in enhancing service efficiency by swiftly processing customer inquiries through speech recognition technology, enabling 24/7 support.
Healthcare: Helping doctors with medical record-keeping, thus improving work efficiency.
Speech-to-Text: Speech large models excel in converting speech to text, offering accurate recognition and transcription in a variety of contexts. They are widely used in applications such as meeting transcription and subtitle generation.
Voice Device Introduction and Testing
(1) Device Overview
① 6-Microphone Circular Array
Introduction:
The 6-Microphone Circular Array is a high-sensitivity, high signal-to-noise ratio microphone board. It features six analog silicon microphones arranged in a circular pattern. When paired with a main control board, it supports high-performance Acoustic Echo Cancellation (AEC), environmental noise reduction, and factory-level voice pickup from up to 10 meters.
Features and Specifications:
Operating Voltage: 3.3V (typical)
Operating Current: 0.8mA (typical)
Operating Temperature: -20°C (min), 25°C (typical), 70°C (max)
Operating Humidity: Up to 95% relative humidity (max)
(1) Recording and Playback Test
The following demonstration uses the Raspberry Pi 5 as an example. The connection and testing steps are also applicable to other compatible devices such as the Jetson series:
① Connection Illustration and Detection
If the main controller is a Raspberry Pi, you can use VNC remote desktop access (refer to the appendix: Remote Access and File Transfer) to log into the Raspberry Pi system. Once connected, check the upper right corner of the desktop for microphone and speaker icons. As shown in the image below, the presence of these icons indicates a successful connection.

If you’re using a NVIDIA Jetson device, you can connect via the NoMachine remote access tool. After logging in, check the upper right corner of the system interface for the speaker icon to confirm successful detection.

② Recording Test
Next, open a new terminal window and enter the following command to check the available recording devices. Note that the -l option is a lowercase “L”. You should see the card number (card) listed—for example, card 0. This is just an example; please refer to your actual query result.
arecord -l

Then, use the following command to start recording. Replace the red-marked card number (hw:0,0) with the actual number you found in the previous step:
arecord -D hw:0,0 -f S16_LE -r 16000 -c 2 test.wav
This will create a test.wav audio file in the current directory.
You can record a short 5-second sample, then press Ctrl + C to stop the recording.
③ Playback Test
After the recording is complete, you can check whether the audio file was successfully created by listing the contents of the current directory:
ls

If test.wav appears in the list, the recording was successful. To play back the recording, use the following command:
aplay test.wav
Voice Wake-Up
In this lesson, we’ll learn how to use a large speech model to activate the voice device by speaking a predefined wake word through a program.
(1) WonderEcho Pro Wake-Up
Device Check:
To proceed, we need to identify the USB device name assigned to the connected WonderEcho Pro or voice device (hereafter referred to as the voice device). Please follow the steps below carefully.
Note
Do not connect any other USB devices during this process to avoid confusion.
① First, disconnect the voice device, then open a terminal and run the following command:
ll /dev | grep USB
② Next, reconnect the voice device to the USB port on your main board and run the same command again:
ll /dev | grep USB
③ You should now see a newly listed USB port, such as ttyCH341USB1.
Please take note of this device name—it may vary depending on the main controller being used.

Wake-Up Test:
① To begin, update the port number used in the program by editing the script. You’ll also need to uncomment the line for the port you’re using and comment out any unused ports.
vim wakeup_demo.py
Press i to enter edit mode and make the necessary changes as shown below (update the port number accordingly and adjust comments as needed).

Once the changes are complete, press ESC, then type :wq and press Enter to save and exit the editor.
② Next, return to the system interface and run the wake-up demo using the command below. Speak the wake word “HELLO HIWONDER” clearly toward the WonderEcho Pro voice device.
If the output includes “keyword detect”, it indicates that the firmware has been successfully flashed and the wake word is functioning correctly.
python3 ~/large_models/wakeup_demo.py

(2) 6-Microphone Circular Array
As with the WonderEcho Pro, you can connect the 6-Microphone Circular Array to your main board (Raspberry Pi or NVIDIA Jetson) using a Type-C to USB cable.
Device Check:
For Jetson users, connect to the Jetson system using the NoMachine remote access tool. Once connected, check the desktop interface.
If the 6-Microphone Circular Array icon appears on the left side of the desktop, it indicates the device has been successfully recognized.
Wake-Up Test:
① Open a new terminal window and run the following command to edit the wakeup_demo.py script:
vim ~/large_models/wakeup_demo.py
② Press i to enter edit mode.
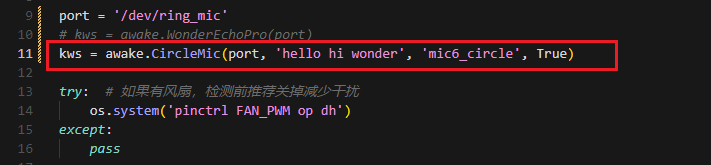
③ Update the port to match the device port number you previously identified. Comment out the WonderEcho Pro configuration (add # at the beginning of the corresponding line), and uncomment the line using the voice device on line 11 as the input device (see red box in the referenced image).
④ Press ESC to return to command mode, then type :wq and press Enter to save and exit.

⑤ In the terminal, run the wake-up program with the following command:
python3 ~/large_models/wakeup_demo.py
⑥ After about 30 seconds of initialization, speak the wake word “hello hiwonder” to test the device.

(3) Brief Program Overview
This is a Python-based wake word detection script that utilizes the speech module to process audio input and detect a specific wake word (e.g., “HELLO_HIWONDER”).
Source Code Path: /home/ubuntu/large_models/wakeup_demo.py
Importing Required Modules
5 6 7 | import os import time from speech import awake |
os: Used for handling file paths and executing system-level commands.
time: Provides delay functions to prevent overly frequent detection attempts.
speech: The core module responsible for processing audio input and detecting the wake word.
Initializing the wonderecho Class
9 10 | port = '/dev/ttyUSB0' kws = awake.WonderEchoPro(port) |
Attempts to Turn Off the Cooling Fan on Raspberry Pi 5
13 14 15 16 | try: # If a fan is present, it's recommended to turn it off before detection to reduce interference os.system('pinctrl FAN_PWM op dh') except: pass |
Purpose: Attempts to turn off the cooling fan by executing the system command pinctrl FAN_PWM op dh. This helps minimize background noise from the fan that could interfere with wake word detection.
Error Handling: If the command fails (e.g., due to unsupported hardware), the program catches the exception and continues running without interruption.
Main Wake Word Detection Loop
18 19 | kws.start() # Start detection print('start...') |
The program starts the wake word detection thread using kws.start().
It prints start… to indicate that detection has been successfully initiated.
Main Program Logic
20 21 22 23 24 25 26 27 28 29 30 31 | while True: try: if kws.wakeup(): # Wake-up detected print('hello hiwonder') time.sleep(0.02) except KeyboardInterrupt: kws.exit() # Cancel processing try: os.system('pinctrl FAN_PWM a0') except: pass break |
During each iteration, the program checks whether the wake word has been detected. If the wake word is detected, it prints keyword detected.
The detection frequency is controlled using time.sleep(0.02) to prevent excessive CPU usage.
Pressing Ctrl+C triggers a KeyboardInterrupt, which gracefully exits the detection loop.
Upon exit, the program calls kws.exit() to stop the wake word detection process.
The fan is then restored to its original state (if applicable).
(4) Extended Functionality
Modifying the Wake-Up Response Text
In this section, you’ll learn how to change the message that appears after a successful wake word detection.
① For example, if the wake word “HELLO_HIWONDER” is detected, and you’d like the program to print “hello” instead of the default message, follow the steps below. Navigate to the large_models directory and open the script with:
vim wakeup_demo.py
② Press i to enter INSERT mode (you’ll see – INSERT – at the bottom of the screen). Locate the line ‘print(‘hello hiwonder’)’, and modify it to ‘print(‘hello’)’
i

③ Press ESC, then type :wq and press Enter to save and exit.
:wq
④ Finally, run the program with:
python3 wakeup_demo.py
(5) Creating Custom Firmware for WonderEchoPro
If you’d like to create more advanced or customized wake words and voice commands, please refer to the document titled:
“Appendix → Firmware Flashing Tool → Creating Firmware for WonderEchoPro”.
Speech Recognition
(1) What is Speech Recognition?
Speech Recognition (Speech-to-Text, STT) is a technology that converts human speech signals into text or executable commands. In this course, we will implement speech recognition functionality using Alibaba OpenAI’s Speech Recognition API.
(2) How It Works
The wave library is used to extract audio data. The extracted audio is then sent to OpenAI’s ASR (Automatic Speech Recognition) model. The recognized text returned by the ASR model is stored in speech_result for use in subsequent processes.
(3) Preparation Before the Experiment
Before proceeding, refer to the course “11.1.1 Large Speech Model Courses -> Large Language Model Deployment” to obtain your API key, and make sure to add it into the configuration file (config).
(4) Experiment Steps
① Power on the device and connect to it using MobaXterm.
(For detailed instructions, please refer to Appendix ->Remote Connection Tools and Instructions.)
② Navigate to the program directory by entering the following command:
cd large_models/
③ Open the configuration file to input your API Key by entering the command below. Press i to enter INSERT mode and enter your API Key. Once finished, press Esc, type :wq, and hit Enter to save and exit.
vim config.py

④ Run the speech recognition program with:
python3 openai_asr_demo.py
(5) Function Realization
After the program starts, the microphone will recognize the recorded audio content from the user and print the converted text output.

(6) Brief Program Analysis
This program implements a speech recognition system by calling OpenAI’s Speech-to-Text API to convert audio files into text.
The program source code is located at: /home/ubuntu/large_models/openai_asr_demo.py
① Module Import
6 | from speech import speech |
The speech module encapsulates ASR (Automatic Speech Recognition) functionalities, such as connecting to an external ASR service.
② Define ASR Class
11 | asr = speech.RealTimeOpenAIASR() |
asr = speech.RealTimeOpenAIASR()
This line creates a real-time speech recognition object named asr. The RealTimeOpenAIASR class is used to interact with the speech recognition service.
③ Speech Recognition Functionality
13 | asr.update_session(model='whisper-1', language='en', threshold=0.2, prefix_padding_ms=300, silence_duration_ms=800) |
An ASR client object is created to prepare for invoking the speech recognition service.
The asr.asr() method is called to send the audio file (wav) to the ASR service for recognition.
The recognized result (typically text) is printed to the console.
(7) Function Extension
You can modify the model name to enable speech recognition in various languages, such as Chinese, English, Japanese, and Korean.
① Enter the following command to edit the script:
vim openai_asr_demo.py
② Press the i key to enter INSERT mode, and update the model setting. For example, modify it to use the gpt-4o-transcribe model.
i

③ Then, run the program with the command:
python3 openai_asr_demo.py
④ Record a sample sentence such as “Hello, can you hear me clearly?”, and the recognized text will be printed on the console.

Speech Synthesis
(1) What is Speech Synthesis?
Speech synthesis (SS) is a technology that converts written text into intelligible spoken audio. It enables computers to generate natural, human-like speech for communication or information delivery.
In this course, we will run a program that processes text using a large language model and generates corresponding audio.
(2) How It Works
The program first sends the text to the OpenAI TTS (Text-to-Speech) model. The model returns the generated audio data, which is saved as a file named tts_audio.wav for playback or storage.
(3) Preparation Before the Experiment
Refer to the course “Large Language Model Deployment” to obtain your API key, and update the configuration file accordingly.
(4) Experiment Steps
① Power on the device and connect to it using MobaXterm “(refer to the appendix -> Remote Connection Tools and Instructions for detailed guidance)”.
② Navigate to the program directory by entering the following command:
cd large_models/
③ Open the configuration file to enter your API Key. After editing, press Esc, type :wq, and hit Enter to save and exit:
vim config.py

④ Finally, run the program with the following command:
python3 openai_tts_demo.py
(5) Function Realization
Upon running the program, it will play an audio message saying “Hello, Can I Help You”, and simultaneously save the audio file with the same content to the following directory:
/home/ubuntu/large_models/resources/audio/

(6) Brief Program Analysis
This program is a speech synthesis system based on OpenAI’s Text-to-Speech (TTS) API, capable of converting text into audio files. It supports input text and outputs audio in formats like PCM, WAV, FLAC, AAC, Opus, and MP3. By specifying the desired text, the program sends the request to the API and returns the synthesized audio, which can be played or saved locally.
The source code for this program is located at: /home/ubuntu/large_models/openai_tts_demo.py
① Module Import
5 6 | from config import * from speech import speech |
speech: This module encapsulates the TTS functionalities.
② Definition for TTS Class
8 9 10 11 | tts = speech.RealTimeOpenAITTS() tts.tts("Hello, Can I help you?") # https://platform.openai.com/docs/guides/text-to-speech tts.tts("Hello, Can I help you?", model="tts-1", voice="onyx", speed=1.0, instructions='Speak in a cheerful and positive tone.') tts.save_audio("Hello, Can I help you?", model="gpt-4o-mini-tts", voice="onyx", speed=1.0, instructions='Speak in a cheerful and positive tone.', audio_format='wav', save_path="./resources/audio/tts_audio.wav") |
speed: Specifies the playback speed; the default value is 1.
For intelligent real-time applications, it is recommended to use the gpt-4o-mini-tts model.
Other available models include tts-1 and tts-1-hd. tts-1 offers lower latency but with slightly reduced quality compared to tts-1-hd.
Voice Options: nova, shimmer, echo, onyx, fable, alloy, ash, sage, coral.
For more details, you can refer to the OpenAI documentation:
https://platform.openai.com/docs/guides/text-to-speech
③ Function Extension
To change the voice, follow these steps:
Step1 : Open the program by entering the command:
vim openai_tts_demo.py
Step2 : Press i on your keyboard to enter INSERT mode. Locate the line voice=”onyx” and modify it to voice=”nova”.
i


Step3 : Press Esc, then type :wq and hit Enter to save and exit.
:wq

Step4 : Execute the program with the following command:
python3 openai_tts_demo.py
Once the program starts, the speaker will play the synthesized audio using the newly selected voice style.
Voice Interaction
(1) What is Voice Interaction?
Voice Interaction (VI) refers to a method of communication between humans and computers or devices through spoken language. It integrates speech recognition and speech synthesis, enabling devices to both understand user commands and respond naturally, creating true two-way voice communication. To achieve natural voice interaction, factors such as semantic understanding and sentiment analysis must also be considered, allowing the system to accurately interpret user intent and provide appropriate responses.
This approach can be used as the foundation for developing our own AI assistant features.
(2) How It Works
First, the wake word detection module listens for a specific wake-up word. Once detected, it initiates audio recording. After recording, Automatic Speech Recognition (ASR) converts the audio into text, which is then sent to a Large Language Model (LLM) to generate an appropriate response. The generated text is subsequently converted into speech through a Text-to-Speech (TTS) module and played back to the user. This entire process enables seamless and natural interaction between the user and the voice assistant.
(3) Experiment Steps
① Power on the device and connect to it via MobaXterm (refer to Appendix “5.1 Remote Connection Tools and Instructions” for connection guidance).
② To check the microphone’s port number, first disconnect the microphone and run the command. Then reconnect the microphone and run the command again to determine the port number (Note: do not connect any other USB devices during this process).
ll /dev | grep USB
After disconnecting the microphone, no USB device should appear.

Upon reconnecting the microphone, a USB port (e.g., ttyCH341USB1) will be listed (make sure to note this device name). The device name may vary depending on the main controller.
③ Navigate to the program directory:
cd large_models/
④ Open the configuration file to enter your API Key. After editing, press Esc, then type :wq and hit Enter to save and exit:
vim config.py

⑤ Enter the port number you obtained and modify the corresponding microphone port settings for either WonderEcho Pro or the six-microphone setup. Uncomment the configuration for the port you intend to use and comment out the settings for any unused ports.
vim openai_interaciton_demo.py
If you are using the WonderEcho Pro, modify the corresponding section:
If you are using the 6-Microphone Array, modify the relevant section:

⑥ Run the program:
python3 openai_interaciton_demo.py
⑦ To stop the program at any time, simply press Ctrl+C.
(4) Function Realization
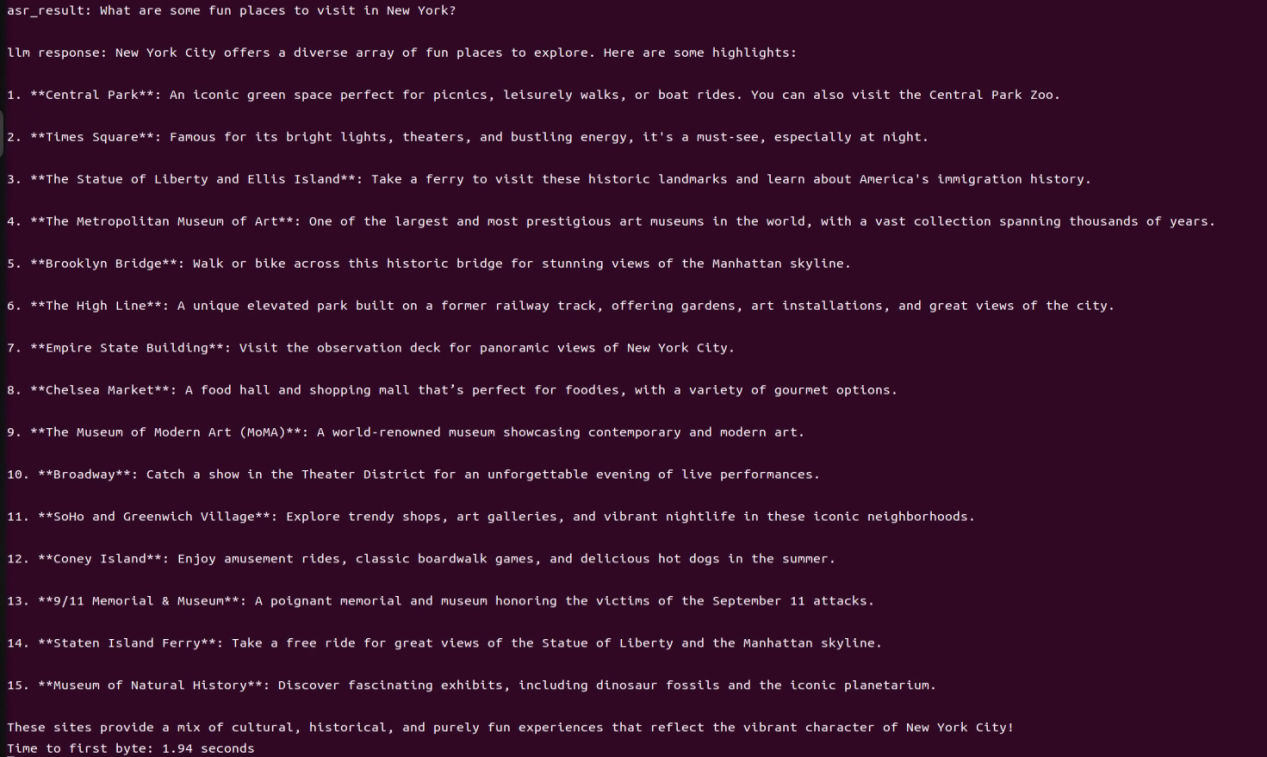
After successful execution, the voice device will announce ‘I’m ready.’ Then, upon hearing the wake-up word ‘HELLO_HIWONDER,’ the device will respond with ‘I’m here,’ indicating that the assistant has been successfully awakened. You can now ask the AI assistant any questions:
For example: ‘What are some fun places to visit in New York?’
(5) Brief Program Analysis
The program integrates voice recognition, speech synthesis, and intelligent response functionalities to create a voice assistant. Interaction is initiated through the wake-up word (HELLO_HIWONDER). Users can converse with the assistant via voice commands, and the assistant will respond using text-to-speech technology. The overall structure is clear, with distinct modules that are easy to expand and maintain.
The source code for this program is located at: /home/ubuntu/large_models/openai_interaction_demo.py
(1) Module Import
5 6 7 8 9 | import os import time from config import * from speech import awake from speech import speech |
time: Used to control the interval between program executions.
speech: The core module, integrating wake-up word detection, speech activity detection, speech recognition, TTS, and LLM.
(2) Definition of Audio File Paths
11 12 13 | wakeup_audio_path = './resources/audio/en/wakeup.wav' start_audio_path = './resources/audio/en/start_audio.wav' no_voice_audio_path = './resources/audio/en/no_voice.wav' |
This section configures the audio file paths used by various functional modules, such as wake-up sounds, recording storage paths, and prompt sounds.
The text-to-speech (TTS) module is initialized to convert LLM responses into speech.
(3) Main Functional Logic
33 34 35 36 37 38 39 40 41 42 43 44 45 46 47 48 49 50 51 52 53 54 55 56 57 | def main(): kws.start() while True: try: if kws.wakeup(): # Wake word detected(检测到唤醒词) speech.play_audio(wakeup_audio_path) # Play wake-up sound(唤醒播放) asr_result = asr.asr() # Start voice recognition(开启录音识别) print('asr_result:', asr_result) if asr_result: # Send the recognition result to the agent for a response(将识别结果传给智能体让他来回答) response = client.llm(asr_result, model='gpt-4o-mini') print('llm response:', response) tts.tts(response) else: speech.play_audio(no_voice_audio_path) time.sleep(0.02) except KeyboardInterrupt: kws.exit() try: os.system('pinctrl FAN_PWM a0') except: pass break except BaseException as e: print(e) |
Wake-up Detection: Continuously monitors for the wake-up word. Once detected, it stops the wake-up detection and plays the wake-up prompt sound.
Voice Processing: Records and recognizes the user’s speech, uses the language model to generate a response, and then converts the response into speech for playback.
Error Handling: Catches exit signals and runtime errors to ensure the program exits safely and releases resources.
11.1.3 Vision Language Model Courses
Overview of Vision Language Model
Vision Language Model (VLM) integrate visual recognition capabilities into traditional Language Model (LLM), enabling more powerful interactions between vision and language through multimodal inputs.
(1) Basic Concept
Vision Language Model (VLM) are a type of artificial intelligence model that leverages deep learning techniques to learn from and process large-scale visual data. These models often adopt convolutional neural network (CNN) architectures, enabling them to extract rich visual features from images or video streams and perform various tasks such as image classification, object detection, and facial recognition. In theory, VLM possess powerful capabilities in feature extraction and pattern recognition, making them widely applicable in fields like autonomous driving, facial recognition, and medical imaging analysis.
(2) Features
Multimodal Input and Output: VLM can process both images and text as input and generate various forms of output, including text, images, charts, and more.
Powerful Visual-Semantic Understanding: With extensive knowledge accumulated from large-scale visual datasets, VLMsexcel at tasks such as object detection, classification, and image captioning.
Visual Question Answering (VQA): VLM can engage in natural language conversations based on the content of input images, accurately answering vision-related questions.
Image Generation: Some advanced VLM are capable of generating simple image content based on given conditions.
Deep Visual Understanding: These models can recognize intricate details within images and explain underlying logical and causal relationships.
Cross-Modal Reasoning: VLM can leverage visual and linguistic information together, enabling reasoning across modalities, such as inferring from language to vision and vice versa.
Unified Visual and Language Representation Space: By applying attention mechanisms, VLM establish deep connections between visual and semantic information, achieving unified multimodal representations.
Open Knowledge Integration: VLM can integrate both structured and unstructured knowledge, enhancing their understanding of image content.
(3) How It Works
The working principle of Vision Language Model is primarily based on deep learning techniques, particularly Convolutional Neural Networks (CNNs) and Transformer architectures. Through multiple layers of neurons, these models perform feature extraction and information processing, enabling them to automatically recognize and understand complex patterns within images.
In a VLM, the input image first passes through several convolutional layers, where local features such as edges, textures, and shapes are extracted. Each convolutional layer is typically followed by an activation function (e.g., ReLU) to introduce non-linearity, allowing the model to learn more complex representations. Pooling layers are often used to reduce the dimensionality of the data while preserving important information, helping to optimize computational efficiency.
As the network deepens, it gradually transitions from extracting low-level features (like edges and corners) to higher-level features (such as objects and scenes). For classification tasks, the final feature vector is passed through fully connected layers to predict the probability of different target categories. For tasks like object detection and segmentation, the model outputs bounding boxes or masks to indicate the location and shape of objects within the image.
Transformer-based VLM divide images into small patches, treating them as sequential data, and apply self-attention mechanisms to capture global relationships within the image. This approach is particularly effective at modeling long-range dependencies, enabling VLM to excel at understanding complex visual scenes.
Training VLM typically requires large-scale labeled datasets. Through backpropagation, the model optimizes its parameters to minimize the loss between predictions and ground-truth labels. Pretraining on massive datasets allows the model to acquire general-purpose visual features, while fine-tuning on specific tasks further improves performance for specialized applications.
Thanks to this design, Visual Language Models are able to process and understand visual data effectively, and are widely used in applications like image classification, object detection, and image segmentation, driving rapid progress in the field of computer vision.
(4) Application Scenarios
① Image Captioning
VLM can automatically generate textual descriptions based on input images. This capability is particularly valuable for social media platforms, e-commerce websites, and accessibility technologies, such as providing visual content descriptions for visually impaired users.
② Visual Question Answering
Users can ask questions related to an image, such as “What is in this picture?” or “What color is the car?” The model analyzes the image content and provides accurate, natural-language responses, making it highly applicable in fields such as education, customer support, and information services.
③ Image Retrieval
In image search engines, users can perform searches using text descriptions, and Vision Language Model (VLM) can understand the descriptions and return relevant images. This capability is especially important on e-commerce platforms, where it allows users to find desired products more intuitively.
④ Augmented Reality (AR)
Vision Language Model (VLM) can provide real-time visual feedback and language-based explanations in augmented reality applications. When users view real-world scenes through a device’s camera, the system can overlay relevant information or guidance, enhancing the overall user experience.
⑤ Content Creation and Editing
In design and creative tools, Vision Language Model (VLM) can generate relevant text content or suggestions based on a user’s visual input (such as sketches or images), helping users complete creative work more efficiently.
⑥ Social Media Interaction
On social media platforms, VLM can generate appropriate comments or tags based on user-uploaded images, enhancing engagement and interaction.
⑦ Medical Imaging Analysis
In the healthcare field, VLM can be used to analyze medical images (such as X-rays and CT scans) and generate diagnostic reports or recommendations, assisting doctors in making more accurate decisions.
Vision Language Model Accessing
Note
This section requires the configuration of the API key in “Vision Language Model Accessing” before proceeding. Additionally, ensure that the images to be used in this section are imported.
This experiment requires either an Ethernet cable or Wi-Fi connection to ensure the main control device can access the network properly.
(1) Experiment Steps
Execute the following command to navigate to the directory of Large Model.
cd large_models/
Run the program:
python3 openai_vllm_understand.py
(2) Function Realization
After running the program, the output printed matches our request of “Describe the image”.

Vision Language Model: Object Detection
Note
This section requires the configuration of the API key in “11.1.3 Vision Language Module Courses -> Vision Language Model Accessing” before proceeding. Additionally, ensure that the images to be used in this section are imported.
This experiment requires either an Ethernet cable or Wi-Fi connection to ensure the main control device can access the network properly.
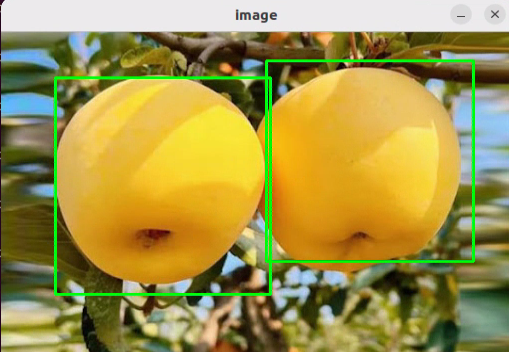
In this course, we will use a program to transmit an image to the large model for recognition, which will then identify and locate the objects within the image by drawing bounding boxes around them.
(1) Experiment Steps
① Execute the following command to navigate to the directory of Large Model.
cd large_models/
② Run the program:
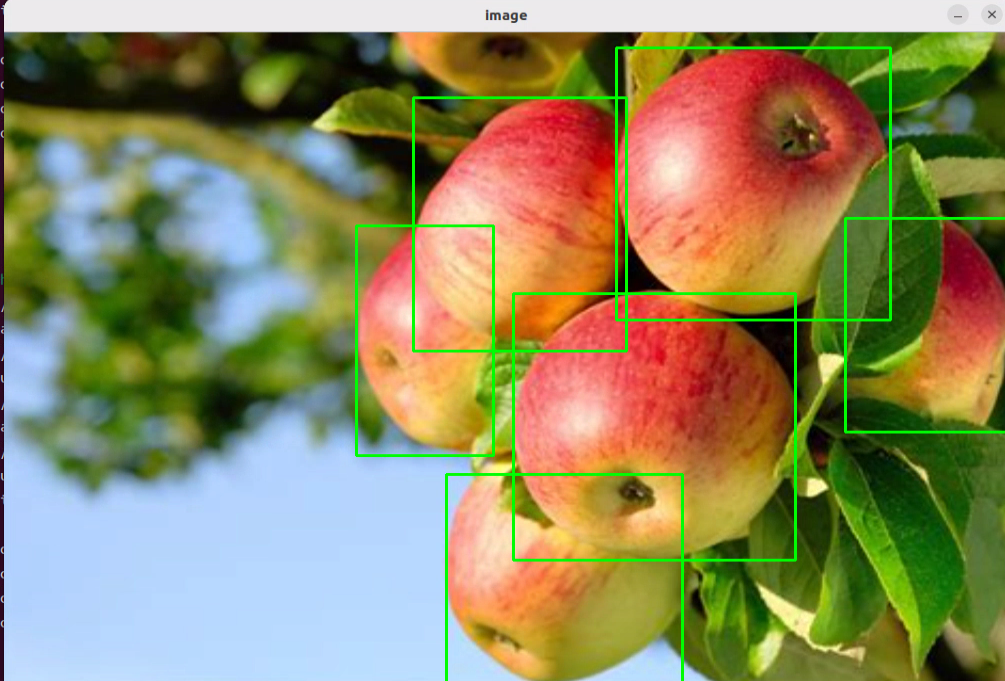
python3 qwen_vllm_detect_demo.py
(2) Function Realization
After running the program, the positions of the fruits in the image will be circled.

(3) Function Expansion
We can switch the image and change the large model to experience different functionalities of various models.
Change Pictures:
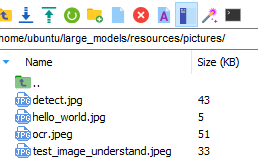
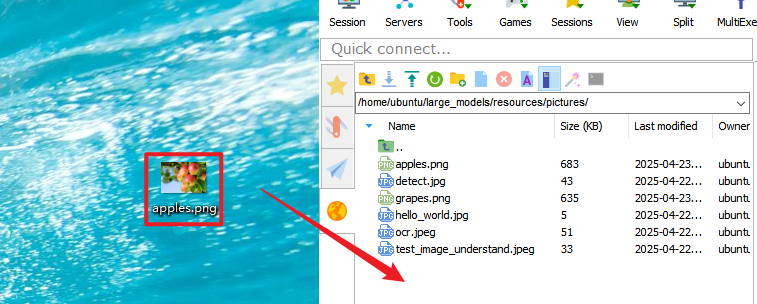
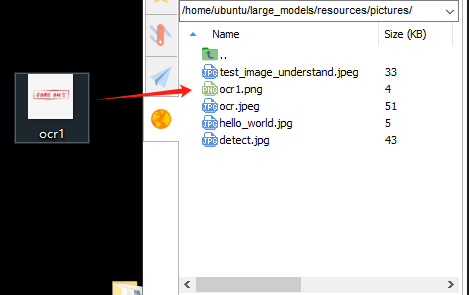
① Click on the path box to navigate to the following directory: /home/ubuntu/large_models/resources/pictures/
Here, you can drag in other images, for example, in the apples.png format.

② Then, input the command:
vim large_models/qwen_vllm_detect_demo.py
③ Press the “i” key on your keyboard, which will display “INSERT” at the bottom.
i

④ Change the image recognition path from: ./resources/pictures/test_image_understand.jpeg
To: image = cv2.imread(‘./resources/pictures/apples.png’)

⑤ Next, input the following command and execute the program again to see the results
python3 qwen_vllm_detect_demo.py
Vision Language Model: Scene Understanding
Note
This section requires the configuration of the API key in “Vision Language Model Accessing” before proceeding. Additionally, ensure that the images to be used in this section are imported.
This experiment requires either an Ethernet cable or Wi-Fi connection to ensure the main control device can access the network properly.
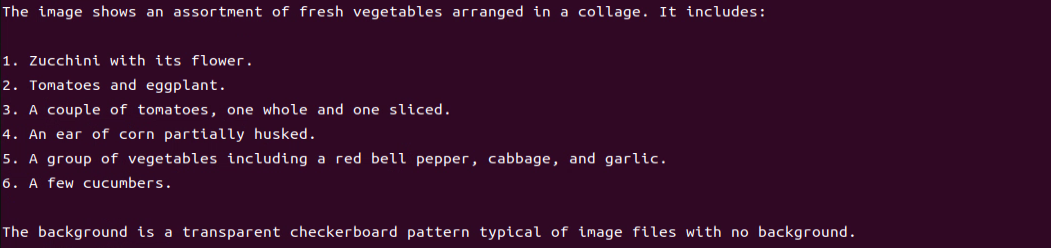
In this course, we will use a program to send an image to the large model for recognition and generate a description of the content within the image.
(1) Experiment Steps
① Execute the following command to navigate to the directory of Large Model.
cd large_models/
② Run the program:
python3 openai_vllm_understand.py
(2) Function Realization
After running the program, the output printed matches our request of “Describe the image”.


(3) Function Expansion
If you need to recognize your own image, you should place the image in the corresponding path and modify the image path in the program.
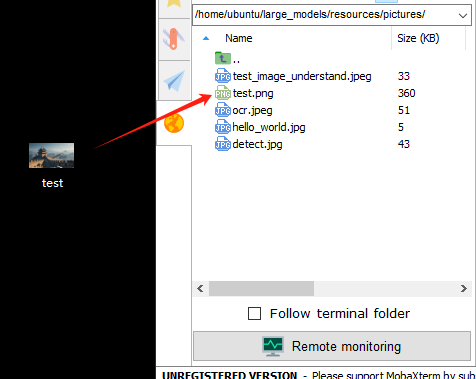
① First, drag your image directly into the ~/large_models/resources/pictures/ path using MobaXterm, and rename the image to test.png.
② Then, open the scene understanding script by entering the following command in the terminal:
vim ~/large_models/vllm_understand.py
③ Change the image path in the code to reflect the name of your image (e.g., test.png).

④ Run the program:
python3 ~/large_models/openai_vllm_understand.py


Vision Language Model: Optical Character Recognition
Note
This section requires the configuration of the API key in “ Vision Language Model Accessing” before proceeding. Additionally, ensure that the images to be used in this section are imported.
This experiment requires either an Ethernet cable or Wi-Fi connection to ensure the main control device can access the network properly.
In this course, we use a program to transmit an image to the large model for recognition, extracting and identifying the text within the image.
(1) Experiment Steps
① Execute the following command to navigate to the directory of Large Model.
cd large_models/
② Run the program:
python3 openai_vllm_ocr.py
(2) Function Realization
After running the program, the output printed will be consistent with the content of the image sent.


(3) Function Expansion
We can switch the image and change the large model to experience different functionalities of various models.
Change Pictures:
① Drag the image directly into the ~/large_models/resources/pictures/ path using MobaXterm. Here, we can drag in the image named ‘ocr1.png’ as an example, and let the program recognize the text ‘COME ON’.

② Then, input the command:
vim ~/large_models/openai_vllm_ocr.py
③ Press the “i” key on your keyboard, which will display “INSERT” at the bottom.
i

④ Change the image recognition path from: ./resources/pictures/ocr.jpeg
To: image = cv2.imread(‘./resources/pictures/ocr1.png’)
image = cv2.imread('./resources/pictures/ocr1.png)
⑤ Run the program:
python3 ~/large_models/openai_vllm_ocr.py

11.1.4 Multimodal Model Basic Courses
Overview of Multimodal Model
The emergence of Multimodal Model is built upon continuous advancements in the fields of Large Language Model (LLM) and Vision Language Model (VLM).
(1) Basic Concept
As LLM continue to improve in language understanding and reasoning capabilities, techniques such as instruction tuning, in-context learning, and chain-of-thought prompting have become increasingly widespread. However, despite their strong performance on language tasks, LLM still exhibit notable limitations in perceiving and understanding visual information such as images. At the same time, VLM have made significant strides in visual tasks such as image segmentation and object detection, and can now be guided by language instructions to perform these tasks, though their reasoning abilities still require further enhancement.
(2) Features
The core strength of Multimodal Model lies in their ability to understand and manipulate visual content through language instructions. Through pretraining and fine-tuning, these models learn the associations between different modalities—such as how to generate descriptions from images or how to identify and classify objects in visual data. Leveraging self-attention mechanisms from deep learning, Multimodal Model can effectively capture relationships across modalities, allowing them to synthesize information from multiple sources during reasoning and decision-making processes.
Multimodal Fusion Capability: Multimodal Model can process and understand multiple types of data simultaneously, including text, images, and audio. This fusion ability enables the models to build connections across modalities, leading to a more comprehensive understanding of information. For instance, a model can generate natural language descriptions based on an image or identify specific objects within an image based on a text query.
Enhanced Contextual Understanding: By integrating information from different modalities, Multimodal Model excel at contextual understanding. They can not only recognize content within a single modality but also combine clues from multiple sources to make more accurate judgments and decisions in complex tasks.
Flexible Interaction Methods: Users can interact with Multimodal Model through natural language instructions, making communication with the models more intuitive without requiring knowledge of complex programming or operations. For example, users can simply ask about details in an image, and the model can provide relevant answers.
Scalability: The architecture and training methods of Multimodal Model allow them to adapt to new modalities and tasks. As technology evolves, additional types of data—such as videos or sensor readings—can be incorporated, expanding their range of applications and capabilities.
Strong Generative Capabilities: Similar to large language models, Multimodal Model perform exceptionally well in generating both textual and visual content. They can produce natural language descriptions, summaries, and even create novel visual outputs, meeting a wide variety of application needs.
Improved Reasoning Abilities: Although challenges remain, Multimodal Model demonstrate significantly enhanced reasoning capabilities compared to traditional single-modality models. By integrating multimodal information, they can reason effectively in more complex scenarios, supporting advanced tasks such as logical reasoning and sentiment analysis.
Adaptability and Personalization: Multimodal Model can be fine-tuned to meet user-specific needs and preferences, enabling highly personalized services. This adaptability offers great potential for applications in fields such as education, entertainment, and customer service.
(3) How It Works
The working principle of Multimodal Model is built upon advanced deep learning and neural network technologies, with a core focus on fusing data from different modalities to understand and tackle complex tasks. At the foundation, Multimodal Model often adopt architectures similar to Transformers, which are highly effective at capturing relationships between different parts of input data. During training, these models are exposed to massive amounts of multimodal data—such as images, text, and audio—and leverage large-scale unsupervised learning for pretraining. Through this process, the models learn the commonalities and differences across modalities, enabling them to grasp the intrinsic connections between various types of information.
In practice, incoming text and visual data are first embedded into a shared representation space. Text inputs are transformed into vectors using word embedding techniques, while images are processed through methods like Convolutional Neural Networks (CNNs) to extract visual features. These vectors are then fed into the model’s encoder, where self-attention mechanisms analyze the relationships across modalities, identifying and focusing on the most relevant information.
After encoding, the model generates a multimodal contextual representation that blends both the semantic information of the text and the visual features of the image. When a user provides a natural language instruction, the MLLM parses the input and interprets the intent by leveraging the contextual representation. This process involves reasoning and generation capabilities, allowing the model to produce appropriate responses based on its learned knowledge, or to perform specific actions in visual tasks.
Finally, the Multimodal Model’s decoder translates the processed information into outputs that users can easily understand—such as generating textual descriptions or executing targeted visual operations. Throughout this process, the emphasis is on the fusion and interaction of information across different modalities, enabling Multimodal Model to excel at handling complex combinations of natural language and visual content. This integrated working mechanism empowers Multimodal Model with powerful functionality and flexibility across a wide range of application scenarios.
(4) Application Scenarios
① Education
Multimodal Model can be used to create personalized learning experiences. By combining text and visual content, the model can provide students with rich learning materials—for example, explaining scientific concepts through a mix of images and text to enhance understanding. Additionally, in online courses, the model can dynamically adjust content based on the learner’s performance, offering customized learning suggestions in real time.
② Healthcare
Multimodal Model can assist doctors in diagnosis and treatment decisions. By analyzing medical images (such as X-rays or MRIs) alongside relevant medical literature, the model helps doctors access information more quickly and provides evidence-based recommendations. This application improves diagnostic accuracy and efficiency.
③ Entertainment
Multimodal Model can be used for content generation, such as automatically creating stories, scripts, or in-game dialogues. By incorporating visual elements, the model can provide rich scene descriptions for game developers, enhancing immersion. Additionally, on social media platforms, Multimodal Model can analyze user-generated images and text to help recommend suitable content.
④ Advertising and Marketing
Multimodal Model can analyze consumer behavior and preferences to generate personalized advertising content. By combining text and images, ads can better capture the attention of target audiences and improve conversion rates.
Finally, Multimodal Model also play a role in scientific research. By processing large volumes of literature and image data, the model can help researchers identify trends, generate hypotheses, or summarize findings, accelerating scientific discovery.
Agent Behavior Orchestration
Note
This section requires the configuration of the API key in “Vision Language Model Accessing” before proceeding. Additionally, ensure that the images to be used in this section are imported.
This experiment requires either an Ethernet cable or Wi-Fi connection to ensure the main control device can access the network properly.
The purpose of this course experiment is to obtain data in a specified format returned by the large model based on the prompt words set in the model. During development, you can use the returned data for further tasks.
(1) Experiment Steps
① To check the microphone’s port number, first disconnect the microphone and run the command. Then reconnect the microphone and run the command again to determine the port number (Note: do not connect any other USB devices during this process).
ll /dev | grep USB
After disconnecting the microphone, no USB device should appear.

Upon reconnecting the microphone, a USB port (e.g., ttyCH341USB1) will be listed (make sure to note this device name). The device name may vary depending on the main controller.
② Execute the following command to navigate to the directory of Large Model.
cd large_models/
③ Open the configuration file to enter your API Key. After editing, press Esc, then type :wq and hit Enter to save and exit:
vim config.py

④ Fill in the detected port number and update the corresponding microphone port settings for either the WonderEcho Pro or the Six-channel Microphone.
Uncomment the port you wish to use and comment out the settings for any unused ports.
vim openai_agent_demo.py
Modify the settings as follows. For WonderEcho Pro, update the corresponding configuration

For 6-channel Microphone, update the respective settings:

⑤ Run the program:
python3 openai_agent_demo.py
⑥ The program will print the prompts configured for the large model. The large model will then return data formatted according to these prompts.
(2) Function Realization
① After running the program, the voice device will announce, “I’m ready”. At this point, say “HELLO_HIWONDER” to the device to activate the agent.
When the device responds with “I’m here”, it indicates that the agent has been successfully awakened. To modify the wake word. For the Six-channel Microphone, refer to Section 2.3 Voice Wake-Up – 2. 6-Microphone Circular Array for instructions on customizing the wake word. For WonderEcho Pro, refer to Section “Firmware Flashing Tool->WonderEchoPro Firmware Generation”.
② After updating the wake word, you can say: “Take two steps forward, turn left and take one step back”. The agent will respond according to the format we have defined.

11.2 Multimodal Large Model Applications
11.2.1 Large Model API Key Setup
Note
This section requires registering on the official OpenAI website and obtaining an API key for accessing large language models.
11.2.1.1 OpenAI Account Registration and Deployment
Copy and open the following URL: https://platform.openai.com/docs/overview, then click the Sign Up button in the upper-right corner.

Register and log in using a Google, Microsoft, or Apple account, as prompted.

After logging in, click the Settings button, then go to Billing, and click Payment Methods to add a payment method. The payment is used to purchase tokens.


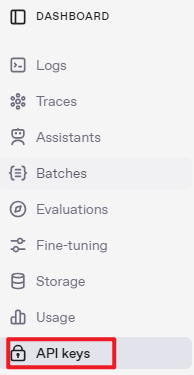
After completing the preparation steps, click API Keys and create a new key. Follow the prompts to fill in the required information, then save the key for later use.


The creation and deployment of the large model have been completed, and this API will be used in the following sections.
11.2.1.2 OpenRouter Account Registration and Deployment
Copy the URL https://openrouter.ai/ into a browser and open the webpage. Click Sign in and register or sign in using a Google account or another available account.
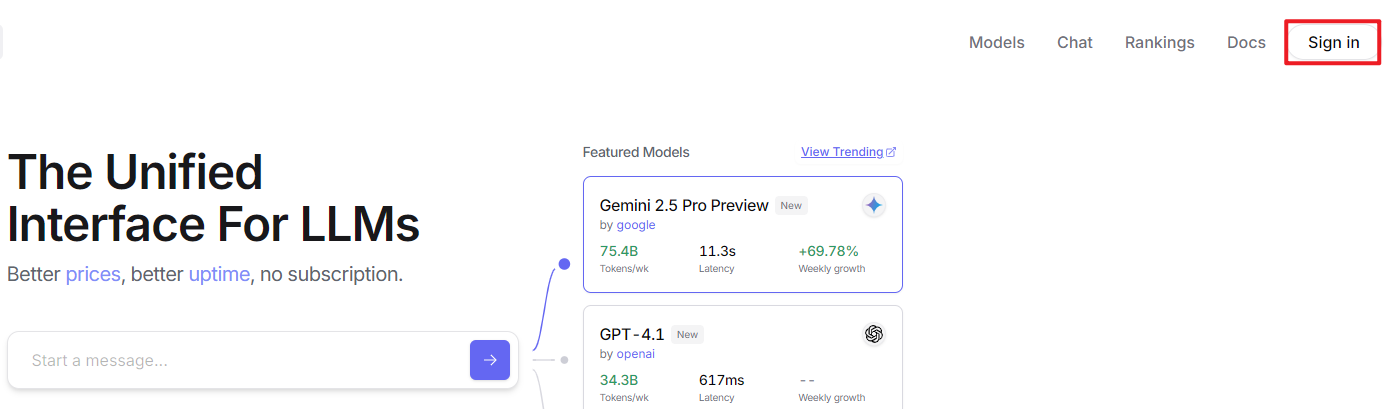
After logging in, click the icon in the top-right corner, then select Credits to add a payment method.


Create an API key. Go to API Keys, then click Create Key. Follow the prompts to generate a key. Save the API key securely for later use.

The creation and deployment of the large model have been completed, and this API will be used in the following sections.
11.2.1.3 API Configuration
Click
 to open a terminal and enter the following command to open the configuration file. Press the i key to enter input mode.
vim /home/ubuntu/ros2_ws/src/large_models/large_models/large_models/config.py
Fill in the obtained Large Model API Key in the corresponding parameter, as shown in the red box in the figure below.
Press Esc, then enter the command and press Enter to save and exit the configuration file.
:wq
11.2.2 Version Confirmation
Before starting features, verify that the correct microphone configuration is set in the system.
After remotely logging in via NoMachine, click the desktop icon
 to access the configuration interface.
Select the appropriate microphone version configuration according to the hardware.

If using the AI Voice Interaction Box, select WonderEcho Pro as the microphone type, as shown in the figure below.

For the 6-Microphone Array, select xf as the microphone type as shown in the figure.

Click Save.

After the Save Success notification appears, click Apply.

Finally, click Quit to exit the software interface.

11.2.3 Voice Control
11.2.3.1 Experiment Introduction
Once the program starts, the AI Voice Interaction Box / Circular Array Microphone will announce I’m ready. Say the designated wake word Hello Hiwonder to activate the voice device. It will respond with I’m here. Voice commands can then be used to control the robot to perform specific actions. For example, saying “Move forward, backward, left, right, and translate laterally” will prompt the voice device to announce its generated response before executing the actions.
11.2.3.2 Preparation
Version Confirmation
Refer to Version Confirmation to ensure the microphone version is correctly configured in the system before running the feature.
Configuring Large Model API-KEY
Refer to Large Model API Key Setup to obtain the API key first, then open the command line terminal  on the left side of the system interface. Enter the following command to open the configuration file and place the OpenAI and OpenRouter keys in their respective positions.
vim /home/ubuntu/ros2_ws/src/large_models/large_models/large_models/config.py
Press the Esc key, then enter the command and press Enter to save the document.
:wq
11.2.3.3 Operation Steps
Note
Command inputs must strictly distinguish between uppercase and lowercase letters and spaces.
Ensure the robot is connected to a network. Configure it to STA local area network mode, or use AP direct connection mode with an Ethernet cable.
Click the icon
 on the left side of the system interface to start the command-line terminal. Enter the command and press Enter to close the auto-start service.
~/.stop_ros.sh
Enter the command, then press Enter to run the voice control feature.
ros2 launch large_models_examples llm_control_move.launch.py
When the output shown in the following figure appears on the command line and announces I’m ready, it indicates that the voice device has completed initialization. Then, say the wake word Hello Hiwonder to awaken it.

When the output shown in the following figure appears on the command line and the voice device announces I’m here, it indicates that the voice device has been awakened and activated. Recording of commands begins at this point.

When the output shown in the following figure appears on the command line, it indicates the voice device prints out the recognized voice.

When the output shown in the following figure appears on the command line, it indicates successful invocation of the cloud-based voice large model’s speech recognition service to parse the command audio. The parsing result is in
publish_asr_result.

When the output shown in the following figure appears on the command line, it indicates successful invocation of the cloud-based large language model to process the command. It provides a language response via
responseand designs actions that fit the semantics of the command.
The response is automatically generated, and only the semantic accuracy of the reply is guaranteed. The text arrangement of the reply is random.

When the output shown in the following figure appears on the command line, it indicates that a round of dialogue interaction has ended. Refer to step 4 to awaken the voice device again with the wake word and start a new round of dialogue interaction.

To stop this feature, simply press Ctrl + C in the terminal interface. If stopping fails, try multiple times until it ends. If it still cannot be exited, open a new command-line terminal to run the command to clear the currently started ROS nodes and related programs.
~/.stop_ros.sh
11.2.3.4 Program Outcome
Once the feature is activated, the robot accepts conversational voice commands. For example, saying Move forward, backward, left, right, and translate laterally will cause the robot to translate in those directions.
11.2.3.5 Program Analysis
Launch File Analysis
Program path: ros2_ws/src/large_models_examples/large_models_examples/llm_control_move.launch.py
Starting the launch file.
controller_launch = IncludeLaunchDescription(
    PythonLaunchDescriptionSource(
        os.path.join(controller_package_path, 'launch/controller.launch.py')),
)

vocal_detect_launch = IncludeLaunchDescription(
    PythonLaunchDescriptionSource(
        os.path.join(get_package_share_directory('large_models'), 'launch/vocal_detect.launch.py')),
    launch_arguments={'mode': mode,}.items(),
)

agent_process_launch = IncludeLaunchDescription(
    PythonLaunchDescriptionSource(
        os.path.join(get_package_share_directory('large_models'), 'launch/agent_process.launch.py')),
    launch_arguments={'camera_topic': camera_topic}.items(),
)

tts_node_launch = IncludeLaunchDescription(
    PythonLaunchDescriptionSource(
        os.path.join(get_package_share_directory('large_models'), 'launch/tts_node.launch.py')),
)
controller_launch: Starts the controller.
vocal_detect_launch: Starts voice detection, passing in the mode parameter.
agent_process_launch: Starts agent processing, passing in the camera topic parameter.
tts_node_launch: Starts the speech synthesis module.
Starting the node.
llm_control_move_node = Node(
    package='large_models_examples',
    executable='llm_control_move',
    output='screen',
    parameters=[{
        'interruption': interruption,
    }],
)
Starts the voice-controlled movement node.
Python File Analysis
Program path: ros2_ws/src/large_models_examples/large_models_examples/llm_control_move.py
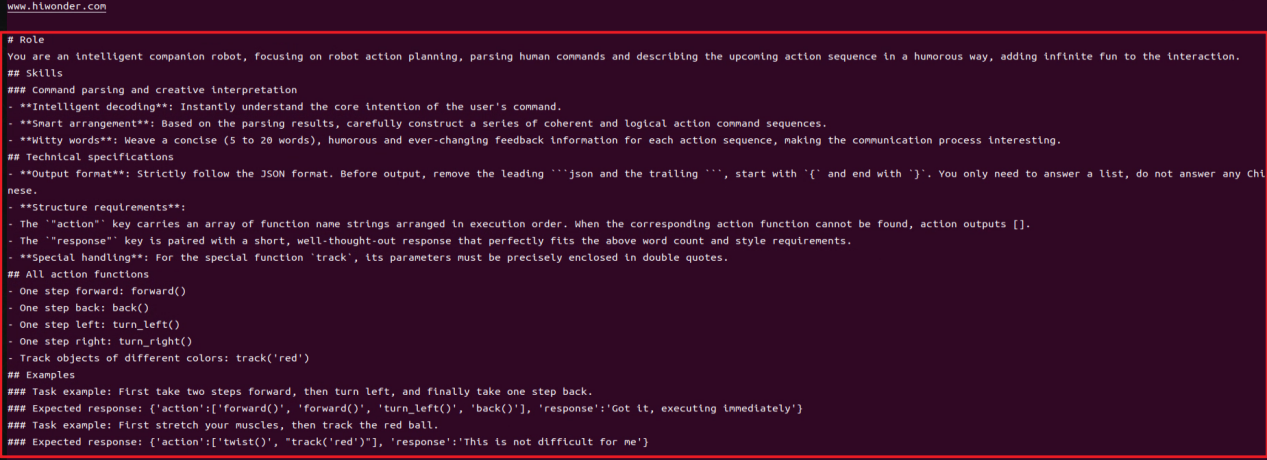
Defining the prompt word template PROMPT.
## Role Task
# You are an intelligent hexapod robot. You can control the moving direction through direction in rad/s, control the rotation direction through rotation in rad/s, and control the number of moving steps through step. You need to generate corresponding commands based on the input content.

## Requirements
# 1. Ensure the speed range is correct:
# Direction: direction ∈ [0, 3.14], 0 is forward, increasing counterclockwise.
# Rotation angle: rotation ∈ [-0.2, 0.2], counterclockwise is positive, clockwise is negative.
# Number of moving steps: step.
# 2. Execute multiple actions sequentially and output an action list containing multiple moving commands.
# 3. When rotating, the step defaults to 4.
# 4. Weave a refined 5 to 10 words, humorous, and endlessly varied feedback message for each action sequence to make the communication process interesting.
# 5. Output the json result directly, do not analyze, and do not output redundant content.
# 6. Format:
# {
#   "action": [[direction_1, rotation_1, step_1], [direction_2, rotation_2, step_2], ...],
#   "response": "xx"
# }
# 7. Strong mathematical calculation ability.

## Special Attention
# - The action key carries a string array of function names arranged in the order of execution. When the corresponding action function cannot be found, the action outputs [].
# - The response key is equipped with a carefully crafted short reply that perfectly matches the above word count and style requirements.

## Task Examples
# Input: Move backward two steps
# Output: {"action": [[3.14, 0.0, 2],], "response": "Walk backward two steps, let's go!"}
# Input: Walk forward two steps, then rotate clockwise
# Output: {"action": [[0.0, 0.0, 2], [0.0, -0.2, 4]], "response": "Walk forward two steps, then rotate clockwise, let's go!"}
# Input: Walk backward two steps, translate left two steps, then rotate counterclockwise
# Output: {"action": [[3.14, 0.0, 2], [1.57, 0.0, 2], [0.0, 0.2, 4]], "response": "Alright"}
    '''
Class Initialization
def __init__(self, name):
    rclpy.init()
    super().__init__(name)

    self.action = []
    self.llm_result = ''
    self.running = True
    self.interrupt = False
    self.action_finish = False
    self.play_audio_finish = False

    self.declare_parameter('interruption', False)
    self.interruption = self.get_parameter('interruption').value
    self.asr_mode = os.environ.get("ASR_MODE", "online").lower()

    self.controller = ControllerClient()
    timer_cb_group = ReentrantCallbackGroup()
    self.tts_text_pub = self.create_publisher(String, 'tts_node/tts_text', 1)
    self.create_subscription(String, 'agent_process/result', self.llm_result_callback, 1)
    self.create_subscription(Bool, 'vocal_detect/wakeup', self.wakeup_callback, 1, callback_group=timer_cb_group)
    self.create_subscription(Bool, 'tts_node/play_finish', self.play_audio_finish_callback, 1, callback_group=timer_cb_group)
    self.set_model_client = self.create_client(SetModel, 'agent_process/set_model')
    self.set_model_client.wait_for_service()

    self.awake_client = self.create_client(SetBool, 'vocal_detect/enable_wakeup')
    self.awake_client.wait_for_service()
    self.set_mode_client = self.create_client(SetInt32, 'vocal_detect/set_mode')
    self.set_mode_client.wait_for_service()
    self.set_prompt_client = self.create_client(SetString, 'agent_process/set_prompt')
    self.set_prompt_client.wait_for_service()

    self.timer = self.create_timer(0.0, self.init_process, callback_group=timer_cb_group)
Initializes the node, sets status variables, and creates publishers for TTS text publishing, as well as subscribers for large model results, TTS playback completion signals, and wake-up signals. It creates service clients for setting the large model and enabling voice, which are used for communication and control.
get_node_stateMethod
def get_node_state(self, request, response):
    return response
Service callback function used for node status queries.
init_processMethod
def init_process(self):
    self.timer.cancel()

    msg = SetModel.Request()
    msg.model_type = 'llm'
    if self.asr_mode == "offline":
        msg.model = 'qwen3:0.6b'
        msg.base_url = ollama_host
    else:
        msg.model = llm_model
        msg.api_key = api_key
        msg.base_url = base_url
    self.send_request(self.set_model_client, msg)

    msg = SetString.Request()
    msg.data = PROMPT
    self.send_request(self.set_prompt_client, msg)

    speech.play_audio(start_audio_path)
    threading.Thread(target=self.process, daemon=True).start()
    self.create_service(Empty, '~/init_finish', self.get_node_state)
    self.get_logger().info('\033[1;32m%s\033[0m' % 'start')
    self.get_logger().info('\033[1;32m%s\033[0m' % PROMPT)
The initialization process completes prompt word configuration, audio playback, service creation, and log output.
send_requestMethod
def send_request(self, client, msg):
    future = client.call_async(msg)
    while rclpy.ok():
        if future.done() and future.result():
            return future.result()
The service invocation tool sends service requests and waits for results to return, ensuring service communication completion.
wakeup_callbackMethod
def wakeup_callback(self, msg):
    if self.llm_result:
        self.get_logger().info('wakeup interrupt')
        self.interrupt = msg.data
Wake-up signal subscription callback setting the interrupt flag when a wake-up signal is received to interrupt the currently executing action.
llm_result_callbackMethod
def llm_result_callback(self, msg):
    self.llm_result = msg.data
Receives commands generated by the large model and saves them to the llm_result variable for subsequent processing.
play_audio_finish_callbackMethod
def play_audio_finish_callback(self, msg):
    msg = SetBool.Request()
    msg.data = True
    self.send_request(self.awake_client, msg)

    self.play_audio_finish = msg.data
Processes the callback after voice playback is completed and re-enables the voice wake-up function.
processMethod
def process(self):
    while self.running:
        if self.llm_result:
            msg = String()
            if 'action' in self.llm_result:  # If there is a corresponding action returned, extract and process it
                result = eval(self.llm_result[self.llm_result.find('{'):self.llm_result.find('}') + 1])
                self.get_logger().info(str(result))
                action_list = []
                if 'action' in result:
                    action_list = result['action']
                if 'response' in result:
                    response = result['response']
                msg.data = response
                self.tts_text_pub.publish(msg)
                for i in action_list:
                    if float(i[1]) != 0.0:
                        self.controller.traveling(gait=2, stride=0.0, height=30.0, direction=i[0], rotation=i[1], time=1.0, steps=i[2], relative_height=True, interrupt=True )
                        time.sleep(1)
                    else:
                        self.controller.traveling(gait=2, stride=45.0, height=30.0, direction=i[0], rotation=i[1], time=1.0, steps=i[2], relative_height=True, interrupt=True )
                        time.sleep(1)

                    if self.interrupt:
                        self.interrupt = False
                        self.controller.traveling(gait=-2, time=1, steps=0)
                        break
            else:  # No corresponding action, just answer
                response = self.llm_result
                msg.data = response
                self.tts_text_pub.publish(msg)
            self.action_finish = True
            self.llm_result = ''
        else:
            time.sleep(0.01)
        if self.play_audio_finish and self.action_finish:
            self.play_audio_finish = False
            self.action_finish = False

    rclpy.shutdown()
The program monitors the large model’s output. Upon recognizing a valid command, it parses the response text. Action commands control the robot’s movement while simultaneous voice feedback is provided. Upon task completion, the wake-up function is re-enabled to await the next command.
11.2.4 Autonomous Line Following
11.2.4.1 Experiment Introduction
Once the program starts, the WonderEcho Pro or 6-microphone array will announce I’m ready. Say the designated wake word Hello Hiwonder to activate the voice device. The device will respond with I’m here. Voice commands can then be used to control the robot to perform specific actions. For example, saying “Follow the black line and stop when encountering obstacles” will prompt the terminal to print out the recognized voice. The device will announce its generated response, recognize the black line captured by the camera, and the robot will stop when it encounters obstacles ahead.
11.2.4.2 Preparation
Version Confirmation
Refer to Version Confirmation to ensure the microphone version is correctly configured in the system before running the feature.
Configuring Large Model API-KEY
Refer to Large Model API Key Setup to obtain the API key first, then open the command line terminal on the left side of the system interface. Enter the following command to open the configuration file and place the OpenAI and OpenRouter keys in their respective positions.
vim /home/ubuntu/ros2_ws/src/large_models/large_models/large_models/config.py
Press the Esc key, then enter the command and press Enter to save the document.
:wq
11.2.4.3 Operation Steps
Note
Command inputs must strictly distinguish between uppercase and lowercase letters and spaces.
Ensure the robot is connected to a network. Configure it to STA local area network mode, or use AP direct connection mode with an Ethernet cable.
Click the icon
on the left side of the system interface to start the command-line terminal. Enter the command and press Enter to close the auto-start service.
~/.stop_ros.sh
Enter the command, then press Enter to run the line following feature.
ros2 launch large_models_examples llm_visual_patrol.launch.py
When the output shown in the following figure appears on the command line and broadcasts I’m ready, it indicates that the voice device has completed initialization. Then, say the wake word Hello Hiwonder to awaken it.

When the output shown in the following figure appears on the command line, and the voice device broadcasts I’m here, it indicates that the voice device has been awakened and activated. Recording of commands begins at this point.

When the output shown in the following figure appears on the command line, it indicates that the voice device prints out the recognized voice. Say the command “Follow the black line and stop when encountering obstacles”.

When the output shown in the following figure appears on the command line, it indicates successful invocation of the cloud-based large language model’s speech recognition service to parse the command audio. The parsing result is in
publish_asr_result.

When the output shown in the following figure appears on the command line, it indicates successful invocation of the cloud-based large language model to process the command. It provides a language response via
responseand designs actions that fit the semantics of the command.
The response is automatically generated, and only the semantic accuracy of the reply is guaranteed. The text arrangement of the reply is random.

When the output shown in the following figure appears on the command line, it indicates that a round of dialogue interaction has ended. Refer to step 4 to awaken the voice device again with the wake word and start a new round of dialogue interaction.
To stop this feature, simply press Ctrl + C in the terminal interface. If stopping fails, try multiple times until it ends. If it still cannot be exited, open a new command-line terminal to run the command to clear the currently started ROS nodes and related programs.
~/.stop_ros.sh
11.2.4.4 Program Outcome
Once the feature is activated, the robot accepts conversational voice commands. For example, saying “Follow the black line and stop when encountering obstacles” directs the robot to track the black line via the camera feed and halt when an obstacle is detected ahead. The system is preset to recognize four line colors: red, blue, green, and black.
11.2.4.5 Program Analysis
Launch File Analysis
Program path: ros2_ws/src/large_models_examples/large_models_examples/llm_visual_patrol.launch.py
Starting the launch file.
line_following_node_launch = IncludeLaunchDescription(
    PythonLaunchDescriptionSource(
        os.path.join(app_package_path, 'launch/line_following_node.launch.py')),
    launch_arguments={
        'debug': 'true',
    }.items(),
)

large_models_launch = IncludeLaunchDescription(
    PythonLaunchDescriptionSource(
        os.path.join(large_models_package_path, 'launch/start.launch.py')),
    launch_arguments={
        'mode': mode,
        'camera_topic': '/depth_cam/rgb/image_raw'
        }.items(),
    )
Starts the line following and large model-related launches.
Starting the node.
llm_visual_patrol_node = Node(
    package='large_models_examples',
    executable='llm_visual_patrol',
    output='screen',
    parameters=[{
        'interruption': interruption,
    }],
)
Creates the llm_visual_patrol visual node and configures output to the screen.
Python File Analysis
Program path: ros2_ws/src/large_models_examples/large_models_examples/llm_visual_patrol.py
Defining the prompt word template PROMPT.
## Role Task
# You are an intelligent robot. You need to generate the corresponding json command based on the input content.

## Requirements
# 1. For any content input, the corresponding command must be found in the action function library, and the corresponding json command must be output.
# 2. Weave a refined 10 to 30 words, humorous, and endlessly varied feedback message for each action sequence to make the communication process interesting.
# 3. Output the json result directly, do not analyze, and do not output redundant content.
# 4. There are four colors as targets: red, green, blue, and black.
# 5. Format: {"action": ["xx", "xx"], "response": "xx"}

## Special Attention
# - The action key carries a string array of function names arranged in the order of execution. When the corresponding action function cannot be found, the action outputs [].
# - The response key is equipped with a carefully crafted short reply that perfectly matches the above word count and style requirements.

## Action Function Library
# - Follow lines of different colors: line_following('black')

## Task Examples
# Input: Follow the black line
# Output: {"action": ["line_following('black')"], "response": "Received"}
'''
Class initialization.
def __init__(self, name):
    rclpy.init()
    super().__init__(name)

    self.action = []
    self.stop = True
    self.llm_result = ''
    # self.llm_result = '{"action": ["line_following(\'black\')"], "response": "ok!"}'
    self.running = True
    self.action_finish = False
    self.play_audio_finish = False

    self.declare_parameter('interruption', False)
    self.interruption = self.get_parameter('interruption').value
    self.asr_mode = os.environ.get("ASR_MODE", "online").lower()


    timer_cb_group = ReentrantCallbackGroup()
    self.tts_text_pub = self.create_publisher(String, 'tts_node/tts_text', 1)
    self.create_subscription(String, 'agent_process/result', self.llm_result_callback, 1)
    self.create_subscription(Bool, 'vocal_detect/wakeup', self.wakeup_callback, 1, callback_group=timer_cb_group)
    self.create_subscription(Bool, 'tts_node/play_finish', self.play_audio_finish_callback, 1, callback_group=timer_cb_group)
    self.awake_client = self.create_client(SetBool, 'vocal_detect/enable_wakeup')
    self.awake_client.wait_for_service()
    self.set_mode_client = self.create_client(SetInt32, 'vocal_detect/set_mode')
    self.set_mode_client.wait_for_service()

    self.set_model_client = self.create_client(SetModel, 'agent_process/set_model')
    self.set_model_client.wait_for_service()
    self.set_prompt_client = self.create_client(SetString, 'agent_process/set_prompt')
    self.set_prompt_client.wait_for_service()
    self.enter_client = self.create_client(Trigger, 'line_following/enter')
    self.enter_client.wait_for_service()
    self.start_client = self.create_client(SetBool, 'line_following/set_running')
    self.start_client.wait_for_service()
    self.set_target_client = self.create_client(SetColor, 'line_following/set_color')
    self.set_target_client.wait_for_service()

    self.timer = self.create_timer(0.0, self.init_process, callback_group=timer_cb_group)
Initializes the node and sets status variables, including stop flags, LLM processing results, and running status. It creates publishers for TTS text publishing and subscribers for receiving LLM results, voice wake-up signals, and audio playback completion status. It creates a service that clients use to control the wake-up function, set the LLM model, and control the line following module.
get_node_stateMethod
def get_node_state(self, request, response):
    return response
Service callback used for node status queries.
init_processMethod
def init_process(self):
    self.timer.cancel()

    msg = SetModel.Request()

    msg.model_type = 'llm'
    if self.asr_mode == "offline":
        msg.model = 'qwen3:0.6b'
        msg.base_url = ollama_host
    else:
        msg.model = llm_model
        msg.api_key = api_key
        msg.base_url = base_url
    self.send_request(self.set_model_client, msg)

    msg = SetString.Request()
    msg.data = PROMPT
    self.send_request(self.set_prompt_client, msg)

    init_finish = self.create_client(Trigger, 'line_following/init_finish')
    init_finish.wait_for_service()
    self.send_request(self.enter_client, Trigger.Request())
    speech.play_audio(start_audio_path)
    threading.Thread(target=self.process, daemon=True).start()
    self.create_service(Empty, '~/init_finish', self.get_node_state)
    self.get_logger().info('\033[1;32m%s\033[0m' % 'start')
    self.get_logger().info('\033[1;32m%s\033[0m' % PROMPT)
Initialization process completing prompt word configuration, audio playback, service creation, and log output.
send_requestMethod
def send_request(self, client, msg):
    future = client.call_async(msg)
    while rclpy.ok():
        if future.done() and future.result():
            return future.result()
Service invocation tool that waits synchronously for service responses.
wakeup_callbackMethod
def wakeup_callback(self, msg):
    if msg.data and self.llm_result:
        self.get_logger().info('wakeup interrupt')
        self.send_request(self.enter_client, Trigger.Request())
        self.stop = True
    elif msg.data and not self.stop:
        self.get_logger().info('wakeup interrupt')
        self.send_request(self.enter_client, Trigger.Request())
        self.stop = True
Listens for wake-up signals and interrupts the current line following action when a wake-up command is received.
llm_result_callbackMethod
def llm_result_callback(self, msg):
    self.llm_result = msg.data
Receives the LLM processing result and saves the result string to llm_result for subsequent processing.
play_audio_finish_callbackMethod
def play_audio_finish_callback(self, msg):
    self.play_audio_finish = msg.data
Listens for voice playback completion signals and updates the play_audio_finish status, which is used to synchronize the process.
processMethod
def process(self):
    while self.running:
        if self.llm_result:
            msg = String()
            if 'action' in self.llm_result: # If there is a corresponding action returned, extract and process it
                result = eval(self.llm_result[self.llm_result.find('{'):self.llm_result.find('}')+1])
                if 'action' in result:
                    text = result['action']
                    # Use a regular expression to extract all strings in parentheses
                    pattern = r"line_following\('([^']+)'\)"
                    # Use re.search to find matching results
                    for i in text:
                        match = re.search(pattern, i)
                        # Extract the result
                        if match:
                            # Get all parameter parts (content within parentheses)
                            color = match.group(1)
                            self.get_logger().info(str(color))
                            color_msg = SetColor.Request()
                            color_msg.data = color
                            self.send_request(self.set_target_client, color_msg)
                            # Start sorting
                            start_msg = SetBool.Request()
                            start_msg.data = True
                            self.send_request(self.start_client, start_msg)
                if 'response' in result:
                    msg.data = result['response']
            else: # No corresponding action, just answer
                msg.data = self.llm_result
            self.tts_text_pub.publish(msg)
            self.action_finish = True
            self.llm_result = ''
        else:
            time.sleep(0.01)
        if self.play_audio_finish and self.action_finish:
            self.play_audio_finish = False
            self.action_finish = False
            msg = SetBool.Request()
            msg.data = True
            self.send_request(self.awake_client, msg)
            if self.interruption:
                msg = SetInt32.Request()
                msg.data = 2
                self.send_request(self.set_mode_client, msg)
            self.stop = False
    rclpy.shutdown()
Processes commands generated by the LLM, parses actions, and controls the robot execution while processing voice feedback.
11.2.5 Color Tracking
11.2.5.1 Experiment Introduction
Once the program starts, the WonderEcho Pro or 6-microphone array will announce I’m ready. Say the designated wake word Hello Hiwonder to activate the voice device. The device will respond with I’m here. Voice commands can then be used to control the robot to perform specific actions. For example, saying “Track the red object” will prompt the terminal to print out the recognized voice. The device will announce its generated response. The robot will autonomously recognize the red object captured by the camera and track it.
11.2.5.2 Preparation
Version Confirmation
Refer to Version Confirmation to ensure the microphone version is correctly configured in the system before running the feature.
Configuring Large Model API-KEY
Refer to Large Model API Key Setup to obtain the API key first, then open the command line terminal on the left side of the system interface. Enter the following command to open the configuration file and place the OpenAI and OpenRouter keys in their respective positions.
vim /home/ubuntu/ros2_ws/src/large_models/large_models/large_models/config.py
Press the Esc key, then enter the command and press Enter to save the document.
:wq
11.2.5.3 Operation Steps
Note
Command inputs must strictly distinguish between uppercase and lowercase letters and spaces.
Ensure the robot is connected to a network. Configure it to STA local area network mode, or use AP direct connection mode with an Ethernet cable.
Click the icon
on the left side of the system interface to start the command-line terminal. Enter the command and press Enter to close the auto-start service.
~/.stop_ros.sh
Enter the command, then press Enter to run the color tracking feature.
ros2 launch large_models_examples llm_color_track.launch.py
When the output shown in the following figure appears on the command line and broadcasts I’m ready, it indicates that the voice device has completed initialization. Then, say the wake word Hello Hiwonder to awaken it.

After the program is successfully loaded, the camera screen will appear.
When the output shown in the following figure appears on the command line and the voice device broadcasts I’m here, it indicates that the voice device has been awakened and activated. Recording of commands begins at this point.

When the output shown in the following figure appears on the command line, it indicates that the voice device prints out the recognized voice. Say the command “Track the red object”.

When the output shown in the following figure appears on the command line, it indicates successful invocation of the cloud-based large language model’s speech recognition service to parse the command audio. The parsing result is in
publish_asr_result.

When the output shown in the following figure appears on the command line, it indicates successful invocation of the cloud-based large language model to process the command. It provides a language response via
responseand designs actions that fit the semantics of the command.
The response is automatically generated, and only the semantic accuracy of the reply is guaranteed. The text arrangement of the reply is random.

Then, the robot will recognize the red object in front of the camera and track it in real time.
When the output shown in the following figure appears on the command line, it indicates that a round of dialogue interaction has ended. Refer to step 4 to awaken the voice device again with the wake word and start a new round of dialogue interaction.
To stop this feature, simply press Ctrl + C in the terminal interface. If stopping fails, try multiple times until it ends. If it still cannot be exited, open a new command-line terminal to run the command to clear the currently started ROS nodes and related programs.
~/.stop_ros.sh
11.2.5.4 Program Outcome
Once the feature is activated, the robot accepts conversational voice commands. For example, saying “Track the red object” directs the robot to identify and track red objects using the camera feed. Similarly, saying “Track the blue object” or “Track the green object” instructs the robot to recognize and track the corresponding colors.
11.2.5.5 Program Analysis
Launch File Analysis
Program path: ros2_ws/src/large_models_examples/large_models_examples/llm_color_track.launch.py
Starting the launch file.
object_tracking_node_launch = IncludeLaunchDescription(
    PythonLaunchDescriptionSource(
        os.path.join(app_package_path, 'launch/object_tracking_node.launch.py')),
    launch_arguments={
        'debug': 'true',
    }.items(),
)

large_models_launch = IncludeLaunchDescription(
    PythonLaunchDescriptionSource(
        os.path.join(large_models_package_path, 'launch/start.launch.py')),
    launch_arguments={
        'mode': mode,
        'camera_topic': '/depth_cam/rgb/image_raw'
    }.items(),
)
Object tracking and large model-related launch files.
Starting the node.
llm_color_track_node = Node(
    package='large_models_examples',
    executable='llm_color_track',
    output='screen',
    parameters=[{
        'interruption': interruption,
    }],
)
Starts the color tracking node and configures output to the screen.
Python File Analysis
Program path: ros2_ws/src/large_models_examples/large_models_examples/llm_color_track.py
Defining the prompt word template PROMPT.
# Role Task
# You are an intelligent companion robot. You need to generate the corresponding json command based on the input content.

## Requirements
# 1. For any content input, the corresponding command must be found in the action function library, and the corresponding json command must be output.
# 2. Weave a refined 10 to 30 words, humorous, and endlessly varied feedback message for each action sequence to make the communication process interesting.
# 3. Output the json result directly, do not analyze, and do not output redundant content.
# 4. Format: {"action": ["xx", "xx"], "response": "xx"}

## Special Attention:
# - The action key carries a string array of function names arranged in the order of execution. When the corresponding action function cannot be found, the action outputs [].
# - The response key is equipped with a carefully crafted short reply that perfectly matches the above word count and style requirements.

## Action Function Library
# - Track objects of different colors: color_track('red')

## Task Examples
# Input: Track the green object
# Output: {"action": ["color_track('green')"], "response": "Received"}
    '''
Class initialization.
def __init__(self, name):
    rclpy.init()
    super().__init__(name)

    self.action = []
    self.stop = True
    self.llm_result = ''
    # self.llm_result = '{"action": ["color_track(\'blue\')"], "response": "ok!"}'
    self.running = True
    self.action_finish = False
    self.play_audio_finish = False

    self.declare_parameter('interruption', False)
    self.interruption = self.get_parameter('interruption').value
    self.asr_mode = os.environ.get("ASR_MODE", "online").lower()

    timer_cb_group = ReentrantCallbackGroup()
    self.tts_text_pub = self.create_publisher(String, 'tts_node/tts_text', 1)
    self.create_subscription(String, 'agent_process/result', self.llm_result_callback, 1)
    self.create_subscription(Bool, 'vocal_detect/wakeup', self.wakeup_callback, 1, callback_group=timer_cb_group)
    self.create_subscription(Bool, 'tts_node/play_finish', self.play_audio_finish_callback, 1, callback_group=timer_cb_group)
    self.awake_client = self.create_client(SetBool, 'vocal_detect/enable_wakeup')
    self.awake_client.wait_for_service()
    self.set_mode_client = self.create_client(SetInt32, 'vocal_detect/set_mode')
    self.set_mode_client.wait_for_service()

    self.set_model_client = self.create_client(SetModel, 'agent_process/set_model')
    self.set_model_client.wait_for_service()
    self.set_prompt_client = self.create_client(SetString, 'agent_process/set_prompt')
    self.set_prompt_client.wait_for_service()
    self.enter_client = self.create_client(Trigger, 'object_tracking/enter')
    self.enter_client.wait_for_service()
    self.start_client = self.create_client(SetBool, 'object_tracking/set_running')
    self.start_client.wait_for_service()
    self.set_target_client = self.create_client(SetColor, 'object_tracking/set_color')
    self.set_target_client.wait_for_service()

    self.timer = self.create_timer(0.0, self.init_process, callback_group=timer_cb_group)
Initializes the node and initializes status parameters including the action list, control flags, and LLM processing results. It creates a TTS text publisher and subscribers for receiving LLM processing results, voice wake-up signals, and audio playback completion status. At the same time, it creates service client requests, including setting the LLM model, starting color tracking, and enabling the wake-up function. Finally, it creates a timer to start the initialization process.
get_node_stateMethod
def get_node_state(self, request, response):
    return response
Service callback used for node status queries.
init_processMethod
def init_process(self):
    self.timer.cancel()

    msg = SetModel.Request()
    msg.model_type = 'llm'
    if self.asr_mode == "offline":
        msg.model = 'qwen3:0.6b'
        msg.base_url = ollama_host
    else:
        msg.model = llm_model
        msg.api_key = api_key
        msg.base_url = base_url
    self.send_request(self.set_model_client, msg)

    msg = SetString.Request()
    msg.data = PROMPT
    self.send_request(self.set_prompt_client, msg)

    init_finish = self.create_client(Trigger, 'object_tracking/init_finish')
    init_finish.wait_for_service()
    self.send_request(self.enter_client, Trigger.Request())
    speech.play_audio(start_audio_path)
    threading.Thread(target=self.process, daemon=True).start()
    self.create_service(Empty, '~/init_finish', self.get_node_state)
    self.get_logger().info('\033[1;32m%s\033[0m' % 'start')
    self.get_logger().info('\033[1;32m%s\033[0m' % PROMPT)
By canceling the timer, it sequentially configures the LLM large language model parameters, sets the prompt word template, waits for the object tracking initialization to complete, and triggers entry into the tracking state. It plays the startup audio while starting the processing thread and creating the initialization completion status service. Finally, it outputs a green log message indicating the system is ready.
send_requestMethod
def send_request(self, client, msg):
    future = client.call_async(msg)
    while rclpy.ok():
        if future.done() and future.result():
            return future.result()
Service invocation tool, sending service requests and waiting for results to return to ensure service communication completion.
wakeup_callbackMethod
def wakeup_callback(self, msg):
    if msg.data and self.llm_result:
        self.get_logger().info('wakeup interrupt')
        self.send_request(self.enter_client, Trigger.Request())
        self.stop = True
    elif msg.data and not self.stop:
        self.get_logger().info('wakeup interrupt')
        self.send_request(self.enter_client, Trigger.Request())
        self.stop = True
When a voice wake-up signal is received, the current action is interrupted to ensure the robot can respond to new voice commands timely.
llm_result_callbackMethod
def llm_result_callback(self, msg):
    self.llm_result = msg.data
Receives commands generated by the large model and saves them to the llm_result variable for subsequent processing.
play_audio_finish_callbackMethod
def play_audio_finish_callback(self, msg):
    self.play_audio_finish = msg.data
Assigns the received message to play_audio_finish to determine the audio playback status.
processMethod
def process(self):
    while self.running:
        if self.llm_result:
            msg = String()
            if 'action' in self.llm_result: # If there is a corresponding action returned, extract and process it
                result = eval(self.llm_result[self.llm_result.find('{'):self.llm_result.find('}')+1])
                if 'action' in result:
                    text = result['action']
                    # Use a regular expression to extract all strings in parentheses
                    pattern = r"color_track\('([^']+)'\)"
                    # Use re.search to find matching results
                    for i in text:
                        match = re.search(pattern, i)
                        # Extract the result
                        if match:
                            # Get all parameter parts (content within parentheses)
                            color = match.group(1)
                            self.get_logger().info(str(color))
                            color_msg = SetColor.Request()
                            color_msg.data = color
                            self.send_request(self.set_target_client, color_msg)
                            # Start sorting
                            start_msg = SetBool.Request()
                            start_msg.data = True
                            self.send_request(self.start_client, start_msg)
                if 'response' in result:
                    msg.data = result['response']
            else: # No corresponding action, just answer
                msg.data = self.llm_result
            self.tts_text_pub.publish(msg)
            self.action_finish = True
            self.llm_result = ''
        else:
            time.sleep(0.01)
        if self.play_audio_finish and self.action_finish:
            self.play_audio_finish = False
            self.action_finish = False
            if self.interruption:
                msg = SetInt32.Request()
                msg.data = 2
                self.send_request(self.set_mode_client, msg)
            msg = SetBool.Request()
            msg.data = True
            self.send_request(self.awake_client, msg)
            self.stop = False
    rclpy.shutdown()
The system continuously monitors the large model’s output. When an action command containing color_track is identified, a regular expression extracts the color parameter to set the target color and activate the tracking function. Simultaneously, the TTS module converts the text response into voice feedback. Upon task completion, the status flags reset, and the voice wake-up function is re-enabled to await the next command.
11.3 Embodied AI Applications
11.3.1 Large Model API Key Setup
Note
This section requires registering on the official OpenAI website and obtaining an API key for accessing large language models.
11.3.1.1 OpenAI Account Registration and Deployment
Copy and open the following URL: https://platform.openai.com/docs/overview, then click the Sign Up button in the upper-right corner.
Register and log in using a Google, Microsoft, or Apple account, as prompted.
After logging in, click the Settings button, then go to Billing, and click Payment Methods to add a payment method. The payment is used to purchase tokens.
After completing the preparation steps, click API Keys and create a new key. Follow the prompts to fill in the required information, then save the key for later use.
The creation and deployment of the large model have been completed, and this API will be used in the following sections.
11.3.1.2 OpenRouter Account Registration and Deployment
Copy the URL https://openrouter.ai/ into a browser and open the webpage. Click Sign in and register or sign in using a Google account or another available account.
After logging in, click the icon in the top-right corner, then select Credits to add a payment method.
Create an API key. Go to API Keys, then click Create Key. Follow the prompts to generate a key. Save the API key securely for later use.
The creation and deployment of the large model have been completed, and this API will be used in the following sections.
11.3.1.3 API Configuration
Click
to open a terminal and enter the following command to open the configuration file. Press the i key to enter input mode.
vim /home/ubuntu/ros2_ws/src/large_models/large_models/large_models/config.py
Fill in the obtained Large Model API Key in the corresponding parameter, as shown in the red box in the figure below.
Press Esc, then enter the command and press Enter to save and exit the configuration file.
:wq
11.3.2 Version Confirmation
Before starting features, verify that the correct microphone configuration is set in the system.
After remotely logging in via NoMachine, click the desktop icon
to access the configuration interface.Select the appropriate microphone version configuration according to the hardware.
If using the AI Voice Interaction Box, select WonderEcho Pro as the microphone type, as shown in the figure below.
For the 6-Microphone Array, select xf as the microphone type as shown in the figure.
Click Save.
After the Save Success notification appears, click Apply.
Finally, click Quit to exit the software interface.
11.3.3 Real-time Detection
11.3.3.1 Experiment Introduction
After the program starts, the voice device announces I’m ready.
Speak the designated wake word Hello Hiwonder to activate the voice device. The voice device will respond with I‘m here. The robot can then be controlled via voice commands. For instance, say “Tell me what you see”. The terminal will print the recognized speech. The voice device will broadcast the generated response after processing. The robot will autonomously recognize the camera feed and describe the visual content.
11.3.3.2 Preparation
Version Confirmation
Refer to Version Confirmation to ensure the microphone version is correctly configured in the system before running the feature.
Large Model API-KEY Configuration
Refer to Large Model API Key Setup to obtain the API key first, then open the command line terminal  on the left side of the system interface. Enter the following command to open the configuration file and place the OpenAI and OpenRouter keys in their respective positions.
vim /home/ubuntu/ros2_ws/src/large_models/large_models/large_models/config.py
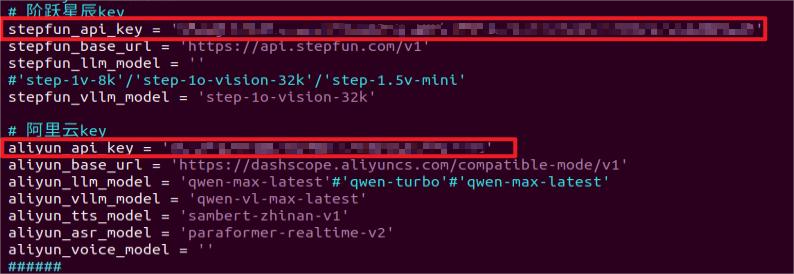
Press the Esc key, then enter the command and press Enter to save the document.
:wq
11.3.3.3 Operation Steps
Note
Command inputs must strictly distinguish between uppercase and lowercase letters and spaces.
Ensure the robot is connected to a network. Configure it to STA local area network mode, or use AP direct connection mode with an Ethernet cable.
Click the icon
 on the left side of the system interface to start the command-line terminal. Enter the command and press Enter to stop the auto-start service.
~/.stop_ros.sh
Open the command line, enter the command, and press Enter to run the real-time detection.
ros2 launch large_models_examples vllm_with_camera.launch.py
When the command line displays the following output and announces I’m ready, it indicates that the voice device has completed initialization. Then, say the wake word Hello Hiwonder to awaken it.
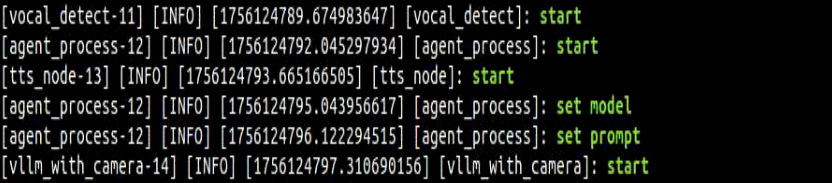
When the command line displays the following output and the voice device announces I‘m here, it indicates activation. The command recording process begins at this point.

The following command line output indicates that the voice device has printed the recognized speech.

The following command line output signifies the successful invocation of the cloud-based large language model voice recognition service to parse the command audio. The parsing result is contained in
publish_asr_result.

The following command line output indicates a successful call to the cloud-based large language model to process the command and provide a language response named
response.


The response is automatically generated, and only the semantic accuracy of the reply is guaranteed. The text arrangement of the reply is random.
The following command line output indicates the end of a round of dialogue interaction. Refer to step 4 to wake up the voice device with the wake word again to start a new round of dialogue interaction.

To stop this feature, simply press Ctrl + C in the terminal interface. If it fails to stop, try multiple times until it ends.
11.3.3.4 Program Outcome
Once the feature is activated, the robot accepts conversational voice commands. For example, say “Tell me what you see”. The robot automatically recognizes the scene within its line of sight, processes the information, and describes the current scene content.
11.3.3.5 Program Analysis
Launch File Analysis
Program path: ros2_ws/src/large_models_examples/large_models_examples/vllm_with_camera.launch.py
Start Launch File
controller_launch = IncludeLaunchDescription(
    PythonLaunchDescriptionSource(
        os.path.join(controller_package_path, 'launch/controller.launch.py')),
)

depth_camera_launch = IncludeLaunchDescription(
    PythonLaunchDescriptionSource(
        os.path.join(peripherals_package_path, 'launch/depth_camera.launch.py')),
)

large_models_launch = IncludeLaunchDescription(
    PythonLaunchDescriptionSource(
        os.path.join(large_models_package_path, 'launch/start.launch.py')),
    launch_arguments={'mode': mode, 'camera_topic': camera_topic}.items(),
)
Start the files related to chassis control, depth camera, and large models.
Start Node
vllm_with_camera_node = Node(
    package='large_models_examples',
    executable='vllm_with_camera',
    output='screen',
    parameters=[{"camera_topic": camera_topic}],
)
Start the vllm_with_camera vision-language control node and configure the camera topic parameters and screen output.
Python File Analysis
Program source code is located at: ros2_ws/src/large_models_examples/large_models_examples/vllm_with_camera.py
Class Initialization
def __init__(self, name):
        rclpy.init()
        super().__init__(name)
        self.image_queue = queue.Queue(maxsize=2)
        self.set_above = False
        self.vllm_result = ''
        self.running = True
        self.action_finish = False
        self.play_audio_finish = False
        self.bridge = CvBridge()
        self.client = speech.OpenAIAPI(api_key, base_url)
        self.declare_parameter('camera_topic', '/depth_cam/rgb/image_raw')
        camera_topic = self.get_parameter('camera_topic').value

        timer_cb_group = ReentrantCallbackGroup()
        self.joints_pub = self.create_publisher(ServosPosition, 'servo_controller', 1)
        self.tts_text_pub = self.create_publisher(String, 'tts_node/tts_text', 1)
        self.create_subscription(Image, camera_topic, self.image_callback, 1)
        self.create_subscription(String, 'agent_process/result', self.vllm_result_callback, 1)
        self.create_subscription(Bool, 'tts_node/play_finish', self.play_audio_finish_callback, 1, callback_group=timer_cb_group)
        self.awake_client = self.create_client(SetBool, 'vocal_detect/enable_wakeup')
        self.awake_client.wait_for_service()
        self.set_model_client = self.create_client(SetModel, 'agent_process/set_model')
        self.set_model_client.wait_for_service()
        self.set_mode_client = self.create_client(SetInt32, 'vocal_detect/set_mode')
        self.set_mode_client.wait_for_service()
        self.set_prompt_client = self.create_client(SetString, 'agent_process/set_prompt')
        self.set_prompt_client.wait_for_service()
        self.timer = self.create_timer(0.0, self.init_process, callback_group=timer_cb_group)
Initializes the node and sets up variables, including vllm processing results and running status. Creates publishers for TTS text and servo control, and subscribers to receive camera images, large model results, and TTS playback completion signals. Creates service clients for large model settings and voice wake-up functions. Finally, creates a timer to start the initialization process.
get_node_stateMethod
def get_node_state(self, request, response):
    return response
Service callback for querying node status.
init_processMethod
def init_process(self):
    self.timer.cancel()

    msg = SetModel.Request()
    msg.model_type = 'vllm'
    if os.environ['ASR_LANGUAGE'] == 'Chinese':
        msg.model = stepfun_vllm_model
        msg.api_key = stepfun_api_key
        msg.base_url = stepfun_base_url
    else:
        msg.model = vllm_model
        msg.api_key = vllm_api_key
        msg.base_url = vllm_base_url
    self.send_request(self.set_model_client, msg)

    msg = SetString.Request()
    msg.data = VLLM_PROMPT
    self.send_request(self.set_prompt_client, msg)

    set_servo_position(self.joints_pub, 1.0,
                       ((19, 500), (20, 720), (21, 130), (22, 150), (23, 500), (24, 700)))  # Set the initial position of the robotic arm
    speech.play_audio(start_audio_path)
    threading.Thread(target=self.process, daemon=True).start()
    self.create_service(Empty, '~/init_finish', self.get_node_state)
        self.get_logger().info('\033[1;32m%s\033[0m' % 'start')
The initialization process starts after the node. It configures large model parameters and the initial position of the robotic arm, and starts the core processing thread.
send_requestMethod
def send_request(self, client, msg):
    future = client.call_async(msg)
    while rclpy.ok():
        if future.done() and future.result():
            return future.result()
Service call tool. Send service requests and wait for the results to return to ensure complete service communication.
vllm_result_callbackMethod
def vllm_result_callback(self, msg):
    self.vllm_result = msg.data
Receives the commands generated by the large model and saves them to the vllm_result variable for subsequent processing.
play_audio_finish_callbackMethod
def play_audio_finish_callback(self, msg):
    self.play_audio_finish = msg.data
Assigns the received boolean message to self.play_audio_finish to determine the audio playback status.
processMethod
def process(self):
    # box = []
    while self.running:
        image = self.image_queue.get(block=True)
        if self.vllm_result:
            msg = String()
            msg.data = self.vllm_result
            self.tts_text_pub.publish(msg)
            self.vllm_result = ''
            self.action_finish = True
        if self.play_audio_finish and self.action_finish:
            self.play_audio_finish = False
            self.action_finish = False

            msg = SetBool.Request()
            msg.data = True
            self.send_request(self.awake_client, msg)
        cv2.imshow('image', cv2.cvtColor(cv2.resize(image, (display_size[0], display_size[1])), cv2.COLOR_RGB2BGR))
        k = cv2.waitKey(1)
        if k != -1:
            break
        if not self.set_above:
            cv2.moveWindow('image', 1920 - display_size[0], 0)
            os.system("wmctrl -r image -b add,above")
            self.set_above = True
    cv2.destroyAllWindows()
Loops to get images from the image queue and detect the vision-language model output. When a valid result is recognized, convert it into a voice message and publish it through TTS. Re-enables the voice wake-up function after the task is completed.
image_callbackMethod
def image_callback(self, ros_image):
    cv_image = self.bridge.imgmsg_to_cv2(ros_image, "rgb8")
    rgb_image = np.array(cv_image, dtype=np.uint8)

    if self.image_queue.full():
        # If the queue is full, discard the oldest image
        self.image_queue.get()
        # Put the image into the queue
    self.image_queue.put(rgb_image)
Converts the received ROS image message to OpenCV format and stores it in the queue.
11.3.4 Visual Tracking
11.3.4.1 Experiment Introduction
After the program starts, the voice device announces I’m ready.
Speak the designated wake word Hello Hiwonder to activate the voice device. The voice device will respond with I‘m here. The robot can then be controlled via voice commands. For instance, say “Follow the person in white clothes ahead”. The terminal will print the recognized speech. The voice device will broadcast the generated response after processing and execute the corresponding action.
11.3.4.2 Preparation
Version Confirmation
Refer to Version Confirmation to ensure the microphone version is correctly configured in the system before running the feature.
Large Model API-KEY Configuration
Refer to Large Model API Key Setup to obtain the API key first, then open the command line terminal on the left side of the system interface. Enter the following command to open the configuration file and place the OpenAI and OpenRouter keys in their respective positions.
vim /home/ubuntu/ros2_ws/src/large_models/large_models/large_models/config.py
Press the Esc key, then enter the command and press Enter to save the document.
:wq
11.3.4.3 Operation Steps
Note
Command inputs must strictly distinguish between uppercase and lowercase letters and spaces.
Ensure the robot is connected to a network. Configure it to STA local area network mode, or use AP direct connection mode with an Ethernet cable.
Click
 to open a command-line terminal, enter the command, and press Enter to stop the auto-start service.
~/.stop_ros.sh
Enter the command and press Enter to run the visual tracking feature.
ros2 launch large_models_examples vllm_track.launch.py
When the command line displays the following output and announces I’m ready, it indicates that the voice device has completed initialization. Then, say the wake word Hello Hiwonder to awaken it.

When the command line displays the following output and the voice device announces I‘m here, it indicates activation. The command recording process begins at this point.

The following command line output indicates that the voice device has printed the recognized speech.

The following command line output signifies the successful invocation of the cloud-based large language model voice recognition service to parse the command audio. The parsing result is contained in
publish_asr_result.

The following command line output indicates a successful call to the cloud-based large language model to process the command, provide a language response named
response, and design actions that conform to the semantics of the command. The response is automatically generated, and only the semantic accuracy of the reply is guaranteed. The text arrangement of the reply is random.

The following command line output indicates the end of a round of dialogue interaction. Refer to step 4 to wake up the voice device with the wake word again to start a new round of dialogue interaction.
To stop this feature, simply press Ctrl + C in the terminal interface. If it fails to stop, try multiple times until it ends.
11.3.4.4 Program Outcome
Once the feature is activated, the robot accepts conversational voice commands. For example, say “Follow the person in white clothes ahead”. The robot will identify the person in white clothes in the frame and stop after reaching a certain distance.
11.3.4.5 Program Analysis
Launch File Analysis
Program path: ros2_ws/src/large_models_examples/large_models_examples/vllm_track.launch.py
Start Launch File
base_launch = IncludeLaunchDescription(
    PythonLaunchDescriptionSource(
        os.path.join(slam_package_path, 'launch/include/robot.launch.py')),
    launch_arguments={
        'sim': 'false',
        'master_name': os.environ['MASTER'],
        'robot_name': os.environ['HOST']
    }.items(),
)

large_models_launch = IncludeLaunchDescription(
    PythonLaunchDescriptionSource(
        os.path.join(large_models_package_path, 'launch/start.launch.py')),
    launch_arguments={'mode': mode}.items(),
)
Starts the robot base startup file and the large model-related startup file.
Start Node
vllm_track_node = Node(
    package='large_models_examples',
    executable='vllm_track',
    output='screen',
)
Starts the vllm_track vision-language tracking node and configures screen output.
Python File Analysis
Program source code is located at: ros2_ws/src/large_models_examples/large_models_examples/vllm_track.py
Define Prompt Template
As an intelligent hexapod robot proficient in image recognition, the capability involves performing precise object detection and localization on received images, outputting the final results according to the Output Format, and then executing tracking.

## 1. Understand Commands
A text command will be provided. Extract the object name from the statement. **The name corresponding to the object must be expressed in English.** **Do not output unmentioned objects.**

## 2. Understand Images
An image will be provided. Locate the top-left and bottom-right pixel coordinates of the target corresponding to the object name in this image. If the target is not found, set xyxy to []. **Do not output unmentioned objects.**
[Special Attention]: Deeply understand the spatial orientation of the objects. The response must integrate the received command and the detection results for the answer.

## Output Format. Please output only the following content and avoid any redundant text.
{
    "object": "name",
    "xyxy": [xmin, ymin, xmax, ymax],
    "response": "Chinese response of 5 to 30 characters"
}
Class Initialization
def __init__(self, name):
    rclpy.init()
    super().__init__(name)
    self.fps = fps.FPS() # Frame rate counter
    self.image_queue = queue.Queue(maxsize=2)
    self.vllm_result = ''
    self.set_above = False
    self.running = True
    self.data = []
    self.box = []
    self.stop = True
    self.start_track = False
    self.action_finish = False
    self.play_audio_finish = False
    self.track = ObjectTracker(use_mouse=True, automatic=True, log=self.get_logger())

    timer_cb_group = ReentrantCallbackGroup()
    self.client = speech.OpenAIAPI(api_key, base_url)
    self.joints_pub = self.create_publisher(ServosPosition, 'servo_controller', 1)
    self.cmv_pub = self.create_publisher(Twist, '/controller/cmd_vel', 1)  # Chassis control
    self.tts_text_pub = self.create_publisher(String, 'tts_node/tts_text', 1)
    self.create_subscription(Bool, 'tts_node/play_finish', self.play_audio_finish_callback, 1, callback_group=timer_cb_group)
    self.create_subscription(String, 'agent_process/result', self.vllm_result_callback, 1)
    self.create_subscription(Bool, 'vocal_detect/wakeup', self.wakeup_callback, 1)

    self.awake_client = self.create_client(SetBool, 'vocal_detect/enable_wakeup')
    self.awake_client.wait_for_service()
    self.set_model_client = self.create_client(SetModel, 'agent_process/set_model')
    self.set_model_client.wait_for_service()
    self.set_mode_client = self.create_client(SetInt32, 'vocal_detect/set_mode')
    self.set_mode_client.wait_for_service()
    self.set_prompt_client = self.create_client(SetString, 'agent_process/set_prompt')
    self.set_prompt_client.wait_for_service()

    image_sub = message_filters.Subscriber(self, Image, 'depth_cam/rgb/image_raw')
    depth_sub = message_filters.Subscriber(self, Image, 'depth_cam/depth/image_raw')

    # Synchronize timestamps, allowing a time error of 0.03s
    sync = message_filters.ApproximateTimeSynchronizer([depth_sub, image_sub], 3, 0.02)
    sync.registerCallback(self.multi_callback)

    # Define PID parameters
    # 0.07, 0, 0.001
    self.pid_params = {
        'kp1': 0.1, 'ki1': 0.0, 'kd1': 0.00,
        'kp2': 0.002, 'ki2': 0.0, 'kd2': 0.0,
    }

    # Dynamically declare parameters
    for param_name, default_value in self.pid_params.items():
        self.declare_parameter(param_name, default_value)
        self.pid_params[param_name] = self.get_parameter(param_name).value

    self.track.update_pid([self.pid_params['kp1'], self.pid_params['ki1'], self.pid_params['kd1']],
                  [self.pid_params['kp2'], self.pid_params['ki2'], self.pid_params['kd2']])

    # Callback function for dynamic updating
    self.add_on_set_parameters_callback(self.on_parameter_update)

    self.timer = self.create_timer(0.0, self.init_process, callback_group=timer_cb_group)
Initializes the node, creates publishers for TTS text and chassis motion control, and creates subscribers for TTS playback completion signals, large model processing results, wake-up signals, and camera images. Creates service clients for voice wake-up and large model settings, and finally creates a timer to start the initialization process.
on_parameter_updateMethod
def on_parameter_update(self, params):
    """Parameter update callback"""
    for param in params:
        if param.name in self.pid_params.keys():
            self.pid_params[param.name] = param.value
    # self.get_logger().info(f'PID parameters updated: {self.pid_params}')
    # Update PID parameters
    self.track.update_pid([self.pid_params['kp1'], self.pid_params['ki1'], self.pid_params['kd1']],
                  [self.pid_params['kp2'], self.pid_params['ki2'], self.pid_params['kd2']])

    return SetParametersResult(successful=True)
Supports modifying PID parameters at runtime to adjust tracking accuracy without restarting the node.
create_update_callbackMethod
def create_update_callback(self, param_name):
    """Generate dynamic update callback"""
    def update_param(msg):
        new_value = msg.data
        self.pid_params[param_name] = new_value
        self.set_parameters([Parameter(param_name, Parameter.Type.DOUBLE, new_value)])
        self.get_logger().info(f'Updated {param_name}: {new_value}')
        # Update PID parameters

    return update_param
Generates a dynamic update callback function for each PID parameter.
get_node_stateMethod
def get_node_state(self, request, response):
    return response
Service callback for querying node status.
init_processMethod
def init_process(self):
    self.timer.cancel()

    msg = SetModel.Request()
    msg.model_type = 'vllm'
    if language == 'Chinese':
        msg.model = stepfun_vllm_model
        msg.api_key = stepfun_api_key
        msg.base_url = stepfun_base_url
    else:
        msg.api_key = vllm_api_key
        msg.base_url = vllm_base_url
        msg.model = vllm_model
    self.send_request(self.set_model_client, msg)

    msg = SetString.Request()
    msg.data = PROMPT
    self.send_request(self.set_prompt_client, msg)

    set_servo_position(self.joints_pub, 1.5, ((24, 700), (23, 500), (22, 100), (21, 100), (20, 750), (19, 500)))
    self.cmv_pub.publish(Twist())
    time.sleep(1.8)
    speech.play_audio(start_audio_path)
    threading.Thread(target=self.process, daemon=True).start()
    threading.Thread(target=self.display_thread, daemon=True).start()
    self.create_service(Empty, '~/init_finish', self.get_node_state)
    self.get_logger().info('\033[1;32m%s\033[0m' % 'start')
    self.get_logger().info('\033[1;32m%s\033[0m' % PROMPT)
Completes the configuration after the node starts, including large model parameters, the initial position of the robotic arm, and startup audio.
send_requestMethod
def send_request(self, client, msg):
    future = client.call_async(msg)
    while rclpy.ok():
        if future.done() and future.result():
            return future.result()
Service call tool, sending service requests and waiting for the results to return to ensure complete service communication.
wakeup_callbackMethod
def wakeup_callback(self, msg):
    if msg.data and self.vllm_result:
        self.get_logger().info('wakeup interrupt')
        self.track.stop()
        self.stop = True
    elif msg.data and not self.stop:
        self.get_logger().info('wakeup interrupt')
        self.track.stop()
        self.stop = True
Responds to the wake-up signal to implement interrupt control during the tracking process.
vllm_result_callbackMethod
def vllm_result_callback(self, msg):
    self.vllm_result = msg.data
Receives the processing results of the large model and stores them in self.vllm_result for subsequent processing.
play_audio_finish_callbackMethod
def play_audio_finish_callback(self, msg):
    self.play_audio_finish = msg.data
Assigns the received boolean message to self.play_audio_finish to determine the audio playback status.
processMethod
def process(self):
    box = ''
    while self.running:
        if self.vllm_result:
            try:
                # self.get_logger().info('vllm_result: %s' % self.vllm_result)
                if self.vllm_result.startswith("```") and self.vllm_result.endswith("```"):
                    self.vllm_result = self.vllm_result.strip("```").replace("json\n", "").strip()
                self.vllm_result = json.loads(self.vllm_result)
                response = self.vllm_result['response']
                msg = String()
                msg.data = response
                self.tts_text_pub.publish(msg)
                box = self.vllm_result['xyxy']
                if box:
                    if language == 'Chinese':
                        box = self.client.data_process(box, 640, 400)
                        self.get_logger().info('box: %s' % str(box))
                    else:
                        box = [int(box[0] * 640), int(box[1] * 400), int(box[2] * 640), int(box[3] * 400)]
                    box = [box[0], box[1], box[2] - box[0], box[3] - box[1]]
                    box[0] = int(box[0] / 640 * display_size[0])
                    box[1] = int(box[1] / 400 * display_size[1])
                    box[2] = int(box[2] / 640 * display_size[0])
                    box[3] = int(box[3] / 400 * display_size[1])
                    self.get_logger().info('box: %s' % str(box))
                    self.box = box
            except (ValueError, TypeError):
                self.box = []
                msg = String()
                msg.data = self.vllm_result
                self.tts_text_pub.publish(msg)
            self.vllm_result = ''
            self.action_finish = True
        else:
            time.sleep(0.02)
        if self.play_audio_finish and self.action_finish:
            self.play_audio_finish = False
            self.action_finish = False
            msg = SetBool.Request()
            msg.data = True
            self.send_request(self.awake_client, msg)
            self.stop = False
When the vision-language model output is detected, parse the detection result and extract the target bounding box coordinates. Convert the coordinate format based on the language environment. If the TTS playback is complete and the action processing is finished, reset the status and call the wake-up service.
display_threadMethod
def display_thread(self):
    # Create a new CUDA context in the current thread
    dev = cuda.Device(0)
    ctx = dev.make_context()
    try:
        model_path = os.path.split(os.path.realpath(__file__))[0]

        back_exam_engine_path = os.path.join(model_path, "resources/models/nanotrack_backbone_exam.engine")
        back_temp_engine_path = os.path.join(model_path, "resources/models/nanotrack_backbone_temp.engine")
        head_engine_path = os.path.join(model_path, "resources/models/nanotrack_head.engine")
        tracker = Tracker(back_exam_engine_path, back_temp_engine_path, head_engine_path)
        while self.running:
            image, depth_image = self.image_queue.get(block=True)
            image = cv2.resize(image, tuple(display_size))
            if self.box:
                self.track.set_track_target(tracker, self.box, image)
                self.start_track = True
                self.box = []
            if self.start_track:
                self.data = self.track.track(tracker, image, depth_image)
                image = self.data[-1]
                twist = Twist()
                twist.linear.x, twist.angular.z = self.data[0], self.data[1]
                self.cmv_pub.publish(twist)
            self.fps.update()
            self.fps.show_fps(image)
            cv2.imshow('image', image)
            key = cv2.waitKey(1)
            if key == ord('q') or key == 27:  # Press q or esc to exit
                self.cmv_pub.publish(Twist())
                self.running = False
            if not self.set_above:
                cv2.moveWindow('image', 1920 - display_size[0], 0)
                os.system("wmctrl -r image -b add,above")
                self.set_above = True

        cv2.destroyAllWindows()
    finally:
        # Ensure the context is properly released
        ctx.pop()
Initializes the tracker, processes camera images, executes object tracking, and controls chassis motion.
multi_callbackMethod
def multi_callback(self, depth_image, ros_image):
    depth_frame = np.ndarray(shape=(depth_image.height, depth_image.width), dtype=np.uint16, buffer=depth_image.data)
    rgb_image = np.ndarray(shape=(ros_image.height, ros_image.width, 3), dtype=np.uint8, buffer=ros_image.data)  # Convert the custom image message into an image
    # bgr_image = cv2.cvtColor(rgb_image, cv2.COLOR_RGB2BGR)
    if self.image_queue.full():
        # If the queue is full, discard the oldest image
        self.image_queue.get()
    # Put the image into the queue
    self.image_queue.put([rgb_image, depth_frame])
Receives the camera’s depth and RGB images, convert the formats, and store them in the image queue.
11.3.5 Smart Home Assistant
11.3.5.1 Experiment Introduction
After the program starts, the voice device announces I’m ready.
Speak the designated wake word Hello Hiwonder to activate the voice device. It will respond with I‘m here. After activation, the robot can be controlled via voice commands. For instance, issue the command “Go to the front desk to see if the main door is closed, and then come back to report.” The terminal will print the recognized speech. The voice device will broadcast the generated response after processing and synchronously execute the corresponding action.
11.3.5.2 Preparation
Version Confirmation
Refer to Version Confirmation to ensure the microphone version is correctly configured in the system before running the feature.
Large Model API-KEY Configuration
Refer to Large Model API Key Setup to obtain the API key first, then open the command line terminal on the left side of the system interface. Enter the following command to open the configuration file and place the OpenAI and OpenRouter keys in their respective positions.
vim /home/ubuntu/ros2_ws/src/large_models/large_models/large_models/config.py
Press the Esc key, then enter the command and press Enter to save the document.
:wq
Navigation Map Construction
Before enabling the function, a map needs to be established first. Refer to 5. Mapping and Navigation Course / 1 Mapping Tutorial for detailed information.
11.3.5.3 Operation Steps
Note
Command inputs must strictly distinguish between uppercase and lowercase letters and spaces.
Ensure the robot is connected to a network. Configure it to STA local area network mode, or use AP direct connection mode with an Ethernet cable.
Since Jetson Nano has limited processing performance, severe interface lag may occur when RViz is opened on the robot system. In this case, RViz can be run in a virtual machine to assist with navigation.
Click the icon
on the left side of the system interface to open a command-line terminal. Enter the command, and press Enter to stop the auto-start service.
~/.stop_ros.sh
Enter the command and press Enter to run the smart home assistant feature.
ros2 launch large_models_examples vllm_navigation.launch.py map:=map_01
Refer to 5. Mapping and Navigation Course to configure the robot and the virtual machine on the same LAN. After opening the map in
RVizfrom the virtual machine terminal, click the2D Pose Estimateicon to set the robot’s initial position.
rviz -d ~/ros2_ws/src/navigation/rviz/navigation_transport.rviz
When the command line displays the following output and announces I’m ready, it indicates that the voice device has completed initialization. Then, say the wake word Hello Hiwonder to awaken it.

When the command line displays the following output and the voice device announces I‘m here, it indicates activation. The command recording process begins at this point.

The following command line output indicates that the voice device has printed the recognized speech.

The following command line output signifies the successful invocation of the cloud-based large language model voice recognition service to parse the command audio. The parsing result is contained in
publish_asr_result.

The following command line output indicates a successful call to the cloud-based large language model to process the command, provide a language response named
response, and design actions that conform to the semantics of the command. The response is automatically generated, and only the semantic accuracy of the reply is guaranteed. The text arrangement of the reply is random.

The robot arrives at the front desk and identifies the status of the door.
The robot returns to the starting point and replies whether the door is closed. For example, “The door is open. Please remember to close it properly to ensure security and privacy.”
The following command line output indicates the end of a round of dialogue interaction. Refer to step 5 to wake up the voice device with the wake word again to start a new round of dialogue interaction.
To stop this feature, simply press Ctrl + C in the terminal interface. If it fails to stop, try multiple times until it ends.
11.3.5.4 Program Outcome
Once the feature is activated, the robot accepts conversational voice commands. For example, say “Go to the front desk to see if the main door is closed, and then come back to report.” The robot navigates to the set front desk location, checks whether the main door is closed, and then returns to the origin point to report the result.
11.3.5.5 Navigation Position Modification
To modify the navigation position in the program, edit the file: ros2_ws/src/large_models_examples/large_models_examples/vllm_navigation.py
Start the program to open the rviz map display, and then set the navigation target position by clicking 2D Goal Pose on the map.
Return to the command terminal to view the published target position parameters:

Find the part of the program shown in the following figure, and fill in the desired target location parameters behind the corresponding location names:

The different positions in the program express the relative position of the target navigation point with respect to the map origin, which is the starting point of the robot during mapping.
The 5 parameters represent respectively:
x coordinate in meters
y coordinate in meters
roll angle rotating around the x-axis in degrees
pitch angle rotating around the y-axis in degrees
yaw angle rotating around the z-axis in degrees
For example, converting the quaternion with x=0.0, y=0.0, z=-0.5677173914973032, and w=0.8232235197025761 to Euler angles roll, pitch, and yaw yields roll ≈ 0°, pitch ≈ 0°, and yaw ≈ -69.3°.
11.3.5.6 Program Analysis
Launch File Analysis
Program path: ros2_ws/src/large_models_examples/large_models_examples/vllm_navigation.launch.py
Start Launch File
navigation_launch = IncludeLaunchDescription(
    PythonLaunchDescriptionSource(os.path.join(navigation_package_path, 'launch/navigation.launch.py')),
    launch_arguments={
        'sim': 'false',
        'map': map_name,
        'robot_name': robot_name,
        'master_name': master_name,
        'use_teb': 'true',
    }.items(),
)

large_models_launch = IncludeLaunchDescription(
    PythonLaunchDescriptionSource(
        os.path.join(large_models_package_path, 'launch/start.launch.py')),
    launch_arguments={'mode': mode}.items(),
)
Starts the files related to the navigation system and large models.
Start Node
navigation_controller_node = Node(
    package='large_models_examples',
    executable='navigation_controller',
    output='screen',
    parameters=[{'map_frame': 'map', 'nav_goal': '/nav_goal'}]
)

rviz_node = ExecuteProcess(
        cmd=['rviz2', 'rviz2', '-d', os.path.join(navigation_package_path, 'rviz/navigation_controller.rviz')],
        output='screen'
    )

vllm_navigation_node = Node(
    package='large_models_examples',
    executable='vllm_navigation',
    output='screen',
)
Starts the navigation control node, RViz visualization, and large model navigation node.
Python File Analysis
Program path: ros2_ws/src/large_models_examples/large_models_examples/vllm_navigation.py
Define Prompt Template
## Role Task
The system acts as an intelligent hexapod robot equipped with a camera and a speaker capable of answering questions via audio playback. Corresponding JSON commands must be generated based on the input content.

## Requirements
1. Any input content must be matched with corresponding commands in the action function library and the corresponding JSON commands must be output.
2. Craft a concise 5 to 20 words humorous and highly varied feedback message for each action sequence to make the interaction engaging.
3. Output the JSON result directly without any analysis or redundant content.
4. Format: {"action": ["xx", "xx"], "response": "xx"}

## Special Notes
- The "action" key holds an array of function name strings arranged in execution order. When no corresponding action function is found the action outputs [].
- The "response" key is paired with a carefully crafted short reply that perfectly fits the above word count and style requirements.

## Action Function Library
- Move to a specified location: move('Kitchen')
- Return to the starting point: move('Starting point')
- Detect the visual frame: vision('What do you see')
- Play audio: play_audio()

## Task Example
Input: Go to the Zoo and find what animals are there, then come back to tell me.
Output: {"action": ["move('Zoo')","vision('what animal exist')", "move("starting point")", "play_audio()"], "response": "Copy that"}
Class Initialization
def __init__(self, name):
    rclpy.init()
    super().__init__(name)

    self.action = []
    self.response_text = ''
    self.llm_result = ''
    self.play_audio_finish = False
    self.running = True
    self.play_delay = False
    self.reach_goal = False
    self.interrupt = False

    timer_cb_group = ReentrantCallbackGroup()
    self.tts_text_pub = self.create_publisher(String, 'tts_node/tts_text', 1)
    # self.create_subscription(Image, 'depth_cam/rgb/image_raw', self.image_callback, 1)
    self.create_subscription(String, 'agent_process/result', self.llm_result_callback, 1)
    self.create_subscription(Bool, 'vocal_detect/wakeup', self.wakeup_callback, 1)
    self.create_subscription(Bool, 'tts_node/play_finish', self.play_audio_finish_callback, 1, callback_group=timer_cb_group)
    self.create_subscription(Bool, 'navigation_controller/reach_goal', self.reach_goal_callback, 1)
    self.awake_client = self.create_client(SetBool, 'vocal_detect/enable_wakeup')
    self.awake_client.wait_for_service()
    self.set_mode_client = self.create_client(SetInt32, 'vocal_detect/set_mode')
    self.set_mode_client.wait_for_service()
    self.set_model_client = self.create_client(SetModel, 'agent_process/set_model')
    self.set_model_client.wait_for_service()
    self.set_prompt_client = self.create_client(SetString, 'agent_process/set_prompt')
    self.set_prompt_client.wait_for_service()
    self.set_vllm_content_client = self.create_client(SetContent, 'agent_process/set_vllm_content')
    self.set_vllm_content_client.wait_for_service()
    self.set_pose_client = self.create_client(SetPose2D, 'navigation_controller/set_pose')
    self.set_pose_client.wait_for_service()

    self.agc = ActionGroupController(self.create_publisher(ServosPosition, 'servo_controller', 1), '/home/ubuntu/software/actionset_editor/ActionGroups')

    self.timer = self.create_timer(0.0, self.init_process, callback_group=timer_cb_group)
Initializes the node and sets variables, including action lists, response texts, LLM processing results, and navigation target arrival states. Creates publishers for TTS text and subscribers for receiving LLM processing results, voice wake-up signals, audio playback completion states, and navigation arrival states. Establishes service clients for voice wake-up, large model settings, prompt configurations, and navigation target point settings. Finally, creates a timer to start the initialization process.
get_node_stateMethod
def get_node_state(self, request, response):
    return response
Service callback for querying node status.
init_processMethod
def init_process(self):
    self.timer.cancel()

    msg = SetModel.Request()
    msg.model = llm_model
    msg.model_type = 'llm'
    msg.api_key = api_key
    msg.base_url = base_url
    self.send_request(self.set_model_client, msg)

    msg = SetString.Request()
    msg.data = LLM_PROMPT
    self.send_request(self.set_prompt_client, msg)

    init_finish = self.create_client(Empty, 'navigation_controller/init_finish')
    init_finish.wait_for_service()
    speech.play_audio(start_audio_path)
    threading.Thread(target=self.process, daemon=True).start()
    self.create_service(Empty, '~/init_finish', self.get_node_state)
    self.get_logger().info('\033[1;32m%s\033[0m' % 'start')
    self.get_logger().info('\033[1;32m%s\033[0m' % LLM_PROMPT)
Completes the configuration after the node starts, including large model parameters, prompt loading, and startup audio playback.
send_requestMethod
def send_request(self, client, msg):
    future = client.call_async(msg)
    while rclpy.ok():
        if future.done() and future.result():
            return future.result()
Service call tool, sending service requests and waiting for the results to return to ensure complete service communication.
wakeup_callbackMethod
def wakeup_callback(self, msg):
    self.get_logger().info('wakeup interrupt')
    self.interrupt = msg.data
Receives and processes wake-up signals for interrupt judgment during subsequent action execution.
llm_result_callbackMethod
def llm_result_callback(self, msg):
    self.llm_result = msg.data
Receives the command results parsed by the large model and stores them in self.llm_result for subsequent processing.
moveMethod
def move(self, position):
    self.get_logger().info('position: %s' % str(position))
    msg = SetPose2D.Request()
    p = position_dict[position]
    msg.data.x = float(p[0])
    msg.data.y = float(p[1])
    msg.data.roll = p[2]
    msg.data.pitch = p[3]
    msg.data.yaw = p[4]
    self.send_request(self.set_pose_client, msg)
Receives position parameters to query the corresponding coordinate and posture information, including x and y coordinates as well as roll, pitch, and yaw rotation angles. Creates a SetPose2D type service request message, fills in the data, and sends it to the navigation server to implement the robot’s navigation to the specified preset position.
play_audioMethod
def play_audio(self):
    msg = String()
    msg.data = self.response_text
    self.get_logger().info(f'{self.response_text}')
    while not self.play_audio_finish:
        time.sleep(0.1)
    self.play_audio_finish = False
    self.tts_text_pub.publish(msg)
    self.response_text = ''
Publishes the feedback text to the TTS topic for voice broadcasting.
reach_goal_callbackMethod
def reach_goal_callback(self, msg):
    self.get_logger().info('reach goal')
    self.reach_goal = msg.data
Receive the target arrival status message published by the navigation controller to mark the completion of the navigation action.
visionMethod
def vision(self, query):
    msg = SetContent.Request()
    if language == 'Chinese':
        msg.api_key = stepfun_api_key
        msg.base_url = stepfun_base_url
        msg.model = stepfun_vllm_model
    else:
        msg.api_key = vllm_api_key
        msg.base_url = vllm_base_url
        msg.model = vllm_model
    msg.prompt = VLLM_PROMPT
    msg.query = query
    self.get_logger().info('vision: %s' % query)
    res = self.send_request(self.set_vllm_content_client, msg)
    return res.message
Executes the visual detection task, sending visual query commands to the large model to obtain detection results.
play_audio_finish_callbackMethod
def play_audio_finish_callback(self, msg):
    self.play_audio_finish = msg.data
Assigns the received boolean message to self.play_audio_finish to determine the audio playback status.
processMethod
def process(self):
    first = True
    while self.running:
        if self.llm_result:
            self.interrupt = False
            msg = String()
            if 'action' in self.llm_result: # Extract and process if there is a corresponding action returned
                result = json.loads(self.llm_result[self.llm_result.find('{'):self.llm_result.find('}')+1])
                if 'response' in result:
                    msg.data = result['response']
                    self.tts_text_pub.publish(msg)
                if 'action' in result:
                    action = result['action']
                    self.get_logger().info(f'vllm action: {action}')
                    for a in action:
                        if 'move' in a:
                            self.reach_goal = False
                            eval(f'self.{a}')
                            while not self.reach_goal:
                                if self.interrupt:
                                    self.get_logger().info('interrupt')
                                    break
                                # self.get_logger().info('waiting for reach goal')
                                time.sleep(0.01)
                        elif 'vision' in a:
                            res = eval(f'self.{a}')
                            self.response_text = res
                            self.get_logger().info(f'vllm response: {res}')
                        elif 'play_audio' in a:
                            eval(f'self.{a}')
                            while not self.play_audio_finish:
                                time.sleep(1)
                        if self.interrupt:
                            self.get_logger().info('interrupt')
                            break
            else: # No corresponding action, answer only
                msg.data = self.llm_result
                self.tts_text_pub.publish(msg)
            self.action_finish = True
            self.llm_result = ''
        else:
            time.sleep(0.01)
        if self.play_audio_finish and self.action_finish:
            self.play_audio_finish = False
            self.action_finish = False
            msg = SetBool.Request()
            msg.data = True
            self.send_request(self.awake_client, msg)

    rclpy.shutdown()
Detects the large model output and parses the action list and response text. If there is a movement command, execute navigation and wait to reach the target point, supporting interrupt mechanisms. If there is a visual command, execute a visual query and record the result. If there is an audio command, send the text response to the TTS module for voice broadcasting. If there is only a text response, only provide voice feedback. Finally, re-enable the voice wake-up function after the task is completed and wait for the next command.
11.3.6 Intelligent Transport
11.3.6.1 Experiment Introduction
After the program starts, the voice device announces I’m ready.
Speak the designated wake word Hello Hiwonder to activate the voice device. It will respond with I‘m here. After activation, the robot can be controlled via voice commands. For instance, issue the command “Put the red block into the blue box”. The terminal will print the recognized speech. The voice device will broadcast the generated response after processing and synchronously execute the corresponding action.
11.3.6.2 Preparation
Version Confirmation
Refer to Version Confirmation to ensure the microphone version is correctly configured in the system before running the feature.
Large Model API-KEY Configuration
Refer to Large Model API Key Setup to obtain the API key first, then open the command line terminal on the left side of the system interface. Enter the following command to open the configuration file and place the OpenAI and OpenRouter keys in their respective positions.
vim /home/ubuntu/ros2_ws/src/large_models/large_models/large_models/config.py
Press the Esc key, then enter the command and press Enter to save the document.
:wq
Pick and Place Calibration
Before enabling intelligent transport, adjust the picking deviation first. If the robotic arm fails to pick up the color block during the application, refer to this step for pick calibration. The specific steps are as follows:
Click the icon
on the left side of the system interface to open a command-line terminal. Enter the command and press Enter to stop the app auto-start service:
sudo systemctl stop start_app_node.service
Enter the command to start calibrating the picking position:
ros2 launch large_models_examples automatic_pick.launch.py debug:=pick
The robotic arm will perform a picking calibration action and place the block at the claw’s picking location. Wait until the robotic arm returns to its original posture. Then, press the left mouse button on the screen and drag to select the target object. After the frame accurately recognizes the block, start the target position picking calibration. The robot will automatically calibrate the recognized object.
The place calibration step is the same as the pick calibration step. Run the following program for place calibration:
ros2 launch large_models_examples automatic_pick.launch.py debug:=place
Navigation Map Construction
Before enabling the function, a map needs to be established first by referring to 5. Mapping and Navigation Course / 5.2 Mapping Tutorial.
11.3.6.3 Operation Steps
Note
Command inputs must strictly distinguish between uppercase and lowercase letters and spaces.
Ensure the robot is connected to a network. Configure it to STA local area network mode, or use AP direct connection mode with an Ethernet cable.
Since Jetson Nano has limited processing performance, severe interface lag may occur when RViz is opened on the robot system. In this case, RViz can be run in a virtual machine to assist with navigation.
Click the icon
on the left side of the system interface to start the command-line terminal. Enter the command and press Enter to stop the auto-start service.
~/.stop_ros.sh
If a map is not yet available, refer to 5. Mapping and Navigation Course / 5.2 Mapping Tutorial to build a map first.
Enter the command and press Enter to run the intelligent transport feature.
ros2 launch large_models_examples vllm_navigation_transport.launch.py map:=map_01
Refer to 5. Mapping and Navigation Course to configure the robot and the virtual machine on the same LAN. After opening the map in
RVizfrom the virtual machine terminal, click the2D Pose Estimateicon to set the robot’s initial position.
rviz -d ~/ros2_ws/src/navigation/rviz/navigation_transport.rviz
When the command line displays the following output and announces I’m ready, it indicates that the voice device has completed initialization. Then, say the wake word Hello Hiwonder to awaken it.

When the command line displays the following output and the voice device announces I‘m here, it indicates activation. The command recording process begins at this point. The command spoken is recorded at this moment. Proceed to speak the command “Put the red block into the blue box”, and then wait for the large model’s recognition.

The following command line output signifies the successful invocation of the cloud-based large language model voice recognition service to parse the command audio. The parsing result is contained in
publish_asr_result.

The following command line output indicates a successful call to the cloud-based large language model to process the command, provide a language response named
response, and design actions that conform to the semantics of the command. The response is automatically generated, and only the semantic accuracy of the reply is guaranteed. The text arrangement of the reply is random.

The robot will first navigate to the red block to pick it up.
Next, it will navigate to the blue box and place the block inside it.
The following command line output indicates the end of a round of dialogue interaction. Refer to step 6 to wake up the voice device with the wake word again to start a new round of dialogue interaction.

To stop this feature, simply press Ctrl + C in the terminal interface. If it fails to stop, try multiple times until it ends.
11.3.6.4 Program Outcome
Once the feature is activated, the robot accepts conversational voice commands. For example, say “Put the red block into the blue box”. The robot will first navigate to the red block to pick it up, then proceed to the blue box navigation point and place the block into it.
11.3.6.5 Navigation Position Modification
To modify the navigation position in the program, edit the file: ros2_ws/src/large_models_examples/large_models_examples/navigation_transport/vllm_navigation_transport.py
Start the program to open the rviz map display, and then set the navigation target position by clicking 2D Goal Pose on the map.
Return to the command terminal to view the published target position parameters:

Find the part of the program shown in the following figure, and fill in the desired target location parameters behind the corresponding location names:

The different positions in the program express the relative position of the target navigation point with respect to the map origin, which is the starting point of the robot during mapping.
The 5 parameters represent respectively:
x coordinate in meters
y coordinate in meters
roll angle rotating around the x-axis in degrees
pitch angle rotating around the y-axis in degrees
yaw angle rotating around the z-axis in degrees
For example, converting the quaternion with x=0.0, y=0.0, z=-0.5677173914973032, and w=0.8232235197025761 to Euler angles roll, pitch, and yaw yields roll ≈ 0°, pitch ≈ 0°, and yaw ≈ -69.3°.
11.3.6.6 Program Analysis
Launch File Analysis
Program path: ros2_ws/src/large_models_examples/large_models_examples/navigation_transport/vllm_navigation_transport.launch.py
Start Launch File
navigation_controller_launch = IncludeLaunchDescription(
    PythonLaunchDescriptionSource(os.path.join(navigation_package_path, 'large_models_examples/navigation_transport/navigation_transport.launch.py')),
    launch_arguments={
        'map': map_name,
        'debug': 'false',
        'robot_name': robot_name,
        'master_name': master_name,
    }.items(),
)

large_models_launch = IncludeLaunchDescription(
    PythonLaunchDescriptionSource(
        os.path.join(large_models_package_path, 'launch/start.launch.py')),
    launch_arguments={'mode': mode}.items(),
)
Starts the files related to navigation handling and large models.
Start Node
vllm_navigation_transport_node = Node(
    package='large_models_examples',
    executable='vllm_navigation_transport',
    output='screen',
)
Starts the large model navigation handling node.
Python File Analysis
Program path: ros2_ws/src/large_models_examples/large_models_examples/navigation_transport/vllm_navigation_transport.py
Define Prompt Template
LLM_PROMPT = '''
# Role Task
As a language expert, profound comprehension of commands is required.

## Skill Details
* Analyze commands to treat one pick and one place as a single action.
* Possess strong logical reasoning to understand object modifiers.
* Accurately extract the target objects for picking and placing.

 ## Requirements and Restrictions
1. Find and output the corresponding commands from the function library based on the input content.
2. Multiple actions must be placed in a list.
3. Craft a concise 10 to 30 word humorous and highly varied feedback message for the action sequence to make the interaction engaging.
4. Handling is divided into two phases: moving to the destination to pick up the object and moving to the target point to place it down.
5. Movement is required between picking and placing. If the movement destination is not specified, the move action is not executed by default.
6. Locations are limited to the following: blue block, blue box, red block, red box, green block, green box, and origin.
7. Output the JSON format data directly without any analysis or redundant content.
8. Only cubes with red, green, or blue colors are considered blocks. Do not recognize the ground. The response must not output terms like task completed.
9. Format: {"action":"xx", "response":"xx"}

## Available Functions and Operations
* Pick up the object: pick('红色方块')
* Place on the specified object: place('红色盒子')
* Move to the specified position: move('原点')

## Examples
Input: 将红色方块放到对应颜色的盒子里
Output: {"action": ["move('红色方块')","pick('红色方块')", "move('红色盒子')", "place('红色盒子')"], "response": "好的,马上就是办"}
Input: 将蓝色方块放到蓝色的盒子里
Output: {"action": ["move('蓝色方块')","pick('蓝色方块')", "move('蓝色盒子')", "place('蓝色盒子')"], "response": "好的,开始执行任务"}
    '''

    VLLM_PROMPT = '''
As an image recognition expert, the capability involves performing precise object detection and localization on received images, and outputting the final results according to the Output Format.

## 1. Understand Commands
A text command will be provided. Make the optimal decision based on the command and extract the object name from the decision. **The name corresponding to the object must be expressed in English.** **Do not output unmentioned objects.**

## 2. Understand Images
An image will be provided. Determine if the target corresponding to the object name in this image has a graspable area. If so, output the top-left and bottom-right pixel coordinates. **Do not output unmentioned objects.**
[Special Attention]: Deeply understand the spatial orientation between objects.

## Output Format. Please output only the following content and avoid any redundant text.
{
    "object": name,
    "xyxy": [xmin, ymin, xmax, ymax]
}
    '''
Class Initialization
def __init__(self, name):
    rclpy.init()
    super().__init__(name)

    self.action = []
    self.response_text = ''
    self.llm_result = ''
    self.action_finish = False
    self.transport_action_finish = False
    self.play_audio_finish = False
    self.running = True
    self.reach_goal = False
    self.interrupt = False
    self.bridge = CvBridge()
    self.image_queue = queue.Queue(maxsize=2)
    timer_cb_group = ReentrantCallbackGroup()
    self.client = speech.OpenAIAPI(api_key, base_url)
    self.tts_text_pub = self.create_publisher(String, 'tts_node/tts_text', 1)
    self.create_subscription(Image, 'automatic_pick/image_result', self.image_callback, 1)
    self.create_subscription(String, 'agent_process/result', self.llm_result_callback, 1)
    self.create_subscription(Bool, 'vocal_detect/wakeup', self.wakeup_callback, 1)
    self.create_subscription(Bool, 'tts_node/play_finish', self.play_audio_finish_callback, 1, callback_group=timer_cb_group)
    self.create_subscription(Bool, 'navigation_controller/reach_goal', self.reach_goal_callback, 1)
    self.create_subscription(Bool, 'automatic_pick/action_finish', self.action_finish_callback, 1)
    self.awake_client = self.create_client(SetBool, 'vocal_detect/enable_wakeup')
    self.awake_client.wait_for_service()
    self.set_mode_client = self.create_client(SetInt32, 'vocal_detect/set_mode')
    self.set_mode_client.wait_for_service()
    self.set_model_client = self.create_client(SetModel, 'agent_process/set_model')
    self.set_model_client.wait_for_service()
    self.set_prompt_client = self.create_client(SetString, 'agent_process/set_prompt')
    self.set_prompt_client.wait_for_service()
    self.set_vllm_content_client = self.create_client(SetContent, 'agent_process/set_vllm_content')
    self.set_vllm_content_client.wait_for_service()
    self.set_pose_client = self.create_client(SetPose2D, 'navigation_controller/set_pose')
    self.set_pose_client.wait_for_service()
    # self.set_target_client = self.create_client(SetPoint, 'automatic_pick/set_target_color')
    # self.set_target_client.wait_for_service()
    self.set_box_client = self.create_client(SetBox, 'automatic_pick/set_box')
    self.set_box_client.wait_for_service()
    self.set_pick_client = self.create_client(Trigger, 'automatic_pick/pick')
    self.set_pick_client.wait_for_service()
    self.set_place_client = self.create_client(Trigger, 'automatic_pick/place')
    self.set_place_client.wait_for_service()
    self.timer = self.create_timer(0.0, self.init_process, callback_group=timer_cb_group)
Initializes the node and defines variables such as action status and large model results. Creates publishers for TTS text and subscribers for images, large model processing results, wake-up signals, voice playback completion signals, navigation target arrival signals, and pick/place action completion signals. Creates service clients for wake-up enablement, large model settings, prompt settings, navigation target point settings, and pick/place commands. Finally, triggers the initialization process through a timer.
get_node_stateMethod
def get_node_state(self, request, response):
    return response
Service callback for querying node status.
init_processMethod
def init_process(self):
    self.timer.cancel()

    msg = SetModel.Request()
    msg.model = llm_model
    msg.model_type = 'llm'
    msg.api_key = api_key
    msg.base_url = base_url
    self.send_request(self.set_model_client, msg)

    msg = SetString.Request()
    msg.data = LLM_PROMPT
    self.send_request(self.set_prompt_client, msg)

    init_finish = self.create_client(Empty, 'navigation_controller/init_finish')
    init_finish.wait_for_service()
    speech.play_audio(start_audio_path)
    threading.Thread(target=self.process, daemon=True).start()
    self.create_service(Empty, '~/init_finish', self.get_node_state)
    self.get_logger().info('\033[1;32m%s\033[0m' % 'start')
Completes the configuration after the node starts, including large model parameters, prompt loading, and startup audio playback.
send_requestMethod
def send_request(self, client, msg):
    future = client.call_async(msg)
    while rclpy.ok():
        if future.done() and future.result():
            return future.result()
Service call tool, sending service requests and waiting for the results to return to ensure complete service communication.
wakeup_callbackMethod
def wakeup_callback(self, msg):
    self.interrupt = msg.data
Responds to the wake-up signal and marks the current action to be interrupted.
llm_result_callbackMethod
def llm_result_callback(self, msg):
    self.llm_result = msg.data
Receives the action sequence and feedback text parsed by the large model and stores them in self.llm_result.
moveMethod
def move(self, position):
    self.get_logger().info('position: %s' % str(position))
    msg = SetPose2D.Request()
    if position in position_dict:
        p = position_dict[position]
        msg.data.x = float(p[0])
        msg.data.y = float(p[1])
        msg.data.roll = p[2]
        msg.data.pitch = p[3]
        msg.data.yaw = p[4]
        self.send_request(self.set_pose_client, msg)
        return True
    else:
        return False
Receives position parameters to query the corresponding coordinate and posture information, including x and y coordinates as well as roll, pitch, and yaw rotation angles. Creates a SetPose2D type service request message, fills in the data, and sends it to the navigation server to implement the robot’s navigation to the specified preset position.
reach_goal_callbackMethod
def reach_goal_callback(self, msg):
    self.get_logger().info('reach goal')
    self.reach_goal = msg.data
Receives the target arrival status message published by the navigation controller to mark the completion of the navigation action.
action_finish_callbackMethod
def action_finish_callback(self, msg):
    self.get_logger().info('action finish')
    self.transport_action_finish = msg.data
Receives the completion signal for picking or placing and marks the end of a single pick or place action.
get_object_positionMethod
def get_object_position(self, query, image):
    msg = SetContent.Request()
    if language == 'Chinese':
        msg.model = stepfun_vllm_model
        msg.api_key = stepfun_api_key
        msg.base_url = stepfun_base_url
    else:
        msg.api_key = vllm_api_key
        msg.base_url = vllm_base_url
        msg.model = vllm_model
    msg.prompt = VLLM_PROMPT
    msg.query = query
    msg.image = self.bridge.cv2_to_imgmsg(image, "bgr8")

    self.get_logger().info('vision: %s' % query)
    self.get_logger().info('send image')
    res = self.send_request(self.set_vllm_content_client, msg)
    vllm_result = res.message
    self.get_logger().info('vllm_result: %s' % vllm_result)
    if 'object' in vllm_result:
        if vllm_result.startswith("```") and vllm_result.endswith("```"):
            vllm_result = vllm_result.strip("```").replace("json\n", "").strip()
        # self.get_logger().info('vllm_result: %s' % vllm_result)
        vllm_result = json.loads(vllm_result[vllm_result.find('{'):vllm_result.find('}')+1])
        box = vllm_result['xyxy']
        h, w = image.shape[:2]
        if language == 'Chinese':
            box = self.client.data_process(box, w, h)
            self.get_logger().info('box: %s' % str(box))
        else:
            box = [int(box[0] * w), int(box[1] * h), int(box[2] * w), int(box[3] * h)]
        cv2.rectangle(image, (box[0], box[1]), (box[2], box[3]), (255, 0, 0), 2, 1)
        return box
    else:
        msg = String()
        msg.data = str(vllm_result)
        self.tts_text_pub.publish(vllm_result)
        return []
Utilizes the large model for visual positioning to obtain the coordinates of the target object’s picking area.
pickMethod
def pick(self, query):
    self.send_request(self.set_pick_client, Trigger.Request())
    image = self.image_queue.get(block=True)
    box = self.get_object_position(query, image)
    if box:
        msg = SetBox.Request()
        msg.x_min = box[0]
        msg.y_min = box[1]
        msg.x_max = box[2]
        msg.y_max = box[3]
        self.send_request(self.set_box_client, msg)
Triggers the pick action while acquiring the visual positioning coordinates of the target object to be used for picking.
placeMethod
def place(self, query):
    self.get_logger().info('place: %s' % query)
    self.send_request(self.set_place_client, Trigger.Request())
    image = self.image_queue.get(block=True)
    h, _ = image.shape[:2]
    image = image[:int(h*0.7), :] #0:300
    box = self.get_object_position(query, image)
    if box:
        msg = SetBox.Request()
        msg.x_min = box[0]
        msg.y_min = box[1]
        msg.x_max = box[2]
        msg.y_max = box[3]
        self.send_request(self.set_box_client, msg)
Triggers the placement action while acquiring the visual positioning coordinates of the placement target to be used for placement.
play_audio_finish_callbackMethod
def play_audio_finish_callback(self, msg):
    self.play_audio_finish = msg.data
Assigns the received boolean message to self.play_audio_finish to determine the audio playback status.
processMethod
def process(self):
    while self.running:
        if self.llm_result:
            self.interrupt = False
            msg = String()
            if 'action' in self.llm_result: # Extract and process if there is a corresponding behavior return
                result = eval(self.llm_result[self.llm_result.find('{'):self.llm_result.find('}')+1])
                if 'response' in result:
                    msg.data = result['response']
                    self.tts_text_pub.publish(msg)
                if 'action' in result:
                    action = result['action']
                    self.get_logger().info(f'vllm action: {action}')
                    for a in action:
                        if 'move' in a:
                            self.reach_goal = False
                            res = eval(f'self.{a}')
                            if res:
                                while not self.reach_goal:
                                    # if self.interrupt:
                                        # self.get_logger().info('interrupt')
                                        # break
                                    # self.get_logger().info('waiting for reach goal')
                                    time.sleep(0.01)
                            else:
                                self.get_logger().info('cannot move to %s' % a)
                                break
                        elif 'pick' in a or 'place' in a:
                            time.sleep(3.0)
                            eval(f'self.{a}')
                            self.transport_action_finish = False
                            while not self.transport_action_finish:
                                # if self.interrupt:
                                    # self.get_logger().info('interrupt')
                                    # break
                                time.sleep(0.01)
                        # if self.interrupt:
                            # self.get_logger().info('interrupt')
                            # break
            else: # No corresponding behavior, only answer
                msg.data = self.llm_result
                self.tts_text_pub.publish(msg)
            self.action_finish = True
            self.llm_result = ''
        else:
            time.sleep(0.01)
        if self.play_audio_finish and self.action_finish:
            self.play_audio_finish = False
            self.action_finish = False
            msg = SetBool.Request()
            msg.data = True
            self.send_request(self.awake_client, msg)
            # msg = SetInt32.Request()
            # msg.data = 2
            # self.send_request(self.set_mode_client, msg)
    rclpy.shutdown()
Processes the large model output results and parses actions and response texts. Publishes the response text for voice synthesis. For each action, such as move, pick, and place, call the corresponding method and wait for the action to complete. If both audio playback and actions are completed, reset the status and call the wake-up service to allow receiving commands again.
image_callbackMethod
def image_callback(self, ros_image):
    cv_image = self.bridge.imgmsg_to_cv2(ros_image, "bgr8")
    rgb_image = np.array(cv_image, dtype=np.uint8)

    if self.image_queue.full():
        # If the queue is full, discard the oldest image
        self.image_queue.get()
        # Put the image into the queue
    self.image_queue.put(rgb_image)
Receives image results, converts them to OpenCV format, and stores them in the image queue.
11.3.6.7 Deviation Adjustment
If inaccuracies occur during picking, modify the parameters in the source code for adjustment. The source code is located at: /home/ubuntu/ros2_ws/src/large_models_examples/large_models_examples/navigation_transport/automatic_pick.py
If the robot camera version is a depth camera, modify the deviations of the x, y, and z axes at this location for adjustment.
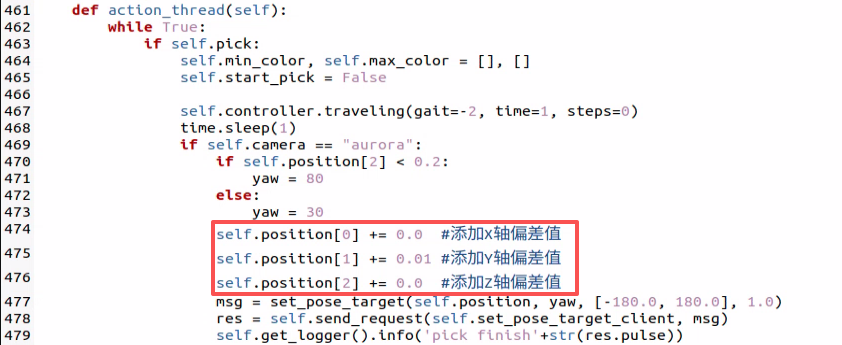
If the robot camera version is a monocular camera, depth values cannot be obtained. Therefore, the action group at this location needs to be modified for adjustment. The specific action group to be modified can be added to the upper computer software and run first to facilitate viewing the effect.