8. ROS2 Basic Course
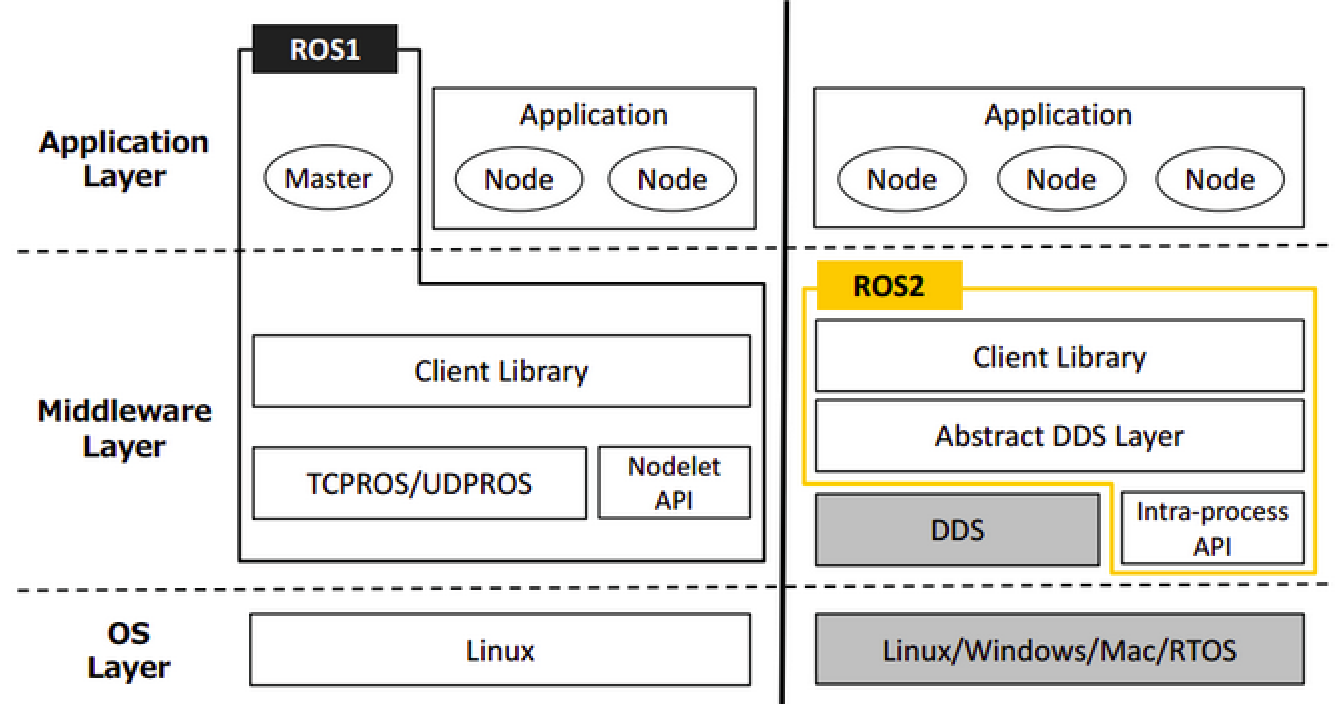
8.1 Introduction to ROS2 and Comparison with ROS1
8.1.1 ROS2 Overview
ROS2 is the second generation of Robot Operating System, an upgraded version of ROS1, which addressing some of the issues present in ROS1. The earliest version of ROS2, Arden, was introduced in 2017. With iterative updates and optimizations, it has now released the stable versions. Similar to ROS1, the choice between Linux version and ROS2 version is also correlated. The corresponding versions for both are as follows:
| ROS2 version | Ubuntu version |
|---|---|
| Foxy | Ubuntu20.04 |
| Galactic | Ubuntu20.04 |
| Humble | Ubuntu22.04 |
8.1.2 ROS2 Features
(1) Distributed architecture: ROS2 adopts a distributed architecture, allowing different nodes to run on multiple computers. This enables ROS2 to operate in larger-scale robotic systems and support higher-level parallel processing and communication.
(2) Multi-language Support: ROS5 supports various programming language, encompassing C++, Python, Java, and others. This allows developers to write ROS applications in their preferred language, enhancing development efficiency and flexibility.
(3) Enhanced Communication Mechanism: ROS2 introduces a refresh communication system called Distribution Service (DDS). It is a high-performance and real-time messaging protocol that enables implement reliable data communication with ROS2.
(4) System-level Tools: ROS2 comes with a set of system-level tools for managing and monitoring ROS2. The tools include management tools (such as Colcon), logging tools (such as Rosout), diagnostic tools (such as Rqt) and others, making it easier for developers to build, test, and debug robotic systems.
(5) Real-time Performance: The design of ROS2 takes into account the real-time performance. It provides several real-time performance tools and libraries, such as Real-Time Executor(RTE), Real-Time Publisher(RTPS), and etc. This allows ROS2 to be used in application scenarios where real-time performance requirements are high.
(6) Ease of Extensibility and Integration: ROS2 supports a modular architecture, allowing developers to easily add new functions and extend ROS2. Furthermore, ROS2 integrates with other commonly uses roboti software and libraries, such as Gazebo simulator and MoveIt robot motion planning library.
8.1.3 Difference Between RO2 and ROS1
(1) Platform
ROS1 currently only supports running on Linux systems, commonly set up and used on Ubuntu. Meanwhile, ROS2 can currently be set up and used on Ubuntu, Windows and even embedded development boards, making its platform more extensive.
(2) language
① C++
The core of ROS1 is based on C++03, while ROS2 extensively utilizes C++11.
② Python
ROS1 primarily uses Python 2, whereas ROS2 requires Python version 3.5 or higher, with Humble specifically requiring Python version 3.6.
(3) Middleware
In ROS1, it is necessary to start roscore before initiating, which acts as master node managing communication between all nodes. However, in ROS2, there is no equivalent to roscore; instead, there is only an abstract intermediate interface for data transmission. Currently, all implements of this interface are based on the DDS (Data Distribution Service) standard. This allows ROS2 to provide various high-quality QoS service strategies, improving communication in different network environments.
(4) Compilation Command
The compilation command for ROS1 is “catkin_make,” while for ROS2, the compilation command is “colcon build.”
If any further development learning is required, please refer to the official tutorial via the following link.
8.2 ROS2 Installation
Note
The provided Raspberry Pi system image has already set up ROS2 environment. This lesson is offered for your reference only.
This lesson takes the example of humble (requires Internet connection)
(1) Press “Ctrl+Alt+T” to open a command line terminal and enter the command “docker pull ros:humble” to download ROS2 image. The download needs to take a while. Please wait patiently.
docker pull ros:humble
(2) After the image is downloaded, enter the command “docker run -it –network=host -d -v=/dev:/dev -v /tmp/.X11-unix:/tmp/.X11-unix –name humble -e DISPLAY=${DISPLAY} –restart=always ros:humble /bin/bash” in the terminal to run the container and specify the name as “humble”.
docker run -it --network=host -d -v=/dev:/dev -v /tmp/.X11-unix:/tmp/.X11-unix --name humble -e DISPLAY=\${DISPLAY} --restart=always ros:humble /bin/bash
(3) Enter “xhost +” to start the access control for X Sever.
xhost +
(4) Enter “docker ps” to view the ID of the newly created container.
docker ps
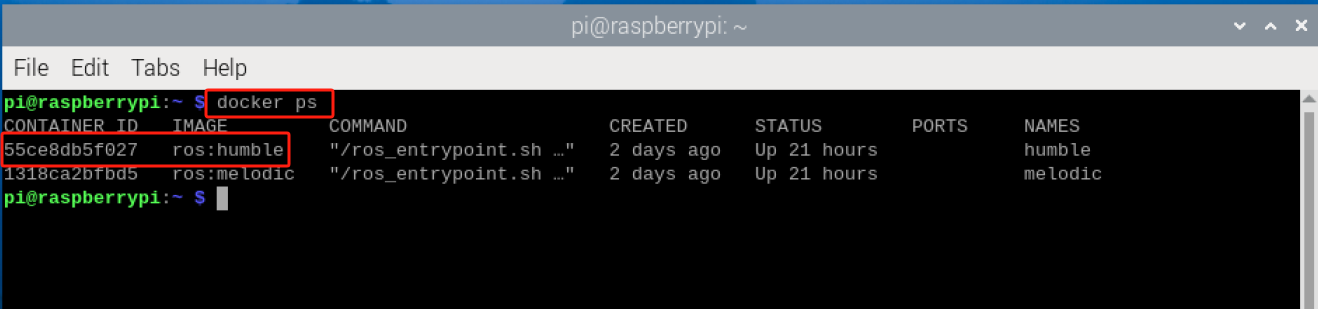
(5) Enter the command “docker exec -it 55ce /bin/bash” to enter the container (the container’s ID can be abbreviated as long as it uniquely identifies the container).
docker exec -it 55ce /bin/bash
(6) Enter the command “useradd -m -s /bin/bash ubuntu” to create a new user.
useradd -m -s /bin/bash ubuntu
(7) In the terminal, enter “passwd ubuntu” to set the password for “ubuntu”. Here, “ubuntu” is set as the password, you will prompted to re-enter the password.
passwd ubuntu
(8) Enter “usermod -aG sudo ubuntu” to add the new user “ubuntu” to the sudo group, granting it the superuser permission.
usermod -aG sudo ubuntu
(9) Enter “sudo apt-get update -y && sudo apt-get upgrade -y” to update the list of available software packages and upgrade the installed software packages on the system.
sudo apt-get update -y && sudo apt-get upgrade -y
(10) Enter “sudo apt-get install vim -y” to install Vim text editor.
sudo apt-get install vim -y
(11) Enter “sudo apt-get install ros-humble-desktop-full -y”to install the complete desktop environment of ROS Humble version.
sudo apt-get install ros-humble-desktop-full -y
8.2.1 Test ROS2 Environment
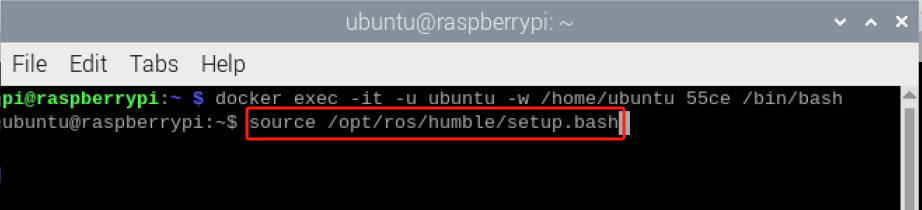
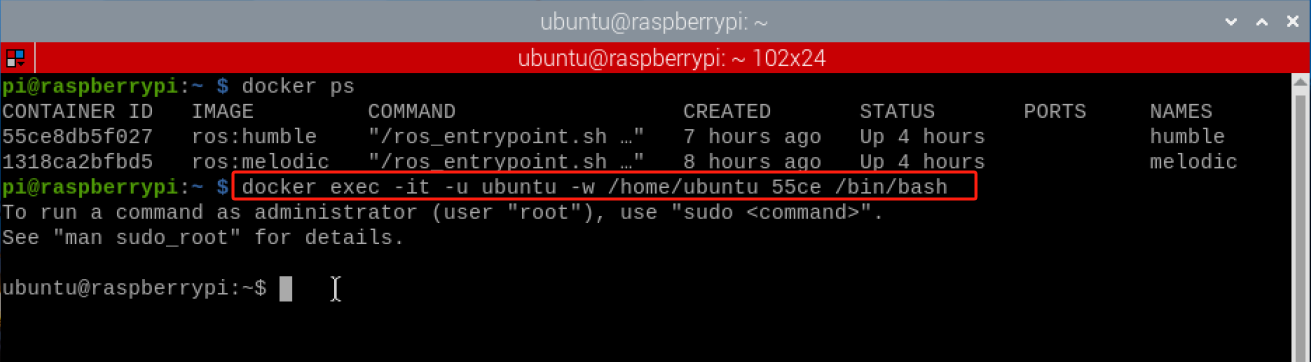
(1) Enter “docker exec -it -u ubuntu -w /home/ubuntu 55ce /bin/bash” to enter the container.
Note
55ce is the container ID with the ROS2 environment installed.
docker exec -it -u ubuntu -w /home/ubuntu 55ce /bin/bash
(2) Enter “source /opt/ros/humble/setup.bash” to manually set up ROS2 environment.
source /opt/ros/humble/setup.bash
(3) The step 2 needs to be executed every time to load the workspace when you open the terminal, you can enter “echo “source /opt/ros/humble/setup.bash” >> ~/.bashrc” to write this command into the .bashrc file.
echo "source /opt/ros/humble/setup.bash" \>\> ~/.bashrc
(4) Enter “source ~/.bashrc” to make the .bashrc file take effect. In this way, there is no need to load the workspace environment for each operation.
source ~/.bashrc
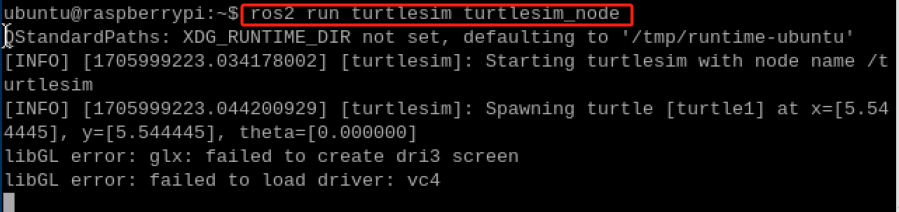
(5) Enter “ros2 run turtlesim turtlesim_node” to start the TurtleSim GUI interface. If it launches successfully, it indicates that ROS2 has been installed successfully.
ros2 run turtlesim turtlesim_node

8.3 ROS2 Command-Line Operation
8.3.1 Component of ROS2 File System
The ROS2 file consists of Packages and Manifests.
Packages are the basic organizational unit in ROS2 software, consisting of a collection of related files and directories used to organize and manage ROS2 nodes, libraries, and resources. These packages contain source code for nodes, configuration files, message and service definition.
Manifests (package.xml) is a description file for the packages used to define the relevant metadata and dependencies of the package. In ROS2, packages typically contain a file named package.xml, which contains metadata information information about the package, such as name, version, maintainer, license agreement, and dependencies.
Manifest file (package.xml) plays a crucial role in ROS2, providing descriptions and management for packages. This enables the ROS2 to properly handle dependencies between packages and perform appropriate building and performance.
8.3.2 Get to Know ROS2 Basic Terms
The following table will introduce you some basic terms in ROS2:
| Term | Instruction |
| Underlying communication layer (DDS) | It provides high-performance, reliable, real-time data communication and integration capabilities, thereby establishing fundamental support for messaging and service invocation between nodes in ROS2. |
| Node | Node is the smallest unit of processing running in ROS. It is typically an executable file. Each node can use topics or services to communicate with other nodes. |
| Message | The variables of data types such as int, float and boolean. |
| Topic | A one-way asynchronous communication mechanism. By publishing messages to topics or subscribing to topics, the data transmission between nodes can be realized. The topic type is determined by the type of corresponding message. |
| Publishing | Send data with a message type corresponding to the topic content. |
| Publishers | For publishing to take place,the publisher node registers various information such as its topics on the master node, and transmits messages to subscribing nodes that wish to subscribe. |
| Subscribing | Receive data with a message type corresponding topic content. |
| Subscribers | For subscription to take place, the subscribing node registers various information such as its topics on the master node. Subsequently, it receives all messages from publisher nodes that have published topics of interest to this node, via the master node. |
| Services | A bidirectional synchronous communication mechanism where the service is provided to the client request corresponding to a specific task and service servers gives the service response. |
| Service Servers | A node taking requests as input, and providing responses as output. |
| Service Clients | A node taking responding as input, and providing requests as output. |
8.3.3 Get to Know ROS2 Commonly File
The following table will provide explanations for the commonly used files in ROS:
| Term | Instruction |
|---|---|
| Urdf file | A model file describing robot's entire elements, including link, joint, kinematics parameters, dynamics parameters, visual models and collision detection models. |
| Srv file | It is stored in the srv folder used to define ROS service messages, consisting of two parts: request and respond. The request and respond are separated by the "---" symbol. |
| Msg file | It is stored in the msg folder used to define ROS topic messages. |
| package.xml | Description of the package attributes, including the package name, version number, authorship and other information. |
| CmakeLists.txt | Compile the configuration file using Cmake. |
| launch | Launch files contain system-wide instructions for launching nodes and services required for the robot to operate. |
8.3.4 Get to Know Commonly Used Command
Package Management Tool
The ros2 pkg has a total of five commands: create, executables, list, prefix, xml.
| Command | Instruction |
|---|---|
| ros2 pkg create | Create packages, specify package name, build type, dependencies, node names, etc. |
| ros2 pkg list | View the list of packages in the system. |
| ros2 pkg executables | View a list of executable files within packages in ROS2. |
| ros2 pkg prefix | View the the installation path prefix of a specific package in ROS2. |
| ros2 pkg xml | View the contents of the .xml file for the specific package. |
Node Running Tool
The function of ros2 run is allow you to run nodes within ROS2 package. The basic syntax is “ros2 run <package_name> <node_name>” as pictured.
Command-line Tool
The ro2 node command is used to view node messages.
| Command | Instruction |
|---|---|
| ros2 node list | View the list of active nodes within the current domain ( nodes grouped by the same ROS_DOMAIN_ID ) |
| ros2 node info | View the detailed information about a specific node in ROS2, including its subscriptions, publications, publishing, services and actions, etc. |
Topic Operation Tool
The ros2 topic command in ROS2 is used to perform operations related to topics.
| Command | Instruction |
|---|---|
| ros2 topic list | List all active topics within the domain. |
| ros2 topic info | Provide information about a specific topic, including its type, and publishers/subscribers. |
| ros2 topic type | View the type of topic messages. |
| ros2 topic find | Find the topics related to a specific message type in ROS2. |
| ros2 topic hz | Display the average publishing frequency of a topic in ROS2. |
| ros2 topic bw | Calculate the bandwidth usage of a specific topic. |
| ros2 topic delay | Calculate the message delay using the timestamp in the message header in ROS2. |
| ros2 topic echo | Display the topic message in console. |
| ros2 topic pub | Publish a message to a specific topic through command-line. |
Interface Operation Tool
The ros2 interface command is used to perform operations related to the interfaces in ROS2.
| Command | Instruction |
|---|---|
| ros2 interface list | List all available interfaces in the system, including Messages, Services, and Actions. |
| ros2 interface package | List the child interfaces within the specific package. |
| ros2 interface packages | List packages containing interfaces. |
| ros2 interface show | Display the detailed contents of the specified interface. |
| ros2 interface proto | Display message module. |
8.4 ROS2 Development Environment Configuration
Note
The provided Raspberry Pi image comes pre-installed and pre-configured with the development environment. This lesson is only provided for learning and reference purpose only.
During the subsequent learning and development processes, users can improve their efficiency by optimizing development environment and installing plugins.
8.4.1 Adjust Resolution
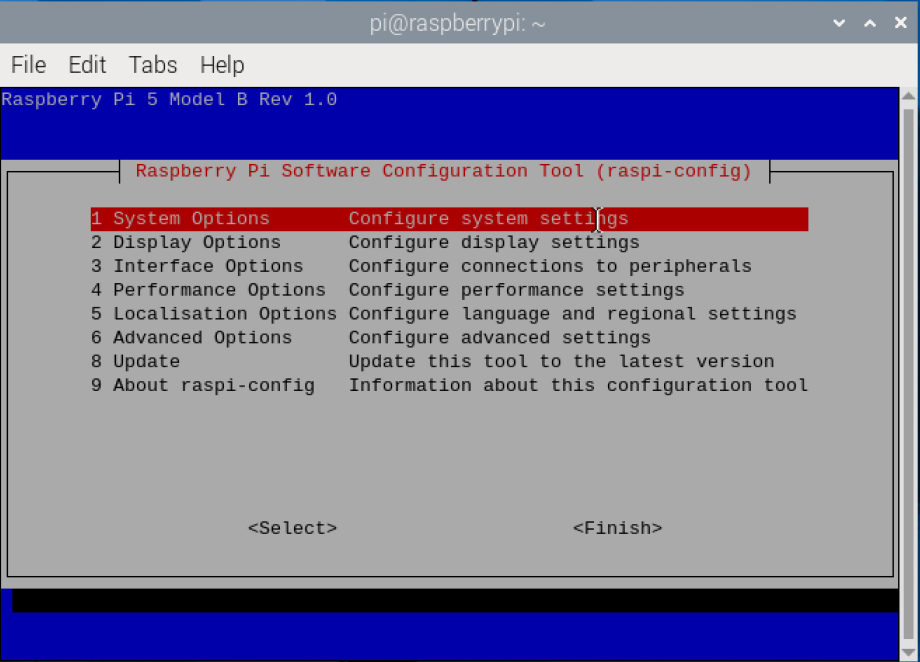
(1) Press “Ctrl+Alt+T” to open a command-line terminal and input the command “sudo raspi-config”, then press Enter.
sudo raspi-config
(2) Select “2. Display Options” using “↑↓” keys and press “Enter” to confirm. “Esc” key can be used to go back to the previous level.

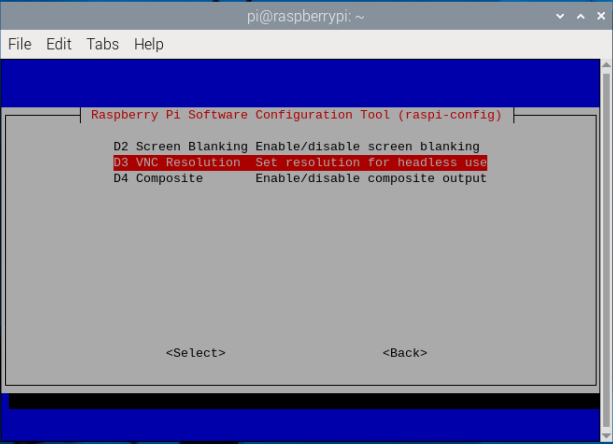
(3) Select “D3 VNC Resolution”, and then press “Enter” to confirm.
(4) Select “1920*1080” and “<Select>” in sequence, then press “Enter” to confirm.
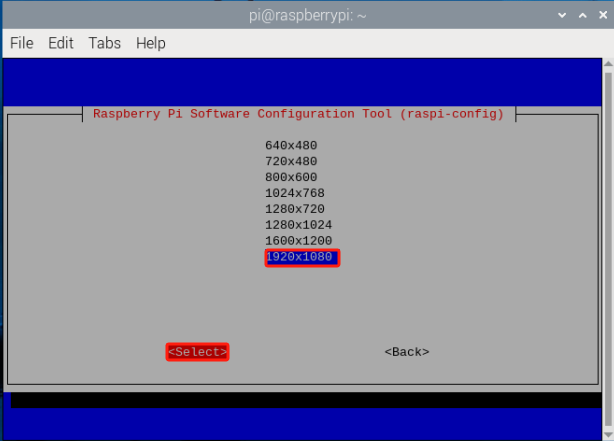
(5) When the modification is completed, Raspberry will restart.
8.4.2 Tool Usage
During the subsequent ROS development, it is necessary to open multiple terminals. In this point, terminator tool will be utilized.
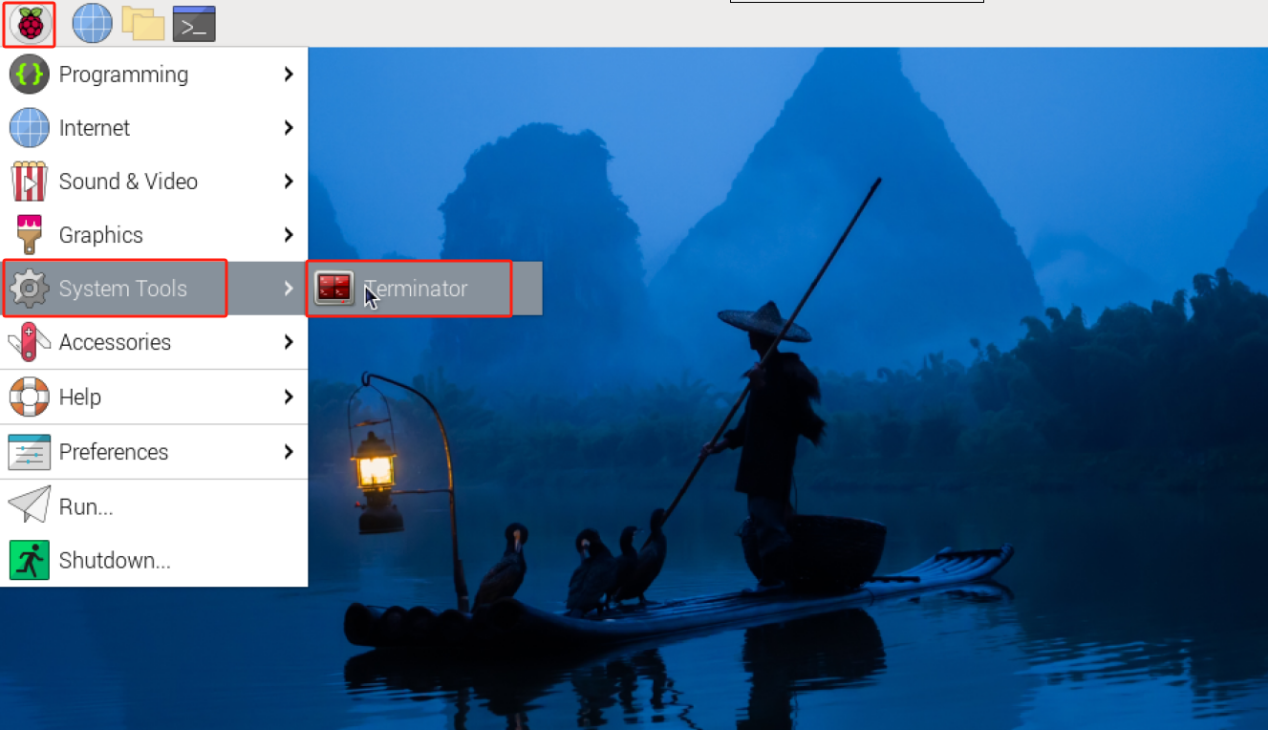
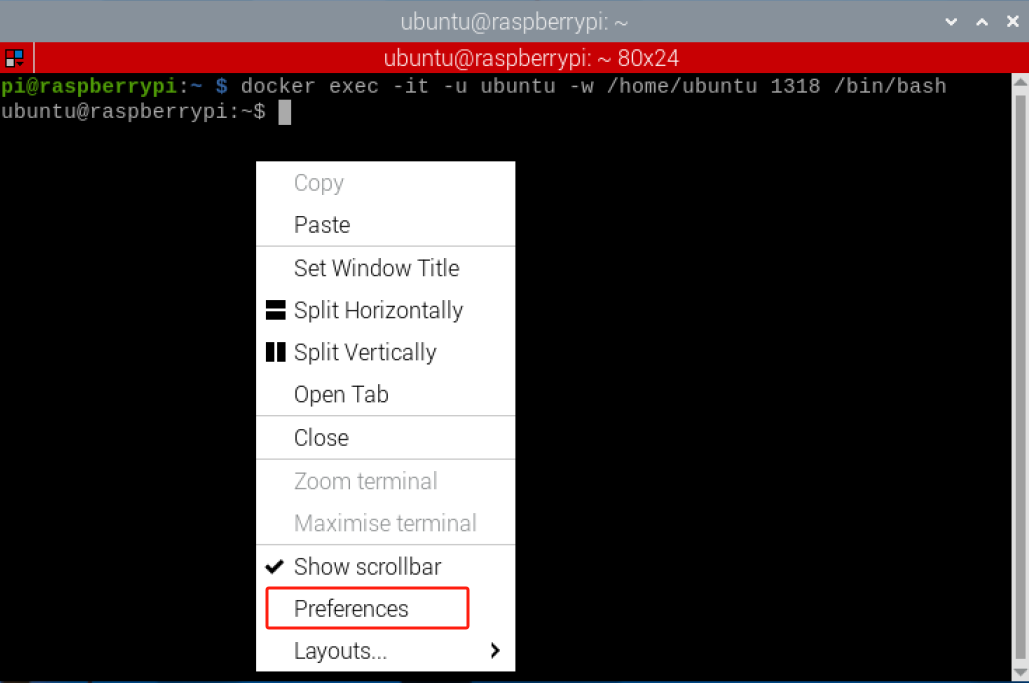
(1) Click  in the upper-left corner, and select System Tools and Terminator in sequence.
(2) Enter “docker exec -it -u ubuntu -w /home/ubuntu 1318 /bin/bash” to enter the container.
docker exec -it -u ubuntu -w /home/ubuntu 1318 /bin/bash
Every time before entering the container, it is inconvenient to enter command in the terminator terminal. You can set the command to enter the container in the terminator tool.
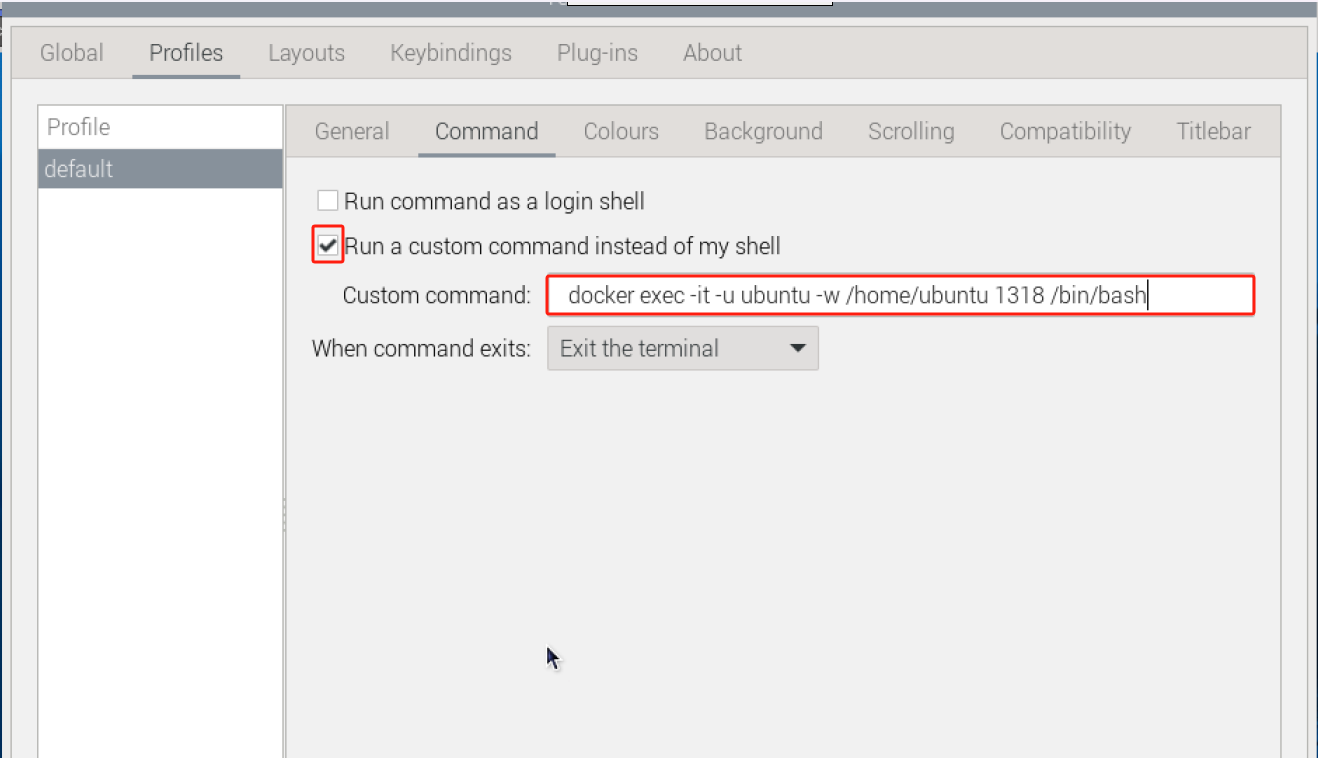
(3) Right-click on the terminator window, and then select “Preference”.
(4) Select Profiles→Command in sequence.

(5) Check the “Run a custom command instead of my deal” option, and then enter the accessible command of container “docker exec -it -u ubuntu -w /home/ubuntu 1318 /bin/bash”.
Note
1318 is the container ID containing ROS2 environment.
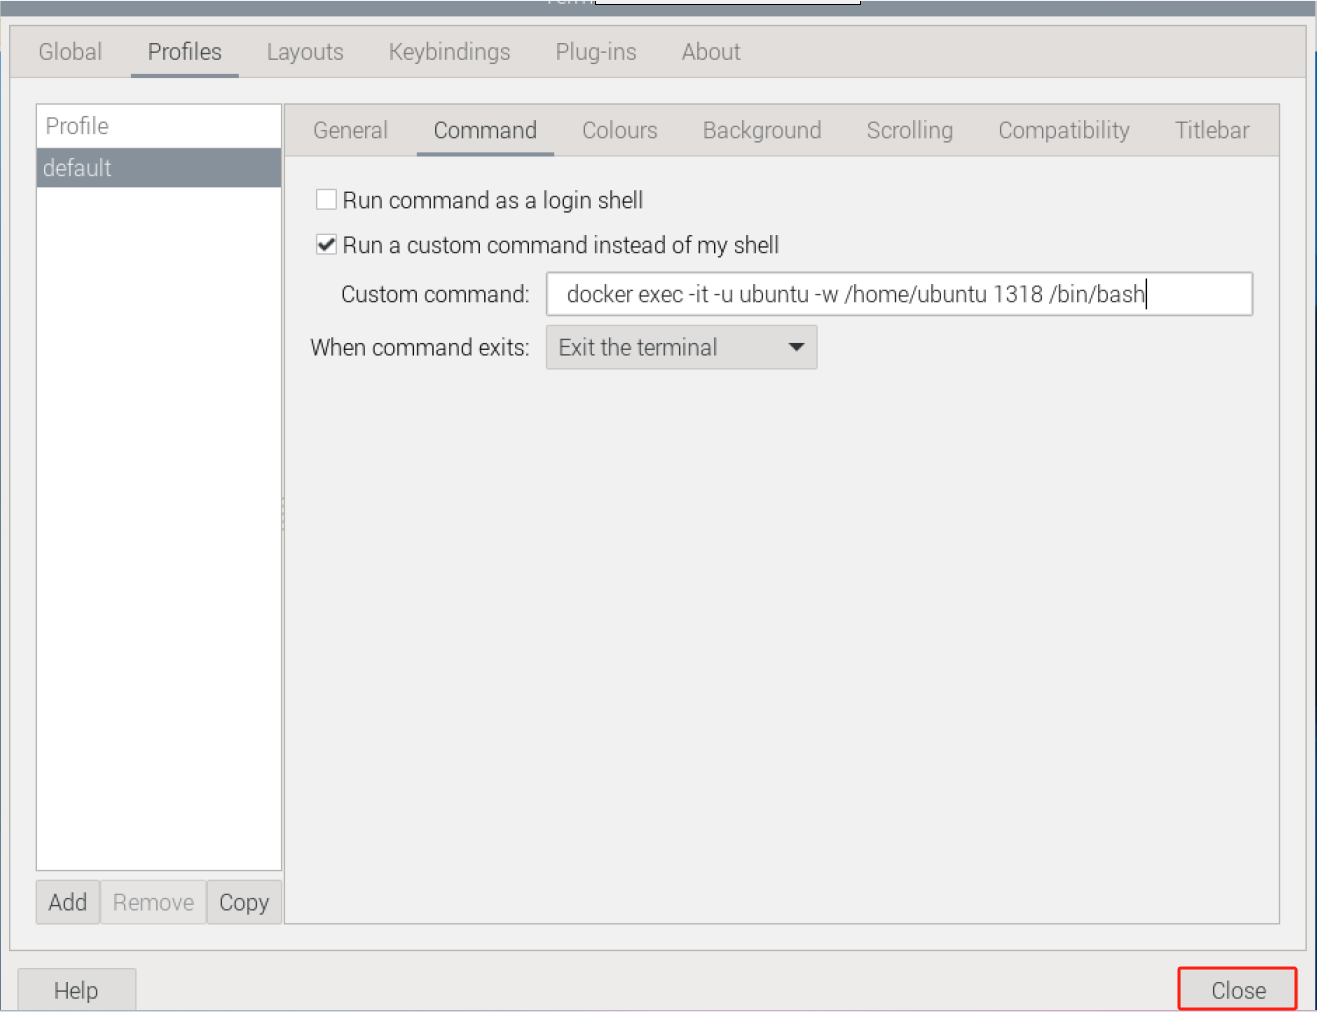
(6) Click “Close”. This way, every time you open the terminal, you can directly enter the container with ROS2 environment.
8.4.3 Tree Tool Installation
The Tree is a command-line tool, used to list the hierarchical structure of directories and files in a tree-like format. It helps users visualize the directory structure of the file system in a clear manner, including files and sub-directories.
(1) Click  in the upper-left corner, select System Tools and Terminator in sequence.
(2) Enter “sudo apt-get install tree” to install Tree tool.
sudo apt-get install tree
(3) After installation, enter “tree -L 1” to display the first-level directories structure of the current folder.
tree -L 1
8.4.4 pip Package Installation
Python-pip is a package for Python3’s package management tool “pip”. pip is the official package management tool for Python, used to install, upgrade and manage Python package .
Enter the command “sudo apt-get install python3-pip” to install pip.
sudo apt-get install python3-pip
8.4.5 transforms3d Library Installation
Transforms3d is a Python library used for 3D transformations and rotation matrices. It provides a set of functions and classes for performing various transformation operations in three-dimensional space, such as rotation, translation and scaling. The traforms3d library has a simple and user-friendly interface that can be used for handling 3D graphics, robot kinematics, computer vision, and other fields. It supports various common presentation of rotations, such as Euler angles, quaternions, and rotation matrices, and provides conversion functions for converting between these representations.
Enter the command “sudo pip3 install transforms3d” to install Python library.
sudo pip3 install transforms3d
Note
Prior to the installation of transforms3d library, you need to first install pip package.
8.4.6 turtle-tf2-py& tf2-tools Libraries Installation
turtle-tf2-py and tf2-tools are two packages in ROS, used to perform coordinate transformation-related functionalities in Python using TF2 (Transform Library).
turtle-tf2-py provides a lightweight TF2 client library for Python, enabling easy coordinate transformation operations in ROS. By using ros-humble-turtle-tf2-py, you can listen for coordinate transformations, query coordinate transformation, perform coordinate transformations, and more.
tf2-tools provides some TF-related practical tools. It includes commonly used functionalities such as interpolation of coordinate transformations, publishing and listening to coordinate transformations, and visualization of coordinate frames.
Enter “sudo apt install ros-humble-turtle-tf2-py ros-humble-tf2-tools” to install turtle-tf2-py and tf2-tools libraries (humble is a version number for ROS2.)
sudo apt install ros-humble-turtle-tf2-py ros-humble-tf2-tools
8.4.7 Gazebo Installation
Gazebo is a powerful open-source 3D robot simulation software that helps us quickly create and test various real-world scenarios on a computer. It comes with a built-in precise physics engine to simulate the interactions of dynamic objects in the scene, such as gravitational forces and friction. It also provides excellent 3D visualization effects, allowing us to clearly see the simulation process through a visual client. Most importantly, Gazebo integrates seamlessly with ROS, allowing us to develop and test ROS nodes directly within it. This enables us to easily transfer simulation code to physical robots.
Enter “sudo apt-get install ros-humble-ros-gz” to install Gazebo (humble is a ROS number for ROS2.)
sudo apt-get install ros-humble-ros-gz
8.5 ROS2 Workspace
8.5.1 Introduction to Workspace
In ROS robot development, when we develop specific functionalities for robots, various code, parameters, scripts, and other files need to be placed in a folder for management. This folder is called a workspace in the ROS system. Therefore, a workspace is a folder where project-related files are stored, serving as the main location for storing all data during the development process.
8.5.2 Create & Compile Workspace
(1) Click  in the upper left corner, then select System Tools and Terminator in sequence.

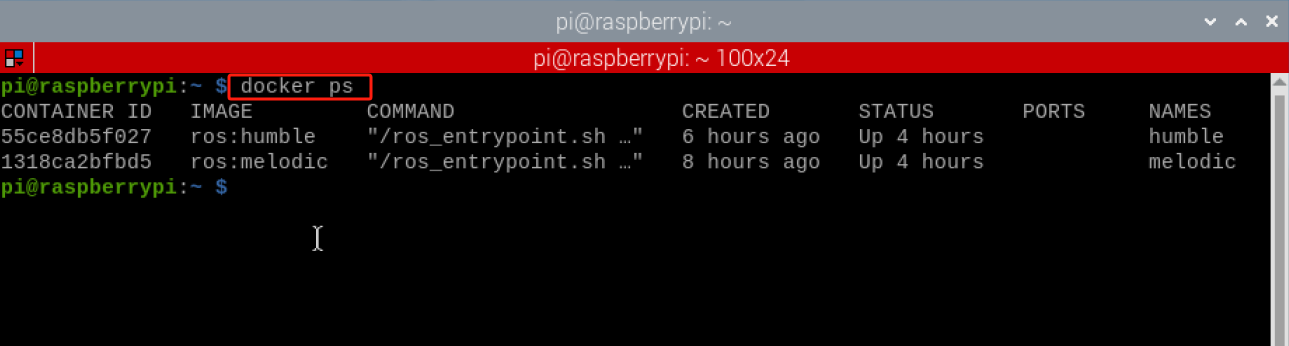
(2) Enter “docker ps” to list the currently running containers
docker ps
(3) Enter “docker exec -it -u ubuntu -w /home/ubuntu 55ce /bin/bash” (the container ID can be abbreviated as long as it uniquely identifies the container) to enter the contain with ROS2 installed.
docker exec -it -u ubuntu -w /home/ubuntu 55ce /bin/bash
(4) Enter “mkdir -p ~/hiwonder_ws/src” to create a workspace called “mkdir -p ~/hiwonder_ws/src”.
mkdir -p ~/hiwonder_ws/src

(5) Enter “cd hiwonder_ws” to switch to the workspace named “hiwonder_ws”.
cd hiwonder_ws

(6) Enter “colcon build” to compile the workspace.
colcon build

(7) Enter “source ~/hiwonder_ws/install/setup.bash” to load the workspace environment in ROS2.
source ~/hiwonder_ws/install/setup.bash

(8) Every time yon open a nrew terminal, step 7) will be executed to load the workspace. However, you can enter the command “echo “source ~/hiwonder_ws/install/setup.bash” >> ~/.bashrc” to append the specified command to the .bashrc file.
echo "source ~/hiwonder_ws/install/setup.bash" >> ~/.bashrc
(9) Then enter “source ~/.bashrc” to make the .bashrc file take effect, thereby there is no need to load the workspace environment for each operation.
source ~/.bashrc
8.5.3 Introduction to Workspace
After compilation, enter the command “tree -L 1” to view the root directory of the workspace.
tree -L 1
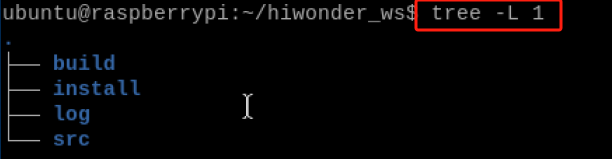
A typical workspace structure in ROS system is shown as above. The “hiwonder_ws” is the root directory of the workspace, which contains four sub-directories, or sub-spaces.
| Name | Meaning | Instruction |
|---|---|---|
| build | Compilation workspace | Save intermediate files generated during the compilation process. |
| install | Installation workspace | Store the compiled executable files and scripts. |
| log | Log workspace | Save various logs including warnings, errors, and information during the compilation and execution processes |
| src | Code workspace | The subsequent code and scripts need to be manually placed here. |
All in all,most of operations are performed within the “src” folder among these four spaces. After successful compilation, the results will be executed from the “install” folder. The “build” and “folder” are rarely used.
Moreover, the name of the workspace can be customized, and there can be multiple workspaces. For example:
Workspace 1:hiwonder_ws_a, used for development of robot A.
Workspace2:hiwonder_ws_b, used for development of robot B.
Workspace3:hiwonder_ws_c, used for development of robot C.
The above situations are all permitted, similar to create multiple new projects in an integrated development environment, they all exists in parallel.
8.6 ROS2 Package
8.6.1 Package Introduction
Each robot may have may functionalities, such as motion control, visual perception, autonomous navigation, etc. It’s possible to put the source code of these functions together, what if we want to share some of these functions with others? It can be found that the code is all mixed up and difficult to separate.
The principle of packages addresses this issue. The code of different function is divided into different packages, aiming to reduce their coupling as much as possible. When we need to share some functions with others in the ROS community, we only need to explain how to use the package, and others can quickly use it. Therefore, the mechanism of packages is one of the important methods to improve software reusability in ROS.
8.6.2 Create and Compile Package
(1) Click  in the upper-left corner, then select “System Tools and Terminator” in sequence.

(2) Enter the command “cd hiwonder_ws/src/” to switch to the src folder within the workspace named hiwonder_ws.
cd hiwonder_ws/src/
(3) Enter “ros2 pkg create hello_world_demo –build-type ament_python –dependencies rclpy –node-name hello_world” and press Enter to create a package named hello_world_demo. Add the dependency “rclpy” and generate an executable program named “hello_world”.
ros2 pkg create hello_world_demo --build-type ament_python --dependencies rclpy --node-name hello_world
(4) Enter “cd ~/hiwonder_ws” to switch to the root directory of the workspace.
cd ~/hiwonder_ws
(5) Enter “colcon build” to compile packages in workspace.
colcon build
(6) After successful compilation, enter “cd src/hello_world_demo/” to enter the directory where the package is located, and press Enter to verify whether the package is created successfully.
cd src/hello_world_demo/
8.6.3 Package Instruction
After compilation, enter the command “tree -L 1” to view the root directory of the workspace.
tree -L 1
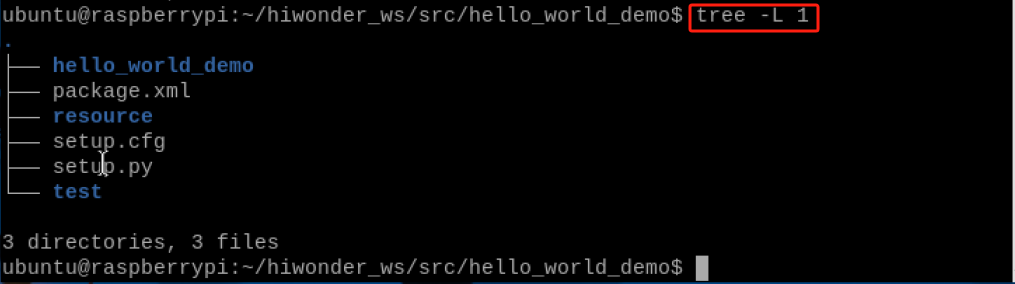
In ROS system, the structure of a typical package is shown above. The “hello_world_demo” is the root directory of the package, there will be 6 files or subdirectories inside.
| Name | Instruction |
|---|---|
| hello_world_demo | Package directory: Python source file directory |
| package.xml | Package information, such as package name, version, author, dependencies. |
| resource | Resource directory |
| setup.cfg | Package basic configuration file |
| setup.py | Similar to CMakeLists.txt file for C++ packages |
| test | Store test-related files |
8.7 ROS2 Node
8.7.1 Node Introduction
During communication, regardless of the method used, the construction of communication entities relies on nodes. In ROS2, each node typically corresponds to a single function module. For example, a lidar driver node may be responsible for publishing lidar messages, while a camera driver node may be responsible for publishing image messages. A complete robotic system may consist of many collaborating nodes. A single executable file in ROS 2 (either a C++ program or a Python program) can contain one or more nodes.
8.7.2 Create Node
(1) Click  in the upper left corner, and then select “System Tools and Terminator” in sequence.

(2) Enter the command “cd hiwonder_ws/src/hello_world_demo/hello_world_demo” and press Enter to switch to the path of the “hello_world_demo” package.
cd hiwonder_ws/src/hello_world_demo/hello_world_demo
(3) Enter command “package” to edit program. Copy the below program. You can press “i” to edit the program. After modification, press “Esc” and enter “:wq” to save and exit the program.
vim hello_world.py
import rclpy
from rclpy.node import Node
import time
class HelloWorldNode(Node):
def __init__(self):
# Call the constructor if the based class Node to set the node name.
super().__init__('hello_world_demo')
def run(self):
# Execute a loop when the ROS2 system is running normally.
while rclpy.ok():
# Print "Hello World" to the node's log.
self.get_logger().info('Hello World')
# Sleep for 0.5s to control the loop time.
time.sleep(0.5)
def main(args=None):
# Initialize ROS2 Python interface
rclpy.init(args=args)
# Create an instance of HelloWorldNode
node = HelloWorldNode()
try:
# Run the main loop of the node.
node.run()
except KeyboardInterrupt:
pass
finally:
# Destroy the node object
node.destroy_node()
# Shut down ROS2 Python interface
rclpy.shutdown()
if __name__ == '__main__':
# Execute the main function
main()
:wq
(4) Enter the command “chmod +x hello_world.py” and press Enter to grant the executable permission to the saved hello_world.py file.
chmod +x hello_world.py
8.7.3 Compilation and Execution
(1) After granting the executable permission, enter the command “cd ~/hiwonder_ws/” to switch to the directory of the workspace.
cd ~/hiwonder_ws/
(2) Enter the command “colcon build” and press Enter to compile the package within the workspace.
colcon build
(3) Enter the command “colcon build” and press Enter to make the environment variables take effect.

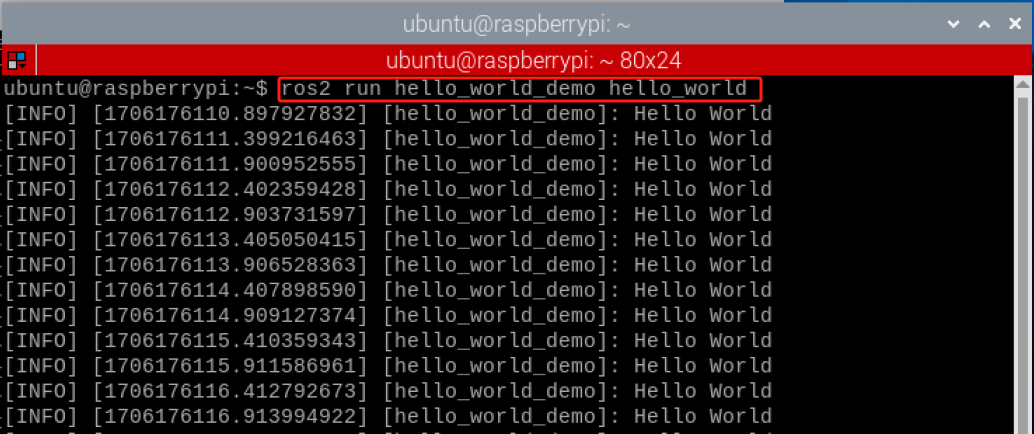
(4) Enter command “ros2 run hello_world_demo hello_world” and press Enter to start hello_world node.
ros2 run hello_world_demo hello_world
8.7.4 Program Analysis
According to the realization result, the logic progress for the program is shown as pictured:

Create a node named HelloWorldNode, and print “Hello World” to the node’s log every 0.5 seconds in the main loop of the node. During program execution, the ROS2 Python interface is initialized first, then a node instance is created and its main loop is run. When the program is interrupted, the node object is destroyed, and the ROS2 Python interface is shut down.
(1) Main function
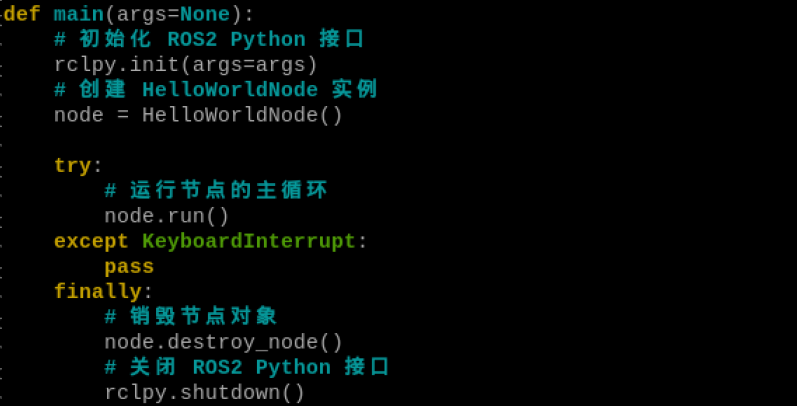
First, invoke the rclpy.init() function to initialize ROS2 Python interface. Then instantiate the HelloWorkdNode file. Finally, execute the node.run() function.
(2) HelloWorldNode Class
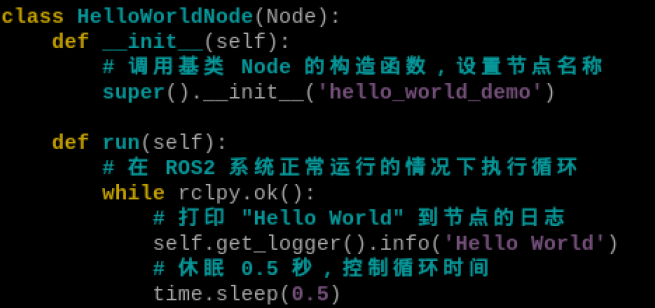
First, create a node named HelloWorldNode, then print “Hello World” to the node’s log at intervals of 0.5 seconds in the node’s main loop.
8.8 ROS2 Topic
8.8.1 Topic Communication Introduction
Topic communication is the most common way of communication in ROS2. Publishers publish data on specific topics, and subscribers who subscribe to those topics can receive the data.
Topic communication is based on publish and subscribe models as pictured:
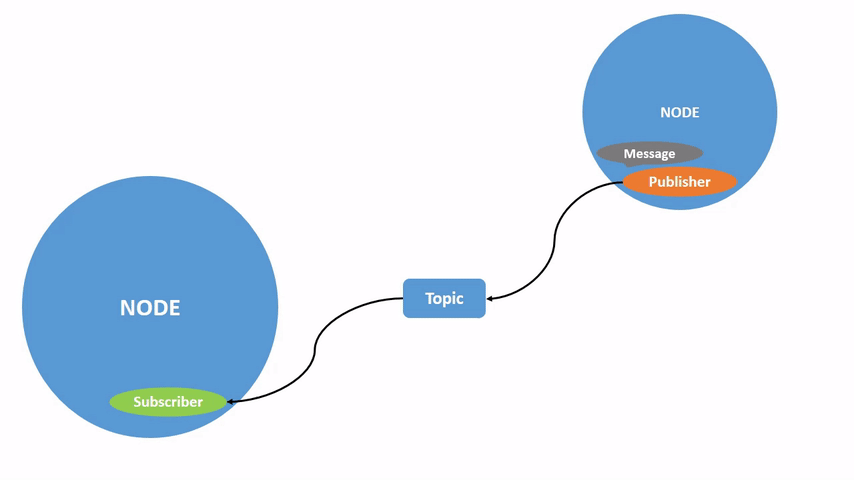
The characteristic of the topic data transmission is from one node to another. The object sending data is called the publisher, while the object receiving data is called the subscriber. Each topic requires a name, and the transmitted data also requires a fixed data type.
8.8.2 Create Topic
Create Publisher
(1) Click  and select “System Tools ->Terminator” in sequence.

(2) Enter the command “cd hiwonder_ws/src/” to switch to the src folder within hiwonder_ws workspace.
cd hiwonder_ws/src/
(3) Enter the command “ros2 pkg create topic_demo –build-type ament_python –dependencies rclpy” and press Enter to create a package named “topic_demo” with rclpy dependency.
ros2 pkg create topic_demo --build-type ament_python --dependencies rclpy
(4) Enter the command “rclpy dependency” to switch to the “topic_demo” package.
rclpy dependency
cd topic_demo/topic_demo
(5) Enter the command “vim topic_pub.py” to edit the program, copy the following program. If modification is required, you can press “i” to modify the program. After modification, press “Esc” and eneter “:wq” to save and exit.
vim topic_pub.py
import rclpy
from rclpy.node import Node

from std_msgs.msg import String

# 定义一个继承自Node的MinimalPublisher类(Define a MinimalPublisher class that inherits from Node)
class MinimalPublisher(Node):

    # 类的初始化方法(Class initialization method)
    def __init__(self):
        # 调用Node类的初始化方法,设置节点名称为'minimal_publisher'(Call Node class initialization method, set node name to 'minimal_publisher')
        super().__init__('minimal_publisher')

        # 创建一个发布者,发布String类型消息到'topic',队列大小为10(Create a publisher that publishes String type messages to 'topic' with queue size 10)
        self.publisher_ = self.create_publisher(String, 'topic', 10)

        # 创建一个定时器,每0.5秒触发一次timer_callback方法(Create a timer that triggers timer_callback method every 0.5 seconds)
        timer_period = 0.5  # 秒(seconds)
        self.timer = self.create_timer(timer_period, self.timer_callback)

        # 计数器,用于生成消息中的数字(Counter for generating numbers in messages)
        self.i = 0

    # 定义定时器回调函数(Define timer callback function)
    def timer_callback(self):
        # 创建一个String类型的消息(Create a String type message)
        msg = String()

        # 设置消息数据为'Hello World: 数字'(Set message data to 'Hello World: number')
        msg.data = 'Hello World: %d' % self.i

        # 发布消息(Publish message)
        self.publisher_.publish(msg)

        # 计数器自增(Increment counter)
        self.i += 1


# 主函数(Main function)
def main(args=None):
    # 初始化ROS 2节点(Initialize ROS 2 node)
    rclpy.init(args=args)

    # 创建MinimalPublisher对象(Create MinimalPublisher object)
    minimal_publisher = MinimalPublisher()

    # 进入ROS 2节点的事件循环(Enter ROS 2 node event loop)
    rclpy.spin(minimal_publisher)

    # 销毁节点对象(Destroy node object)
    minimal_publisher.destroy_node()

    # 关闭ROS 2节点(Shutdown ROS 2 node)
    rclpy.shutdown()


# 如果该脚本是主程序,则执行main函数(If this script is the main program, execute main function)
if __name__ == '__main__':
    main()
:wq
(6) Enter the command “chmod +x topic_pub.py” and press Enter to grant the executable permission to the saved topic_pub.py file.
chmod +x topic_pub.py
Create Subscriber
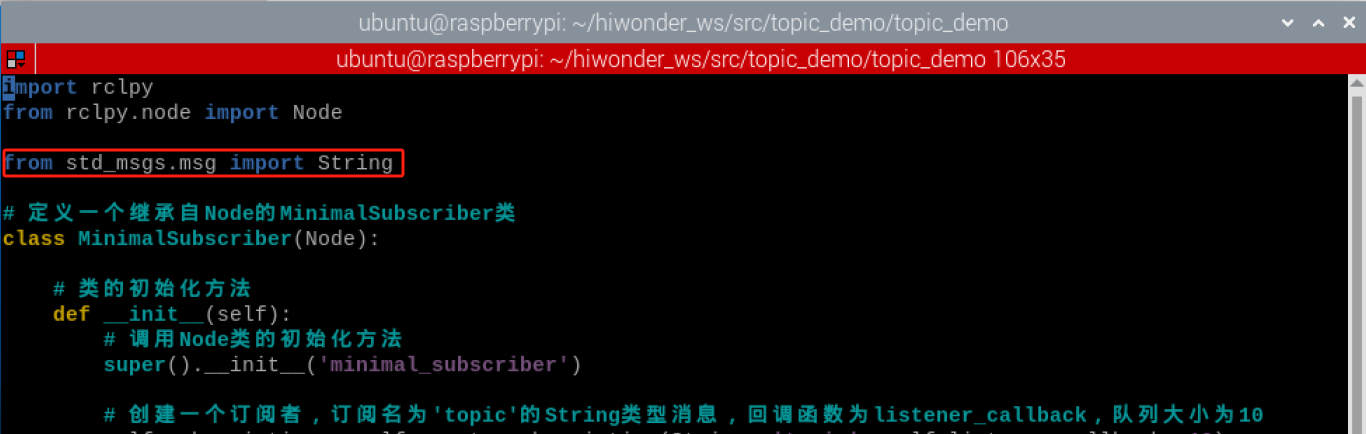
(1) Enter the command “vim topic_sub.py” to edit the program. Copy the following program. If modification is required, you can press “i” to modify the program. After modification, press “Esc” and eneter “:wq” to save and exit.
vim topic_sub.py
import rclpy
from rclpy.node import Node

from std_msgs.msg import String

# 定义一个继承自Node的MinimalSubscriber类(Define a MinimalSubscriber class that inherits from Node)
class MinimalSubscriber(Node):

    # 类的初始化方法(Class initialization method)
    def __init__(self):
        # 调用Node类的初始化方法(Call Node class initialization method)
        super().__init__('minimal_subscriber')

        # 创建一个订阅者,订阅名为'topic'的String类型消息,回调函数为listener_callback,队列大小为10(Create a subscriber that subscribes to String type messages named 'topic', callback function is listener_callback, queue size is 10)
        self.subscription = self.create_subscription(String, 'topic', self.listener_callback, 10)

    # 定义消息回调函数(Define message callback function)
    def listener_callback(self, msg):
        # 获取日志记录器并打印收到的消息(Get logger and print received message)
        self.get_logger().info('I heard: "%s"' % msg.data)

# 主函数(Main function)
def main(args=None):
    # 初始化ROS 2节点(Initialize ROS 2 node)
    rclpy.init(args=args)

    # 创建MinimalSubscriber对象(Create MinimalSubscriber object)
    minimal_subscriber = MinimalSubscriber()

    # 进入ROS 2节点的事件循环(Enter ROS 2 node event loop)
    rclpy.spin(minimal_subscriber)

    # 销毁节点对象(Destroy node object)
    minimal_subscriber.destroy_node()

    # 关闭ROS 2节点(Shutdown ROS 2 node)
    rclpy.shutdown()

# 如果该脚本是主程序,则执行main函数(If this script is the main program, execute main function)
if __name__ == '__main__':
    main()
:wq
(7) Enter the command “chmod +x topic_sub.py” and press Enter to grant the executable permission to the saved topic_sub.py file.
chmod +x topic_sub.py
8.8.3 setup.py File Settings
The setup.py file defines the metadata and build configuration for a ROS2 package, providing information such as package metadata, dependencies, build configuration, and installation logic. It helps developers correctly build, install, and use ROS2 packages. It is necessary to write the program entry points for topic_pub.py and topic_sub.py into the setup.py file.
(1) Enter the command “cd ..” to switch to the parent directory.
cd ..
(2) Enter the command “vim setup.py” and press Enter to open the setup.py file.
vim setup.py
(3) Press “i” to enter the editing mode, and then enter the following code to the corresponding position.
'topic_pub = topic_demo.topic_pub:main',
'topic_sub = topic_demo.topic_sub:main'
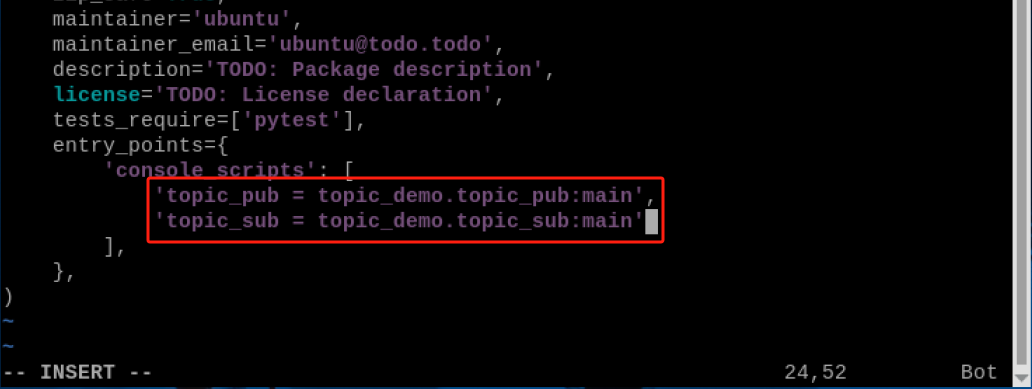
(4) Enter “:wq” to save and exit the file.

8.8.4 Compilation and Execution
(1) After granting the executable permission, enter the command “cd ~/hiwonder_ws/” to switch to the directory of the workspace.
cd ~/hiwonder_ws/
(2) Enter the command “colcon build” and press Enter to compile the packages within the workspace.
colcon build
(3) Enter the command “source ./install/setup.bash” and press Enter to make the environment variables take effect.
source ./install/setup.bash
(4) Enter the command “ros2 run topic_demo topic_pub” and press Enter to start topic_pub topic publishing node.
ros2 run topic_demo topic_pub
(5) Right click to select “Split Vertically” to create a new terminal window.

(6) Enter the command “ros2 run topic_demo topic_sub” and press Enter to start the topic_sub topic publishing node.
ros2 run topic_demo topic_sub
8.8.5 Program Analysis
(1) Publish Topic
According to the realization result, the logic progress for the program is shown as pictured:
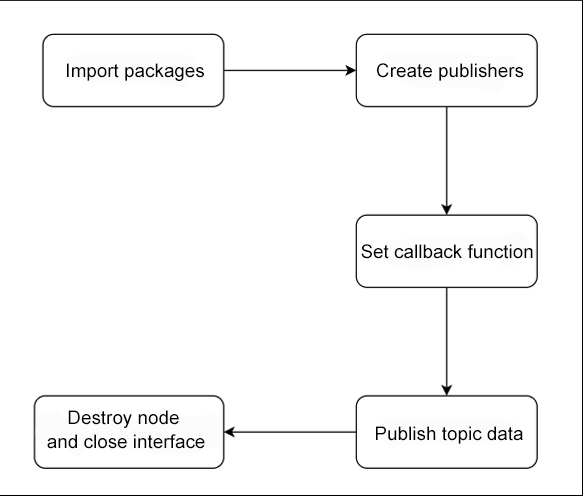
Create a publisher named as minimal_publisher. This publisher publishes a message with an incremental number every to the “topic” topic every 0.5 seconds. During program execution, ROS 2 node is initialized first. Then, a MinimalPublisher object is created, and the program enters the ROS 2 node’s event loop. When the program is interrupted, the node object is destroyed, and the ROS 2 node is shut down.
① Main Function
def main(args=None):
    # 初始化ROS 2节点(Initialize ROS 2 node)
    rclpy.init(args=args)

    # 创建MinimalPublisher对象(Create MinimalPublisher object)
    minimal_publisher = MinimalPublisher()

    # 进入ROS 2节点的事件循环(Enter ROS 2 node event loop)
    rclpy.spin(minimal_publisher)

    # 销毁节点对象(Destroy node object)
    minimal_publisher.destroy_node()

    # 关闭ROS 2节点(Shutdown ROS 2 node)
    rclpy.shutdown()
First, invoke the rclpy.init() function to initialize ROS2 Python interface. Then instantiate the MinimalPublisher() file. Finally, execute the minimal_publisher within the event loop of the ROS2 node.
② MinimalPublisher Class
# 定义一个继承自Node的MinimalPublisher类(Define a MinimalPublisher class that inherits from Node)
class MinimalPublisher(Node):

    # 类的初始化方法(Class initialization method)
    def __init__(self):
        # 调用Node类的初始化方法,设置节点名称为'minimal_publisher'(Call Node class initialization method, set node name to 'minimal_publisher')
        super().__init__('minimal_publisher')

        # 创建一个发布者,发布String类型消息到'topic',队列大小为10(Create a publisher that publishes String type messages to 'topic' with queue size 10)
        self.publisher_ = self.create_publisher(String, 'topic', 10)

        # 创建一个定时器,每0.5秒触发一次timer_callback方法(Create a timer that triggers timer_callback method every 0.5 seconds)
        timer_period = 0.5  # 秒(seconds)
        self.timer = self.create_timer(timer_period, self.timer_callback)

        # 计数器,用于生成消息中的数字(Counter for generating numbers in messages)
        self.i = 0

    # 定义定时器回调函数(Define timer callback function)
    def timer_callback(self):
        # 创建一个String类型的消息(Create a String type message)
        msg = String()

        # 设置消息数据为'Hello World: 数字'(Set message data to 'Hello World: number')
        msg.data = 'Hello World: %d' % self.i

        # 发布消息(Publish message)
        self.publisher_.publish(msg)

        # 计数器自增(Increment counter)
        self.i += 1
First, create a node named minimal_publisher, then create a publisher named “publisher_”. The timier_callback() callback function prints a message with an incremental number to the node’s log at intervals of 0.5 second.
(2) Subscribe to Topic
According to the realization result, the logic progress for the program is shown as pictured:

Create a subscriber named as minimal_sublisher. This subscriber prints the subscribed messages to logger. During program execution, ROS 2 node is initialized first. Then, a MinimalPublisher object is created, and the program enters the ROS 2 node’s event loop. When the program is interrupted, the node object is destroyed, and the ROS 2 node is shut down.
① Main Function
# 主函数(Main function)
def main(args=None):
    # 初始化ROS 2节点(Initialize ROS 2 node)
    rclpy.init(args=args)

    # 创建MinimalPublisher对象(Create MinimalPublisher object)
    minimal_publisher = MinimalPublisher()

    # 进入ROS 2节点的事件循环(Enter ROS 2 node event loop)
    rclpy.spin(minimal_publisher)

    # 销毁节点对象(Destroy node object)
    minimal_publisher.destroy_node()

    # 关闭ROS 2节点(Shutdown ROS 2 node)
    rclpy.shutdown()
First, invoke the rclpy.init() function to initialize ROS2 Python interface. Then instantiate the MinimalPublisher() file. Finally, execute the minimal_publisher within the event loop of the ROS2 node.
② MinimalSublisher Class
# 定义一个继承自Node的MinimalSubscriber类(Define a MinimalSubscriber class that inherits from Node)
class MinimalSubscriber(Node):

    # 类的初始化方法(Class initialization method)
    def __init__(self):
        # 调用Node类的初始化方法(Call Node class initialization method)
        super().__init__('minimal_subscriber')

        # 创建一个订阅者,订阅名为'topic'的String类型消息,回调函数为listener_callback,队列大小为10(Create a subscriber that subscribes to String type messages named 'topic', callback function is listener_callback, queue size is 10)
        self.subscription = self.create_subscription(String, 'topic', self.listener_callback, 10)

    # 定义消息回调函数(Define message callback function)
    def listener_callback(self, msg):
        # 获取日志记录器并打印收到的消息(Get logger and print received message)
        self.get_logger().info('I heard: "%s"' % msg.data)
First create a node named minimal_sublisher. Then create a subscriber named subscription. In the listener_callback() callback function, the received message content is printed to the logger.
8.8.6 Customize Interface
Both topic_pub.py and topic_pub.py utilizes ROS official interfaces.

Though it is a way good practice to use a pre-defined interfaces, it may necessary to define custom messages and services. The following will demonstrate how to create custom interface definitions.
(1) Enter the command “cd ~/hiwonder_ws/src/” to switch to the src folder wthin the hiwonder_ws workspace.
cd ~/hiwonder_ws/src/
(2) Enter the command “ros2 pkg create demo_interfaces –build-type ament_cmake –dependencies rclcpp” and press Enter to create a package named “demo_interfaces”.
ros2 pkg create demo_interfaces --build-type ament_cmake --dependencies rclcpp
(3) Enter the command “demo_interfaces” to enter the custom interface package.
cd demo_interfaces
(4) Enter the command “mkdir msg” to create a folder.
mkdir msg
(5) Enter the command “cd msg” to enter the msg folder.
cd msg
(6) Enter the command “vim String.msg” to edit the program. Enter “string data”. If you need to make modifications, you can press “i”. After modification, enter “:wq” to save and exit.


:wq
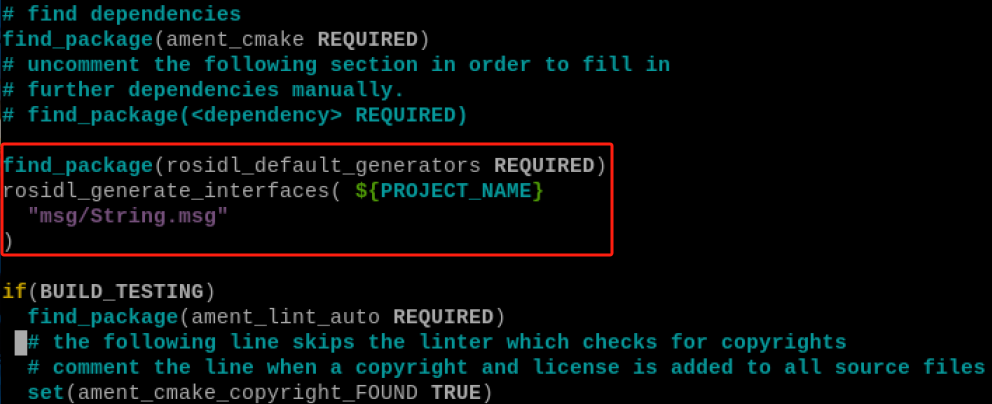
(7) Enter “cd ..” to navigate back to the parent directory, then enter “vim CMakeLists.txt” to open the file using the Vim text editor. Copy the following program and paste it into the specific location as pictured.If you need to make modifications, press “i” to enter insert mode. Once you’ve finished editing, press “Esc”, then type “:wq” to save and exit.
find_package(rosidl_default_generators REQUIRED)
rosidl_generate_interfaces( \${PROJECT_NAME}
"msg/String.msg"
)
(8) Enter the command “vim package.xml” again to open the file using the Vim text editor. If you need to make modifications, press “i” to enter insert mode. Once you’ve finished editing, press “Esc”, then type “:wq” to save and exit.
<build_depend>rosidl_default_generators</build_depend>
<exec_depend>rosidl_default_runtime</exec_depend>
<member_of_group>rosidl_interface_packages</member_of_group>

(9) Reference the step 1), 2) and 3) in “8.8.4 Compilation and Execution” to compile the workspace.
(10) Modify the code inside the red box below, replace it with the statement “from demo_interfaces.msg import String”. This change enables the use of custom messages and maintains the same functionality as before.
8.9 ROS2 Service Instruction
8.9.1 Introduction to Service Communication
Service communication is a communication model based on request and respond. During the mutual communication, the client sends request data to the server, and the server responds with results to the client.
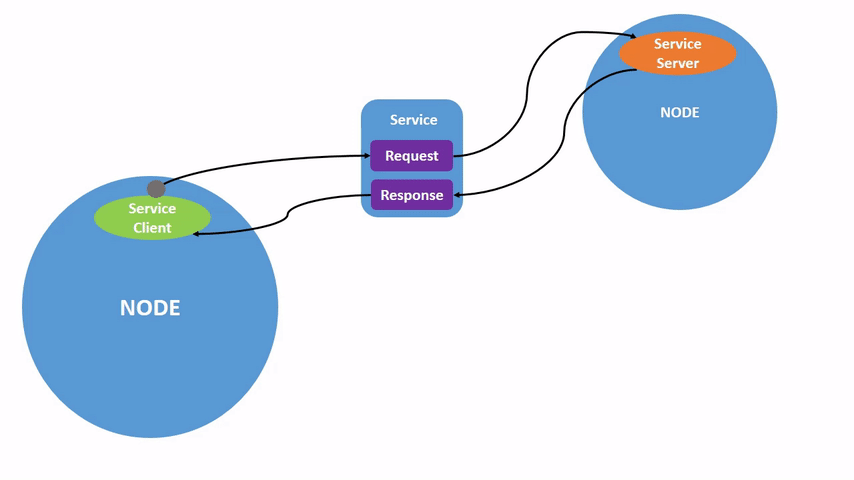
From the perspective of service implementation, the request- respond form is called the client/server model, abbreviated as CS mode. In this model, when the client requires certain data, aiming at a specified service, a request message targeting a specific service will be sent. Upon receiving the request, the server processes it and provides a respond.
This communication mechanism is common in our daily life. For example, when we browse various web pages, your computer browser acts as the client, it sends requests to the website using domain names or other operations. The server returns the necessary page data to be displayed upon receiving these requests.
8.9.2 Create Interface
(1) Click  and select “**System Tools ->Terminator in sequence.

(2) Enter the command “cd hiwonder_ws/src/” to switch to the demo_interfaces package.
cd hiwonder_ws/src/demo_interfaces
(3) Enter the command “demo_interfaces” to create the srv folder.
demo_interfaces
mkdir src
(4) Enter the command “cd srv” to enter the srv folder.
cd src
(5) Enter the command “vim AddInts.srv” to edit the program. Enter the code below. If you need to make modifications, press “i” to enter insert mode. Once you’ve finished editing, press “Esc”, then type “:wq” to save and exit.
vim AddInts.srv
vim String.msg
int32 num1
int32 num2
---
int32 sum

:wq
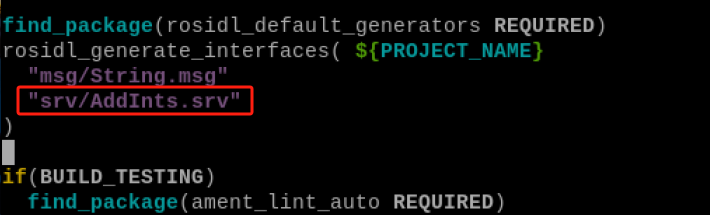
(6) Enter “cd ..” to navigate back to the parent directory, then enter “vim CMakeLists.txt” to open the file using the Vim text editor. Copy the following program and paste it into the specific location as pictured.If you need to make modifications, press “i” to enter insert mode. Once you’ve finished editing, press “Esc”, then type “:wq” to save and exit.
find_package(rosidl_default_generators REQUIRED)
rosidl_generate_interfaces( \${PROJECT_NAME}
"msg/String.msg"
"srv/AddInts.srv"
)
8.9.3 Create Service
Create Server
(1) Click and select “**System Tools ->Terminator in sequence.
(2) Enter the command “cd hiwonder_ws/src/” to switch to the src folder within hiwonder_ws workspace.

(3) Enter the command “ros2 pkg create service_demo –build-type ament_python –dependencies rclpy” and press Enter to create a package named “service_demo” with rclpy dependency.
ros2 pkg create service_demo --build-type ament_python --dependencies rclpy
(4) Enter the command “cd service_demo/service_demo/” to switch to the “service_demo” package.
cd service_demo/service_demo/
(5) Enter the command “vim service_server.py” to edit the program, copy the program below. If modification is required, you can press “i” to modify the program. After modification, press “Esc” and eneter “:wq” to save and exit.
vim service_server.py
import rclpy
from rclpy.node import Node
from demo_interfaces.srv import AddInts

# 定义一个继承自Node的MinimalService类(Define a MinimalService class that inherits from Node)
class MinimalService(Node):

    # 类的初始化方法(Class initialization method)
    def __init__(self):
        # 调用Node类的初始化方法,设置节点名称为'minimal_service'(Call Node class initialization method, set node name to 'minimal_service')
        super().__init__('minimal_service')

        # 创建一个服务,提供AddInts类型的服务,服务名称为'add_two_ints',回调函数为add_two_ints_callback(Create a service that provides AddInts type service, service name is 'add_two_ints', callback function is add_two_ints_callback)
        self.srv = self.create_service(AddInts, 'add_two_ints', self.add_two_ints_callback)

    # 定义服务回调函数(Define service callback function)
    def add_two_ints_callback(self, request, response):
        # 在日志中记录接收到的请求的num1和num2(Log the received request's num1 and num2)
        self.get_logger().info('Incoming request\nnum1: %d num2: %d' % (request.num1, request.num2))

        # 计算并设置响应的sum字段(Calculate and set the sum field of the response)
        response.sum = request.num1 + request.num2

        # 返回响应(Return response)
        return response

# 主函数(Main function)
def main():
    # 初始化ROS 2节点(Initialize ROS 2 node)
    rclpy.init()

    # 创建MinimalService对象(Create MinimalService object)
    minimal_service = MinimalService()

    # 进入ROS 2节点的事件循环(Enter ROS 2 node event loop)
    rclpy.spin(minimal_service)

    # 关闭ROS 2节点(Shutdown ROS 2 node)
    rclpy.shutdown()

# 如果该脚本是主程序,则执行main函数(If this script is the main program, execute main function)
if __name__ == '__main__':
    main()
:wq
(6) Enter the command “chmod +x service_server.py” and press Enter to grant the executable permission to the saved service_server.py.
chmod +x service_server.py
Create Client
(1) Enter the command “vim service_client.py” to edit the program. Copy the following program. If you need to make modifications, you can press “i” to modify the program. After modification, press “Esc” and eneter “:wq” to save and exit.
vim service_client.py
import sys
import rclpy
from rclpy.node import Node
from rclpy.logging import get_logger
from demo_interfaces.srv import AddInts

# 定义一个继承自Node的MinimalClient类(Define a MinimalClient class that inherits from Node)
class MinimalClient(Node):

    # 类的初始化方法(Class initialization method)
    def __init__(self):
        # 调用Node类的初始化方法,设置节点名称为'minimal_client'(Call Node class initialization method, set node name to 'minimal_client')
        super().__init__('minimal_client')

        # 创建一个服务客户端,连接到名为'add_two_ints'的AddInts服务(Create a service client that connects to AddInts service named 'add_two_ints')
        self.cli = self.create_client(AddInts, 'add_two_ints')

        # 等待服务连接,最多等待1秒(Wait for service connection, wait up to 1 second)
        while not self.cli.wait_for_service(timeout_sec=1.0):
            self.get_logger().info('service is connecting...')

    # 发送服务请求的方法(Method to send service request)
    def send_request(self):
        # 创建一个AddInts请求对象(Create an AddInts request object)
        request = AddInts.Request()

        # 从命令行参数中获取两个整数,并设置到请求对象中(Get two integers from command line arguments and set them to the request object)
        request.num1 = int(sys.argv[1])
        request.num2 = int(sys.argv[2])

        # 异步调用服务,并获取一个Future对象(Asynchronously call the service and get a Future object)
        self.future = self.cli.call_async(request)

# 主函数(Main function)
def main():
    # 检查命令行参数是否包含两个整数(Check if command line arguments contain two integers)
    if len(sys.argv) != 3:
        get_logger("rclpy").error("请提供两个整数值")
        return

    # 初始化ROS 2节点(Initialize ROS 2 node)
    rclpy.init()

    # 创建MinimalClient对象(Create MinimalClient object)
    minimal_client = MinimalClient()

    # 发送服务请求(Send service request)
    minimal_client.send_request()

    # 阻塞等待服务调用完成(Block and wait for service call completion)
    rclpy.spin_until_future_complete(minimal_client, minimal_client.future)

    try:
        # 获取服务调用的响应(Get the response from service call)
        response = minimal_client.future.result()

        # 打印响应结果(Print response result)
        minimal_client.get_logger().info("请求结果:sum = %d" % response.sum)
    except Exception:
        # 打印请求失败的错误信息(Print error message for failed request)
        minimal_client.get_logger().error("请求失败")

    # 销毁节点对象(Destroy node object)
    minimal_client.destroy_node()

    # 关闭ROS 2节点(Shutdown ROS 2 node)
    rclpy.shutdown()

# 如果该脚本是主程序,则执行main函数(If this script is the main program, execute main function)
if __name__ == '__main__':
    main()
:wq
(2) Enter the command “chmod +x service_client.py” and press Enter to grant the executable permission to the saved service_client.py file.
chmod +x service_client.py
8.9.4 setup.py File Settings
The setup.py file defines the metadata and build configuration for a ROS2 package, providing information such as package metadata, dependencies, build configuration, and installation logic. It helps developers correctly build, install, and use ROS2 packages. It is necessary to write the program entry points for service_client.py and service_server.py into the setup.py file.
(1) Enter the command “cd ..” to switch to the parent directory.
cd ..
(2) Enter the command “vim setup.py” and press Enter to open the setup.py file.
vim setup.py
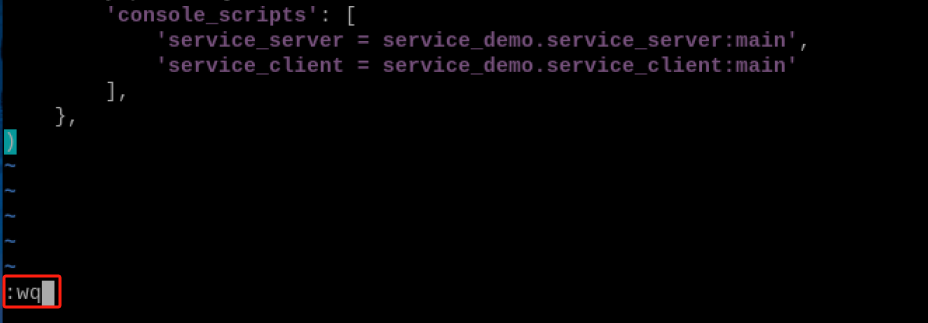
(3) Press “i” to enter the editing mode, and then enter the following code to the corresponding position.
'service_server = service_demo.service_server:main',
'service_client = service_demo.service_client:main'

(4) Enter “:wq” to save and exit the file.
:wq
8.9.5 Compilation and Execution
(1) After granting the executing permission, enter the command “cd ~/hiwonder_ws/” to switch to the directory of the workspace.
cd ~/hiwonder_ws/
(2) Enter the command “colcon build” and press Enter to compile the packages within the workspace.
colcon build
(3) Enter the command “source ./install/setup.bash” and press Enter to make the environment variables take effect.
source /opt/ros/humble/setup.bash
source ./install/setup.bash
(4) Enter the command “ros2 run service_demo service_server” and press Enter to start service_server server.
ros2 run service_demo service_server
(5) Right click to select “Split Vertically” to create a new terminal window.

(6) Enter the command “ros2 run service_demo service_client 1 2” and press Enter to start the service_client client to send the calculation request for numbers 1 and 2. Once the server receives the calculation request for numbers 1 and 2, it will send back the result to the client.
ros2 run service_demo service_client 1 2

8.9.6 Program Analysis
Server
According to the realization result, the logic progress for the program is shown as pictured:

Create a server named minimal_service which will receive requests, perform calculations on them, and respond with the result. During program execution, ROS 2 node is initialized first. Then, a MinimalPublisher object is created, and the program enters the ROS 2 node’s event loop. When the program is interrupted, the node object is destroyed, and the ROS 2 node is shut down.
(1) Main Function
# 主函数(Main function)
def main():
    # 初始化ROS 2节点(Initialize ROS 2 node)
    rclpy.init()

    # 创建MinimalService对象(Create MinimalService object)
    minimal_service = MinimalService()

    # 进入ROS 2节点的事件循环(Enter ROS 2 node event loop)
    rclpy.spin(minimal_service)

    # 关闭ROS 2节点(Shutdown ROS 2 node)
    rclpy.shutdown()
First, invoke the rclpy.init() function to initialize ROS2 Python interface. Then instantiate the MinimalService(). Finally, execute the minimal_service within the event loop of the ROS2 node.
(2) MinimalService Class
# 定义一个继承自Node的MinimalService类(Define a MinimalService class that inherits from Node)
class MinimalService(Node):

    # 类的初始化方法(Class initialization method)
    def __init__(self):
        # 调用Node类的初始化方法,设置节点名称为'minimal_service'(Call Node class initialization method, set node name to 'minimal_service')
        super().__init__('minimal_service')

        # 创建一个服务,提供AddInts类型的服务,服务名称为'add_two_ints',回调函数为add_two_ints_callback(Create a service that provides AddInts type service, service name is 'add_two_ints', callback function is add_two_ints_callback)
        self.srv = self.create_service(AddInts, 'add_two_ints', self.add_two_ints_callback)

    # 定义服务回调函数(Define service callback function)
    def add_two_ints_callback(self, request, response):
        # 在日志中记录接收到的请求的num1和num2(Log the received request's num1 and num2)
        self.get_logger().info('Incoming request\nnum1: %d num2: %d' % (request.num1, request.num2))

        # 计算并设置响应的sum字段(Calculate and set the sum field of the response)
        response.sum = request.num1 + request.num2

        # 返回响应(Return response)
        return response
First, a node named minimal_service is created. Then, a service is created to provide a service of type AddInts, with the service name ‘add_two_ints’. Inside the add_two_ints_callback() callback function, the two data from the request are received, processed for calculation, and the result of the calculation is responded back.
Client
According to the realization result, the logic progress for the program is shown as pictured:
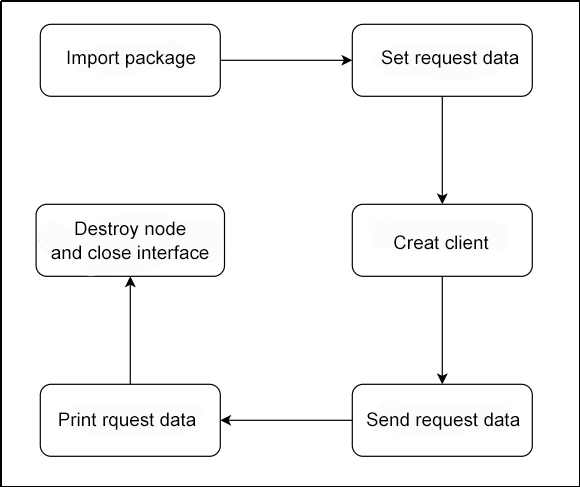
A client named minimal_client is created, which connects to the AddInts service named ‘add_two_ints’. It sends the two requested data. During program execution, it initializes the ROS2 node, creates a MinimalClient object, sends the service request, prints the response result, and upon interruption, it destroys the node object and closes the ROS 2 node.
(1) Main Function
# 主函数(Main function)
def main():
    # 检查命令行参数是否包含两个整数(Check if command line arguments contain two integers)
    if len(sys.argv) != 3:
        get_logger("rclpy").error("请提供两个整数值")
        return

    # 初始化ROS 2节点(Initialize ROS 2 node)
    rclpy.init()

    # 创建MinimalClient对象(Create MinimalClient object)
    minimal_client = MinimalClient()

    # 发送服务请求(Send service request)
    minimal_client.send_request()

    # 阻塞等待服务调用完成(Block and wait for service call completion)
    rclpy.spin_until_future_complete(minimal_client, minimal_client.future)

    try:
        # 获取服务调用的响应(Get the response from service call)
        response = minimal_client.future.result()

        # 打印响应结果(Print response result)
        minimal_client.get_logger().info("请求结果:sum = %d" % response.sum)
    except Exception:
        # 打印请求失败的错误信息(Print error message for failed request)
        minimal_client.get_logger().error("请求失败")

    # 销毁节点对象(Destroy node object)
    minimal_client.destroy_node()

    # 关闭ROS 2节点(Shutdown ROS 2 node)
    rclpy.shutdown()
First, invoke the rclpy.init() function to initialize ROS2 Python interface. Then instantiate the MinimalClient() file and send the service request. Finally, process the respond data.
(2) MinimalClient Class
# 定义一个继承自Node的MinimalClient类(Define a MinimalClient class that inherits from Node)
class MinimalClient(Node):

    # 类的初始化方法(Class initialization method)
    def __init__(self):
        # 调用Node类的初始化方法,设置节点名称为'minimal_client'(Call Node class initialization method, set node name to 'minimal_client')
        super().__init__('minimal_client')

        # 创建一个服务客户端,连接到名为'add_two_ints'的AddInts服务(Create a service client that connects to AddInts service named 'add_two_ints')
        self.cli = self.create_client(AddInts, 'add_two_ints')

        # 等待服务连接,最多等待1秒(Wait for service connection, wait up to 1 second)
        while not self.cli.wait_for_service(timeout_sec=1.0):
            self.get_logger().info('service is connecting...')

    # 发送服务请求的方法(Method to send service request)
    def send_request(self):
        # 创建一个AddInts请求对象(Create an AddInts request object)
        request = AddInts.Request()

        # 从命令行参数中获取两个整数,并设置到请求对象中(Get two integers from command line arguments and set them to the request object)
        request.num1 = int(sys.argv[1])
        request.num2 = int(sys.argv[2])

        # 异步调用服务,并获取一个Future对象(Asynchronously call the service and get a Future object)
        self.future = self.cli.call_async(request)
First, a node named minimal_client is created. Then, a service client is created to connect to the AddInts service named add_two_ints. In the send_request() function, the two command-line augments are used as the data for the request object, and the request is sent.
8.10 ROS2 Action
8.10.1 Introduction to Action Communication
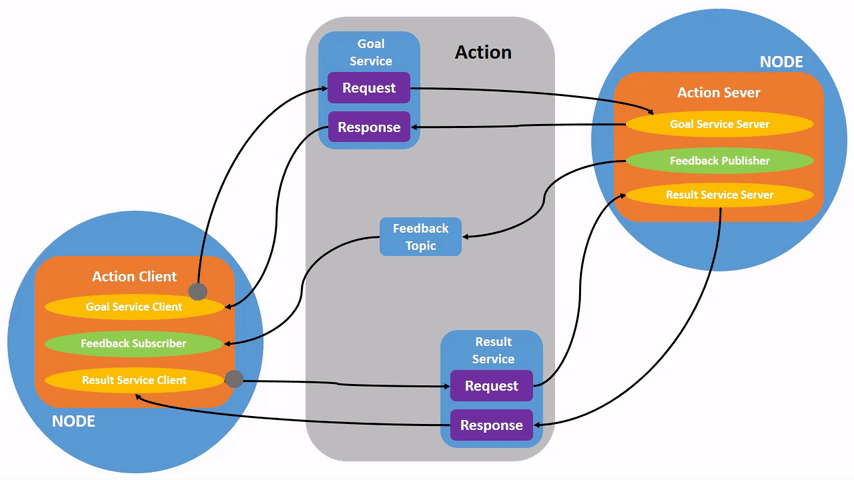
The action communication is a communication with continuous feedback. In this model, the client sends request data to the server, and the server responds with results to the client. However, during the process from receiving the request on the server to generating the final response, continuous feedback messages are sent to the client.
The action communication client/server model is as follow:
8.10.2 Create Interface
(1) Click  and select “System Tools ->Terminator” in sequence.

(2) Enter the command “cd hiwonder_ws/src/demo_interfaces/” to switch to the “demo_interfaces” package.
cd hiwonder_ws/src/demo_interfaces/
(3) Enter the command “mkdir action” to create an action folder.
mkdir action
(4) Enter the command “cd action” to enter the action folder.
cd action
(5) Enter the command “vim FileDownload.action” to open the file with text editor, then enter the code below. If you need to make modifications, you can press “i” to modify. Once modifications are completed, press “Esc” and enter “:wq” to save and exit the program.
vim FileDownload.action
int32 file_size

---

int32 current_size

---

float32 completion_percentage
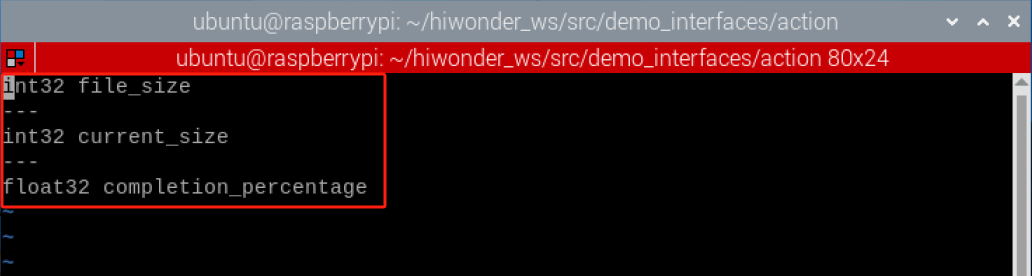
:wq
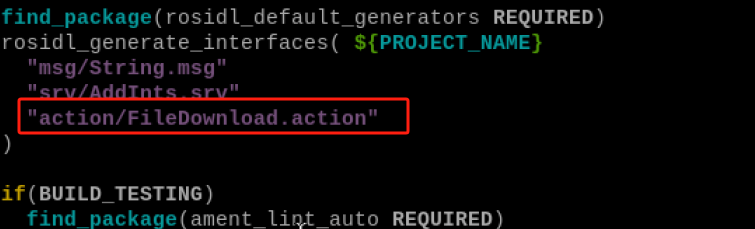
(6) Enter “cd ..” to navigate back to the parent directory, then enter “vim CMakeLists.txt” to open the file using the Vim text editor. Copy the following program and paste it into the specific location as pictured.If you need to make modifications, press “i” to enter insert mode. Once you’ve finished editing, press “Esc”, then type “:wq” to save and exit.
find_package(rosidl_default_generators REQUIRED)
rosidl_generate_interfaces( \${PROJECT_NAME}
"msg/Student.msg"
"srv/AddInts.srv"
"action/FileDownload.action"
)
8.10.3 Create Action Communication
Create Server
(1) Click and select “System Tools ->Terminator” in sequence.
(2) Enter the command “cd hiwonder_ws/src/” to switch to the src folder within hiwonder_ws workspace.
cd hiwonder_ws/src/

(3) Enter the command “ros2 pkg create action_demo –build-type ament_python –dependencies rclpy” and press Enter to create a package named “action_demo” with rclpy dependency.
ros2 pkg create action_demo --build-type ament_python --dependencies rclpy
(4) Enter the command “cd action_demo/action_demo/” to switch to the “action_demo” package.
cd action_demo/action_demo/
(5) Enter the command “vim action_server.py” to edit the program, copy the program below. If you need to make modifications, press “i” to enter insert mode. Once you’ve finished editing, press “Esc”, then type “:wq” to save and exit.
vim action_server.py
import rclpy  # 导入rclpy模块(Import rclpy module)
from rclpy.node import Node  # 导入Node类(Import Node class)
from rclpy.action import ActionServer  # 导入ActionServer类(Import ActionServer class)
from demo_interfaces.action import FileDownload  # 导入FileDownload action接口(Import FileDownload action interface)
import random  # 导入random模块(Import random module)

class FileDownloadActionServer(Node):  # 定义一个继承自Node类的FileDownloadActionServer类(Define a FileDownloadActionServer class that inherits from Node class)
    def __init__(self):
        super().__init__('file_download_action_server')  # 调用父类构造函数初始化节点(Call parent class constructor to initialize node)
        self._action_server = ActionServer(
            self,
            FileDownload,  # 使用FileDownload action接口(Use FileDownload action interface)
            'file_download',  # 定义action的名称为file_download(Define action name as file_download)
            self.execute_callback)  # 设置回调函数为execute_callback(Set callback function as execute_callback)

    def execute_callback(self, goal_handle):
        # 服务器端执行的回调函数(Server-side execution callback function)

        self.get_logger().info(f'Start file download for {goal_handle.request.file_size} bytes...')  # 打印开始下载的日志(Print log for starting download)
        feedback_msg = FileDownload.Feedback()  # 创建Feedback消息类型的对象(Create Feedback message type object)

        current_size = 0  # 初始化当前下载的文件大小为0(Initialize current downloaded file size to 0)
        while current_size < goal_handle.request.file_size:
            increment_size = random.randint(1, 10)  # 模拟随机增加下载大小(Simulate random increment in download size)
            current_size += increment_size  # 更新当前下载的文件大小(Update current downloaded file size)
            if current_size > goal_handle.request.file_size:
                current_size = goal_handle.request.file_size
            completion_percentage = (current_size / goal_handle.request.file_size) * 100  # 计算下载进度百分比(Calculate download progress percentage)

            feedback_msg.completion_percentage = completion_percentage  # 更新Feedback消息的下载进度(Update download progress in Feedback message)
            self.get_logger().info(f'Publishing feedback: {completion_percentage:.2f}% downloaded')  # 打印发布的反馈消息(Print published feedback message)
            goal_handle.publish_feedback(feedback_msg)  # 发布反馈消息(Publish feedback message)
            rclpy.spin_once(self, timeout_sec=1.0)  # 模拟时间的流逝(Simulate time passage)

        goal_handle.succeed()  # 指示目标已完成(Indicate goal completion)
        result = FileDownload.Result()  # 创建Result消息类型的对象(Create Result message type object)
        result.current_size = current_size  # 设置Result消息的当前文件大小(Set current file size in Result message)
        self.get_logger().info('File download completed!')  # 打印文件下载完成的日志(Print log for file download completion)
        return result  # 返回结果(Return result)

def main(args=None):
    rclpy.init(args=args)  # 初始化ROS节点(Initialize ROS node)
    server = FileDownloadActionServer()  # 创建FileDownloadActionServer对象(Create FileDownloadActionServer object)
    rclpy.spin(server)  # 进入主循环(Enter main loop)
    server.destroy_node()  # 销毁节点(Destroy node)
    rclpy.shutdown()  # 关闭ROS(Shutdown ROS)

if __name__ == '__main__':
    main()
:wq
(6) Enter the command “chmod +x action_server.py” and press Enter to grant the executable permission to the saved action_server.py.
chmod +x action_server.py
Create Client
(1) Enter the command “vim action_client.py” to edit the program. Copy the following program. If you need to make modifications, press “i” to enter insert mode. After modification, press “Esc” and eneter “:wq” to save and exit.
vim action_client.py
import rclpy  # 导入rclpy模块(Import rclpy module)
from rclpy.node import Node  # 导入Node类(Import Node class)
from rclpy.action import ActionClient  # 导入ActionClient类(Import ActionClient class)
from demo_interfaces.action import FileDownload  # 导入FileDownload action接口(Import FileDownload action interface)

class FileDownloadActionClient(Node):  # 定义一个继承自Node类的FileDownloadActionClient类(Define a FileDownloadActionClient class that inherits from Node class)
    def __init__(self):
        super().__init__('file_download_action_client')  # 调用父类构造函数初始化节点(Call parent class constructor to initialize node)
        self._action_client = ActionClient(self, FileDownload, 'file_download')  # 创建ActionClient对象(Create ActionClient object)

    def send_goal(self, file_size):
        goal_msg = FileDownload.Goal()  # 创建Goal消息类型的对象(Create Goal message type object)
        goal_msg.file_size = file_size  # 设置文件大小(Set file size)

        self.get_logger().info(f'Sending file download goal for {file_size} bytes')  # 打印发送目标的日志(Print log for sending goal)

        self._action_client.wait_for_server()  # 等待服务器可用(Wait for server to be available)
        self.future = self._action_client.send_goal_async(goal_msg, feedback_callback=self.feedback_callback)  # 发送目标异步请求(Send goal async request)

        self.future.add_done_callback(self.goal_response_callback)  # 添加目标响应回调函数(Add goal response callback function)

    def goal_response_callback(self,future):
        goal_handle = future.result()  # 获取目标句柄(Get goal handle)
        if not goal_handle.accepted:
            self.get_logger().info("Goal rejected")  # 打印目标被拒绝的日志(Print log for goal rejection)
            return
        self.get_logger().info("Goal accepted")  # 打印目标被接受的日志(Print log for goal acceptance)
        self._get_result_future = goal_handle.get_result_async()  # 获取目标结果异步请求(Get goal result async request)
        self._get_result_future.add_done_callback(self.get_result_callback)  # 添加获取结果的回调函数(Add get result callback function)

    def get_result_callback(self,future):
        self.get_logger().info("File download completed successfully.")  # 打印文件下载成功完成的日志(Print log for successful file download completion)

    def feedback_callback(self, feedback_msg):
        self.get_logger().info(f'Received feedback: {feedback_msg.feedback.completion_percentage:.2f}% downloaded')  # 打印接收到的反馈消息(Print received feedback message)

def main(args=None):
    rclpy.init(args=args)  # 初始化ROS节点(Initialize ROS node)
    client = FileDownloadActionClient()  # 创建FileDownloadActionClient对象(Create FileDownloadActionClient object)

    result = client.send_goal(100)  # 发送目标(Send goal)

    rclpy.spin(client)  # 进入主循环(Enter main loop)
    client.destroy_node()  # 销毁节点(Destroy node)
    rclpy.shutdown()  # 关闭ROS(Shutdown ROS)

if __name__ == '__main__':
    main()
:wq
(2) Enter the command “chmod +x service_client.py” and press Enter to grant the executable permission to the saved action_client.py file.
chmod +x service_client.py
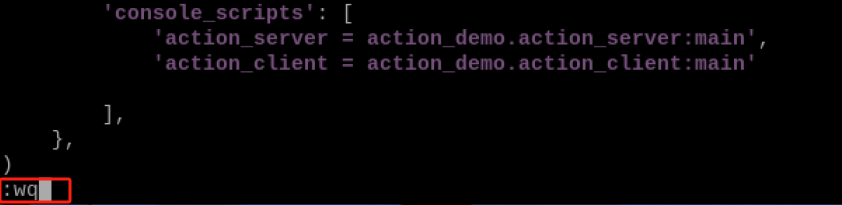
8.10.4 setup.py File Settings
The setup.py file defines the metadata and build configuration for a ROS2 package, providing information such as package metadata, dependencies, build configuration, and installation logic. It helps developers correctly build, install, and use ROS2 packages. It is necessary to write the program entry points for service_client.py and service_server.py into the setup.py file.
(1) Enter the command “cd ..” to switch to the parent directory.
cd ..
(2) Enter the command “vim setup.py” and press Enter to open the setup.py file.
vim setup.py
(3) Press “i” to enter insert mode, and then enter the code below to the corresponding location.
'action_server = action_demo.action_server:main',
'action_client = action_demo.action_client:main'

(4) Enter “:wq” to save and exit the file.
8.10.5 Compilation and Execution
(1) After granting the executing permission, enter the command “cd ~/hiwonder_ws/” to switch to the directory of the workspace.
cd ~/hiwonder_ws/
(2) Enter the command “colcon build” and press Enter to compile the packages within the workspace.
colcon build
(3) Enter the command “source ./install/setup.bash” and press Enter to make the environment variables take effect.
source ./install/setup.bash
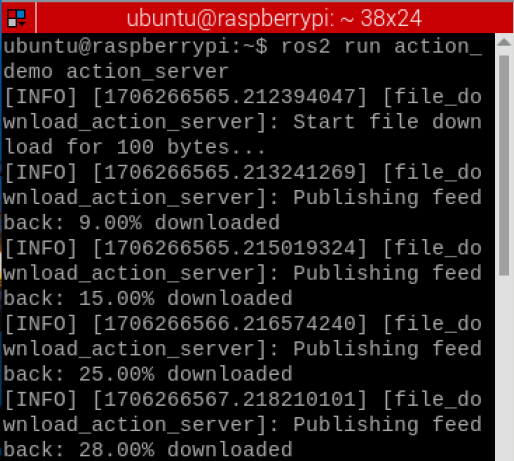
(4) Enter the command “ros2 run action_demo action_server” and press Enter to start the action server “action_server”.
ros2 run action_demo action_server
(5) Right click to select “Split Vertically” to create a new terminal window.

(6) Enter the command “ros2 run action_demo action_client” and press Enter to tart “action_client” action client. At this point, the server also receive the requests.
ros2 run action_demo action_client

8.10.6 Program Analysis
Server
According to the realization result, the logic progress for the program is shown as pictured:
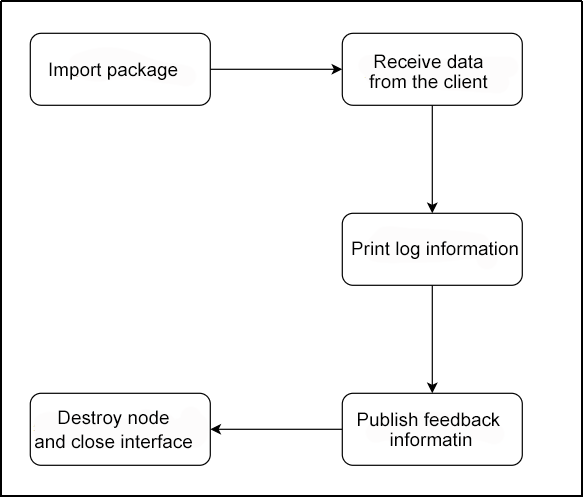
First, define a node named FileDownloadActionServer to construct an ActionServer of the FileDownload action type to provide task services. This execution callback function within ActionSeriver is responsible for simulating the process of executing real download tasks. It randomly increases the download progress to simulate file download while continuously publishing download feedback to the client through the goak_handle object. After the task is completed, the task status is set to success, and the download result is returned.
(1) Main Function
def main(args=None):
    rclpy.init(args=args)  # 初始化ROS节点(Initialize ROS node)
    server = FileDownloadActionServer()  # 创建FileDownloadActionServer对象(Create FileDownloadActionServer object)
    rclpy.spin(server)  # 进入主循环(Enter main loop)
    server.destroy_node()  # 销毁节点(Destroy node)
    rclpy.shutdown()  # 关闭ROS(Shutdown ROS)
First, invoke the rclpy.init() function to initialize ROS2 Python interface. Then instantiate the FileDownloadActionServer(). Finally, execute the server within the event loop of the ROS2 node.
(2) FileDownloadActionServer Class
class FileDownloadActionServer(Node):  # 定义一个继承自Node类的FileDownloadActionServer类(Define a FileDownloadActionServer class that inherits from Node class)
    def __init__(self):
        super().__init__('file_download_action_server')  # 调用父类构造函数初始化节点(Call parent class constructor to initialize node)
        self._action_server = ActionServer(
            self,
            FileDownload,  # 使用FileDownload action接口(Use FileDownload action interface)
            'file_download',  # 定义action的名称为file_download(Define action name as file_download)
            self.execute_callback)  # 设置回调函数为execute_callback(Set callback function as execute_callback)

    def execute_callback(self, goal_handle):
        # 服务器端执行的回调函数(Server-side execution callback function)

        self.get_logger().info(f'Start file download for {goal_handle.request.file_size} bytes...')  # 打印开始下载的日志(Print log for starting download)
        feedback_msg = FileDownload.Feedback()  # 创建Feedback消息类型的对象(Create Feedback message type object)

        current_size = 0  # 初始化当前下载的文件大小为0(Initialize current downloaded file size to 0)
        while current_size < goal_handle.request.file_size:
            increment_size = random.randint(1, 10)  # 模拟随机增加下载大小(Simulate random increment in download size)
            current_size += increment_size  # 更新当前下载的文件大小(Update current downloaded file size)
            if current_size > goal_handle.request.file_size:
                current_size = goal_handle.request.file_size
            completion_percentage = (current_size / goal_handle.request.file_size) * 100  # 计算下载进度百分比(Calculate download progress percentage)

            feedback_msg.completion_percentage = completion_percentage  # 更新Feedback消息的下载进度(Update download progress in Feedback message)
            self.get_logger().info(f'Publishing feedback: {completion_percentage:.2f}% downloaded')  # 打印发布的反馈消息(Print published feedback message)
            goal_handle.publish_feedback(feedback_msg)  # 发布反馈消息(Publish feedback message)
            rclpy.spin_once(self, timeout_sec=1.0)  # 模拟时间的流逝(Simulate time passage)

        goal_handle.succeed()  # 指示目标已完成(Indicate goal completion)
        result = FileDownload.Result()  # 创建Result消息类型的对象(Create Result message type object)
        result.current_size = current_size  # 设置Result消息的当前文件大小(Set current file size in Result message)
        self.get_logger().info('File download completed!')  # 打印文件下载完成的日志(Print log for file download completion)
        return result  # 返回结果(Return result)
This callback function is invoked to execute the file download task. Within this function, a while loop is used to simulate the real-time file download process by randomly increasing the current download amount. During the download process, it continuously publishes the current download progress as feedback information through the goal_handle object. Once the task download is completed, it uses the goal_handle to set the task status to success and returns the final download result.
Subscriber
According to the realization result, the logic progress for the program is shown as pictured:
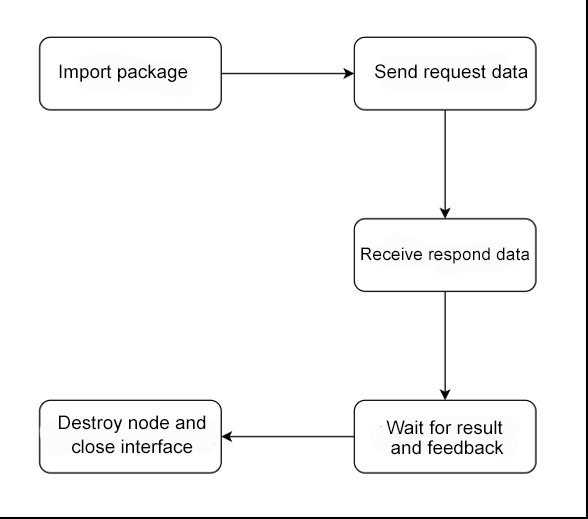
A FileDownloadActionClien class is defined, which creates an ActionClient object in the constructor and configures it for file download task type. The client provides a send_goal method to send the target file size as the action Goal. Additionally, it registers three callback functions to handle Goal status responses, task process feedback, and the final task. In the main function, an instance of the client is created, send_goal is called to send the download task, and rclpy.spin() to obtain the full process of task execution status changes.
(1) Main Function
def main(args=None):
    rclpy.init(args=args)  # 初始化ROS节点(Initialize ROS node)
    client = FileDownloadActionClient()  # 创建FileDownloadActionClient对象(Create FileDownloadActionClient object)

    result = client.send_goal(100)  # 发送目标(Send goal)

    rclpy.spin(client)  # 进入主循环(Enter main loop)
    client.destroy_node()  # 销毁节点(Destroy node)
    rclpy.shutdown()  # 关闭ROS(Shutdown ROS)
First, invoke the rclpy.init() function to initialize ROS2 Python interface. Then instantiate the FileDownloadActionClient(). Finally, execute the client within the event loop of the ROS2 node.
(2) FileDownloadActionClient Class
class FileDownloadActionClient(Node):  # 定义一个继承自Node类的FileDownloadActionClient类(Define a FileDownloadActionClient class that inherits from Node class)
    def __init__(self):
        super().__init__('file_download_action_client')  # 调用父类构造函数初始化节点(Call parent class constructor to initialize node)
        self._action_client = ActionClient(self, FileDownload, 'file_download')  # 创建ActionClient对象(Create ActionClient object)

    def send_goal(self, file_size):
        goal_msg = FileDownload.Goal()  # 创建Goal消息类型的对象(Create Goal message type object)
        goal_msg.file_size = file_size  # 设置文件大小(Set file size)

        self.get_logger().info(f'Sending file download goal for {file_size} bytes')  # 打印发送目标的日志(Print log for sending goal)

        self._action_client.wait_for_server()  # 等待服务器可用(Wait for server to be available)
        self.future = self._action_client.send_goal_async(goal_msg, feedback_callback=self.feedback_callback)  # 发送目标异步请求(Send goal async request)

        self.future.add_done_callback(self.goal_response_callback)  # 添加目标响应回调函数(Add goal response callback function)

    def goal_response_callback(self,future):
        goal_handle = future.result()  # 获取目标句柄(Get goal handle)
        if not goal_handle.accepted:
            self.get_logger().info("Goal rejected")  # 打印目标被拒绝的日志(Print log for goal rejection)
            return
        self.get_logger().info("Goal accepted")  # 打印目标被接受的日志(Print log for goal acceptance)
        self._get_result_future = goal_handle.get_result_async()  # 获取目标结果异步请求(Get goal result async request)
        self._get_result_future.add_done_callback(self.get_result_callback)  # 添加获取结果的回调函数(Add get result callback function)

    def get_result_callback(self,future):
        self.get_logger().info("File download completed successfully.")  # 打印文件下载成功完成的日志(Print log for successful file download completion)

    def feedback_callback(self, feedback_msg):
        self.get_logger().info(f'Received feedback: {feedback_msg.feedback.completion_percentage:.2f}% downloaded')  # 打印接收到的反馈消息(Print received feedback message)
A ActionClient object is created to communicate with the task service. The client provides a send_goal method to send the download target, and registers three callback functions to handle the status changes feedback at the different stages of the task. After sending the Goal, the send_goal method adds callback functions through the future object to wait for the ActionServer's response. These three callback functions are used to obtain the Goal reception result, update the task progress, and obtain the completion result, covering the entire lifecycle of the task.
8.11 ROS2 Communication Interface
8.11.1Communication Interface Introduction
In the ROS system, regardless of topics, services or actions, they all rely on an significant concept –communication interface.
Communication isn’t a monologue but rather an exchange between two or more parties. What is being exchanged? To ensure mutual understanding, we can define a standardized structure for the data being transmitted, and this is what we call a communication interface.
Interfaces help reduce dependencies between programs, making it easier for us to use others’ code and for others to use our code. This is the core goal of ROS, which is to reduce redundant efforts.
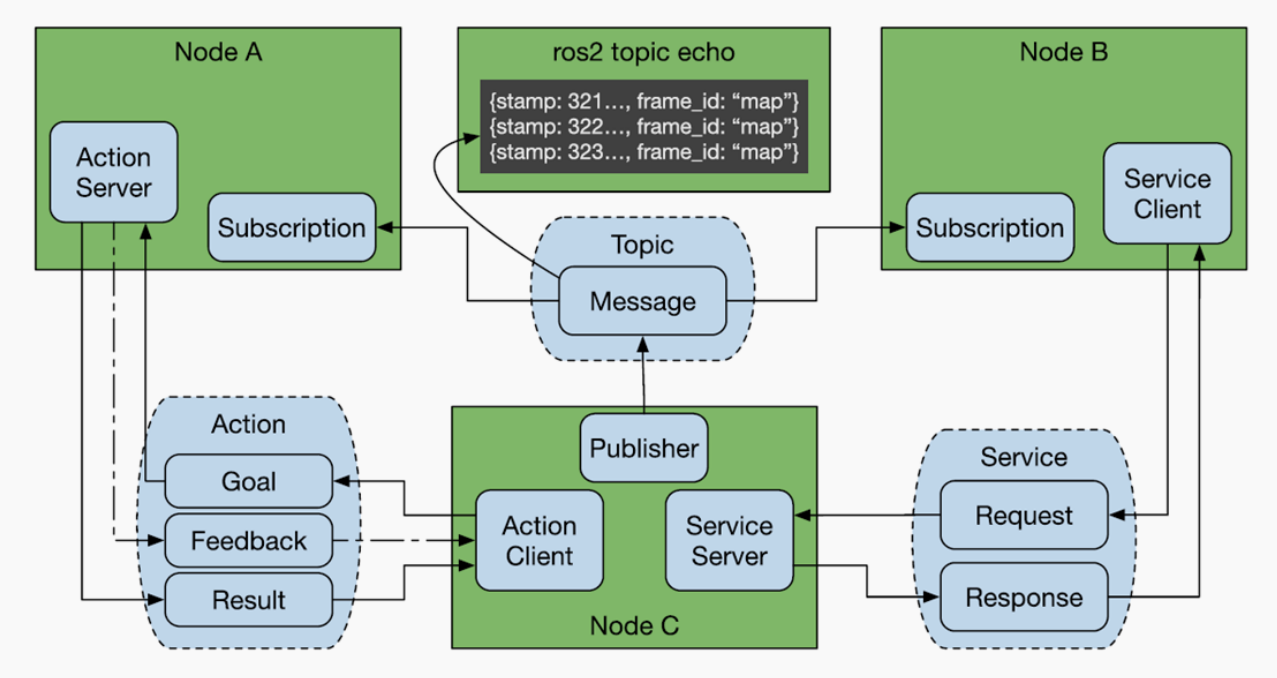
ROS has three commonly used communication mechanisms, namely topics, services, and actions. Through the interfaces defined by each communication mechanism, various nodes can be interconnected.
8.11.2 Custom Interface
In the Lesson 8 ROS Topic, Lesson 9 Service Instruction, and Lesson 10 ROS Action, the custom interface package named demo_interfaces. Within this package, three custom interfaces are created, which are String.msg, FileDownload.action, and AddInts.srv.
(1) Click  and select “**System Tools ->Terminator in sequence.

(2) Enter the command “cd hiwonder_ws/src/demo_interfaces” to switch to the “demo_interfaces” custom interface package.
cd hiwonder_ws/src/demo_interfaces
(3) Enter “tree -L 1” and press Enter to view the root directory of the package.
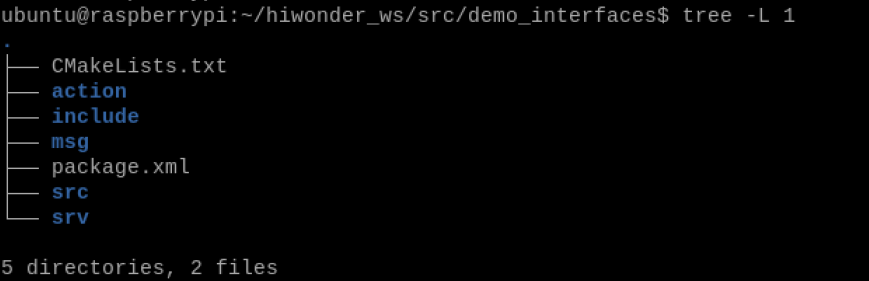
The demo_interfaces package has action, msg and srv folders for storing custom interface files. Following provides an explanation for each folder:
| Folder Name | Instruction |
|---|---|
| action | The .action file for storing action communication. |
| msg | The .msg file file for storing topic communication. |
| srv | The srv file file for storing service communication |
8.12 ROS2 Parameter Instruction
8.12.1 Parameter Introduction
Similar to global variables in C++ programming, which can facilitate sharing certain data across multiple programs, parameters in the ROS robot system are globe dictionaries that allow sharing data among multiple nodes.
In the ROS system, parameters are presented in the the form of global dictionary. What is a dictionary? Just like a real dictionary, it consists of names and values, also known as keys and values, forming key-value pairs. Alternatively, it can also be understood as the parameters in programming, where there is a parameter name following by an equal sign, and then the parameter value. When using it, you can access this parameter name.
Parameters have rich features. For example, if a node shares a parameter, other nodes can access it. If a node modifies a parameter, other node can also immediately know about it, thus obtaining the latest value.
8.12.2 param Parameter
Let’s fist get to know param parameter commands. The detailed instruction is as follow:
| Command | Instruction |
|---|---|
| ros2 param list | List current multiple parameters |
| ros2 get param_key | List a certain parameter value |
| ros2 set param_key param_value | Set a certain parameter value |
| ros2 param dump file_name | Save parameters into file |
| ros2 param load file_name | Read parameters from a file |
| ros2 param delete param_key | Delete parameters |
8.12.3 Create A Parameter Example
(1) Click  and select “**System Tools ->Terminator in sequence.

(2) Enter the command “Enter the command “cd hiwonder_ws/src/demo_interfaces” to switch to the src folder within the hiwonder_was workspace.
cd hiwonder_ws/src/demo_interfaces

(3) Enter the command “ros2 pkg create param_demo –build-type ament_python –dependencies rclpy” and press Enter to create a package named “param_demo” with rclpy dependency.
ros2 pkg create param_demo --build-type ament_python --dependencies rclpy
(4) Enter the command “cd param_demo/param_demo/” to switch to the “param_demo” package.
cd param_demo/param_demo/
(5) Enter the command “vim param_demo.py” to open the file using VIM text editor. Copy the program below. If you need to make modifications, you can press “i” to enter the insert mode. If you’ve finishing the modification, press “Esc” and enter “:wq” to save and exit.
vim param_demo.py
import rclpy  # 导入rclpy模块(Import rclpy module)
from rclpy.node import Node  # 导入Node类(Import Node class)
from rclpy.parameter import Parameter  # 导入Parameter类(Import Parameter class)

class MinimalParam(Node):  # 定义一个继承自Node类的MinimalParam类(Define a MinimalParam class that inherits from Node class)
    def __init__(self):
        super().__init__('minimal_param_node')  # 调用父类构造函数初始化节点(Call parent class constructor to initialize node)

        self.declare_parameter('my_parameter', 'hiwonder')  # 声明一个名为'my_parameter'的参数,并设置默认值为'hiwonder'(Declare a parameter named 'my_parameter' with default value 'hiwonder')

        self.timer = self.create_timer(1, self.timer_callback)  # 创建定时器,设置回调函数为timer_callback,时间间隔为1秒(Create timer with callback function timer_callback, interval 1 second)

    def timer_callback(self):
        my_param = self.get_parameter('my_parameter').get_parameter_value().string_value  # 获取参数'my_parameter'的值,并转换为字符串(Get parameter 'my_parameter' value and convert to string)

        self.get_logger().info('Hello %s!' % my_param)  # 打印带有参数值的日志消息(Print log message with parameter value)

        my_new_param = Parameter(  # 创建一个新的参数对象(Create a new parameter object)
            'my_parameter',  # 参数名称为'my_parameter'(Parameter name is 'my_parameter')
            rclpy.Parameter.Type.STRING,  # 参数类型为字符串(Parameter type is string)
            'hiwonder'  # 参数值为'hiwonder'(Parameter value is 'hiwonder')
        )
        all_new_parameters = [my_new_param]  # 将新的参数对象放入列表中(Put new parameter object into list)
        self.set_parameters(all_new_parameters)  # 设置节点的参数值为新的参数值(Set node parameter values to new parameter values)

def main():
    rclpy.init()  # 初始化ROS节点(Initialize ROS node)
    node = MinimalParam()  # 创建MinimalParam对象(Create MinimalParam object)
    rclpy.spin(node)  # 进入主循环(Enter main loop)

if __name__ == '__main__':
    main()
:wq
(6) Enter the command “chmod +x param_demo.py” and press Enter to grant the executable permission to the saved param_demo.py file.
chmod +x param_demo.py
8.12.4 Compilation and Execution
(1) After granting the executing permission, enter the command “cd ~/hiwonder_ws/” to switch to the directory of the workspace.
cd ~/hiwonder_ws/
(2) Enter the command “colcon build” and press Enter to compile the packages within the workspace.
colcon build
(3) Enter the command “source ./install/setup.bash” and press Enter to make the environment variables take effect.
source ./install/setup.bash
(4) Enter the command “ros2 run param_demo param_demo” and press Enter to start the param_demo node.
ros2 run param_demo param_demo
(5) Right click to select “Split Vertically” to create a new terminal window.

(6) Enter the command “ros2 param set minimal_param_node my_parameter world” and press Enter to modify the parameter my_parameter of the node minimal_param_node to “world”.
ros2 param set minimal_param_node my_parameter world
At this point, you can notice that the output from the param_demo node is “Hello world!”, indicating the parameter are modified successfully.
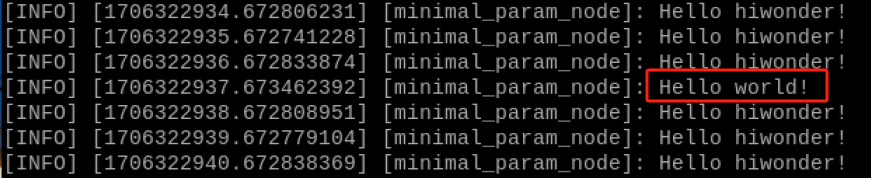
8.12.5 Program Analysis
According to the realization result, the logic progress for the program is shown as pictured:
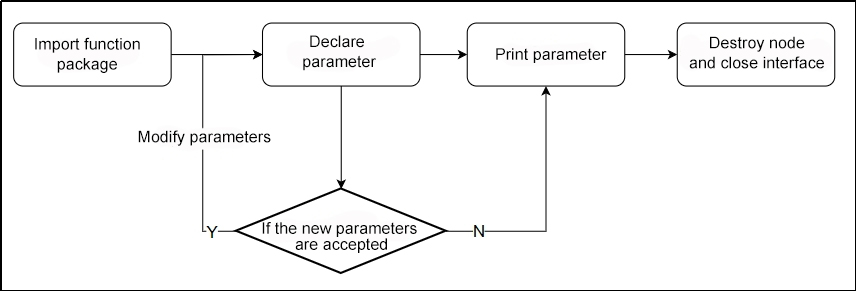
Create a MinimalParam class, declare a string parameter my_parameter in the constructor, and create a timer with a 1-second interval. The timer callback function is called every 1 second. Inside the callback, it first retrieves the current value of the parameter, then prints a log, creates a new parameter object, sets a new value, and finally calls the set_parameters function to modify the parameter value in the parameter server.
Main Function
def main():
    rclpy.init()  # 初始化ROS节点(Initialize ROS node)
    node = MinimalParam()  # 创建MinimalParam对象(Create MinimalParam object)
    rclpy.spin(node)  # 进入主循环(Enter main loop)
First, invoke the rclpy.init() function to initialize ROS2 Python interface. Then instantiate the MinimalParam. Finally, execute the node.run() function**.**
MinimalParam Class
class MinimalParam(Node):  # 定义一个继承自Node类的MinimalParam类(Define a MinimalParam class that inherits from Node class)
    def __init__(self):
        super().__init__('minimal_param_node')  # 调用父类构造函数初始化节点(Call parent class constructor to initialize node)

        self.declare_parameter('my_parameter', 'hiwonder')  # 声明一个名为'my_parameter'的参数,并设置默认值为'hiwonder'(Declare a parameter named 'my_parameter' with default value 'hiwonder')

        self.timer = self.create_timer(1, self.timer_callback)  # 创建定时器,设置回调函数为timer_callback,时间间隔为1秒(Create timer with callback function timer_callback, interval 1 second)

    def timer_callback(self):
        my_param = self.get_parameter('my_parameter').get_parameter_value().string_value  # 获取参数'my_parameter'的值,并转换为字符串(Get parameter 'my_parameter' value and convert to string)

        self.get_logger().info('Hello %s!' % my_param)  # 打印带有参数值的日志消息(Print log message with parameter value)

        my_new_param = Parameter(  # 创建一个新的参数对象(Create a new parameter object)
            'my_parameter',  # 参数名称为'my_parameter'(Parameter name is 'my_parameter')
            rclpy.Parameter.Type.STRING,  # 参数类型为字符串(Parameter type is string)
            'hiwonder'  # 参数值为'hiwonder'(Parameter value is 'hiwonder')
        )
        all_new_parameters = [my_new_param]  # 将新的参数对象放入列表中(Put new parameter object into list)
        self.set_parameters(all_new_parameters)  # 设置节点的参数值为新的参数值(Set node parameter values to new parameter values)
First, a string parameter named my_parameter is declared, and a timer with a 1-second period is created. The timer callback function, timer_callback, is called every second. It first retrieves the current value of the my_parameter parameter and then prints a log output. Next, the callback function creates a new parameter object with the same name but with a value of “hiwonder”. Afterward, it calls the set_parameters function to modify the parameter value.
8.13 Distributed Communication Instruction
8.13.1 Introduction
Multicomputer communication refers to the process of information transmission and exchange between multiple computers or nodes in a network.
The ROS-based intermediate piece is DDS. In the same network, the distributed communication can be implemented by using the domain DDS’s ID mechanics (ROS_DOMAIN_ID). The general progress: before starting nodes, the value of domain ID can be set. If different nodes have the same domain ID, they can freely discover and communicate with each other. Conversely, if the domain ID values are different, communication cannot be established. By default, all nodes use a domain ID of 0 at startup. In other words, as long as you ensure that they are in the same network, no configuration is required, and nodes on different ROS2 devices can achieve distributed communication.
The distributed communication has extensive application scenarios such as autonomous vehicle formations, drone formations, remote control, and so on. The interaction of these data relies on distributed communication.
8.13.2 ROS2 Distributed Network Group
ROS2 provides a mechanism called DOMAIN, similar to grouping, where terminals within the same DOMAIN can communicate.
By default, all ROS2 nodes uses a domain ID of 0. To avoid messages confusion, devices from different groups running ROS2 within the same network should use different domain ID. It is recommended to use ID between 0-101.
(1) Click  and select “System Tools ->Terminator” in sequence.

(2) Enter the command “vim ~/.bashrc” to open the bashrc file suing VIM text editor.
vim ~/.bashrc
(3) Press “i” to enter the insert mode, and enter “export ROS_DOMAIN_ID=25” in corresponding location. After you’ve finishing modifications, press “Esc” and enter “:wq” to save and exit.
export ROS_DOMAIN_ID=25
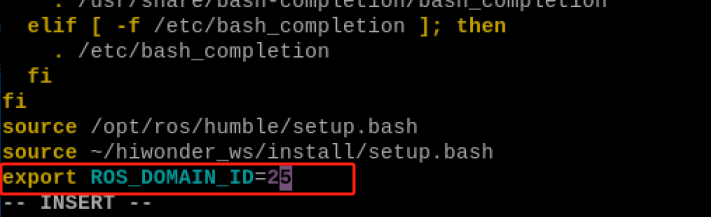
(4) Enter the command “source ~/.bashrc” to make the environment variables make effect.
source ~/.bashrc
Add the statement “export ROS_DOMAIN_ID=25” to the barshrc files of other terminals to assign them to the same group (i.e., domain ID 25), enabling distributed communication. If different domain IDs are assigned, communication between them will not be possible.
(5) Comparison of ROS1 and ROS in Distributed Communication Mechanisms.
The distributed Communication Mechanism of ROS1:
① Utilizes anonymous TCP/IP-based communication for distributed communication.
② Communication adopts publish/subscribe mode through central master
③ Nodes need to actively register with the master to obtain information about peer nodes.
④ The reliability of communication depends on the central node master.
The distributed communication mechanism of ROS2:
① Utilizing the common transmission protocols such as TCP, UDP, DDS, etc.
② Introduce distributed service discovery with mechanisms for discovery, authentication and authorization mechanism.
③ Nodes communicate directly with peer nodes without without the need for a central mater.
④ ZeroMQ is deployed by default to build communication middleware, enabling decentralized distributed communication.
⑤ Support both point-to-point and multicast communication, providing better scalability.
⑥ Stronger fault tolerance, ensuring communication can be maintained even if nodes go offline.
8.14 ROS2 DDS Instruction
8.14.1 DDS Introduction
The full name of DDS is Data Distribution Service, which means data distribution service. It was published and maintained by the Object Management Organization (OMG) in 2004. It is a set of data publish-subscribe standards tailored for real-time systems. It was initially used by the US Navy to address compatibility issues with large software upgrades in complex naval network environments. It has since become a mandatory standard.
DDS emphasizes putting data at the center and can provide a rich set of quality of service policies to ensure real-time, efficient, and flexible data distribution. It can meet various requirements of distributed real-time communication applications.
In the previous courses, the topics, services, and actions learned are all implemented at the communication level through DDS. It can be considered as the neural network within the ROS system. The common communication models include the following four types:
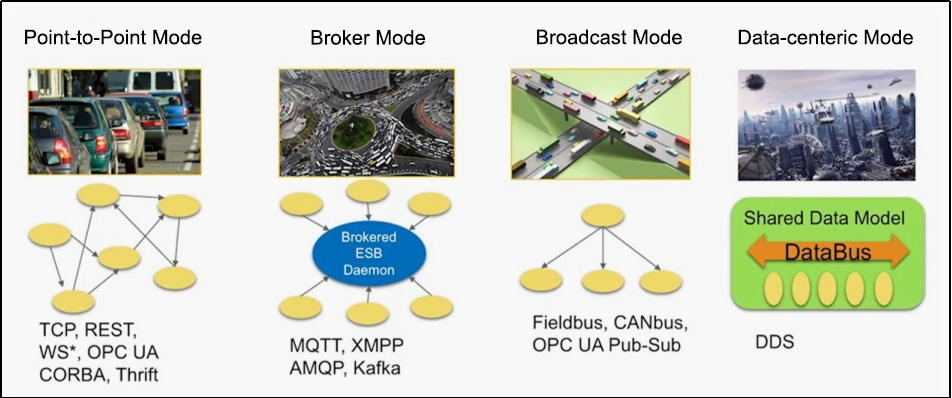
(1) In the point-to-point model, many clients connect to a single server, requiring the establishment of a connection each time communication occurs. A the number of communication nodes increases, so does the number of connections. Additionally, each client needs to know the specific address of the server and the services it provides. Once the server’s address changes, all clients are affected.
(2) In the broker mode, optimization is applied to the point-to-point model. A centralized Broker handles all requests and further identifies the roles that can effectively respond to the service.This relieves clients from needing to concern themselves with the specific address of the server. However, there are evident issues with this approach. As the Broker serves as the core, its processing speed impacts the efficiency of all nodes. When the system scales to a certain extent, the Broker becomes the performance bottleneck of the entire system. Moreover, if the Broker encounters an exception, it may result in the entire system failing to operate normally. Previously, the ROS1 system utilized a similar architecture.
(3) In the broadcast model, all nodes can broadcast on a channel and receive these messages. This model addresses the issue of server addresses, and eliminating the need for the communication parties to establish individual connections. However, the volume of messages on the broadcast channel is significant, requiring all nodes to process each message, even those unrelated to them.
(4) The Data-Centric Model, similar to the broadcast model, allows all nodes to publish and subscribe to messages on the DataBus. However, its sophistication lies in incorporating multiple parallel channels of communication. Each node can focus solely focuses on the data itself rather than the endpoints involved in communication.
8.14.2 The Application of DDS in ROS
The position of DDS within the ROS 2 system is crucial, as all upper-level constructs are built upon it. In the architectural diagram of ROS 2, the blue and red sections represent DDS.
In the four major components of ROS, the addition of DDS significantly improves the comprehensive capability of the distributed communication system. Consequently, in the process of developing robots, we are relieved from the burden of grappling with communication intricacies, enabling us to allocate more time to application development in other domains.
8.14.3 Quality of Service (QoS)
The fundamental structure in DDS is the Domain, which binds various applications together for communication. Another important feature in DDS is Quality of Service - QoS.
QoS is a network transmission strategy where applications specify the required quality of network transmission behavior. QoS services fulfill these behavioral requirements, striving to meet customers’ demands for communication quality. It can be regarded as a contract between data providers and receivers. The strategies are as follow:
(1) The DEADLINE policy indicates that communication data must be transmitted within a specified deadline for each communication instance.
(2) The HISTORT policy indicates a cache capacity for historical data.
(3) The RELIABILITY policy indicates the mode of data communication. When it is configured as BEST_EFFORT, it operates in a best-effort transmission mode, ensuring data flow even under adverse network conditions, which may result in potential data loss. Configured as RELIABLE, it operates in a reliable mode, striving to maintain the integrity of the data during communication. We can choose the appropriate communication mode based on the functional scenarios of the application.
(4) The DURABILITY strategy allows configurations for nodes that are added later to ensure a certain amount of historical data is sent, enabling new nodes to quickly adapt to the system.
8.14.4 DDS Configuration in Command-line
(1) Click  in the upper-left corner to select “System Tools→Terminator” in sequence.

(2) Enter the command “ros2 topic pub /chatter std_msgs/msg/Int32 “data: 42” –qos-reliability best_effort” to publish a topic named “/chatter” using the message type “std_msgs/msg/Int32”, sending an integer message with the data 42. Through adding the option of “–qos-reliability best_effort”, the publisher specifies the use of best effort reliability.
ros2 topic pub /chatter std_msgs/msg/Int32 "data: 42" --qos-reliability best_effort

(3) Right click on a blank area to select “Split Vertically” to create a new terminal window.

(4) Enter the command “ros2 topic echo /chatter –qos-reliability reliable” to subscribe to a topic named “/chatter” and print the received messages. If the publisher uses the reliable QoS policy for publishing while the subscriber uses the best effort policy for subscribing, data communication cannot be achieve. Only when the publisher and receiver use the same QoS policy can the correct correct transmission of data be ensured.
ros2 topic echo /chatter --qos-reliability reliable
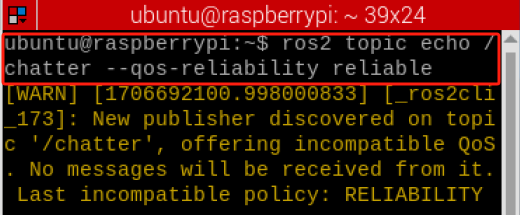
(5) Enter the command “ros2 topic echo /chatter –qos-reliability best_effort” and subscribe to a topic named “/chatter” and print the received messages. By adding the “–qos-reliability reliable” option, modify it to the same “best_effort” in order to achieve data transmission
ros2 topic echo /chatter --qos-reliability best_effort
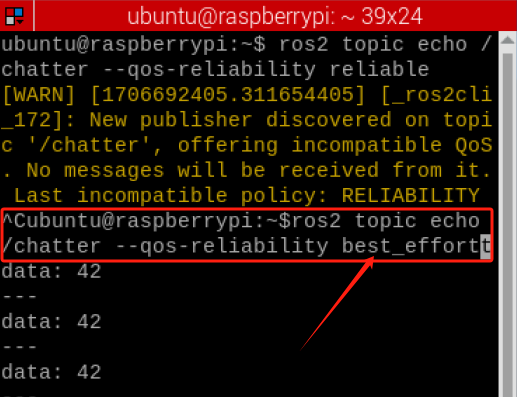
8.14.5 DDS Programming Example
Create Publisher
(1) Click in the upper-left corner to select “System Tools→Terminator” in sequence.
(2) Enter command “cd hiwonder_ws/src/” to switch to the src folder within the hiwonder_ws workspace.
cd hiwonder_ws/src/
(3) Enter the command “ros2 pkg create DDS_qos_demo –build-type ament_python –dependencies rclpy” and press Enter to create a package named DDS_qos_demo, adding a dependency on rclpy.
ros2 pkg create DDS_qos_demo --build-type ament_python --dependencies rclpy
(4) Enter the command “cd DDS_qos_demo/DDS_qos_demo/” to switch to the “DDS_qos_demo” package directory.
cd DDS_qos_demo/DDS_qos_demo/
(5) Enter the command “vim DDS_qos_pub.py” to edit the program using VIM editor, copy and paste the program below. If you need to make modifications, you can press “i” to enter the insert mode. Once you’ve finished the modifications, you can press “Esc” and enter “:wq” to save and exit.
vim DDS_qos_pub.py
import rclpy  # 导入rclpy模块(Import rclpy module)
from rclpy.node import Node  # 导入Node类(Import Node class)

from std_msgs.msg import String  # 导入String消息类型(Import String message type)
from rclpy.qos import QoSProfile, QoSReliabilityPolicy, QoSHistoryPolicy  # 导入QoSProfile和QoSReliabilityPolicy、QoSHistoryPolicy类(Import QoSProfile, QoSReliabilityPolicy, QoSHistoryPolicy classes)

class MinimalPublisher(Node):  # 定义一个继承自Node类的MinimalPublisher类(Define a MinimalPublisher class that inherits from Node class)

    def __init__(self):
        super().__init__('minimal_publisher')  # 调用父类构造函数初始化节点(Call parent class constructor to initialize node)
        qos_profile = QoSProfile(  # 创建QoSProfile对象(Create QoSProfile object)
            reliability=QoSReliabilityPolicy.RELIABLE,  # 设置可靠性策略为RELIABLE(Set reliability policy to RELIABLE)
            history=QoSHistoryPolicy.KEEP_LAST,  # 设置历史策略为KEEP_LAST(Set history policy to KEEP_LAST)
            depth=1  # 设置深度为1(Set depth to 1)
        )
        self.publisher_ = self.create_publisher(String, 'topic', qos_profile)  # 创建发布者对象(Create publisher object)
        timer_period = 0.5  # 设置定时器回调的时间间隔为0.5秒(Set timer callback interval to 0.5 seconds)
        self.timer = self.create_timer(timer_period, self.timer_callback)  # 创建定时器,设置回调函数为timer_callback(Create timer and set callback function to timer_callback)
        self.i = 0

    def timer_callback(self):
        msg = String()  # 创建String消息类型的对象(Create String message type object)
        msg.data = 'Hello World: %d' % self.i  # 设置消息的数据(Set message data)
        self.publisher_.publish(msg)  # 发布消息(Publish message)
        self.i += 1  # 自增计数器(Increment counter)


def main(args=None):
    rclpy.init(args=args)  # 初始化ROS节点(Initialize ROS node)

    minimal_publisher = MinimalPublisher()  # 创建MinimalPublisher对象(Create MinimalPublisher object)

    rclpy.spin(minimal_publisher)  # 进入主循环(Enter main loop)

    minimal_publisher.destroy_node()  # 销毁节点(Destroy node)
    rclpy.shutdown()  # 关闭ROS(Shutdown ROS)

if __name__ == '__main__':
    main()
:wq
(6) Enter the command “chmod +x DDS_qos_pub.py” and press Enter to grant the executable permission to the saved “topic_pub.py”.
chmod +x DDS_qos_pub.py
Create Subscriber
(1) Enter the command “vim DDS_qos_sub.py” to edit the program using VIM editor, copy and paste the program below. If you need to make modifications, you can press “i” to enter the insert mode. Once you’ve finished the modifications, you can press “Esc” and enter “:wq” to save and exit.
vim DDS_qos_sub.py
import rclpy  # 导入rclpy模块(Import rclpy module)
from rclpy.node import Node  # 导入Node类(Import Node class)

from std_msgs.msg import String  # 导入String消息类型(Import String message type)
from rclpy.qos import QoSProfile, QoSReliabilityPolicy, QoSHistoryPolicy  # 导入QoSProfile和QoSReliabilityPolicy、QoSHistoryPolicy类(Import QoSProfile, QoSReliabilityPolicy, QoSHistoryPolicy classes)

class MinimalSubscriber(Node):  # 定义一个继承自Node类的MinimalSubscriber类(Define a MinimalSubscriber class that inherits from Node class)

    def __init__(self):
        super().__init__('minimal_subscriber')  # 调用父类构造函数初始化节点(Call parent class constructor to initialize node)
        qos_profile = QoSProfile(  # 创建QoSProfile对象(Create QoSProfile object)
            reliability=QoSReliabilityPolicy.RELIABLE,  # 设置可靠性策略为RELIABLE(Set reliability policy to RELIABLE)
            history=QoSHistoryPolicy.KEEP_LAST,  # 设置历史策略为KEEP_LAST(Set history policy to KEEP_LAST)
            depth=1  # 设置深度为1(Set depth to 1)
        )
        self.subscription = self.create_subscription(String, 'topic', self.listener_callback, qos_profile)  # 创建订阅者对象,并设置回调函数为listener_callback(Create subscriber object and set callback function to listener_callback)

    def listener_callback(self, msg):
        self.get_logger().info('I heard: "%s"' % msg.data)  # 打印接收到的消息内容(Print received message content)


def main(args=None):
    rclpy.init(args=args)  # 初始化ROS节点(Initialize ROS node)

    minimal_subscriber = MinimalSubscriber()  # 创建MinimalSubscriber对象(Create MinimalSubscriber object)

    rclpy.spin(minimal_subscriber)  # 进入主循环(Enter main loop)

    minimal_subscriber.destroy_node()  # 销毁节点(Destroy node)
    rclpy.shutdown()  # 关闭ROS(Shutdown ROS)

if __name__ == '__main__':
    main()
:wq
(2) Enter the command “chmod +x DDS_qos_sub.py” and press Enter to grant the executable permission to the saved file topic_sub.py.
chmod +x DDS_qos_sub.py
8.14.6 setup.py File Settings
The setup.py file defines the metadata and build configuration for a ROS2 package, providing information such as package metadata, dependencies, build configuration, and installation logic. It helps developers correctly build, install, and use ROS2 packages. It is necessary to write the program entry points for topic_pub.py and topic_sub.py into the setup.py file.
(1) Enter the command “cd ..” to navigate to the parent directory.
cd ..
(2) Enter the command “vim setup.py” and press Enter to open the setup.py file.
vim setup.py
(3) Press “i” to enter the insert mode, and then enter the following code to the corresponding position.
'DDS_qos_pub = DDS_qos_demo.DDS_qos_pub:main',
'DDS_qos_sub = DDS_qos_demo.DDS_qos_sub:main'
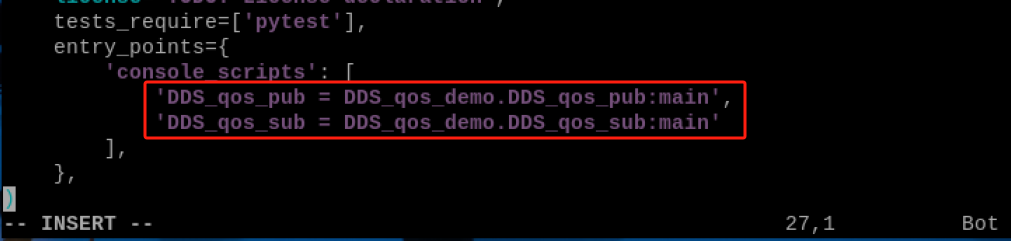
(4) Enter “:wq” to save and exit the file.
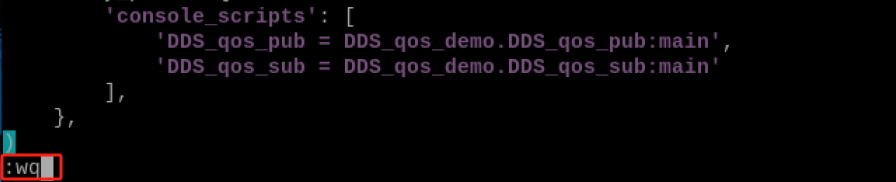
8.14.7 Compilation and Execution
(1) After granting the executable permission, enter the command “cd ~/hiwonder_ws/” to switch to the directory of the workspace.
cd ~/hiwonder_ws/
(2) Enter the command “colcon build” and press Enter to compile the packages within the workspace.
colcon build
(3) Enter the command “source ./install/setup.bash” and press Enter to make the environment variables take effect.
source ./install/setup.bash
(4) Enter the command “ros2 run topic_demo topic_pub” and press Enter to start topic_pub topic publishing node.
ros2 run topic_demo topic_pub
(5) Right click on a blank space to select “Split Vertically” to create a new terminal window.
(6) Enter the command “ros2 run topic_demo topic_sub” and press Enter to start the topic_sub topic publishing node.
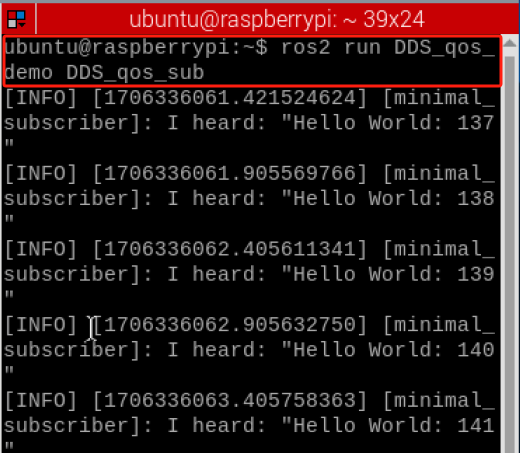
8.14.8 Program Analysis
Publish Topic
According to the realization result, the logic progress for the program is shown as pictured:
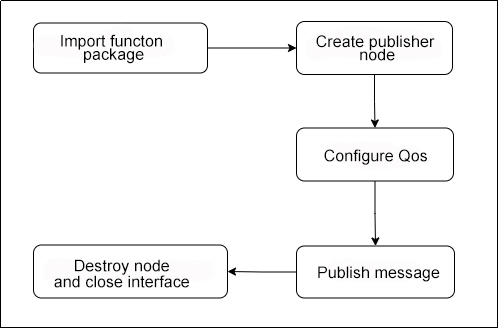
A MinimalPublisher node class is created. In its constructor, a QosProfile object is instantiated to configuring publishing as reliable mode, ensuring the delivery of the lats or the first message, with a buffer depth set to 1. Then, a timer object with 0.5-sccond period is created. In the timer callback function, a String message is constructed, and its content is modified as the loop counter i increases. The message string is then published using the publisher_ object.
The main function first initializes the ROS node environment, then creates an instance of the node, and enters the main loop to drive the execution of the timer task. The timer task allows the published content to be sent in a loop. Finally, the node resources are cleaned up.
(1) Main Function
def main(args=None):
    rclpy.init(args=args)  # 初始化ROS节点(Initialize ROS node)

    minimal_publisher = MinimalPublisher()  # 创建MinimalPublisher对象(Create MinimalPublisher object)

    rclpy.spin(minimal_publisher)  # 进入主循环(Enter main loop)

    minimal_publisher.destroy_node()  # 销毁节点(Destroy node)
    rclpy.shutdown()  # 关闭ROS(Shutdown ROS)
First, invoke the rclpy.init() function to initialize ROS2 Python interface. Then instantiate the MinimalPublisher() file. Finally, execute the minimal_publisher within the event loop of the ROS2 node.
(2) MinimalPublisher Class
class MinimalPublisher(Node):  # 定义一个继承自Node类的MinimalPublisher类(Define a MinimalPublisher class that inherits from Node class)

    def __init__(self):
        super().__init__('minimal_publisher')  # 调用父类构造函数初始化节点(Call parent class constructor to initialize node)
        qos_profile = QoSProfile(  # 创建QoSProfile对象(Create QoSProfile object)
            reliability=QoSReliabilityPolicy.RELIABLE,  # 设置可靠性策略为RELIABLE(Set reliability policy to RELIABLE)
            history=QoSHistoryPolicy.KEEP_LAST,  # 设置历史策略为KEEP_LAST(Set history policy to KEEP_LAST)
            depth=1  # 设置深度为1(Set depth to 1)
        )
        self.publisher_ = self.create_publisher(String, 'topic', qos_profile)  # 创建发布者对象(Create publisher object)
        timer_period = 0.5  # 设置定时器回调的时间间隔为0.5秒(Set timer callback interval to 0.5 seconds)
        self.timer = self.create_timer(timer_period, self.timer_callback)  # 创建定时器,设置回调函数为timer_callback(Create timer and set callback function to timer_callback)
        self.i = 0

    def timer_callback(self):
        msg = String()  # 创建String消息类型的对象(Create String message type object)
        msg.data = 'Hello World: %d' % self.i  # 设置消息的数据(Set message data)
        self.publisher_.publish(msg)  # 发布消息(Publish message)
        self.i += 1  # 自增计数器(Increment counter)
Firstly, a MinimalPublisher node class is created to achieve cyclic publishing in ROS 2 reliable mode. In the constructor init(), a QoSProfile object is created to configure the publishing quality to reliable mode. Then, the publisher_ object is initialized using the QoSProfile. The constructor also sets the timer period to 0.5s and creates a timer object. The counter i is initialized to 0. The timer callback function timer_callback is defined, where a String message object msg is first constructed. The current value of the counter i is then written into the message content using string formatting. Finally, this message is published using the publisher_ object defined earlier, and the counter i is incremented by 1.
(3) Subscribe to Topic
According to the realization result, the logic progress for the program is shown as pictured:
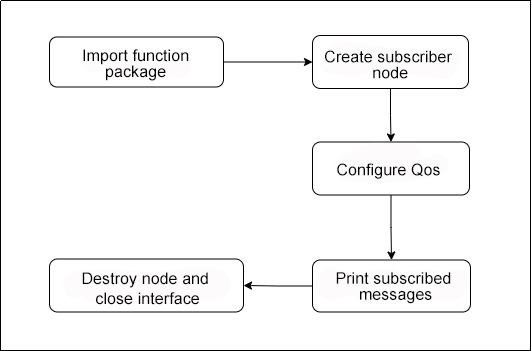
A MinimalSubscriber node class is created to realize the reliable mode subscription in ROS2. In its constructor, it first utilizes a QosProfile object to configure the subscription quality, setting reliability to RELIABLE, retaining the most recent message in history, and setting the buffer depth to 1. Then, creates a subscriber object using the QoSProfile object, subscribes to the topic, and specifies the callback function. The callback function, listener_callback, simply prints the received message content. The main function initializes the node, creates an instance of the subscriber, enters the main loop to drive the callback function, and releases node resources. Through the configuration of QoSProfile, the subscriber ensures that the callback function receives the most recent correct message.
(4) Main Function
def main(args=None):
    rclpy.init(args=args)  # 初始化ROS节点(Initialize ROS node)

    minimal_subscriber = MinimalSubscriber()  # 创建MinimalSubscriber对象(Create MinimalSubscriber object)

    rclpy.spin(minimal_subscriber)  # 进入主循环(Enter main loop)

    minimal_subscriber.destroy_node()  # 销毁节点(Destroy node)
    rclpy.shutdown()  # 关闭ROS(Shutdown ROS)
First, invoke the rclpy.init() function to initialize ROS2 Python interface. Then instantiate the MinimalSublisher() file. Finally, execute the minimal_sublisher within the event loop of the ROS2 node.
(5) MinimalSubscriber Class
class MinimalSubscriber(Node):  # 定义一个继承自Node类的MinimalSubscriber类(Define a MinimalSubscriber class that inherits from Node class)

    def __init__(self):
        super().__init__('minimal_subscriber')  # 调用父类构造函数初始化节点(Call parent class constructor to initialize node)
        qos_profile = QoSProfile(  # 创建QoSProfile对象(Create QoSProfile object)
            reliability=QoSReliabilityPolicy.RELIABLE,  # 设置可靠性策略为RELIABLE(Set reliability policy to RELIABLE)
            history=QoSHistoryPolicy.KEEP_LAST,  # 设置历史策略为KEEP_LAST(Set history policy to KEEP_LAST)
            depth=1  # 设置深度为1(Set depth to 1)
        )
        self.subscription = self.create_subscription(String, 'topic', self.listener_callback, qos_profile)  # 创建订阅者对象,并设置回调函数为listener_callback(Create subscriber object and set callback function to listener_callback)

    def listener_callback(self, msg):
        self.get_logger().info('I heard: "%s"' % msg.data)  # 打印接收到的消息内容(Print received message content)
A MinimalSubscriber node class is first created to implement reliable subscription functionality in ROS2. In its constructor init(), a QoSProfile object is initially created to configure the subscription quality to reliable mode (RELIABLE, KEEP_LAST, etc.). Then, using the QoSProfile object and the specified callback function, a subscription object is created to subscribe to a topic and specify the callback function. The subscription callback function listener_callback is defined to simply print the received message content msg.
8.15 ROS2 Launch Multiple Node Startup and Configuration Script
8.15.1 Launch Introduction
In the realm of ROS, initiating a node often entails the tedious process of opening a new terminal window and executing a command. This repetitive sequence of operations can quickly become cumbersome. Is there a more efficient approach? Enter launch files. These specialized scripts offer a solution by enabling the simultaneous launch and configuration of multiple nodes within the ROS ecosystem. With launch files, the complexity of node deployment is significantly reduced, providing a streamlined solution for managing ROS-based systems.
In ROS2, Launch is used for multi-node startup, configuring program execution parameters, and other functionalities. ROS2 Launch files can be in XML, YAML, or Python formats. This section of the course uses Python format for Launch files as an example. Compared to the other two formats, Python format offers more flexibility:
(1) Python provides a wide range of libraries that can be used within the launch file.
(2) ROS2 generic and specific launch features are written in Python, allowing access to launch features that may not be publicly available in XML and YAML.
When writing ROS2 launch files in Python, the main focus is on abstracting each node, file, or script into an action and using a unified interface for startup. The main structure is as follows:
def generate_launch_description():
	return LaunchDescription([
		action_1,
		action_2,
		...
		action_n
	])
8.15.2 Single Node Launch File
Create single_node.launch.py
(1) Click on  and select “System Tools →Terminator” in sequence.

(2) Enter command “cd hiwonder_ws/src/” to switch to the src folder within the hiwonder_ws workspace.
cd hiwonder_ws/src/
(3) Enter the command “ros2 pkg create DDS_qos_demo –build-type ament_python –dependencies rclpy” and press Enter to create a function package named launch_demo, adding a dependency on rclpy.
ros2 pkg create DDS_qos_demo --build-type ament_python --dependencies rclpy
(4) Enter the command “cd launch_demo/” to switch the directory of the launch_demo package,
cd launch_demo/
(5) Enter the command “mkdir launch” to create the launch folder.
mkdir launch
(6) Enter the command “cd launch” to switch to the launch folder.
cd launch
(7) Enter the command “vim single_node.launch.py” to edit the program and copy the following program. If you need to make modifications, please press “i” to enter the insert mode. Once you’ve finished modifications, please press “Esc” and input “:wq” to save and exit.
vim single_node.launch.py
from launch import LaunchDescription           # launch文件的描述类(Launch file description class)
from launch_ros.actions import Node            # 节点启动的描述类(Node startup description class)

def generate_launch_description():             # 自动生成launch文件的函数(Automatically generate launch file function)
    return LaunchDescription([                 # 返回launch文件的描述信息(Return launch file description information)
        Node(                                  # 配置一个节点的启动(Configure a node startup)
            package='hello_world_demo',        # 节点所在的功能包(Package where the node is located)
            executable='hello_world',          # 节点的可执行文件(Node executable file)
        ),
    ])
:wq
(8) Enter the command “chmod +x single_node.launch.py” and press Enter to grant the executable permission to the saved single_node.launch.py file.
chmod +x single_node.launch.py
setup.py File Settings
The setup.py file defines the metadata and build configuration for a ROS2 package, providing information such as package metadata, dependencies, build configuration, and installation logic. It helps developers correctly build, install, and use ROS2 packages. It is necessary to write the program entry points single_node.launch.py into the setup.py file.
(1) Enter the command “cd ..” to navigate to the parent directory.
cd ..
(2) Enter the command “vim setup.py” and press Enter to open the setup.py file.
vim setup.py
(3) Press “i” to enter the insert mode, and then enter the following code to the corresponding position.
from setuptools import find_packages, setup
import os
from glob import glob
(os.path.join('share', package_name, 'launch'), glob(os.path.join('launch', '*.launch.py'))),
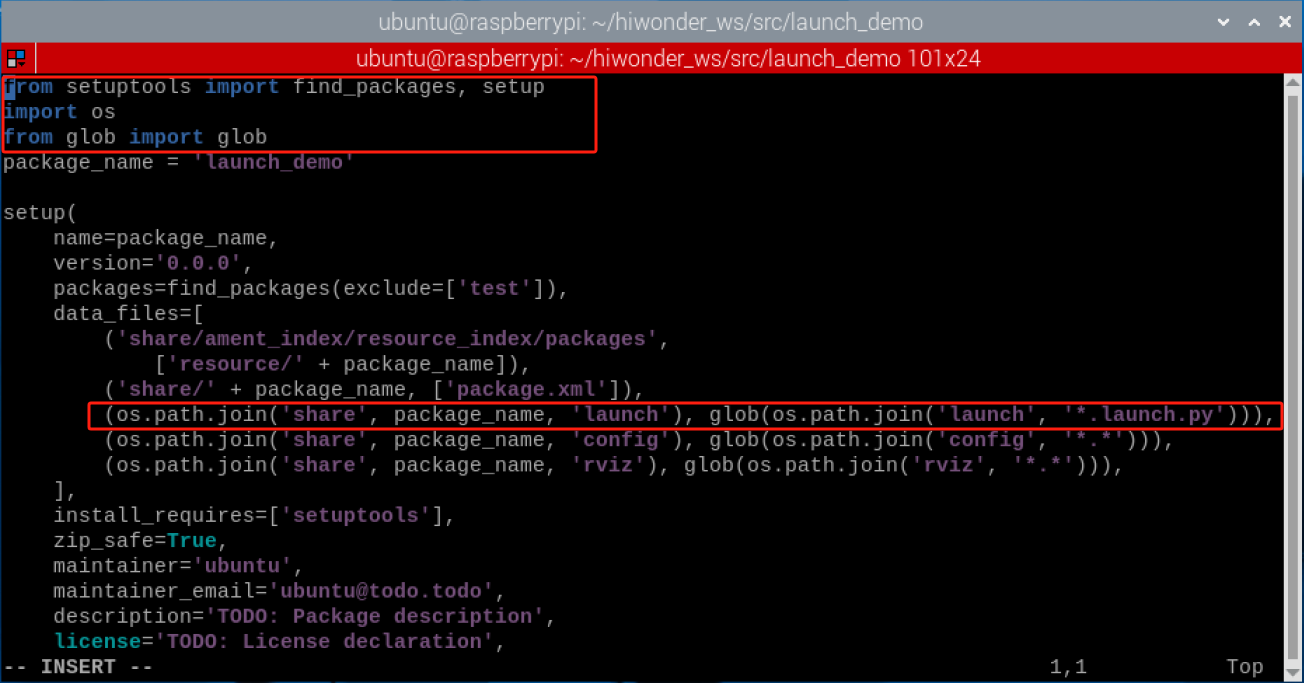
(4) Enter “:wq” to save and exit the file.

Compilation and Execution
(1) After granting the executable permission, enter the command “cd ~/hiwonder_ws/” to switch to the directory of the workspace.
cd ~/hiwonder_ws/
(2) Enter the command “colcon build” and press Enter to compile the packages within the workspace.
colcon build
(3) Enter the command “source ./install/setup.bash” and press Enter to make the environment variables take effect.
source ./install/setup.bash
(4) Enter the command “ros2 launch launch_demo single_node.launch.py” and press Enter to start single_node.launch.py file.
ros2 launch launch_demo single_node.launch.py

Program Analysis
To describe a launch task for the “hello_world” node using a Node, including the package name and executable file, and to return a LaunchDescription object containing this node task, implement the generation of a launch file to describe and start the “hello_world” node.
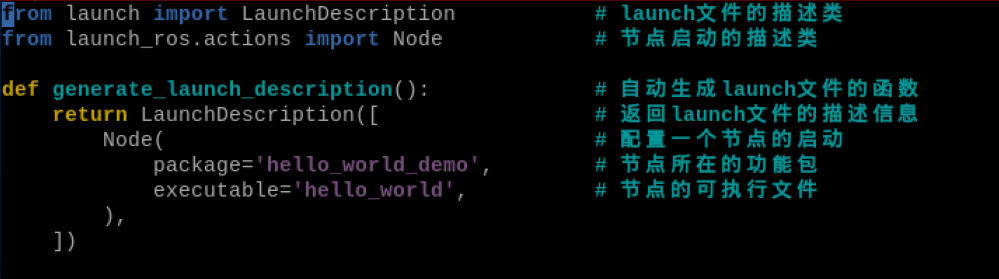
8.15.3 Multiple Node Launch File
Create multi_node.launch.py
(1) Enter the command “cd hiwonder_ws/src/launch_demo/launch” to switch the launch folder within the launch_demo workspace.
cd hiwonder_ws/src/launch_demo/launch
(2) Enter the command “vim multi_node.launch.py” to edit the program and copy the following program. If you need to make modifications, please press “i” to enter the insert mode. Once you’ve finished modifications, please press “Esc” and input “:wq” to save and exit.
vim multi_node.launch.py
from launch import LaunchDescription           # launch文件的描述类(Launch file description class)
from launch_ros.actions import Node            # 节点启动的描述类(Node startup description class)

def generate_launch_description():             # 自动生成launch文件的函数(Automatically generate launch file function)
    return LaunchDescription([                 # 返回launch文件的描述信息(Return launch file description information)
        Node(                                  # 配置一个节点的启动(Configure a node startup)
            package='topic_demo',              # 节点所在的功能包(Package where the node is located)
            executable='topic_pub',            # 节点的可执行文件(Node executable file)
        ),
        Node(                                  # 配置一个节点的启动(Configure a node startup)
            package='topic_demo',              # 节点所在的功能包(Package where the node is located)
            executable='topic_sub',            # 节点的可执行文件名(Node executable file name)
        ),
    ])
:wq
(3) Enter the command “chmod +x multi_node.launch.py” and press Enter to grant the executable permission to the saved multi_node.launch.py file.
chmod +x multi_node.launch.py
Compilation and Execution
(1) After granting the executable permission, enter the command “cd ~/hiwonder_ws/” to switch to the directory of the workspace.
cd ~/hiwonder_ws/
(2) Enter the command “colcon build” and press Enter to compile the packages within the workspace.
colcon build
(3) Enter the command “source ./install/setup.bash” and press Enter to make the environment variables take effect.
source ./install/setup.bash
(4) Enter the command “ros2 launch launch_demo multi_node.launch.py” and press Enter to start single_node.launch.py file.
ros2 launch launch_demo multi_node.launch.py
source ./install/setup.bash
Program Analysis
Describing two node launch tasks (one publishing node and one subscribing node) under the topic_demo package through Node, and adding both node tasks to a LaunchDescription object for return, generating a descriptive launch file to automatically start these two nodes interacting with each other.
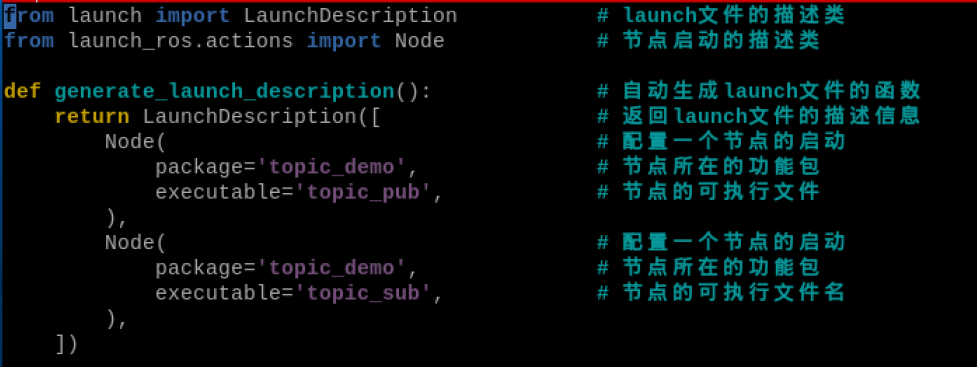
8.15.4 Remapping Launch File
In the ROS community, there are abundant resources. When using code from others, it’s common to find that the topic names for communication don’t quite match our requirements. Is it possible to rename such resources? To enhance software reusability, ROS provides a mechanism for resource remapping
Create remapping.launch.py
(1) Enter the command “cd hiwonder_ws/src/launch_demo/launch” to switch the launch folder within the launch_demo workspace.
cd hiwonder_ws/src/launch_demo/launch
(2) Enter the command “vim remapping.launch.py” to edit the program and copy the following program. If you need to make modifications, please press “i” to enter the insert mode. Once you’ve finished modifications, please press “Esc” and input “:wq” to save and exit.
vim remapping.launch.py
from launch import LaunchDescription           # launch文件的描述类(Launch file description class)
from launch_ros.actions import Node            # 节点启动的描述类(Node startup description class)

def generate_launch_description():             # 自动生成launch文件的函数(Automatically generate launch file function)
    return LaunchDescription([                 # 返回launch文件的描述信息(Return launch file description information)
        Node(                                  # 配置一个节点的启动(Configure a node startup)
            package='topic_demo',          # 节点所在的功能包(Package where the node is located)
            executable='topic_pub', # 节点的可执行文件(Node executable file)
            remappings=[("/topic","topic_pub")] # 话题重映射(Topic remapping)
        ),
    ])
:wq
(3) Enter the command “chmod +x remapping.launch.py” and press Enter to grant the executable permission to the saved remapping.launch.py file.
chmod +x remapping.launch.py
Compilation and Execution
(1) After granting the executable permission, enter the command “cd ~/hiwonder_ws/” to switch to the directory of the workspace.
cd ~/hiwonder_ws/
(2) Enter the command “colcon build” and press Enter to compile the packages within the workspace.
colcon build
(3) Enter the command “source ./install/setup.bash” and press Enter to make the environment variables take effect.
source ./install/setup.bash
(4) Enter the command “ros2 launch launch_demo multi_node.launch.py” and press Enter to start remapping.launch.py file. The original topic name is “/topic”, and after remapping, the topic name becomes “/topic_pub”.
ros2 launch launch_demo multi_node.launch.py
(5) Right-click with the mouse, select “Split Vertically”, and click to create a new terminal window.

(6) Enter the command “ros2 topic list” to view the current list of topics. The original topic name is “/topic”, and after remapping, the topic name becomes “/topic_pub”
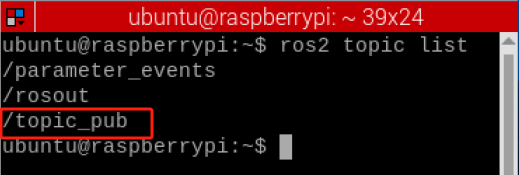
Program Analysis
Through Node action, a launch task to execute the topic_pub node from the topic_demo package was described. Additionally, the topic name published by the node was remapped from “/topic” to “topic_pub” using the remappings parameter. Finally, this node task was added to a LaunchDescription object and returned. The purpose is to automatically generate a launch file for the described node tasks and achieve topic name remapping configuration.
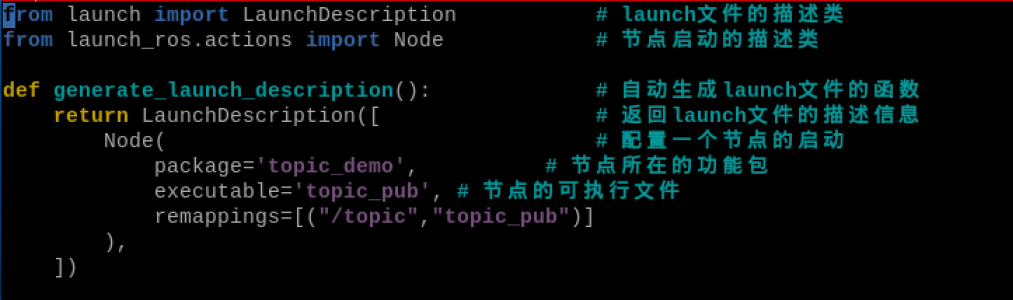
8.15.5 Parameter Configuration Launch File
Create param.launch.py
(1) Enter the command “cd hiwonder_ws/src/launch_demo/launch” to switch the launch folder within the launch_demo workspace.
cd hiwonder_ws/src/launch_demo/launch
(2) Enter the command “vim param.launch.py” to edit the program and copy the following program. If you need to make modifications, please press “i” to enter the insert mode. Once you’ve finished modifications, please press “Esc” and input “:wq” to save and exit.
vim param.launch.py
from launch import LaunchDescription                   # launch文件的描述类(Launch file description class)
from launch.actions import DeclareLaunchArgument       # 声明launch文件内使用的Argument类(Declare Argument class used in launch file)
from launch.substitutions import LaunchConfiguration, TextSubstitution

from launch_ros.actions import Node                    # 节点启动的描述类(Node startup description class)


def generate_launch_description():                     # 自动生成launch文件的函数(Automatically generate launch file function)
   background_r_launch_arg = DeclareLaunchArgument(
      'background_r', default_value=TextSubstitution(text='0')     # 创建一个Launch文件内参数(arg)background_r(Create a Launch file parameter (arg) background_r)
   )
   background_g_launch_arg = DeclareLaunchArgument(
      'background_g', default_value=TextSubstitution(text='120')    # 创建一个Launch文件内参数(arg)background_g(Create a Launch file parameter (arg) background_g)
   )
   background_b_launch_arg = DeclareLaunchArgument(
      'background_b', default_value=TextSubstitution(text='90')   # 创建一个Launch文件内参数(arg)background_b(Create a Launch file parameter (arg) background_b)
   )

   return LaunchDescription([                                      # 返回launch文件的描述信息(Return launch file description information)
      background_r_launch_arg,                                     # 调用以上创建的参数(arg)(Call the parameters (arg) created above)
      background_g_launch_arg,
      background_b_launch_arg,
      Node(                                                        # 配置一个节点的启动(Configure a node startup)
         package='turtlesim',
         executable='turtlesim_node',                              # 节点所在的功能包(Package where the node is located)
         name='sim',                                               # 对节点重新命名(Rename the node)
         parameters=[{                                             # ROS参数列表(ROS parameter list)
            'background_r': LaunchConfiguration('background_r'),   # 创建参数background_r(Create parameter background_r)
            'background_g': LaunchConfiguration('background_g'),   # 创建参数background_g(Create parameter background_g)
            'background_b': LaunchConfiguration('background_b'),   # 创建参数background_b(Create parameter background_b)
         }]
      ),
   ])
:wq
(5) Enter the command “chmod +x param.launch.py” and press Enter to grant the executable permission to the saved remapping.launch.py file.
chmod +x param.launch.py
Compilation and Execution
(1) After granting the executable permission, enter the command “cd ~/hiwonder_ws/” to switch to the directory of the workspace.
cd ~/hiwonder_ws/
(2) Enter the command “colcon build” and press Enter to compile the packages within the workspace.
colcon build
(3) Enter the command “source ./install/setup.bash” and press Enter to make the environment variables take effect.
source ./install/setup.bash
(4) Enter the command “ros2 launch launch_demo param.launch.py” and press Enter to start the param.launch.py file.
ros2 launch launch_demo param.launch.py
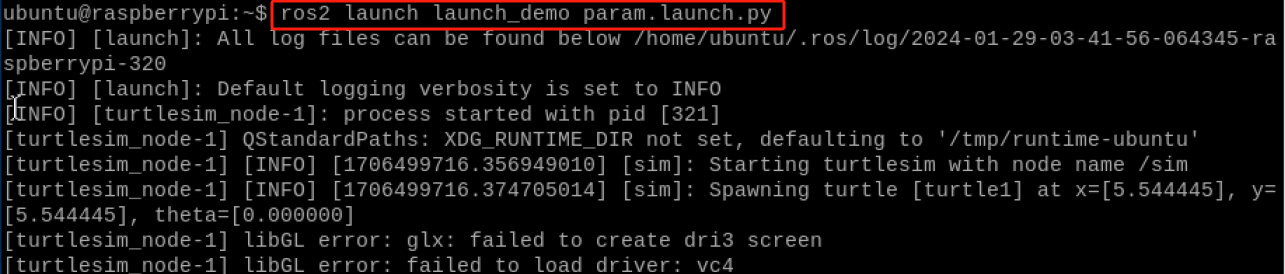
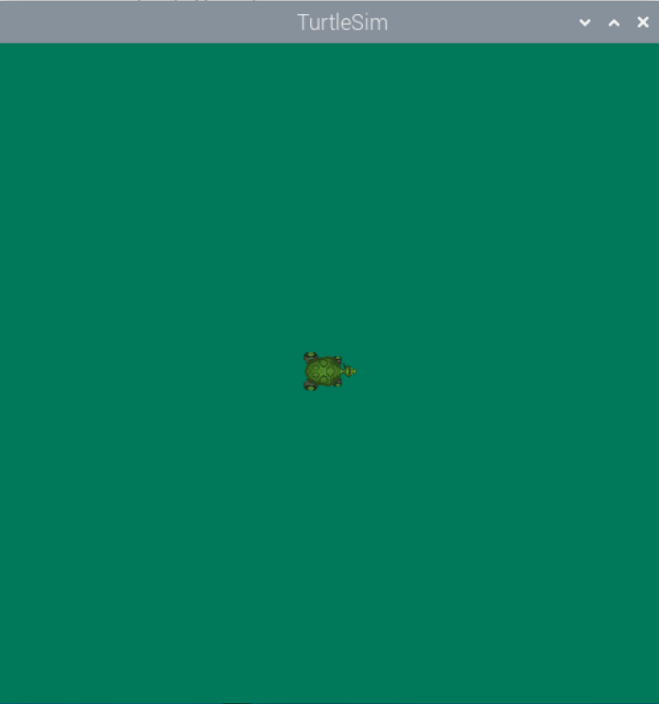
Program Analysis
Through DeclareLaunchArgument, three parameters, background_r, g, and b, were declared, with default values set for these parameters. Then, the launch task of the turtlesim node was described through Node, injecting these three parameters into the node parameters using LaunchConfiguration. This generates a launch file with parameter definitions. By using the launch file, you can dynamically set the background color parameter to control the background color of the turtle simulator.
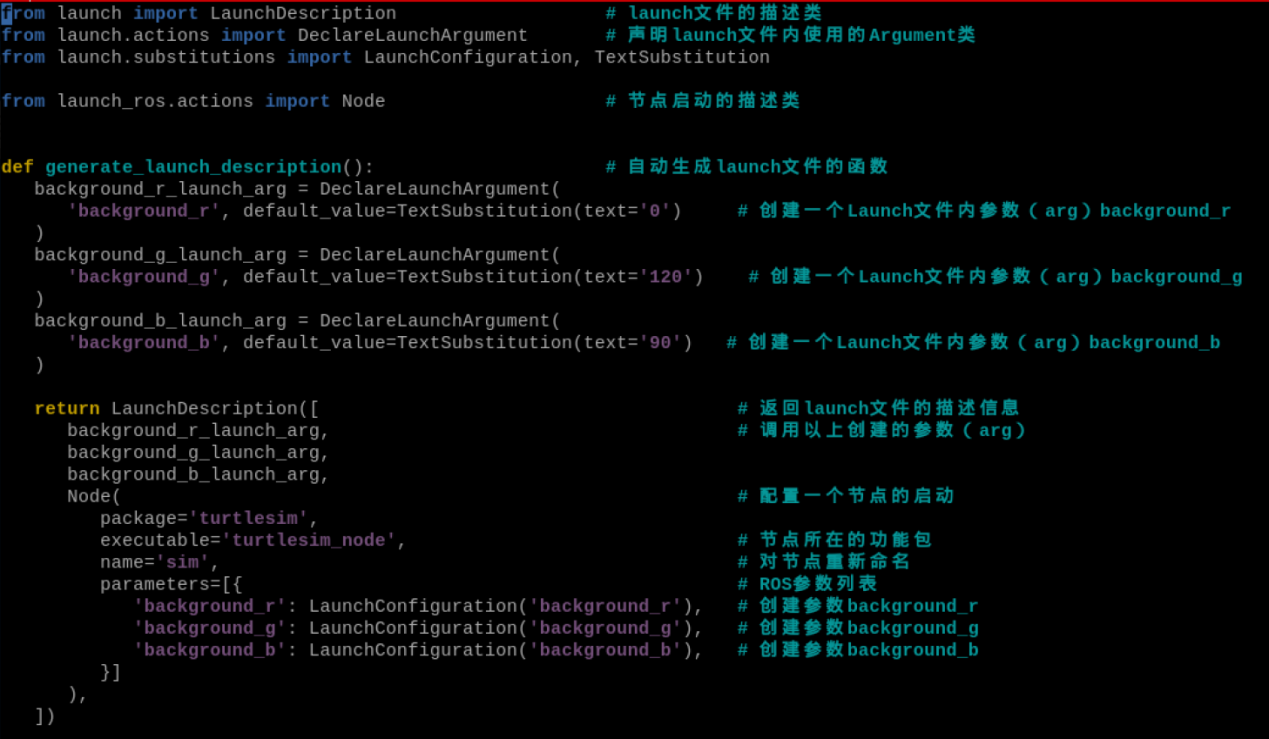
8.15.6.YAML Parameters Launch File
Create param_yaml.launch.py
(1) Enter the command “cd hiwonder_ws/src/launch_demo/launch” to switch the launch folder within the launch_demo workspace.
cd hiwonder_ws/src/launch_demo/launch
(2) Enter the command “vim param_yaml.launch.py” to edit the program and copy the following program. If you need to make modifications, please press “i” to enter the insert mode. Once you’ve finished modifications, please press “Esc” and input “:wq” to save and exit.
vim param_yaml.launch.py
import os

from ament_index_python.packages import get_package_share_directory  # 查询功能包路径的方法(Method to query package path)

from launch import LaunchDescription   # launch文件的描述类(Launch file description class)
from launch_ros.actions import Node    # 节点启动的描述类(Node startup description class)


def generate_launch_description():     # 自动生成launch文件的函数(Automatically generate launch file function)
   config = os.path.join(              # 找到参数文件的完整路径(Find the complete path of the parameter file)
      get_package_share_directory('launch_demo'),
      'config',
      'turtlesim.yaml'
      )

   return LaunchDescription([          # 返回launch文件的描述信息(Return launch file description information)
      Node(                            # 配置一个节点的启动(Configure a node startup)
         package='turtlesim',          # 节点所在的功能包(Package where the node is located)
         executable='turtlesim_node',  # 节点的可执行文件名(Node executable file name)
         namespace='turtlesim2',       # 节点所在的命名空间(Namespace where the node is located)
         name='sim',                   # 对节点重新命名(Rename the node)
         parameters=[config]           # 加载参数文件(Load parameter file)
      )
   ])
:wq
(6) Enter the command “chmod +x param_yaml.launch.py” and press Enter to grant the executable permission to the saved param_yaml.launch.py file.
chmod +x param_yaml.launch.py
setup.py File Settings
The setup.py file defines the metadata and build configuration for a ROS2 package, providing information such as package metadata, dependencies, build configuration, and installation logic. It helps developers correctly build, install, and use ROS2 packages. It is necessary to write the program entry points for param_yaml.launch.p into the setup.py file.
(1) Enter the command “cd ..” to navigate to the parent directory.
cd ..
(2) Enter the command “vim setup.py” and press Enter to open the setup.py file.
vim setup.py
(3) Press “i” to enter the insert mode, and then enter the following code to the corresponding position.
(os.path.join('share', package_name, 'config'), glob(os.path.join('config', '\*.\*'))),

(4) Enter “:wq” to save and exit the file.
Compilation and Execution
(1) After granting the executable permission, enter the command “cd ~/hiwonder_ws/” to switch to the directory of the workspace.
cd ~/hiwonder_ws/
(2) Enter the command “colcon build” and press Enter to compile the packages within the workspace.
colcon build
(3) Enter the command “source ./install/setup.bash” and press Enter to make the environment variables take effect.
source ./install/setup.bash
(4) Enter the command “ros2 launch launch_demo param_yaml.launch.py” and press Enter to start param_yaml.launch.py file.
ros2 launch launch_demo param_yaml.launch.py

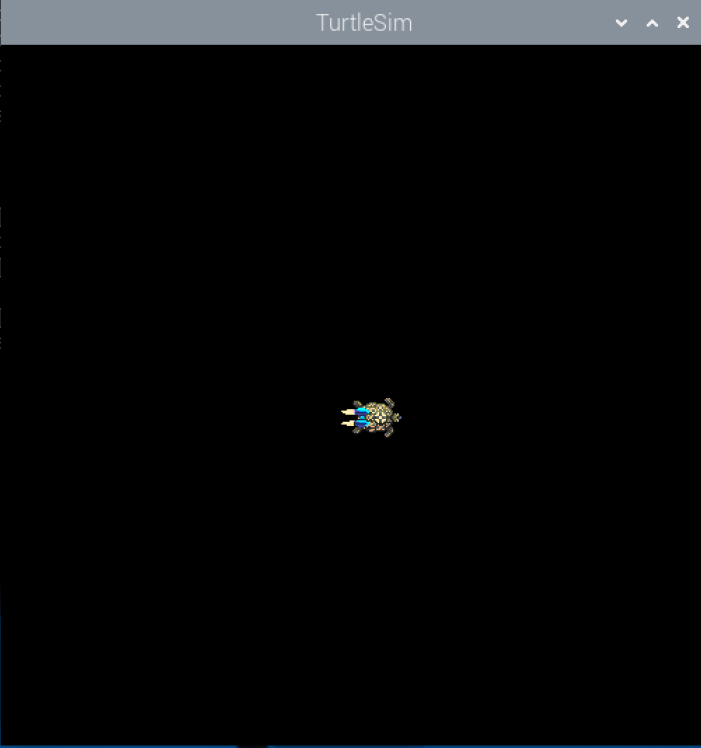
Program Analysis
Through Node, describe a launch task for a turtlesim node, setting the package name, executable file name, namespace, and name label. Load the configuration file turtlesim.yaml from the specified path using parameters. Finally, add this task to LaunchDescription and return it, generating a launch file to describe and launch the turtlesim node with parameters.
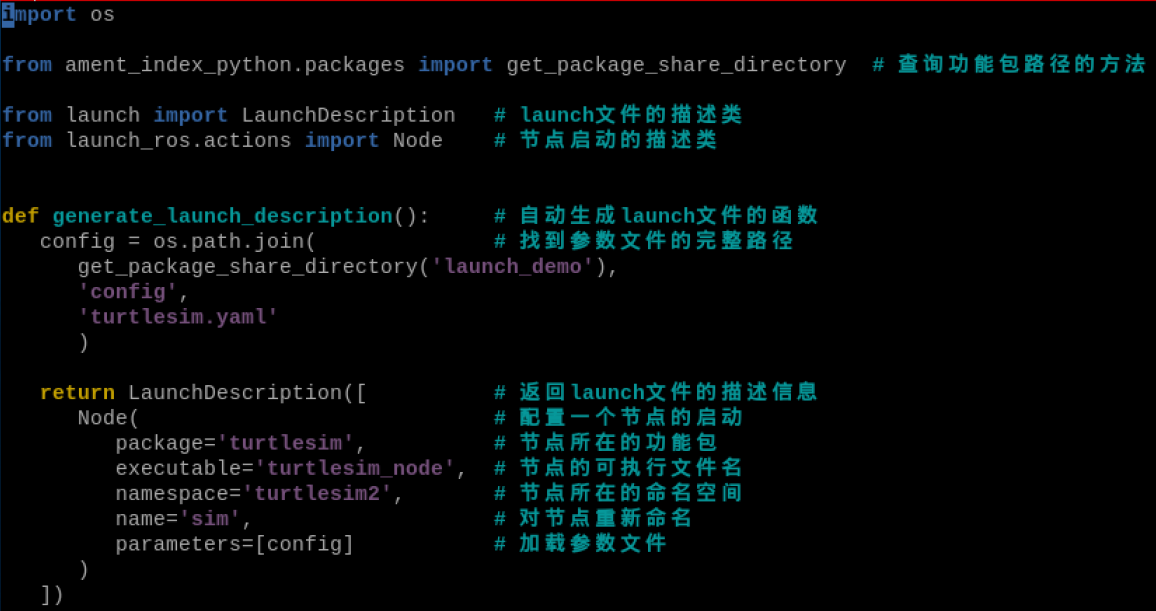
8.15.7 Launch the Launch File
Create launch_include.launch.py
(1) Enter the command “cd hiwonder_ws/src/launch_demo/launch” to switch the launch folder within the launch_demo workspace.
cd hiwonder_ws/src/launch_demo/launch
(2) Enter the command “vim launch_include.launch.py” to edit the program and copy the following program. If you need to make modifications, please press “i” to enter the insert mode. Once you’ve finished modifications, please press “Esc” and input “:wq” to save and exit.
vim launch_include.launch.py
import os

from ament_index_python.packages import get_package_share_directory  # 查询功能包路径的方法(Method to query package path)

from launch import LaunchDescription                 # launch文件的描述类(Launch file description class)
from launch.actions import IncludeLaunchDescription  # 节点启动的描述类(Node startup description class)
from launch.launch_description_sources import PythonLaunchDescriptionSource
from launch.actions import GroupAction               # launch文件中的执行动作(Execution action in launch file)
from launch_ros.actions import PushRosNamespace      # ROS命名空间配置(ROS namespace configuration)

def generate_launch_description():                   # 自动生成launch文件的函数(Automatically generate launch file function)
   hello_world = IncludeLaunchDescription(        # 包含指定路径下的另外一个launch文件(Include another launch file from specified path)
      PythonLaunchDescriptionSource([os.path.join(
         get_package_share_directory('launch_demo'), 'launch'),
         '/single_node.launch.py'])
      )

   return LaunchDescription([                        # 返回launch文件的描述信息(Return launch file description information)
      hello_world
   ])
:wq
(7) Enter the command “chmod +x launch_include.launch.py” and press Enter to grant the executable permission to the saved launch_include.launch.py file.
chmod +x launch_include.launch.py
Compilation and Execution
(1) After granting the executable permission, enter the command “cd ~/hiwonder_ws/” to switch to the directory of the workspace.
cd ~/hiwonder_ws/
(2) Enter the command “colcon build” and press Enter to compile the packages within the workspace.
colcon build
(3) Enter the command “source ./install/setup.bash” and press Enter to make the environment variables take effect.
source ./install/setup.bash
(4) Enter the command “ros2 launch launch_demo launch_include.launch.py” and press Enter to start launch_include.launch.py file.
ros2 launch launch_demo launch_include.launch.py

Program Analysis
Using the IncludeLaunchDescription action, another launch file described by single_node.launch.py from the specified path is imported, and this task is added to the LaunchDescription object for return. This generates a main launch file to include and run the node tasks defined in the child launch file.

8.16 ROS2 TF2 Robot Coordinate System Manager
8.16.1 TF2 Introduction
The coordinate system is a very familiar concept for us, it is also an important foundation in robotics. In a complete robot system, there are often multiple coordinate systems. How should the positional relationships between these coordinate systems be managed? ROS provides us with a magical tool for managing coordinate systems: TF2.
In a mobile robot system, the coordinate system also serves as an important role. For example, the center point of a mobile robot is the base coordinate system, known as Based Link.The position of Lidar is referred to as the lidar coordinate system, or laser link. As the robot moves, the odometry coordinate system, or odom. However, odometry tend to accumulate errors and drift. The absolute positional reference system is known as the map coordinate system.
The relationships between coordinate systems, layered one upon the other, are complex. Some are relatively fixed. Even seemingly simple coordinate systems become intricate within spatial contexts. A well-managed coordinate system becomes particularly crucial in such scenarios.

The basic theory of coordinate transformation relationships is explained in every textbook on robotics. It can be decomposed into two parts: translation and rotation, described using a 4*4 matrix. Drawing coordinate systems in space and the transformation relationships between them is essentially a vectorial description.
The underlying principle of the TF (Transform) functionality in ROS is to encapsulate these mathematical transformations. Detailed theoretical knowledge can be found in robotics textbooks. Our focus here is primarily on explaining the practical usage of the TF coordinate management system.
8.16.2 Operations
(1) Click on  and select “System Tools →Terminator” in sequence.

(2) Input the command “ros2 launch turtle_tf2_py turtle_tf2_demo.launch.py” to run the turtle_tf2_demo.launch.py file.
ros2 launch turtle_tf2_py turtle_tf2_demo.launch.py
(3) Right click on a black space and select “Split Vertically” to create a new terminal window.

(4) Input the command “ros2 run turtlesim turtle_teleop_key” to run the turtle keyboard control node.

(5) Press “↑↓←→” keys to control the movement of the turtle. Another turtlr will also move accordingly.
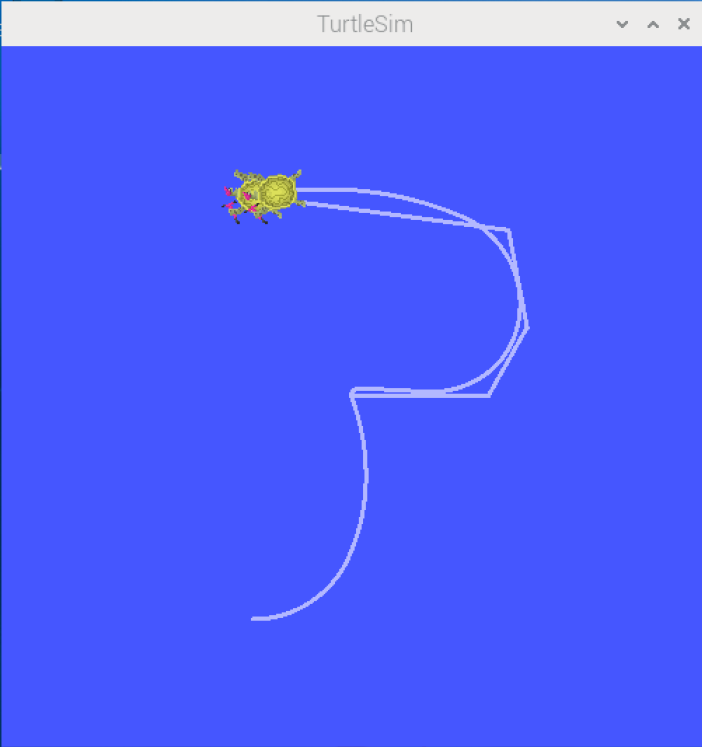
(6) Refer to step 3) to open a new terminal, and then input the command “ros2 run tf2_ros tf2_echo turtle2 turtle1” to view the specific relationship between the turtle1 and turtle2 coordinate frames.
ros2 run tf2_ros tf2_echo turtle2 turtle1
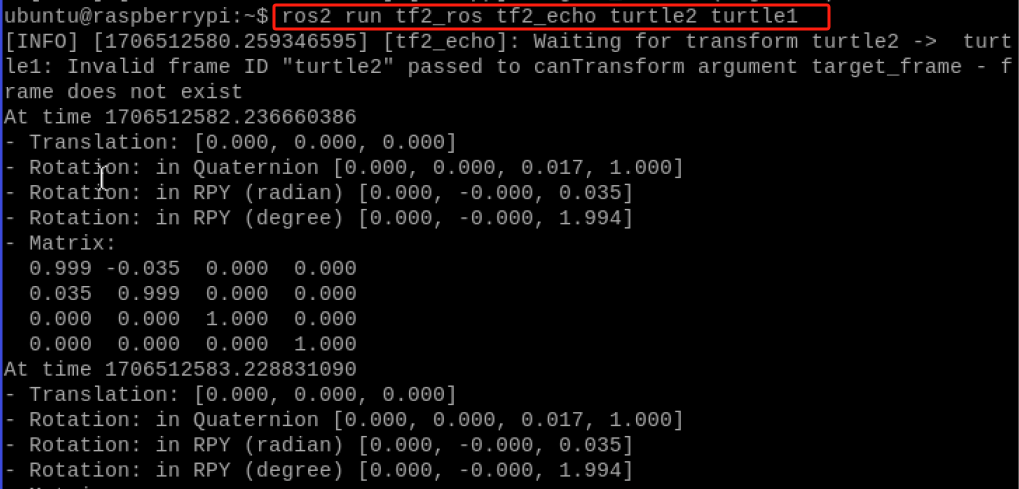
The transformation values of the coordinate frames are cyclically printed in the terminal, consisting of two parts: translation and rotation, along with the rotation matrix.
8.16.3 Static TF Broadcasting
Create static_tf_broadcaster.py
(1) Click on and select “System Tools →Terminator” in sequence.
(2) Input the command “cd hiwonder_ws/src/” to switch to the src folder within the hiwonder_ws workspace.
cd hiwonder_ws/src/
(3) Input the command “ros2 pkg create tf_demo –build-type ament_python –dependencies rclpy” and press Enter to create a package named “tf_demo” with dependency rclpy.
ros2 pkg create tf_demo --build-type ament_python --dependencies rclpy
(4) Input the command “cd tf_demo/tf_demo/” to switch to the directory of the tf_demo package.
cd tf_demo/tf_demo/
(5) Enter the command “vim static_tf_broadcaster.py” to edit the program, copy and paste the program below. If you need to make changes, press “i” to enter insert mode. Once you’ve finished editing, press “Esc”, then type “:wq” to save and exit.
vim static_tf_broadcaster.py
#!/usr/bin/env python3
# -*- coding: utf-8 -*-

import rclpy                                                                 # ROS2 Python接口库(ROS2 Python interface library)
from rclpy.node import Node                                                  # ROS2 节点类(ROS2 Node class)
from geometry_msgs.msg import TransformStamped                               # 坐标变换消息(Coordinate transformation message)
import tf_transformations                                                    # TF坐标变换库(TF coordinate transformation library)
from tf2_ros.static_transform_broadcaster import StaticTransformBroadcaster  # TF静态坐标系广播器类(TF static coordinate system broadcaster class)

class StaticTFBroadcaster(Node):
    def __init__(self, name):
        super().__init__(name)                                                  # ROS2节点父类初始化(ROS2 node parent class initialization)
        self.tf_broadcaster = StaticTransformBroadcaster(self)                  # 创建一个TF广播器对象(Create a TF broadcaster object)

        static_transformStamped = TransformStamped()                            # 创建一个坐标变换的消息对象(Create a coordinate transformation message object)
        static_transformStamped.header.stamp = self.get_clock().now().to_msg()  # 设置坐标变换消息的时间戳(Set timestamp for coordinate transformation message)
        static_transformStamped.header.frame_id = 'world'                       # 设置一个坐标变换的源坐标系(Set source coordinate system for coordinate transformation)
        static_transformStamped.child_frame_id  = 'house'                       # 设置一个坐标变换的目标坐标系(Set target coordinate system for coordinate transformation)
        static_transformStamped.transform.translation.x = 10.0                  # 设置坐标变换中的X、Y、Z向的平移(Set X, Y, Z translation in coordinate transformation)
        static_transformStamped.transform.translation.y = 5.0
        static_transformStamped.transform.translation.z = 0.0
        quat = tf_transformations.quaternion_from_euler(0.0, 0.0, 0.0)          # 将欧拉角转换为四元数(roll, pitch, yaw)(Convert Euler angles to quaternion (roll, pitch, yaw))
        static_transformStamped.transform.rotation.x = quat[0]                  # 设置坐标变换中的X、Y、Z向的旋转(四元数)(Set X, Y, Z rotation in coordinate transformation (quaternion))
        static_transformStamped.transform.rotation.y = quat[1]
        static_transformStamped.transform.rotation.z = quat[2]
        static_transformStamped.transform.rotation.w = quat[3]

        self.tf_broadcaster.sendTransform(static_transformStamped)              # 广播静态坐标变换,广播后两个坐标系的位置关系保持不变(Broadcast static coordinate transformation, position relationship between two coordinate systems remains unchanged after broadcasting)

def main(args=None):
    rclpy.init(args=args)                                # ROS2 Python接口初始化(ROS2 Python interface initialization)
    node = StaticTFBroadcaster("static_tf_broadcaster")  # 创建ROS2节点对象并进行初始化(Create ROS2 node object and initialize)
    rclpy.spin(node)                                     # 循环等待ROS2退出(Loop and wait for ROS2 exit)
    node.destroy_node()                                  # 销毁节点对象(Destroy node object)
    rclpy.shutdown()
:wq
(5) Input the command “chmod +x static_tf_broadcaster.py” and press Enter to grand the executable permissions to the saved static_tf_broadcaster.py file.
chmod +x static_tf_broadcaster.py
Create tf_listener.py
(1) Enter the command “vim tf_listener.py” to edit the program, copy the following program. If need to make modifications, you can press “i” to enter the insert mode. After you’ve have finished the modifications, press “Esc” and input “:wq” to save and exit.
vim tf_listener.py
#!/usr/bin/env python3
# -*- coding: utf-8 -*-


import rclpy                                              # ROS2 Python接口库(ROS2 Python interface library)
from rclpy.node import Node                               # ROS2 节点类(ROS2 Node class)
import tf_transformations                                 # TF坐标变换库(TF coordinate transformation library)
from tf2_ros import TransformException                    # TF左边变换的异常类(TF coordinate transformation exception class)
from tf2_ros.buffer import Buffer                         # 存储坐标变换信息的缓冲类(Buffer class for storing coordinate transformation information)
from tf2_ros.transform_listener import TransformListener  # 监听坐标变换的监听器类(Listener class for monitoring coordinate transformations)

class TFListener(Node):

    def __init__(self, name):
        super().__init__(name)                                      # ROS2节点父类初始化(ROS2 node parent class initialization)

        self.declare_parameter('source_frame', 'world')             # 创建一个源坐标系名的参数(Create a parameter for source coordinate system name)
        self.source_frame = self.get_parameter(                     # 优先使用外部设置的参数值,否则用默认值(Prioritize externally set parameter values, otherwise use default values)
            'source_frame').get_parameter_value().string_value

        self.declare_parameter('target_frame', 'home')             # 创建一个目标坐标系名的参数(Create a parameter for target coordinate system name)
        self.target_frame = self.get_parameter(                     # 优先使用外部设置的参数值,否则用默认值(Prioritize externally set parameter values, otherwise use default values)
            'target_frame').get_parameter_value().string_value

        self.tf_buffer = Buffer()                                   # 创建保存坐标变换信息的缓冲区(Create buffer for storing coordinate transformation information)
        self.tf_listener = TransformListener(self.tf_buffer, self)  # 创建坐标变换的监听器(Create coordinate transformation listener)

        self.timer = self.create_timer(1.0, self.on_timer)          # 创建一个固定周期的定时器,处理坐标信息(Create a fixed-period timer to handle coordinate information)

    def on_timer(self):
        try:
            now = rclpy.time.Time()                                 # 获取ROS系统的当前时间(Get current time of ROS system)
            trans = self.tf_buffer.lookup_transform(                # 监听当前时刻源坐标系到目标坐标系的坐标变换(Monitor coordinate transformation from source to target coordinate system at current time)
                self.target_frame,
                self.source_frame,
                now)
        except TransformException as ex:                            # 如果坐标变换获取失败,进入异常报告(If coordinate transformation acquisition fails, enter exception report)
            self.get_logger().info(
                f'Could not transform {self.target_frame} to {self.source_frame}: {ex}')
            return

        pos  = trans.transform.translation                          # 获取位置信息(Get position information)
        quat = trans.transform.rotation                             # 获取姿态信息(四元数)(Get attitude information (quaternion))
        euler = tf_transformations.euler_from_quaternion([quat.x, quat.y, quat.z, quat.w])
        self.get_logger().info('Get %s --> %s transform: [%f, %f, %f] [%f, %f, %f]'
          % (self.source_frame, self.target_frame, pos.x, pos.y, pos.z, euler[0], euler[1], euler[2]))

def main(args=None):
    rclpy.init(args=args)                       # ROS2 Python接口初始化(ROS2 Python interface initialization)
    node = TFListener("tf_listener")            # 创建ROS2节点对象并进行初始化(Create ROS2 node object and initialize)
    rclpy.spin(node)                            # 循环等待ROS2退出(Loop and wait for ROS2 exit)
    node.destroy_node()                         # 销毁节点对象(Destroy node object)
    rclpy.shutdown()                            # 关闭ROS2 Python接口(Shutdown ROS2 Python interface)
:wq
(2) Enter the command “chmod +x tf_listener.py” and press Enter to grant the executable permissions to the saved tf_listener.py file.
chmod +x tf_listener.py
setup.py File Setting
the metadata and build configuration for a ROS2 package, providing information such as package metadata, dependencies, build configuration, and installation logic. It helps developers correctly build, install, and use ROS2 packages. It is necessary to write the program entry points for static_tf_broadcaster.py and tf_listener.py into the setup.py file.
(1) Enter the command “cd ..” to switch to the parent directory.
cd ..
(2) Enter the command “vim setup.py” and press Enter to open the setup.py file.
vim setup.py
(3) Press “i” to enter the editing mode, and then enter the following code to the corresponding position.
'static_tf_broadcaster = tf_demo.static_tf_broadcaster:main',
'tf_listener = tf_demo.tf_listener:main',
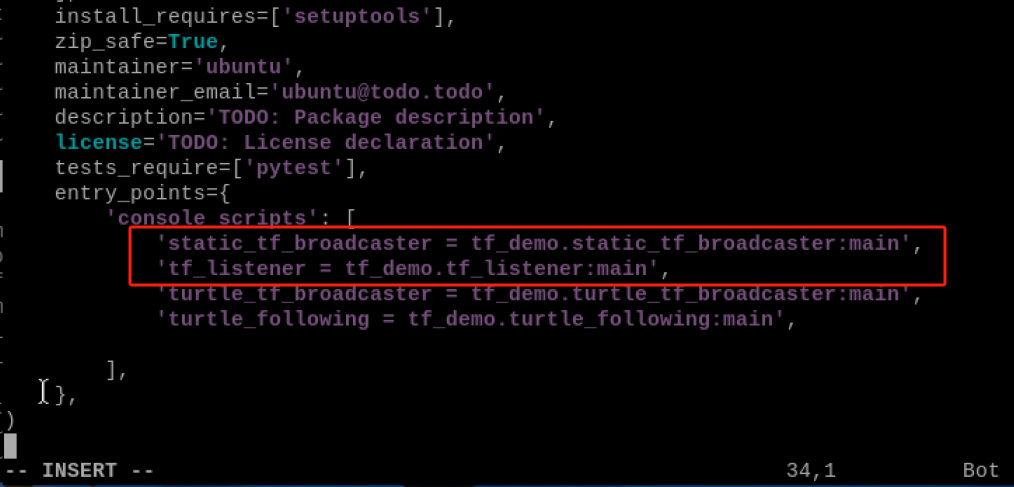
(4) Enter “:wq” to save and exit the file.
Compilation and Execution
(1) After granting the executable permission, enter the command “cd ~/hiwonder_ws/” to switch to the directory of the workspace.
cd ~/hiwonder_ws/
(2) Enter the command “colcon build” and press Enter to compile the packages within the workspace.
colcon build
(3) Enter the command “source ./install/setup.bash” and press Enter make the environment variables make effect.
source ./install/setup.bash
(4) Enter the command “ros2 run tf_demo static_tf_broadcaster” and press Enter to start static_tf_broadcaster node.
ros2 run tf_demo static_tf_broadcaster
(5) Right click on a blank space, select “Split Vertically” to create a new terminal window.
(6) Enter the command “ros2 run tf_demo tf_listener” and press Enter to start tf_listener listener.
ros2 run tf_demo tf_listener
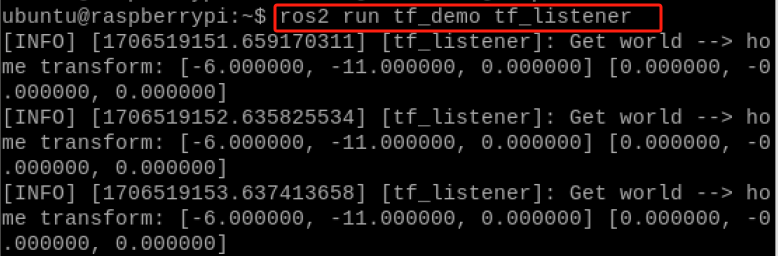
It can be seen that there are two coordinate systems in the current system, one is “world,” and the other is “house.” The relative positions between them will not change, and they are maintained by a static TF object.
Program Analysis
(1) static_tf_broadcaster.py
In accordance to the realization effect, the working logic of the program is concluded as pictured:
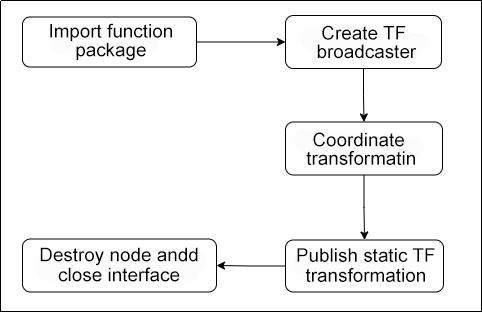
The StaticTFBroadcaster node class was created, and during the initialization of the node object, a TF broadcaster was created. Then, a coordinate transformation message containing the source coordinate system (world), the target coordinate system (home), and transformation information such as translation and rotation, was generated. The Euler angles were converted to quaternion format using tf_transformations. Throughout the node’s runtime, this static coordinate transformation information is continuously broadcasted using the broadcaster object. The purpose is to provide coordinate transformation support from the world coordinate system to the home coordinate system for other nodes or tools.
(2) tf_listener.py
In accordance to the realization effect, the working logic of the program is concluded as pictured:
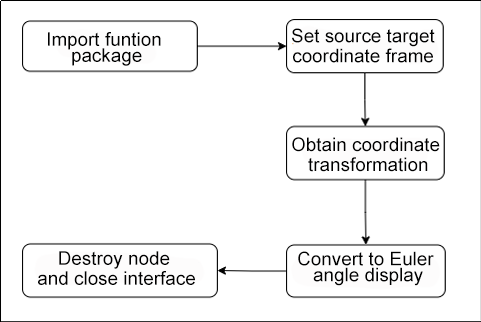
The TFListener node class was created, and during the initialization of the node object, a TF buffer and a listener were created. The parameter for dynamically obtaining the source and target coordinate systems was set. Through the timer interface, the node periodically queries the coordinate transformation relationship between the specified coordinate systems from the listener, retrieves their position and orientation information, and prints it to the log. Additionally, it handles exceptions when coordinate transformation fails. Its purpose is to monitor the dynamic transformation relationship between specified coordinate systems in real-time and provide real-time coordinate transformation support for other nodes or users.
8.16.4 TF Listening
Create turtle_tf_broadcaster.py
(1) Click on and select “System Tools →Terminator” in sequence.
(2) Enter the command “cd hiwonder_ws/src/tf_demo/tf_demo/” to switch to the tf_demo folder.
cd hiwonder_ws/src/tf_demo/tf_demo/
(3) Enter the command “vim turtle_tf_broadcaster.py” to edit the program, copy and paste the program below. If you need to make changes, press “i” to enter insert mode. Once you’ve finished editing, press “Esc”, then type “:wq” to save and exit.
vim turtle_tf_broadcaster.py
#!/usr/bin/env python3
# -*- coding: utf-8 -*-


import rclpy                                       # ROS2 Python接口库(ROS2 Python interface library)
from rclpy.node import Node                        # ROS2 节点类(ROS2 Node class)
from geometry_msgs.msg import TransformStamped     # 坐标变换消息(Coordinate transformation message)
import tf_transformations                          # TF坐标变换库(TF coordinate transformation library)
from tf2_ros import TransformBroadcaster           # TF坐标变换广播器(TF coordinate transformation broadcaster)
from turtlesim.msg import Pose                     # turtlesim小海龟位置消息(turtlesim turtle position message)

class TurtleTFBroadcaster(Node):

    def __init__(self, name):
        super().__init__(name)                                # ROS2节点父类初始化(ROS2 node parent class initialization)

        self.declare_parameter('turtlename', 'turtle')        # 创建一个海龟名称的参数(Create a parameter for turtle name)
        self.turtlename = self.get_parameter(                 # 优先使用外部设置的参数值,否则用默认值(Prioritize externally set parameter values, otherwise use default values)
            'turtlename').get_parameter_value().string_value

        self.tf_broadcaster = TransformBroadcaster(self)      # 创建一个TF坐标变换的广播对象并初始化(Create and initialize a TF coordinate transformation broadcaster object)

        self.subscription = self.create_subscription(         # 创建一个订阅者,订阅海龟的位置消息(Create a subscriber to subscribe to turtle position messages)
            Pose,
            f'/{self.turtlename}/pose',                       # 使用参数中获取到的海龟名称(Use turtle name obtained from parameters)
            self.turtle_pose_callback, 1)

    def turtle_pose_callback(self, msg):                              # 创建一个处理海龟位置消息的回调函数,将位置消息转变成坐标变换(Create a callback function to handle turtle position messages, converting position messages to coordinate transformations)
        transform = TransformStamped()                                # 创建一个坐标变换的消息对象(Create a coordinate transformation message object)

        transform.header.stamp = self.get_clock().now().to_msg()      # 设置坐标变换消息的时间戳(Set timestamp for coordinate transformation message)
        transform.header.frame_id = 'world'                           # 设置一个坐标变换的源坐标系(Set source coordinate system for coordinate transformation)
        transform.child_frame_id = self.turtlename                    # 设置一个坐标变换的目标坐标系(Set target coordinate system for coordinate transformation)
        transform.transform.translation.x = msg.x                     # 设置坐标变换中的X、Y、Z向的平移(Set X, Y, Z translation in coordinate transformation)
        transform.transform.translation.y = msg.y
        transform.transform.translation.z = 0.0
        q = tf_transformations.quaternion_from_euler(0, 0, msg.theta) # 将欧拉角转换为四元数(roll, pitch, yaw)(Convert Euler angles to quaternion (roll, pitch, yaw))
        transform.transform.rotation.x = q[0]                         # 设置坐标变换中的X、Y、Z向的旋转(四元数)(Set X, Y, Z rotation in coordinate transformation (quaternion))
        transform.transform.rotation.y = q[1]
        transform.transform.rotation.z = q[2]
        transform.transform.rotation.w = q[3]

        # Send the transformation
        self.tf_broadcaster.sendTransform(transform)     # 广播坐标变换,海龟位置变化后,将及时更新坐标变换信息(Broadcast coordinate transformation, coordinate transformation information will be updated in time after turtle position changes)

def main(args=None):
    rclpy.init(args=args)                                # ROS2 Python接口初始化(ROS2 Python interface initialization)
    node = TurtleTFBroadcaster("turtle_tf_broadcaster")  # 创建ROS2节点对象并进行初始化(Create ROS2 node object and initialize)
    rclpy.spin(node)                                     # 循环等待ROS2退出(Loop and wait for ROS2 exit)
    node.destroy_node()                                  # 销毁节点对象(Destroy node object)
    rclpy.shutdown()                                     # 关闭ROS2 Python接口(Shutdown ROS2 Python interface)
:wq
(3) Input the command “chmod +x turtle_tf_broadcaster.py”
chmod +x turtle_tf_broadcaster.py
Create turtle_following.py
(1) Enter the command “vim turtle_following.py” to edit the program, then paste the following program. If you need to make modifications, you can press “i” to enter the insert mode. Once you’ve finished modifications, input “:wq” to save and exit the file.
vim turtle_following.py
#!/usr/bin/env python3
# -*- coding: utf-8 -*-
import math
import rclpy                                              # ROS2 Python interface library
from rclpy.node import Node                               # ROS node class
import tf_transformations                                 # TF coordinate transformation library
from tf2_ros import TransformException                    # Abnormal class of TF left-side transformation
from tf2_ros.buffer import Buffer                         #Store coordinate transformation buffer class
from tf2_ros.transform_listener import TransformListener  # Listener class for coordinate transformation
from geometry_msgs.msg import Twist                       # ROS2 velocity control message
from turtlesim.srv import Spawn                           # Service interface generated by the turtle
class TurtleFollowing(Node):

    def __init__(self, name):
        super().__init__(name)                                      # ROS2 node parent class initialization

        self.declare_parameter('source_frame', 'turtle1')           # Create a parameter for the name of the source coordinate system
        self.source_frame = self.get_parameter(                     # Prioritize the parameter values set externally, otherwise use the default values.

            'source_frame').get_parameter_value().string_value

        self.tf_buffer = Buffer()
        Create a buffer to store coordinate transformation information
        self.tf_listener = TransformListener(self.tf_buffer, self)  # Create a listener for coordinate transformation
        self.spawner = self.create_client(Spawn, 'spawn')           # Create a client to generate turtle requests
        self.turtle_spawning_service_ready = False                  # The flag indicating whether the turtle generation service has been requested.
        self.turtle_spawned = False                                 # The flag indicating whether the turtle generation was successful.

        self.publisher = self.create_publisher(Twist, 'turtle2/cmd_vel', 1) # Create a topic for the speed of the turtle following movement.

        self.timer = self.create_timer(1.0, self.on_timer)         # Create a fixed-period timer to control the movement of the following turtle.

    def on_timer(self):
         from_frame_rel = self.source_frame                         # Source coordinate frame
        to_frame_rel   = 'turtle2'                                 # Target coordinate frame

        if self.turtle_spawning_service_ready:                     # If the turtle generation service has been requested.
            if self.turtle_spawned:                                # If the following turtle has been generated
                try:
                    now = rclpy.time.Time()                        # Obtain the current time of the ROS system
                    trans = self.tf_buffer.lookup_transform(       #
Listen to the coordinate transformation from the source coordinate system to the target coordinate system at the current time.
                        to_frame_rel,
                        from_frame_rel,
                        now)
                except TransformException as ex:
                    #
If the coordinate transformation retrieval fails, enter the exception reporting.
                    self.get_logger().info(
                        f'Could not transform {to_frame_rel} to {from_frame_rel}: {ex}')
                    return

                msg = Twist()                                      # Create speed control message
                scale_rotation_rate = 1.0                          # Calculate the angular velocity based on the turtle's angle.
                msg.angular.z = scale_rotation_rate * math.atan2(
                    trans.transform.translation.y,
                    trans.transform.translation.x)

                scale_forward_speed = 0.5                          # Calculate the linear velocity based on the turtle's distance
                msg.linear.x = scale_forward_speed * math.sqrt(
                      trans.transform.translation.x ** 2 +
                    trans.transform.translation.y ** 2)

                self.publisher.publish(msg)                        # Publish velocity commands for the turtle to follow movement.
            else:                                                  # If the following turtle has not been generated
                if self.result.done():                             # Check if the turtle has been generated.
                    self.get_logger().info(
                        f'Successfully spawned {self.result.result().name}')
                    self.turtle_spawned = True
                else:                                              # The following turtle still hasn't been generated.
                    self.get_logger().info('Spawn is not finished')
        else:                                                      # If the turtle generation service hasn't been requested.
            if self.spawner.service_is_ready():                    # If
    the turtle generation server is ready.
                request = Spawn.Request()                          # Create a request data.
                request.name = 'turtle2'                           # Set the content of the request data, including the turtle's name, xy position, and orientation.
                request.x = float(4)
                request.y = float(2)
                request.theta = float(0)

                self.result = self.spawner.call_async(request)     # Send the service request
                self.turtle_spawning_service_ready = True          # Set the flag indicating that the request has been sent.
            else:
                self.get_logger().info('Service is not ready')     # Notification that the turtle generation server is not yet ready. def main(args=None):
rclpy.init(args=args)                       # ROS2 Python interface initialization
node = TurtleFollowing("turtle_following")  # Create ROS2 node object and initialize it

    rclpy.spin(node)                            # Loop waiting for ROS2 to exit
    node.destroy_node()                         # Destroy node object
    rclpy.shutdown()                            # Shut down ROS2 Python interface
:wq
(2) Enter the command “chmod +x turtle_following.py” and press Enter to grant the executable permission to the saved turtle_following.py file.
chmod +x turtle_following.py
Create turtle_following.launch.py
In this example, we need to start four nodes: the Turtlebot simulator, coordinate frame broadcasting for Turtle 1, coordinate frame broadcasting for Turtle 2, and the turtle following control. You can write the commands to start these four nodes in the same launch file. Running the launch file will start all four nodes simultaneously.
(1) Enter the command “cd..” to return to the parent directory.
cd ..
(2) Then, input the command “mkdir launch” to create the launch folder.
mkdir launch
(3) Enter the command “cd launch/” to enter the launch folder.
cd launch/
(4) Enter the command “vim turtle_following.launch.py” to edit the program, and then paste the following program. If you need to make modifications, you can press “i”. Once you’ve finished the modifications, press “Esc” and enter “:wq” to save and exit.
vim turtle_following.launch.py
from launch import LaunchDescription
from launch.actions import DeclareLaunchArgument
from launch.substitutions import LaunchConfiguration
from launch_ros.actions import Node
def generate_launch_description():
    return LaunchDescription([
        Node(
            package='turtlesim',
            executable='turtlesim_node',
            name='sim'
        ),
        Node(
            package='tf_demo',
            executable='turtle_tf_broadcaster',
            name='broadcaster1',
            parameters=[
                {'turtlename': 'turtle1'}
            ]
              ),
        DeclareLaunchArgument(
            'target_frame', default_value='turtle1',
            description='Target frame name.'
        ),
        Node(
            package='tf_demo',
            executable='turtle_tf_broadcaster',
            name='broadcaster2',
            parameters=[
                {'turtlename': 'turtle2'}
            ]
        ),
        Node(
            package='tf_demo',
            executable='turtle_following',
            name='listener',
            parameters=[
                               {'target_frame': LaunchConfiguration('target_frame')}
            ]
        ),
    ])
:wq
(5) Enter the command “chmod +x turtle_following.launch.py” and press Enter to grant the executable permission to the saved turtle_following.launch.py file.
chmod +x turtle_following.launch.py
setup.py File Settings
The setup.py file defines the metadata and build configuration for a ROS2 package, providing information such as package metadata, dependencies, build configuration, and installation logic. It helps developers correctly build, install, and use ROS2 packages. It is necessary to write the program entry points for turtle_tf_broadcaster.py and turtle_following.py into the setup.py file.
(1) Enter the command “cd ..” to navigate to the parent directory.
cd ..
(2) Enter the command “vim setup.py” and press Enter to open the setup.py file.
vim setup.py
(3) Press “i” to enter the insert mode, and then enter the following code to the corresponding position.
import os
from glob import glob
(os.path.join('share', package_name, 'launch'), glob(os.path.join('launch', '*.launch.py'))),
'turtle_tf_broadcaster = tf_demo.turtle_tf_broadcaster:main',
'turtle_following = tf_demo.turtle_following:main',


(4) Enter “:wq” to save and exit the file.
:wq
Compilation and Execution
(1) After granting the executable permission, enter the command “cd ~/hiwonder_ws/” to switch to the directory of the workspace.
cd ~/hiwonder_ws/
(2) Enter the command “colcon build” and press Enter to compile the packages within the workspace.
colcon build
(3) Enter the command “source ./install/setup.bash” and press Enter to make the environment variables take effect.
source ./install/setup.bash
(4) Enter the command “ros2 launch tf_demo turtle_fllowing.launch.py” and press Enter to start turtle_fllowing.launch.py file.
ros2 launch tf_demo turtle_fllowing.launch.py
(5) Right click on a blank space to select “Split Vertically” to create a new terminal window.
(6) Enter the command “ros2 run turtlesim turtle_teleop_key” and press Enter to start the turtle_teleop_key control node.
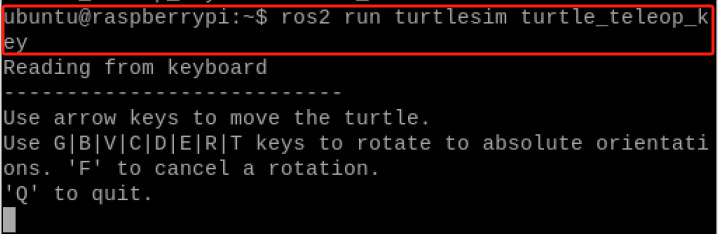
Press “↑↓←→” to control the turtle to move.

Program Analysis
(1) turtle_tf_broadcaster.py
According to the realization result, the logic progress for the program is shown as pictured:

We’ve created the TurtleTFBroadcaster node class, which initializes a node object and creates a TF broadcaster. This broadcaster subscribes to the turtle’s position messages. In the position callback function, it generates coordinate transformation messages from the world coordinates to the turtle’s coordinates based on the received messages. It sets the translation as the position and converts the rotation into quaternions using Euler angles. Through the broadcaster, it continuously propagates the coordinate transformation information in real-time. This allows for dynamically updating the turtle’s coordinate transformation relationship in the world coordinates based on its real-time position, providing support for real-time coordinate transformation for subsequent planning, control, and user nodes.
(2) turtle_following.py
According to the realization result, the logic progress for the program is shown as pictured:

We’ve created the TurtleFollowing node class, which initializes a node and creates a TF listener and a velocity publisher. By periodically querying TF, it obtains the coordinate relationship between the source turtle and the target turtle, calculates the velocity command for the target turtle. In the first step, it requests the generation of the following turtle. Then, based on the real-time position and orientation of the source turtle, it dynamically controls the movement of the target turtle to achieve the following effect. This implementation, based on TF coordinate transformation, realizes a following control application between two turtles in a ROS2 environment.
8.17 ROS2 URDF Robot Modeling Method
8.17.1 URDF Introduction
The modeling method in ROS is called URDF, which stands for United Robot Description Format. Not only can precisely describe the model of the robot itself, but also the environment surrounding the robot. The format of URDF model is XML.
8.17.2 Components of A Robot
During the process of modeling and describing robots, it’s essential for us to familiarize with the components and parameters of the robot. For example, a robot typically consists of four major parts including hardware structure, drive system, sensor system, and control system. The robot. Whether it’s mobile robot or desktop robotic arm, common robot on the market can be decomposed into these four main components.
(1) Hardware structure refers to tangible components such as chassis, casing, motors, etc.
(2) The drive system consists of devices that enable the proper operation of these components. For example, motor drivers, power management systems and so on.
(3) The sensor system includes encoders on the motors, onboard IMU, mounted camera and lidar, and other devices, enabling the robot to perceive its own and the external environment.
(4) The control system serves as the primary platform in our development process, typically consisting of computing platforms such as Raspberry Pi, computers along with their operating systems and application software.
8.17.3 URDF Syntax
Description of A Link
Tags are used to describe the appearance and physical properties of a specific rigid body part of a robot. Appearance includes dimensions, color and shape, while physical properties include mass, inertia matrix, collision parameters, etc.
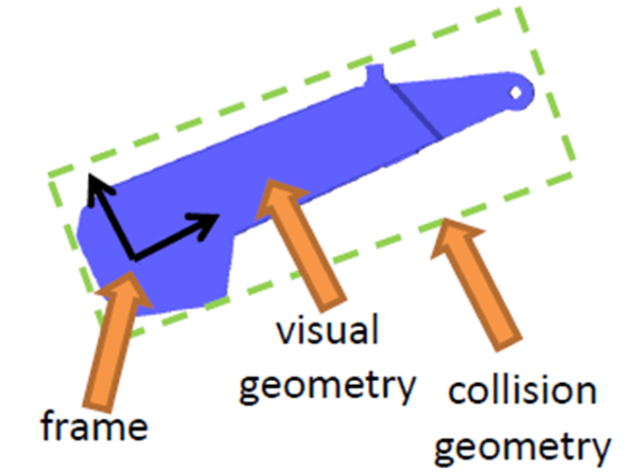
Take the link of this robotic arm as example. Its links description is as follows:
<link name="link 4">
	<visual>
		<geometry>
			<mesh filename="link 4.stl"/>
		</geometry>
        <origin xyz="0 0 0" rpy="0 0 0" />
	</visual>
	<collision>
	<geometry>
		<cylinder length="0.5" radius="0.1"/>
	</geometry>
	<origin xyz="0 0 -0.05" rpy="0 0 0" />
	</collision>
</link>
The <name> attribute in the link tag represents the name of this link, which can be customized. When connecting joints to the link in the future, this name will be used.
The <visual>in the link tag is used to describe the appearance of the robot. For example:
(1) The <geometry> represents the geometric shape. It utilizes <mesh> to reference a pre-designed blue appearance created in 3D software, which is STL file. It appears consistent with the real robot.
(2) The <origin> represents the offset of the coordinates relative to the initial location. It includes translations in the direction of x, y and z, as well as rotations in roll, pitch, and yaw. It no offset is required, all values should be set to 0.
The second part <collision> describes the collision parameters. The contents insides similar to <visual>, with <geometry> and <origin>. Though they seems alike, they actually serve distinct purposes.
(3) The <visual> section primarily describes the visual appearance of the robot, essentially the visual effects.
(4) The <collision> section focuses on the state of the robot during motion. For example, what kind of contact between robot and environment is regarded as collision.
Description of A Joint
In a robot model, the robot body need to be connected through joints in order to generate relative motion.
| Joint Type | Description |
|---|---|
| continuous | A continuous joint allows infinite rotation around a single axis. |
| revolute | A revolute joint is similar to continuous, with limits on the revolution angle. |
| prismatic | A prismatic joint is a sliding joint that moves along a single axis, with position limits. |
| fixed | A fixed joint is a special joint that does not allow any motion |
| floating | Floating joint allows both translation and rotation movements. |
| planar | Planar joint allows translation or rotation along orthogonal directions within a plane. |
URDF defines six types of motion for joints.
The joint in URDF has six types of motion.
(1) continuous: Describes rotational motion and allows infinite rotation around a specific axis. For example, the wheels of a car fall under this category.
(2) revolute: Also a rotational joint, but unlike continuous joints, it has angle limitations. For example, the two links of a robotic arm fall under this type of motion.
(3) Prismatic: A sliding joint that allows movement along a single axis, with position limits. Linear motors typically exhibit this type of motion.
(4) Fixed: A fixed joint is the only type that does not allow any motion. Despite its immobility, it is frequently used. For instance, the link holding a camera mounted on a robot maintains a constant relative position, making it suitable for a fixed joint connection.
(5) Floating: Floating joint allows free movement in space, typically with six degrees of freedom. This type of joint is less commonly used. The sixth type, planar, constrains motion to a specific plane, and both types are relatively less frequently used.
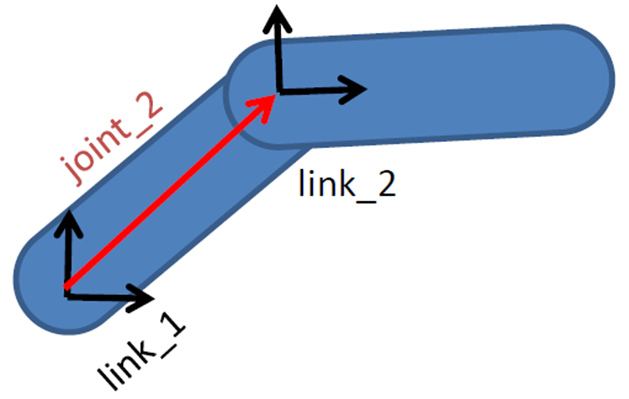
In the URDF model, each link is described using XML content, specifying details such as the name of the joint and its motion type.
<joint name="joint 2" type="revoluteu">
	<parent link=link 1"/>
    <child link=ulink 2"/>
	<origin xyz="0.2 0.2 0" rpy="0 0 0"/>
	<axis xyz="0 0 1"/>
	<limit lower="-3.14" upper="3.14" velocity="1.0"/>
</joint>
① parent tag: Describes the parent tag.
② child tag: Describes the child link, which moves relative to the parent link.
③ origin: Represents the relationship between two link coordinate systems, depicted by the red vector in the diagram. It indicates how these two links should be installed together.
④ Axis: Represents the unit vector of the joint motion axis. For example, if z equals 1, it indicates that the rotational motion occurs around the positive direction of the z-axis.
⑤ Limit: Specifies constraints on the motion, such as minimum position, maximum position, and maximum velocity.
Note
In ROS, the default unit for translation is meters, and for rotation it’s radians (not degrees). Therefore, in this context, 3.14 implies movement between -180 degrees and 180 degrees, linear velocity is in m/s, and angular velocity is in rad/s.
8.17.4 Complete Robot Model
Create Robot Model
(1) Click  and select “System Tools →Terminator” in sequence.

(1) Input the command “System Tools →Terminator” and press enter to switch to the src folder in hiwonder_ws workspace

(2) Input the command “ros2 pkg create urdf_demo –build-type ament_python –dependencies rclpy” and press Enter to creating a package named “urdf_demo” with the dependency rclpy.
ros2 pkg create urdf_demo --build-type ament_python --dependencies rclpy
(3) Input the command “cd urdf_demo/” to navigate to the urdf_demo package.
cd urdf_demo/
(4) Input the command “mkdir urdf” to create the urdf folder.
mkdir urdf
(5) Input the command “cd urdf/” to switch to the urdf folder.
cd urdf/
(6) Input the command “vim simple_demo.urdf” to open the file using VIM editor, copy and paste the program below. If you need to make modifications, you can press “i” to enter the insert mode. After you’ve finished the modifications, press “Esc” and enter “:wq” to save and exit.
vim simple_demo.urdf
<?xml version="1.0"?>
<robot name="materials">
  <material name="blue">
    <color rgba="0 0 0.8 1"/>
  </material>
  <material name="white">
        <color rgba="1 1 1 1"/>
  </material>
  <link name="base_link">
    <visual>
      <geometry>
        <cylinder length="0.6" radius="0.2"/>
      </geometry>
      <material name="blue"/>
    </visual>
  </link>
  <link name="right_leg">
    <visual>
      <geometry>
        <box size="0.6 0.1 0.2"/>
      </geometry>
      <origin rpy="0 1.57075 0" xyz="0 0 -0.3"/>
      <material name="white"/>
    </visual>
      </link>
  <joint name="base_to_right_leg" type="fixed">
    <parent link="base_link"/>
    <child link="right_leg"/>
    <origin xyz="0 -0.22 0.25"/>
  </joint>
  <link name="left_leg">
    <visual>
      <geometry>
        <box size="0.6 0.1 0.2"/>
      </geometry>
      <origin rpy="0 1.57075 0" xyz="0 0 -0.3"/>
      <material name="white"/>
    </visual>
  </link>
  <joint name="base_to_left_leg" type="fixed">
    <parent link="base_link"/>
    <child link="left_leg"/>
        <origin xyz="0 0.22 0.25"/>
  </joint>
</robot>
:wq
(8) Input the command “chmod +x simple_demo.urdf” and press Enter to grant the executable permissions to the saved simple_demo.urdf file.
chmod +x simple_demo.urdf
Load Robot Model
The model loaded by the above code appears is as follow:
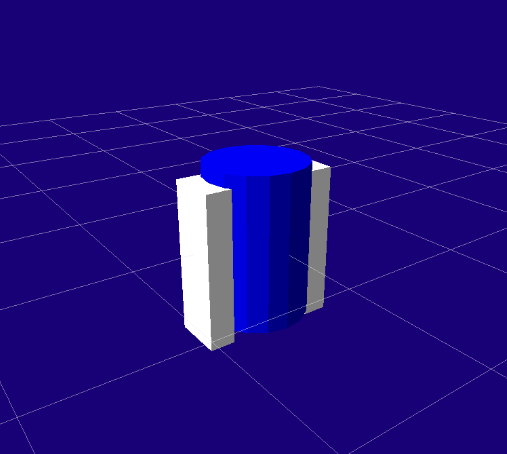
Define a simple robot mode, with the main components and functionalities as follow:
(1) Two materials are defined - blue and white.
(2) Defined the base_link using blue materials and cylinder geometry.
(3) Defined the link of right leg and left leg using white material and box geometry.
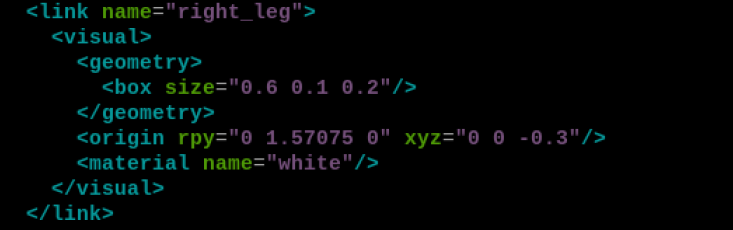
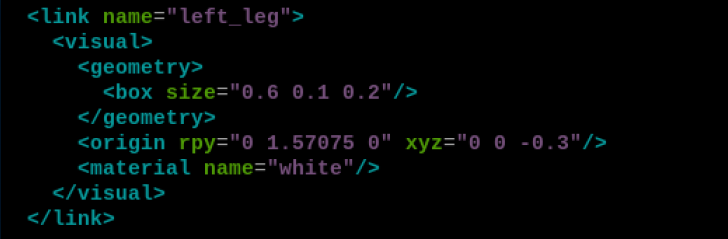
(4) Defined fixed rotational joints for the right leg and left leg, connecting them to the base link. The origin of the right leg joint is located at (0, -0.22, 0.25), and for the left leg, it’s at (0, 0.22, 0.25). The leg boxes are rotated to stand upright.

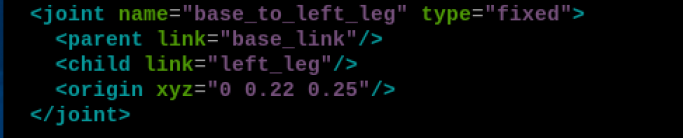
The main function is to define the materials, geometries, links and their connections or this simple robot.
By defining materials, links, visual components, joints, and other basic syntax, the definition of this robot is completed.
8.18 ROS2 Gazebo 3D Physics Simulation Platform
8.18.1 Gazebo Introduction
Gazebo is the most commonly used 3D physics simulation platform in ROS system. It supports dynamics engine, enabling high-quality graphic rendering. Not only can simulate robots and surrounding environments, but it can also incorporate physical properties such as friction and elasticity coefficients.
For instance, if we plan to develop a Mars robot car, the Martian surface environment can be simulated in Gazebo. Similarly, if we face constrains in conducting frequent experiences due to drone endurance and flight restrictions, we can utilize Gazebo for simulation. This allows us to develop algorithms in simulation first and then deploy them onto physical hardware once they are sufficiently refined.
Therefore, the similar simulation platforms like Gazebo can assist us in validating robot algorithms, optimizing robot designs, and testing robot scenarios and applications, which explores more possibilities for robot development.
8.18.2 Run Gazebo
(1) Click  to select “System Tools →Terminator” in sequence.

(2) Input the command “ros2 launch ros_gz_sim_demos robot_description_publisher.launch.py” and press Enter to run the “robot_description_publisher.launch.py” file.
ros2 launch ros_gz_sim_demos robot_description_publisher.launch.py
After successful execution, the simulation interface of Ignition and the PC software of Rivz will open, allowing us to visualize the data of the small ball.
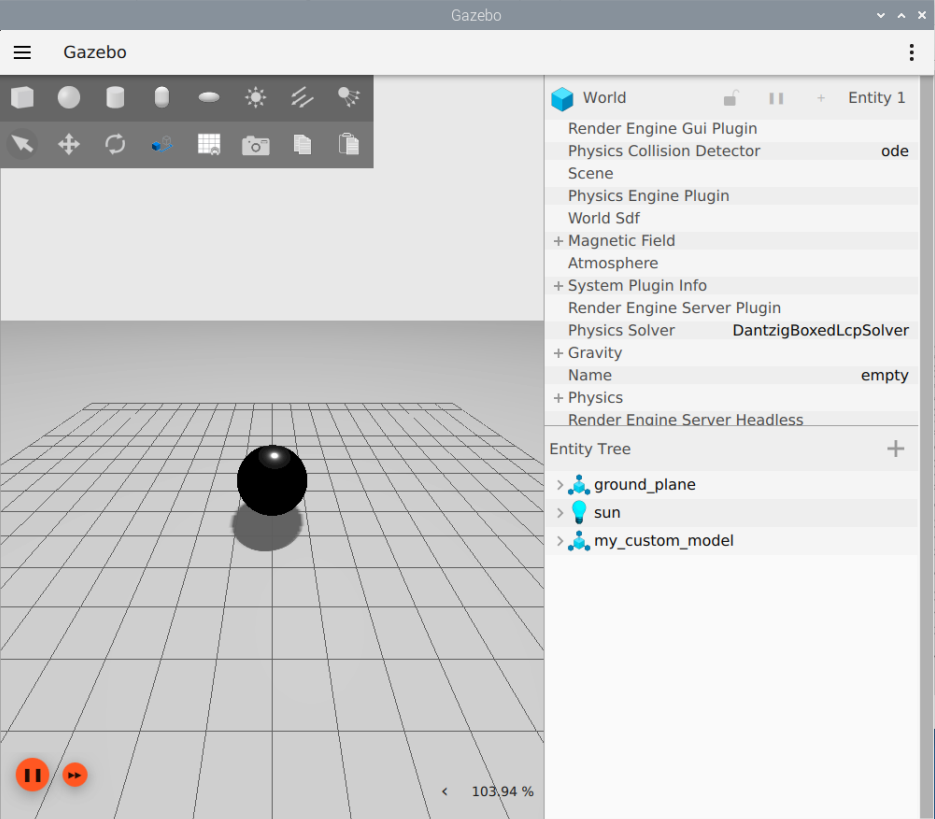

8.19 ROS2 Rviz Tool Usage
8.19.1 Rviz2 Introduction
During the process of robot development, if we only analyze various functionalities from a data perspective, it’s challenging to quickly grasp the the data’s effect. For example, with robot models, we need to know what our designed model looks like, as well as the positions of numerous coordinate systems within the model during the motion process.
For instance, in tasks like motion planning for robotic arms or autonomous navigation for mobile robots, it’s essential to visualize the surrounding environment, the planned trajectory, and sensor data such as cameras, 3D cameras, LiDAR, etc. Data is used for computation, but visualization effects are intended for human understanding.
Therefore, data visualization can significantly enhance development efficiency. Rviz2 is precisely such a data visualization software for the robot development process. It handles everything from robot models to sensor information and environmental data, streamlining the development process.
8.19.2 Start Rviz2
(1) Click on  to select “System Tools -> Terminator”.

(2) Input the command “rviz2” to start Rivz2 tool.
rviz2
The interface of Rviz can be primarily divided into five areas: toolbar area, the display list, 3D view area, viewpoint setting area, and time display area.

(1) Tool Bar Area
| Icon | Function |
 |
Select robot or specify a location to adjust the angle. |
 |
After selecting the tool, press and hold left mouse button within the 3D view, then drag the mouse to adjust the camera angle. |
 |
After selecting the tool, press and hold left mouse button within the 3D view to box-select the model. |
 |
After selecting the tool, simply click the left mouse button anywhere within the 3D view to set that point as the center of the map. |
 |
After selecting the tool, click the left mouse button once at the starting point and once at the ending point within the 3D view to measure the distance between the two points. |
 |
To set the position of the robot within the 3D view, this function is only available during navigation. When the robot undergoes displacement, indicating the actual position does not match its position in the 3D view, it's necessary to reset the robot's position within the 3D view to ensure navigation effectiveness. After selecting the tool, click the left mouse button at any location within the 3D view to set that point as the robot's position. |
 |
To set a single target point for the robot, this function is only available during navigation. After selecting the tool, click the left mouse button at any location within the map display area to set that point as the target. Once set, the robot will automatically generate a travel route and move along the route to the target point. |
 |
To set multiple target points for the robot, this function is only available during navigation. The usage of this tool is similar to "2D Nav Goal," but this tool can set multiple target points. Each click sets one target point, and you can set up to three target points. Once set, the robot will automatically generate a travel route based on the set order and move along the route to each target point sequentially. |
(2) Display List
Global Options

| Icon | Function |
|---|---|
| Fixed Frame | Used as the reference coordinate system for all other coordinates frame. |
| Blackground Color | The background color of the 3D view. |
| Frame Rate | The refresh frame rate of the 3D view. |
| Default Light | The light source for the current 3D view. |
Grid
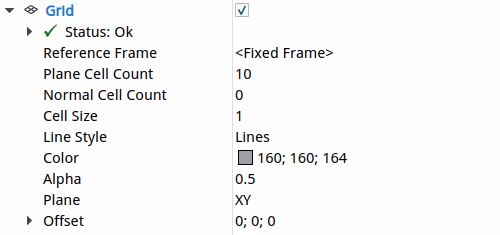
| Icon | Function |
|---|---|
| Reference Frame | Used as reference coordinate system for the grid coordinates |
| Plane Cell Count | The number of cells to be drawn in the grid panel. |
| Normal Cell Count | The number of cells drawn along the grid's normal vector. |
| Cell Size | The size of each cell, indicating the dimensions of each grid unit, measured in meters. |
| Line Style | The dimension of the grid lines. |
| Color | The background color of the grid. |
| Alpha | The thickness of the grid lines. |
| Plane | The plane used for drawing the grid. |
| Offset | Offset grid from the origin of the coordinate system, with three parameters representing the offset along the X, Y, and Z axes, measured in meters. |
8.19.3 Load URDF Model on Rviz
Write A launch File
(1) Click on to select “**System Tools -> Terminator.
(2) Input the command “cd hiwonder_ws/src/urdf_demo/” to switch to the “urdf_demo” workspace.
cd hiwonder_ws/src/urdf_demo/
(3) Input the command “mkdir rviz launch” and press Enter to create rivz and launch files.
mkdir rviz launch
(4) Input the command “cd launch/” to switch to the launch folder.
cd launch/
(5) Enter the command “vim rviz_view.launch.py” to open the file using the VIM editor, copy and paste the program below. If you need to make modifications, you can press “i” to modify. After you’ve finishing the modifications, press “Esc” and enter “:wq” to save and exit.
vim rviz_view.launch.py
from launch import LaunchDescription  # Import the LaunchDescription class for describing launch file.
from launch_ros.actions import Node #Import the Node class, which is used to start ROS nodes.
Import Node class for starting ROS nodes.
from ament_index_python.packages import get_package_share_directory  # Import get_package_share_directory function for obtaining the shared directory of a package.

def generate_launch_description():
    # Obtain the path of the URDF file
    urdf_file_path = get_package_share_directory('urdf_demo') + '/urdf/simple_demo.urdf'

# Create a parameter node to load the URDF file to the parameter server.
    load_urdf_param_node = Node(
        package='robot_state_publisher',  # Package name
        executable='robot_state_publisher',  # executable file name
        name='robot_state_publisher',  # node name
        parameters=[{'robot_description': open(urdf_file_path).read()}]  # Load the URDF file into the parameter server.
    )
    # Activate RViz node and load URDF model
    rviz_node = Node(
        package='rviz2',  # Package name
        executable='rviz2',  # Executable file name
        name='rviz2',  # Node name
        output='screen',  # Output the screen information
    )
    return LaunchDescription([
        load_urdf_param_node,
        rviz_node
    ])
setup.py File Setting
The setup.py file defines the metadata and build configuration for a ROS2 package, providing information such as package metadata, dependencies, build configuration, and installation logic. It helps developers correctly build, install, and use ROS2 packages. It is necessary to write the program entry points for rviz_view.launch.py into the setup.py file.
(1) Enter the command “cd ..” to switch to the parent directory.
cd ..
(2) Enter the command “vim setup.py” and press Enter to open the setup.py file.
vim setup.py
(3) Press “i” to enter the editing mode, and then enter the following code to the corresponding position.
from setuptools import find_packages, setup
import os
from glob import glob
 (os.path.join('share', package_name, 'launch'), glob(os.path.join('launch', '*.launch.py'))),
        (os.path.join('share', package_name, 'urdf'), glob(os.path.join('urdf', '*.*'))),
        (os.path.join('share', package_name, 'urdf/sensors'), glob(os.path.join('urdf/sensors', '*.*'))),
        (os.path.join('share', package_name, 'meshes'), glob(os.path.join('meshes', '*.*'))),
        (os.path.join('share', package_name, 'rviz'), glob(os.path.join('rviz', '*.rviz'))),
(4) Enter “:wq” to save and exit the file.

8.19.4 Compilation and Execution
(1) After granting the executable permission, enter the command “cd ~/hiwonder_ws/” to switch to the directory of the workspace.
cd ~/hiwonder_ws/
(2) Enter the command “colcon build” and press Enter to compile the packages within the workspace.
colcon build
(3) Enter the command “source ./install/setup.bash” and press Enter make the environment variables make effect.
source ./install/setup.bash
(4) Enter the command “ros2 launch urdf_demo rviz_view.launch.py” and press Enter to start rviz_view.launch.py file.
ros2 launch urdf_demo rviz_view.launch.py
(5) Select “base_link” in Rviz tool.
(6) Click “Add” button to select “RobotModel” model, and then click “OK” to add model.
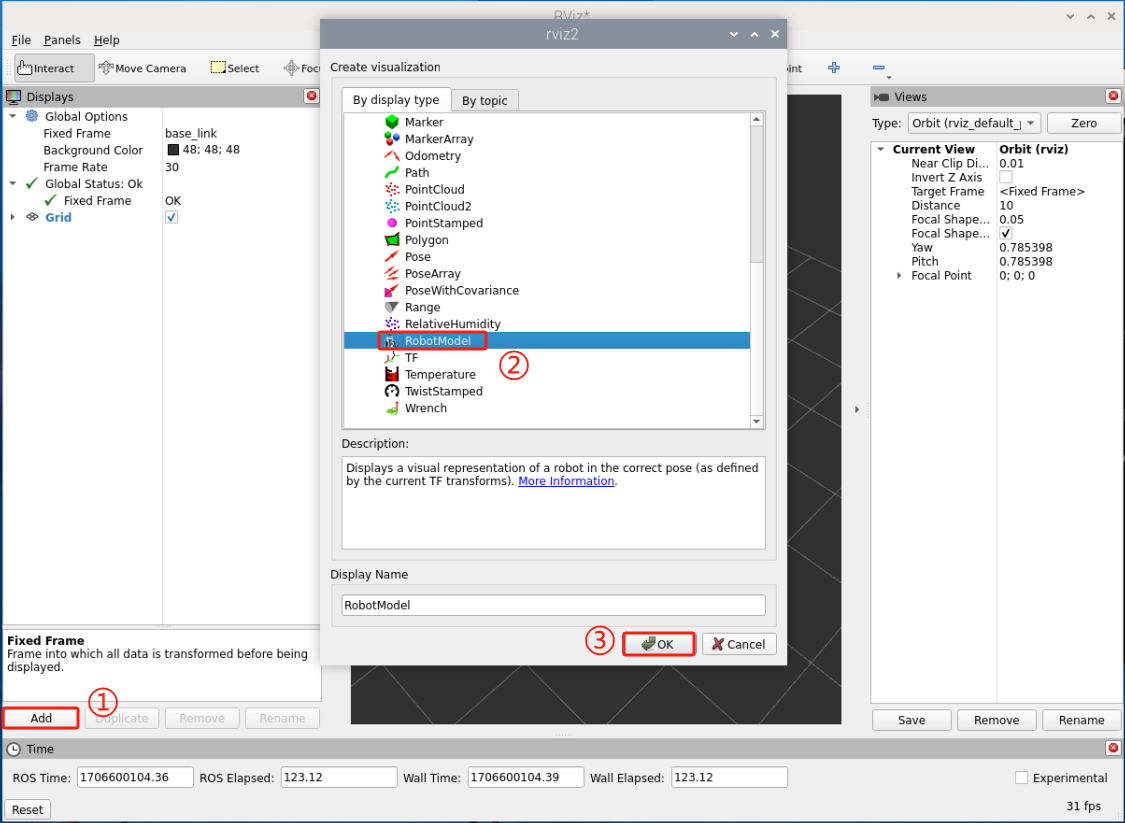
(7) Select “/robot_description” in the “Description Source” column, then click on an empty space to load the model.
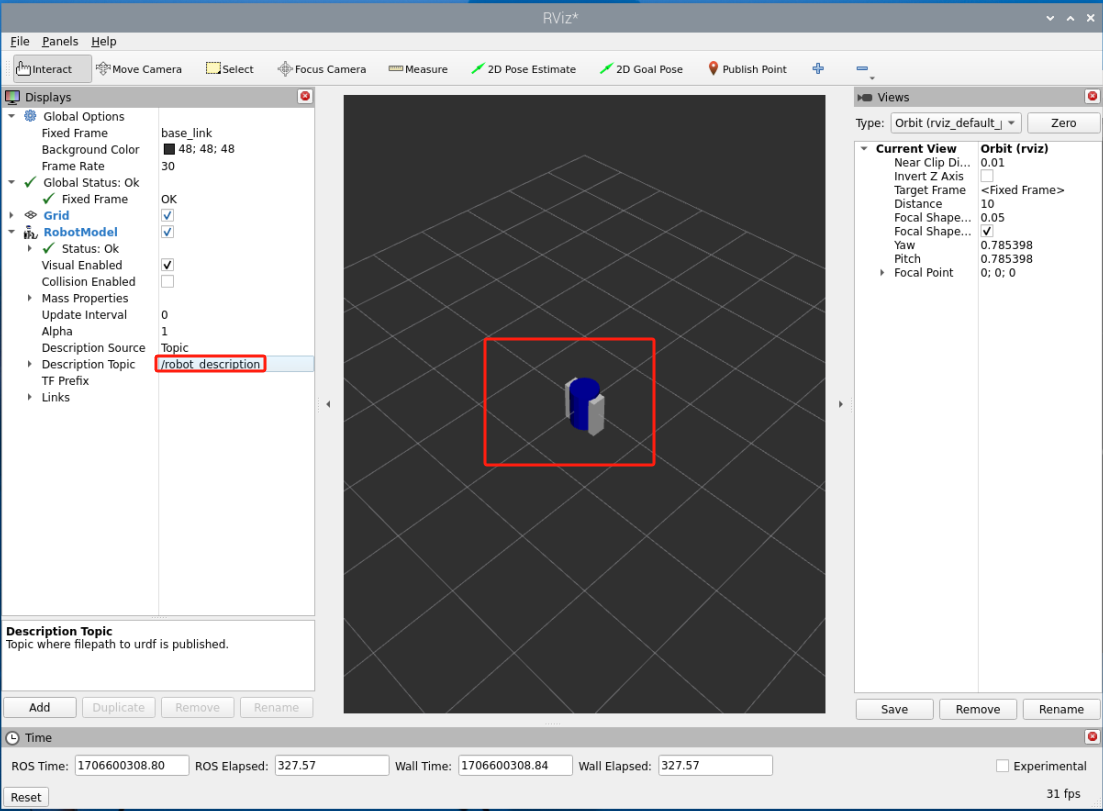
(8) Select “File” in the top-left corner, then choose “Save Config As” to save the model configuration parameters.
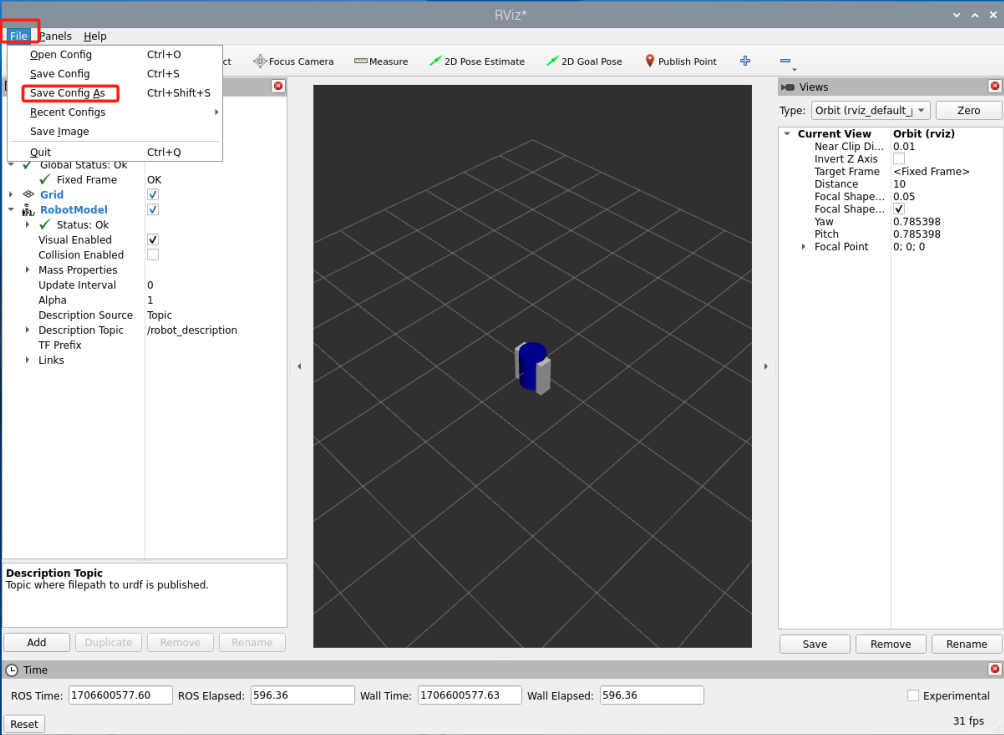
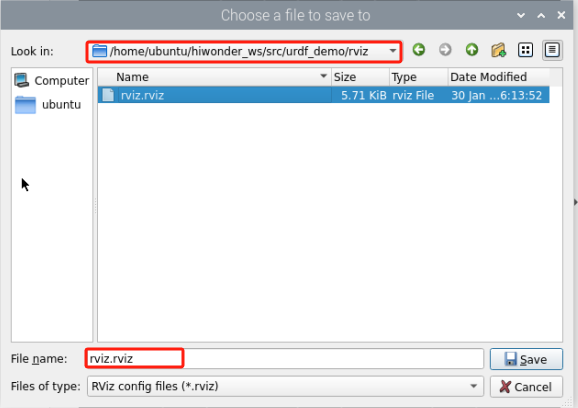
(9) Click on to select “System Tools -> Terminator”.
(10) Enter the command “cd hiwonder_ws/src/urdf_demo/launch/” to switch to the launch folder.
cd hiwonder_ws/src/urdf_demo/launch/
(11) Enter the command “vim rviz_view.launch.py” to edit the program, then copy the following code. If you need to make modifications, press “i” to enter insert mode. After making changes, press “Esc”, then type “:wq” to save and exit.
vim rviz_view.launch.py
arguments=[‘-d’, get_package_share_directory(‘urdf_demo’) + ‘/rviz/rviz.rviz’] # Load the RViz configuration file to display the URDF model.
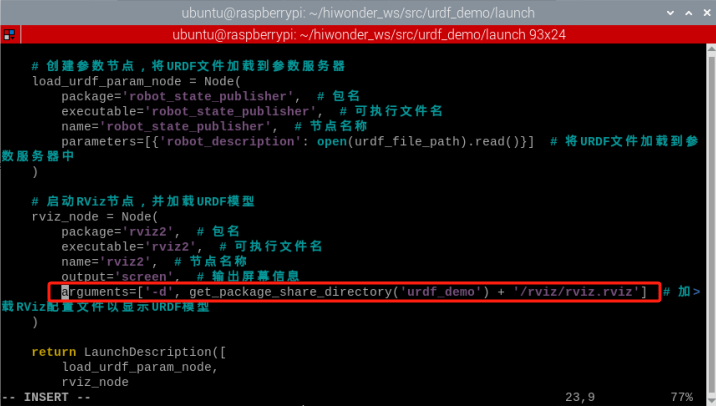
(12) Then enter “:wq” to save and exit the file.
:wq
8.20 ROS2 RQT Tool Usage Instruction
8.20.1 RQT Instruction
The functionality of Rviz in ROS is already quite powerful. However, in some scenarios, we may prefer simpler, modular visualization tools. For example, displaying images from just one camera. If using Rviz for this purpose, it might feel a bit cumbersome. In such cases, we can turn to another modular visualization tool provided by ROS, called RQT.
Just like Rviz, the name RQT indicates that it is also based on the QT visualization tool.
(1) Click on  at the top left corner, and then select “System Tools→Terminator” in sequence.

(2) Enter the command “rqt” to open RQT tool.


This interface loads may small modules, each capable of implementing a specific small functionality. The commonly uses modules contain topics, services, actions, parameters, logs, etc. You can use them according to your requirements, facilitating the ROS2 program debug.
8.20.2 Logging Display
(1) Click on at the top left corner, and then select “System Tools→Terminator” in sequence.
(2) Enter the command “ros2 run turtlesim turtlesim_node” to launch the TurtleSim node.
ros2 run turtlesim turtlesim_node

(3) Right click on a blank space to select “Split Vertically” to create a new terminal window.
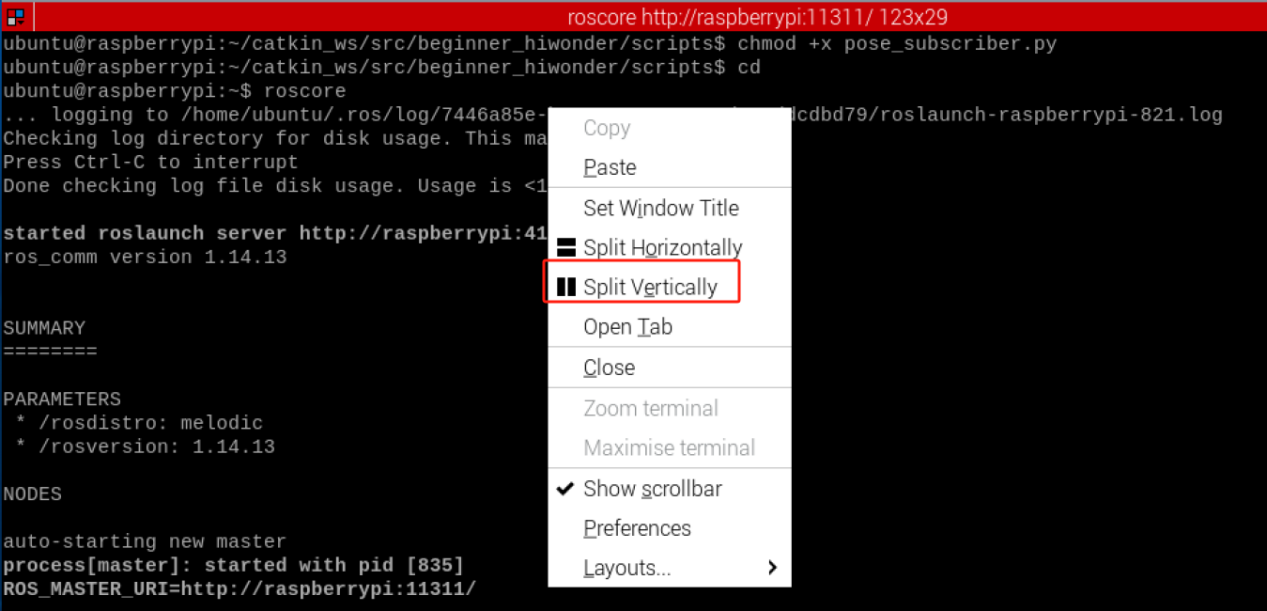
(4) Enter the command “ros2 run turtlesim turtle_teleop_key” and press Enter to launch the TurtleSim control node.
(5) Refer to step 3) to create a new window, and then enter command “rqt” to open RQT tool.

(6) Select “Plugins→Logging→Console” in sequence to open logging display.
(7) Use the “↑↓←→” keys to control the movement of the turtle. If the turtle touches the wall, log messages will be displayed.
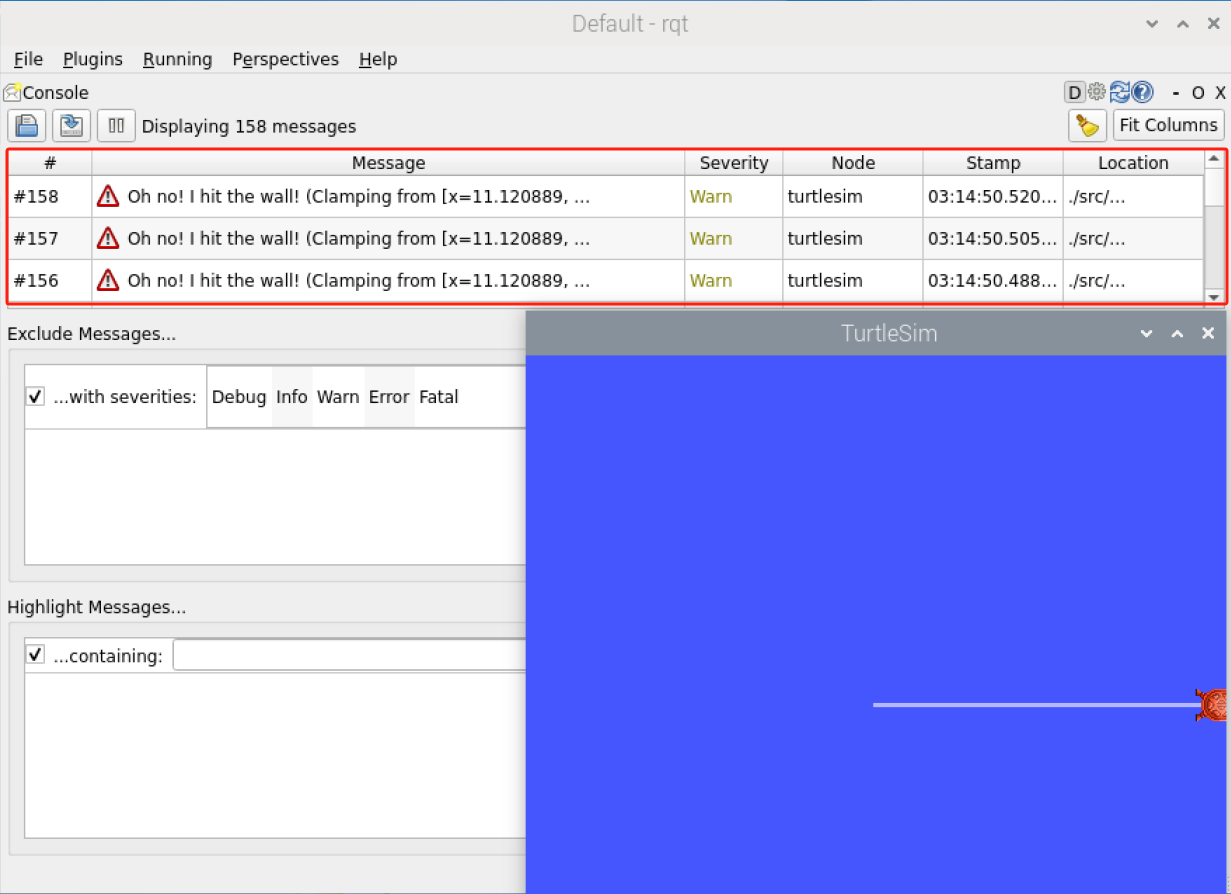
8.20.3 Topic Pugin
(1) Select “Plugins→Topic→Message Publisher” in sequence to open the topic plugin.
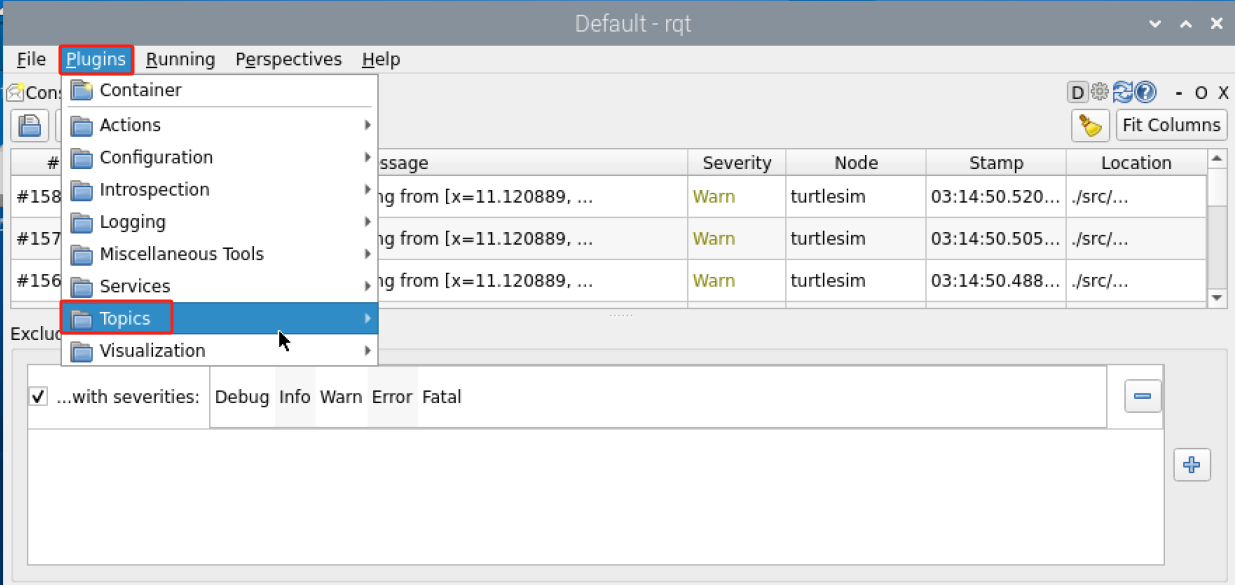
(2) Click on  , then select the topic of “/turtel/cmd_vel/”, then Click on
  .
.

(3) Modify the the linear velocity value X and the angular velocity Z, then select and check.
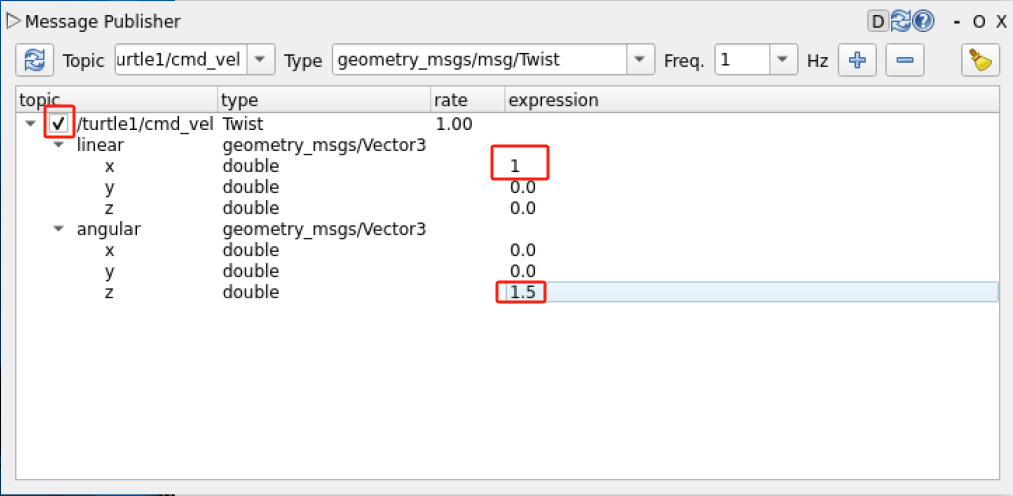
The turtle will move according to the specific linear and angular velocity data.
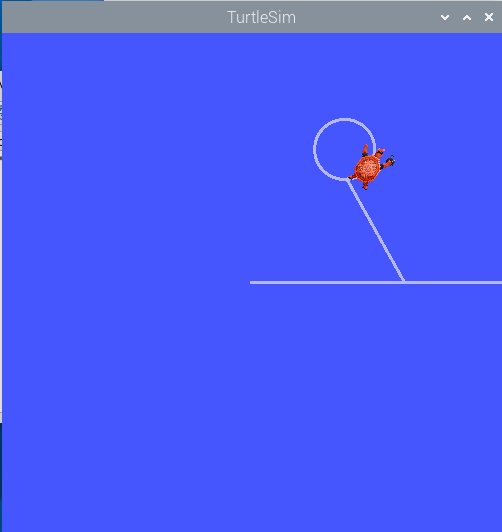
8.20.4 Service Plugin
(1) Select “Plugins→Services→Services Caller” in sequence to open the service plugin.

(2) Select the “/spawn” service, then set the position for the new turtle to be spawned, name it as “turtle2”, and finally click on “Call”.
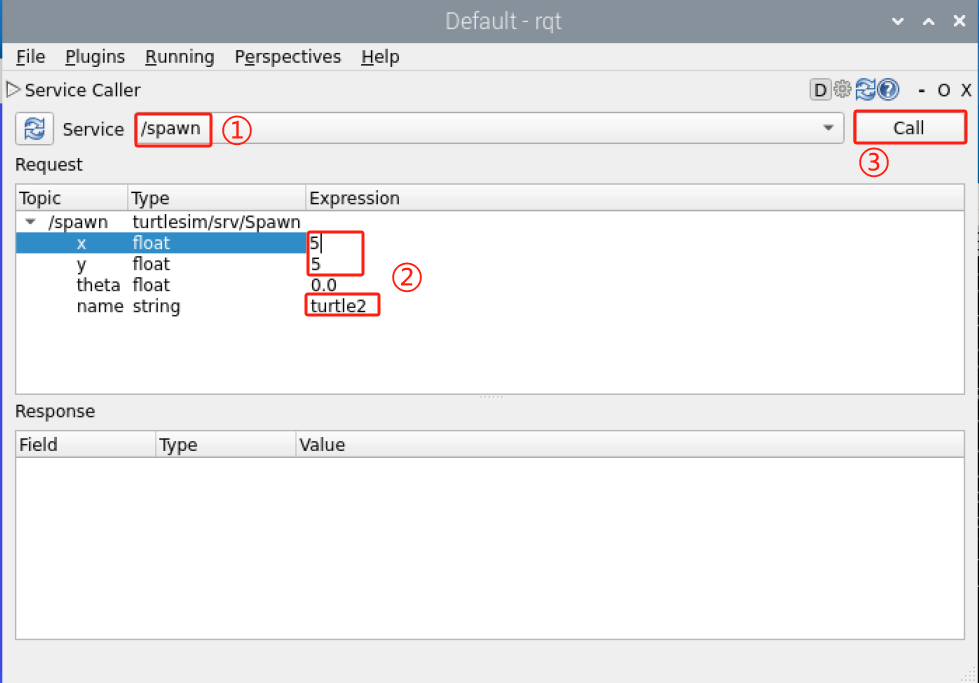
At this point, a turtle named “turtle2” will be spawned.
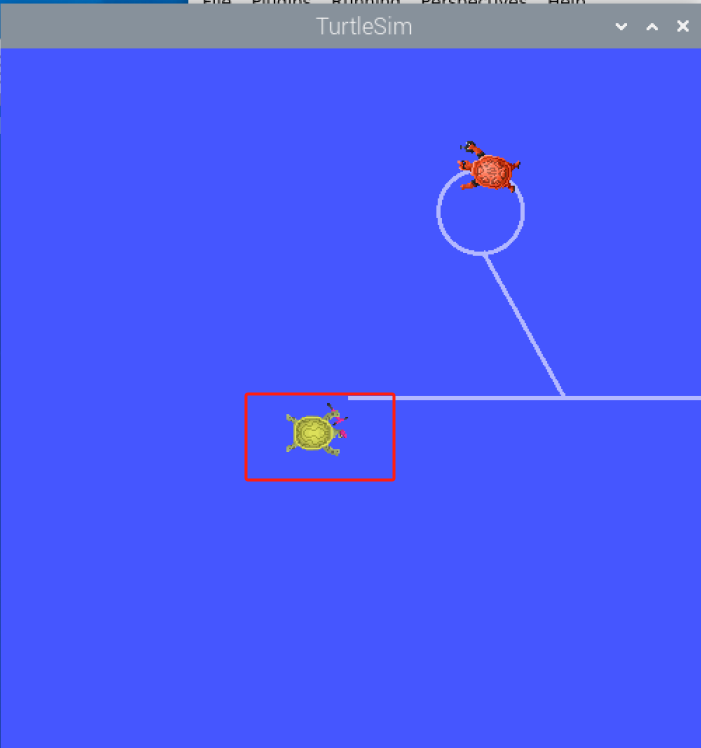
8.20.5 Drawing Plugin
(1) Select “Plugins→Visualization→Plot” in sequence to open drawing plugin.
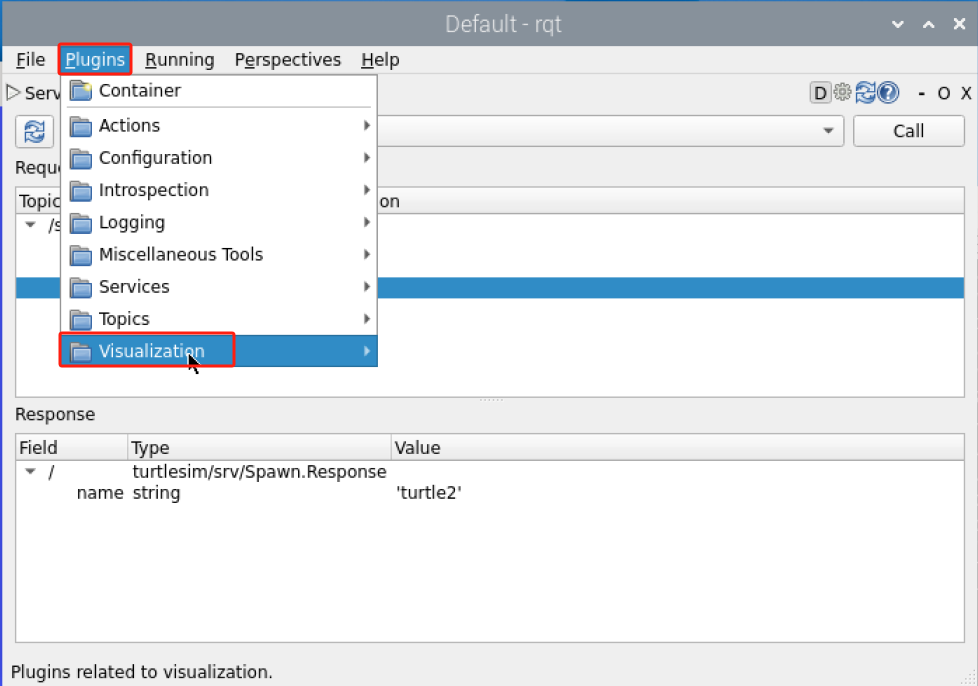
(2) Enter “/turtle/pose/” to select the turtle’s position data, then Click  .
.
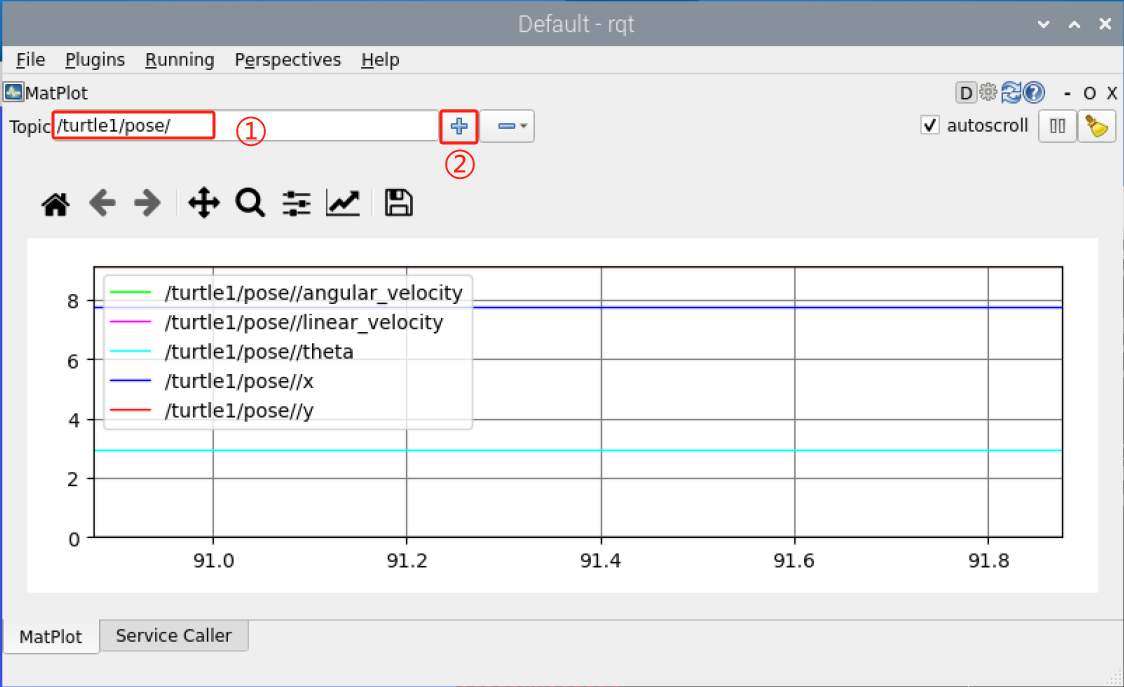
(3) The plugin will visualize the angular velocity, linear velocity, orientation, X coordinate, and Y coordinate of the turtle in real-time.

To further learn about other plugins in the RQT tool, please visit the official website (https://www.ros.org/) and explore the tutorials available there.