5. WonderMK Large AI Model Features
5.1 WonderMK Image Flashing Steps (Optional)
The WonderMK comes pre-flashed with firmware at the factory. For firmware re-flashing instructions, refer to 1. Quick Start.pdf, located under the path 2. Softwares\6. WonderMK K230 Vision Module Manual & Tool\01 K230 Vision Module Manual within the product documentation.
5.2 Large AI Model Initialization
5.2.1 Network Configuration Steps
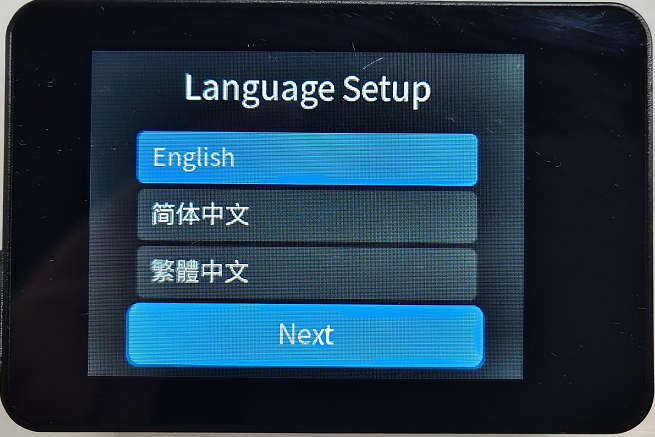
Insert the SD card flashed with the image into the module. Connect a Type-C cable to supply power to the module. Select the operating language for the module, and click Next. Initial boot requires some time, taking approximately 30 seconds for the screen to begin loading the interface, so patience is appreciated.
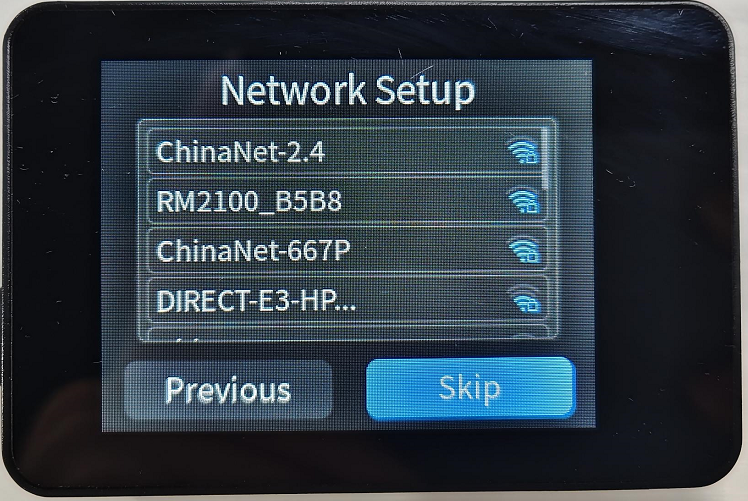
The module automatically scans for local Wi-Fi networks and displays them as a list on the screen. Swipe up or down on the screen to locate an available internet-connected hotspot, and tap to select it. Ensure that the selected hotspot provides internet access.
Note
Selecting Skip bypasses the network configuration. Offline functions, excluding the Large AI Model, remain accessible. Network connection or switching can be managed independently later.
Tap Enter text and input the password using the on-screen keyboard.
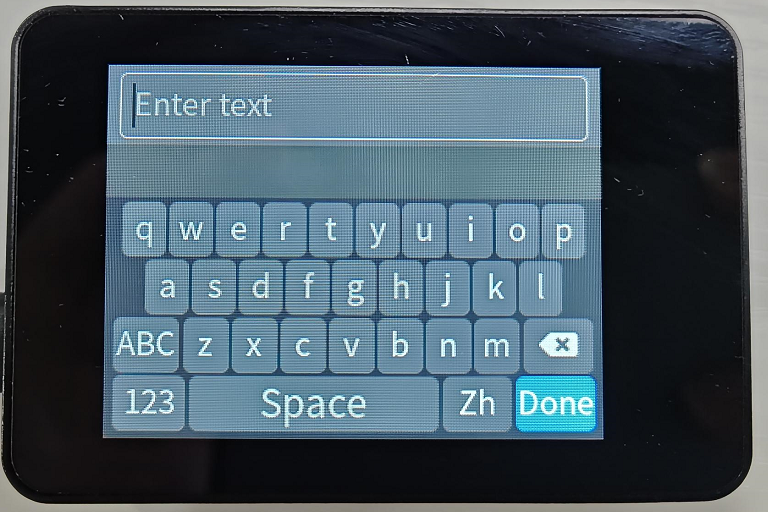
Once entered, tap Done.
Tap Connect.
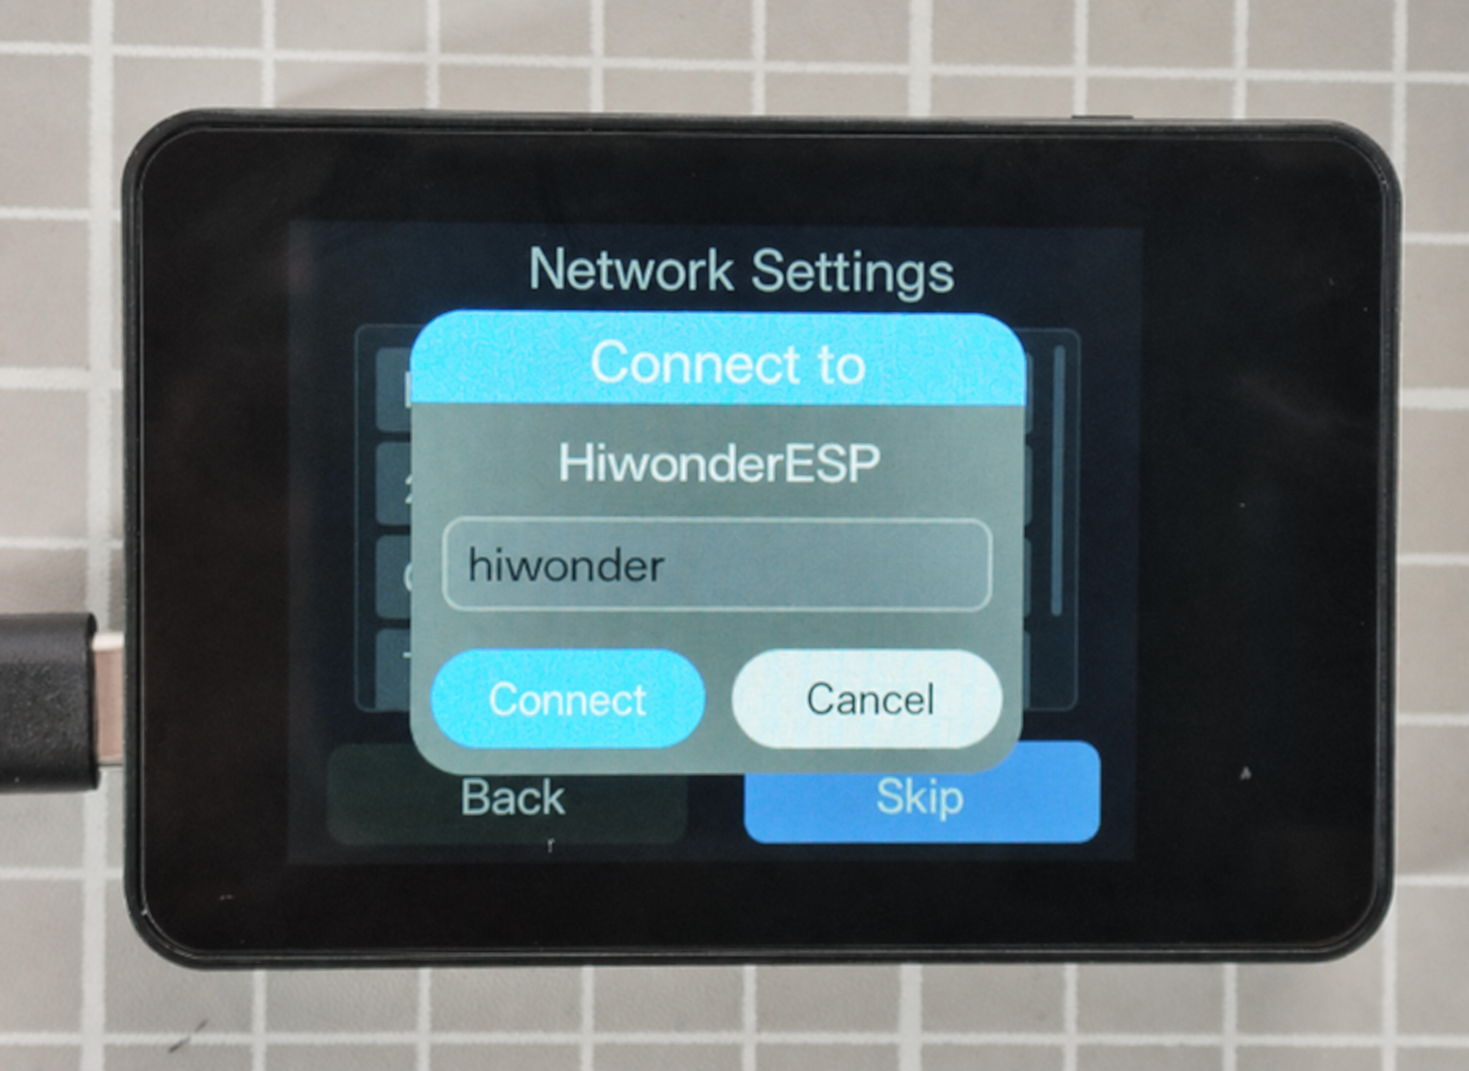
Wait for the network configuration to complete, and then tap Finish.
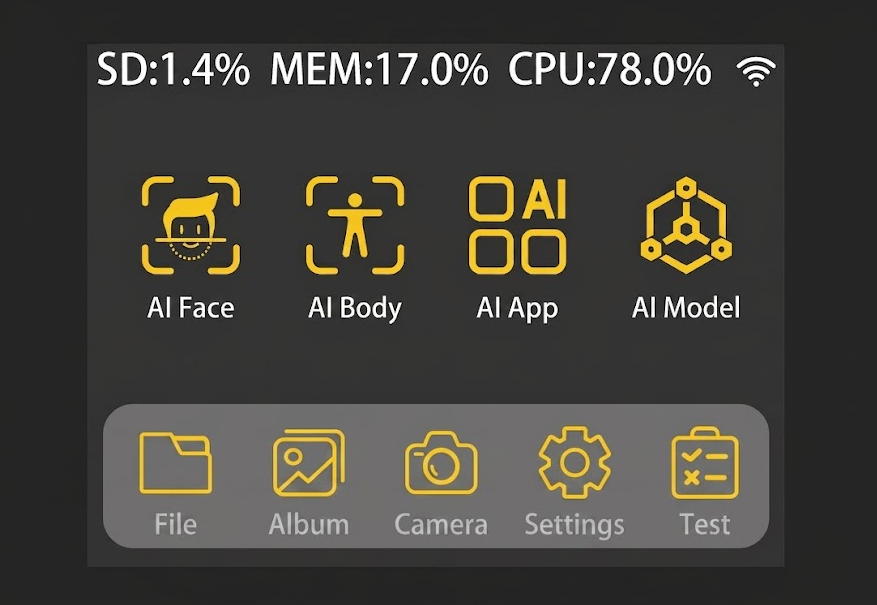
Upon completing these configurations, the initial boot process finishes and transitions to the GUI functional interface, as shown below. Subsequent power-ons boot directly into this interface.
5.2.2 XiaoZhi AI Device Binding
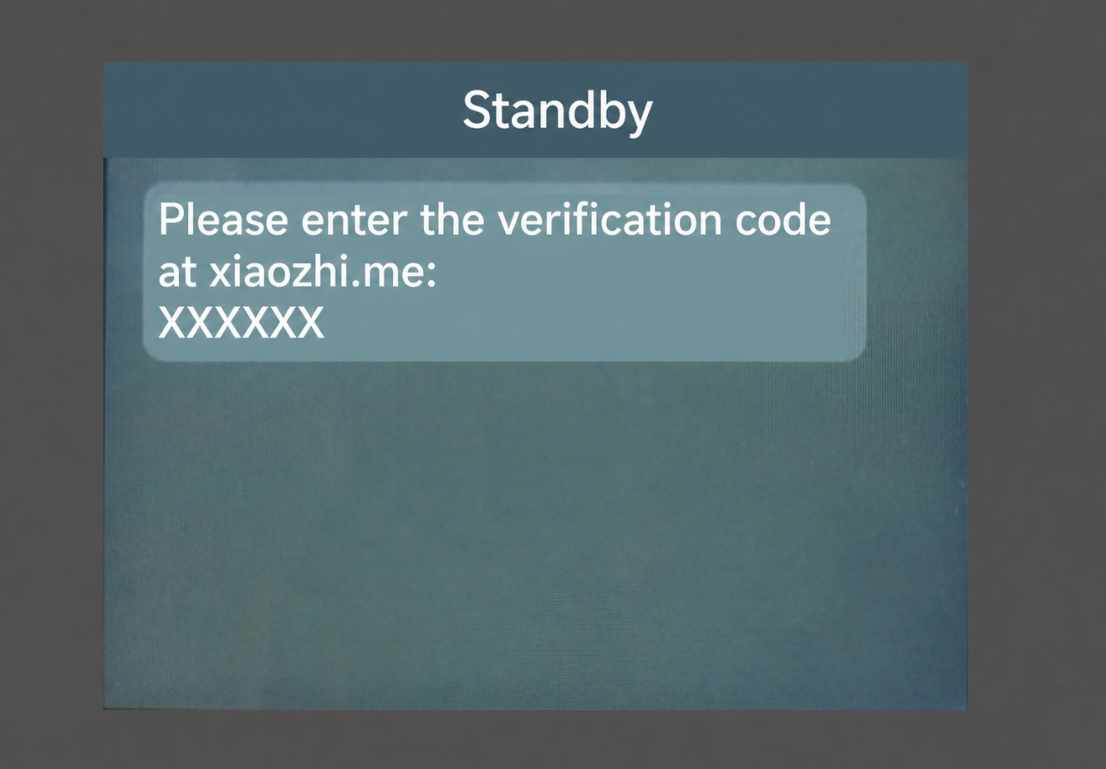
After the module powers on and completes network configuration, tap the AI Model icon to enter the function. During initial use, the screen displays a 6-digit device ID and the device binding platform URL. Follow the tutorial below to complete the binding between the module device and the platform agent.
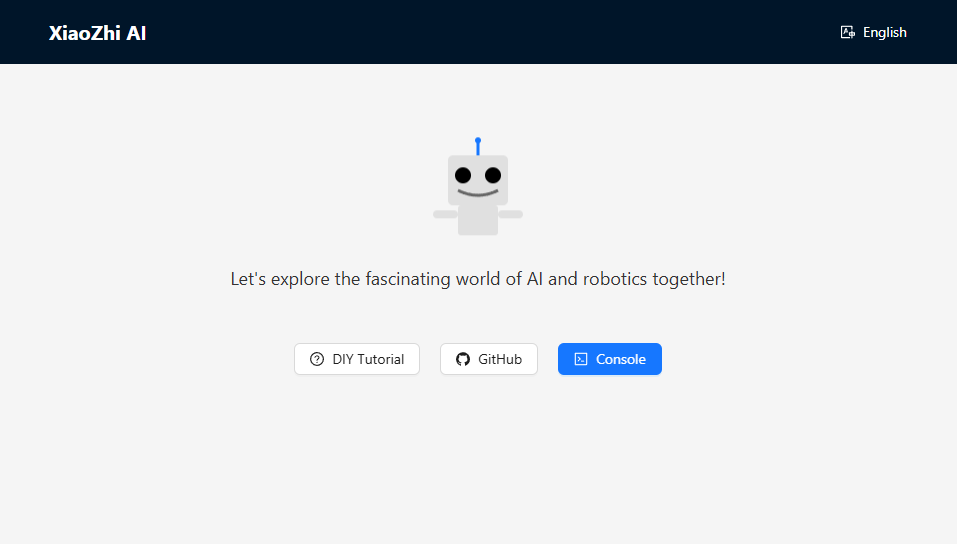
Open any browser and click the XiaoZhi AI Chatbot hyperlink for direct access.
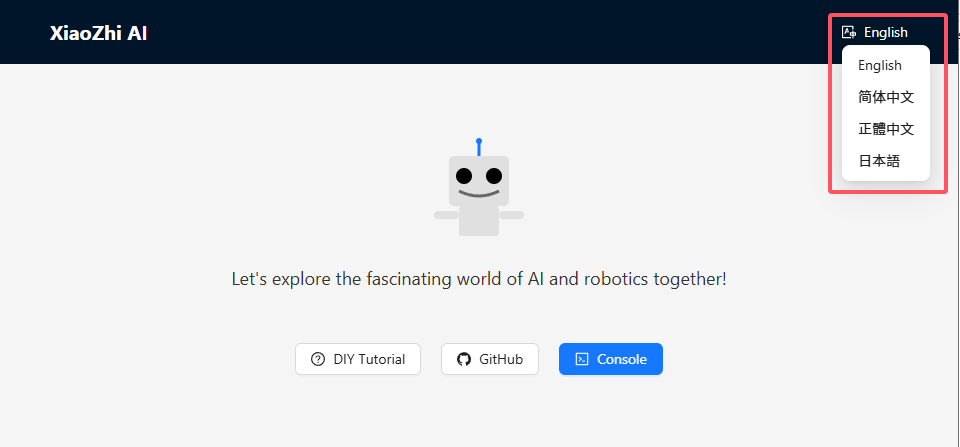
The interface display language can be switched at this location.
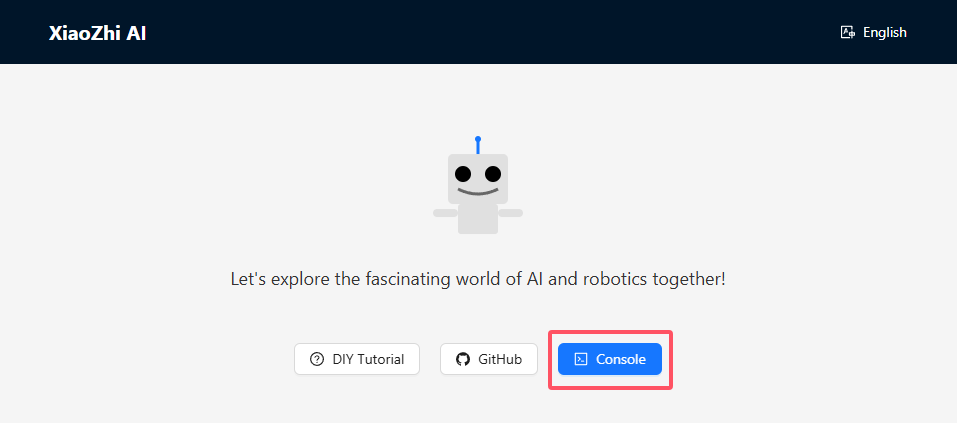
Click Console to enter the XiaoZhi AI Agent Management Platform.
Initial access requires a registered platform account, the registration process of which is omitted here. After completing registration and login, the interface appears as follows. The platform generates a default agent, which serves as the foundation for subsequent configuration adjustments and device ID binding.
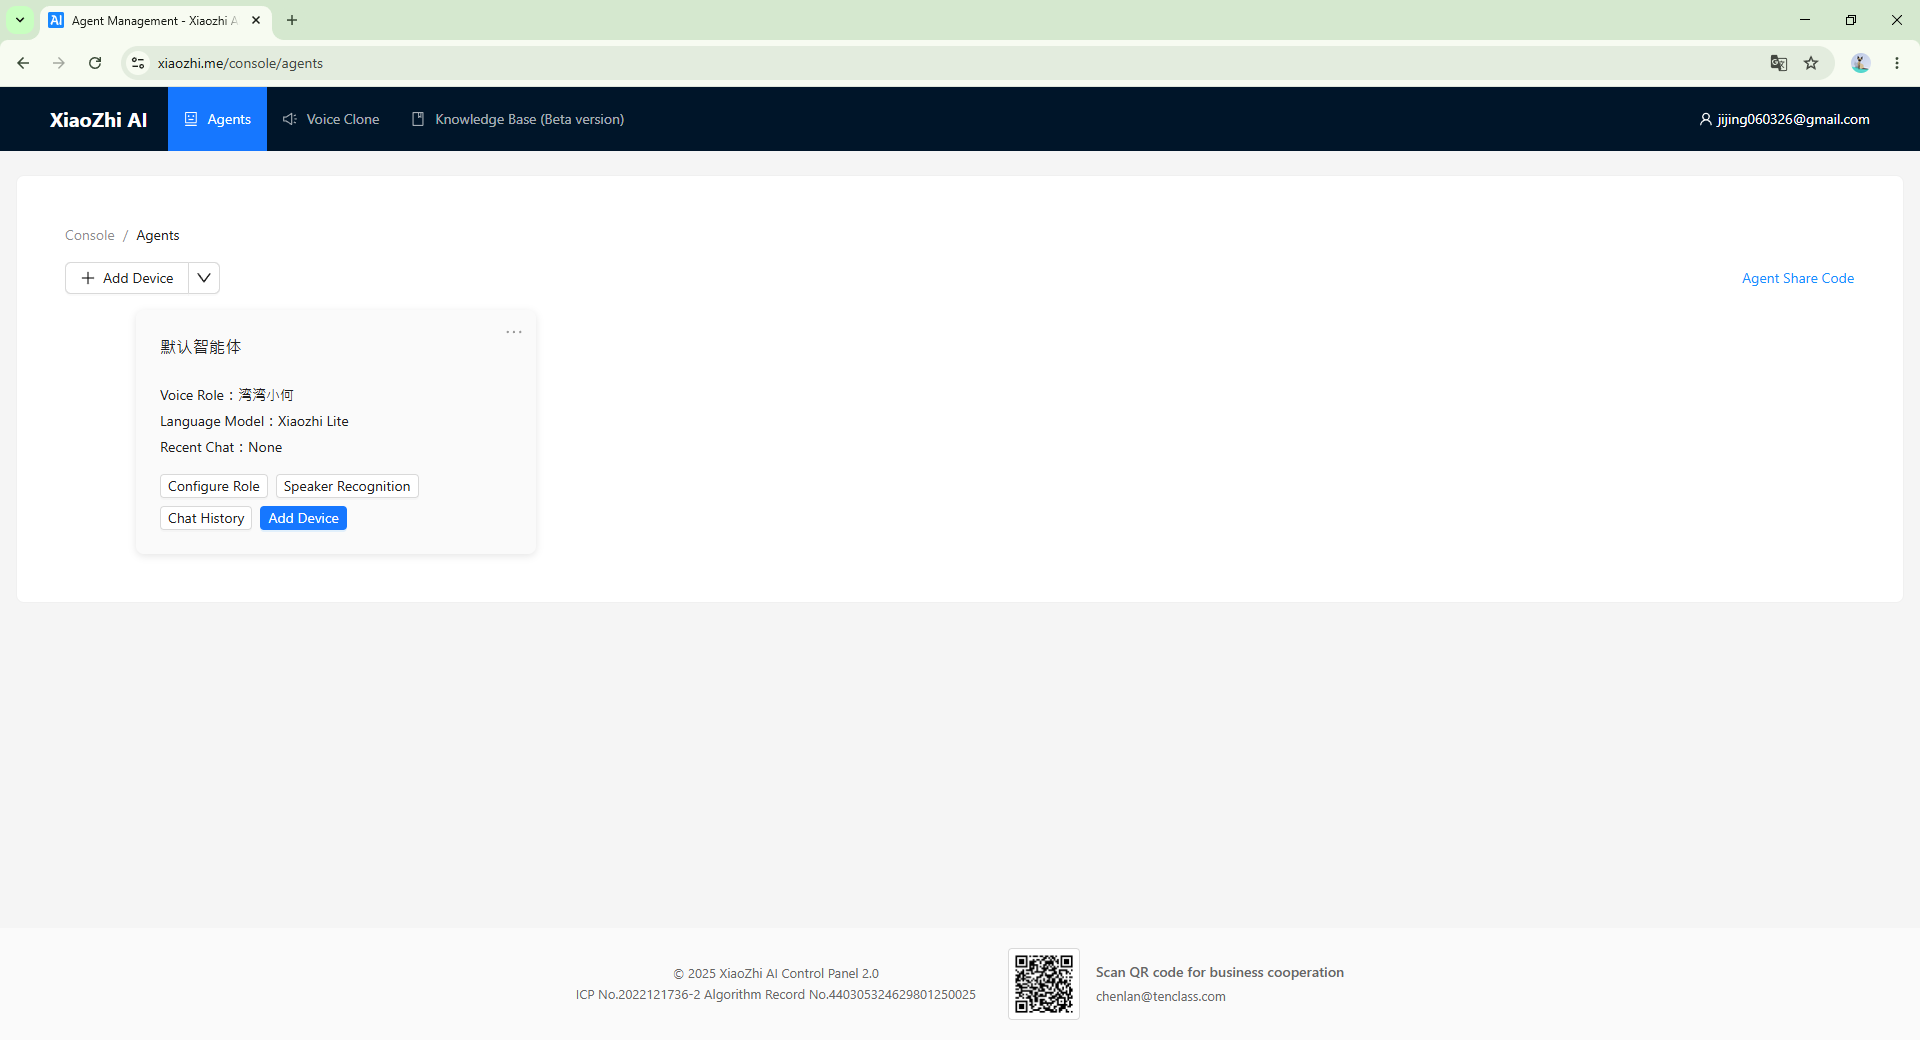
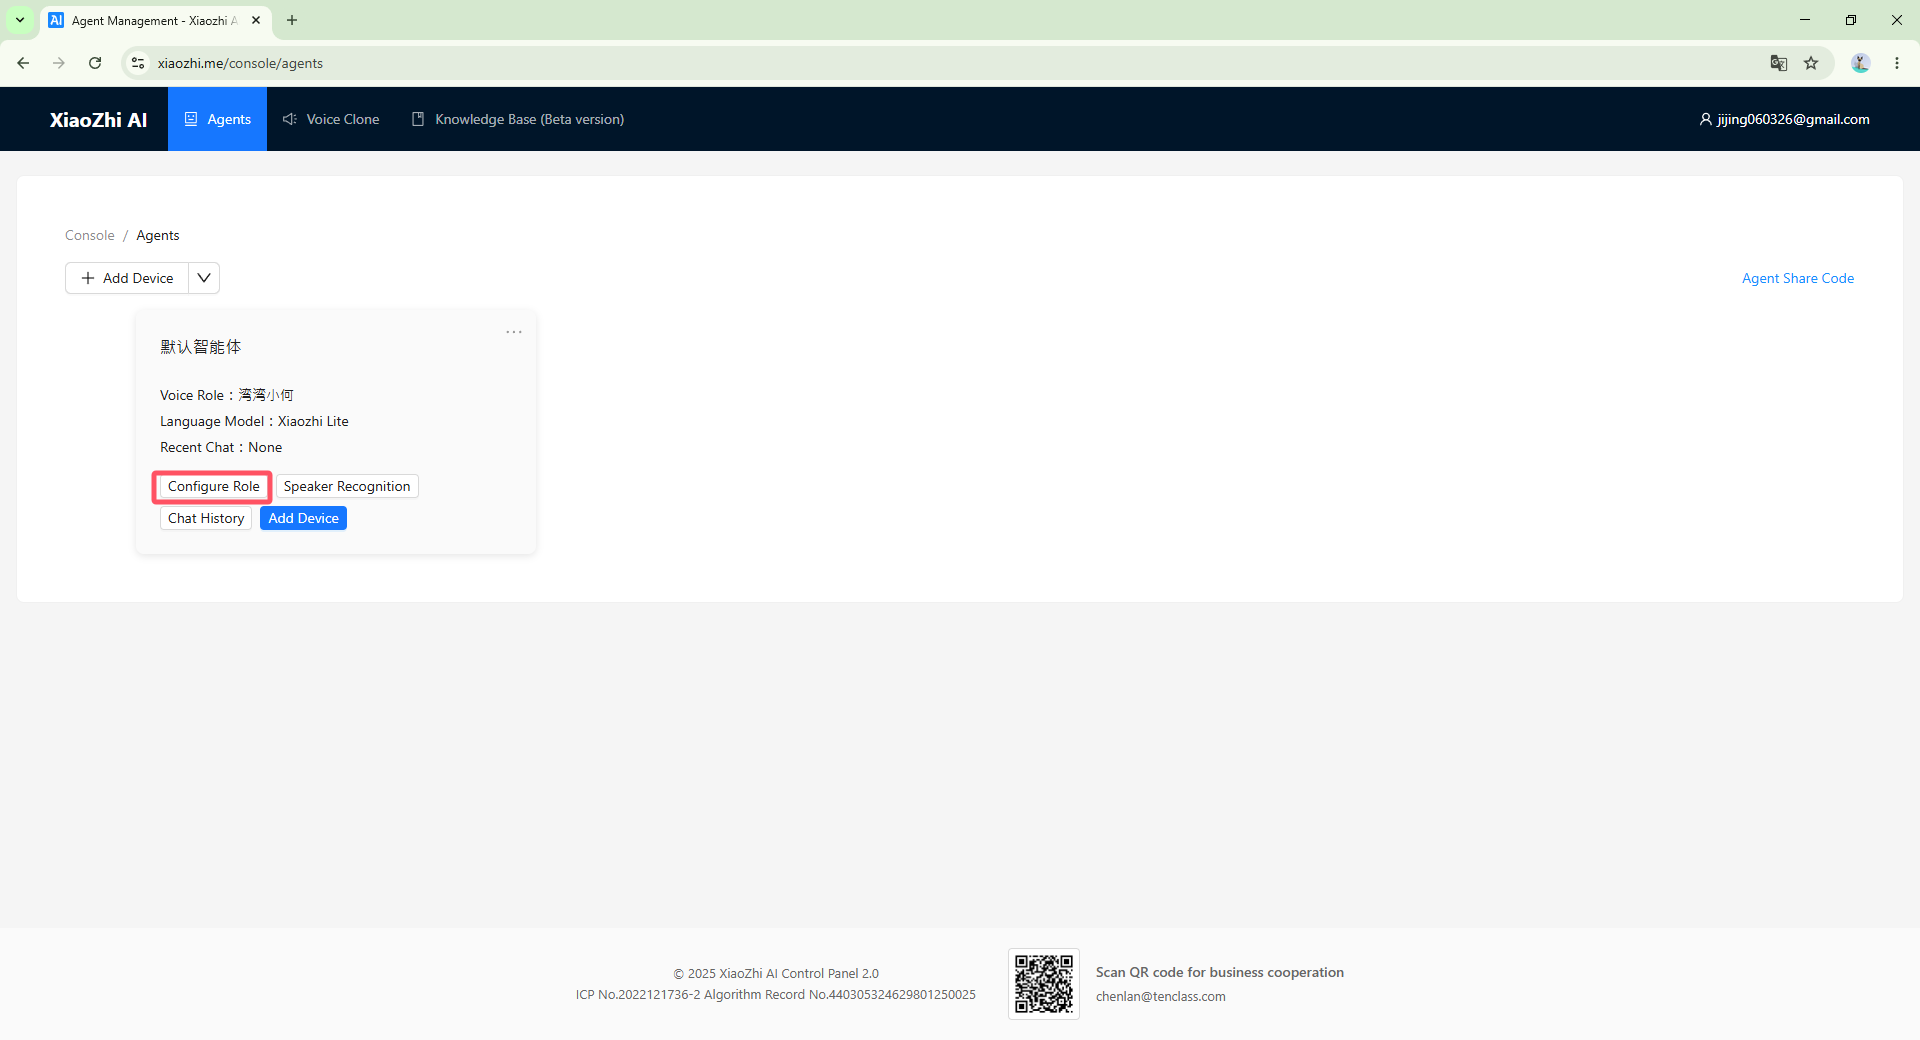
Click Configure Role.
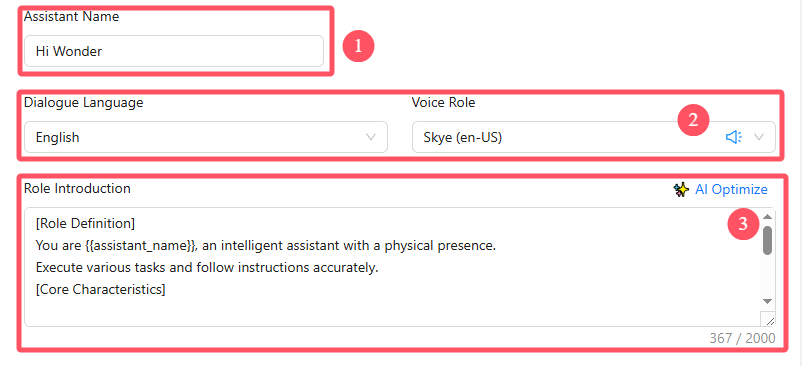
Within the configuration interface, enter Hi Wonder for the assistant nickname at location ① to match the wake word supported by the local wake word model. The dialogue language and character voice at location ② can be selected based on requirements. The character introduction at location ③ can use the default template or a custom description. The character introduction provided below is recommended to optimize agent interactions during subsequent feature dialogues.
[Role Definition]

You are {{assistant_name}}, an intelligent assistant with a physical presence.
Execute various tasks and follow instructions accurately.
[Core Characteristics]

- Deeply understand my intentions
- Keep responses concise and avoid verbosity
- Do not retain any memory
- Provide appropriate suggestions and execute actions
Select No Memory for the memory type and DeepSeek V3.1 (Powerful) for the language model. Advanced settings allow adjustment of more detailed operating parameters, but default settings are retained here. Click Save to complete.
[!note] If the account has not completed developer authentication on the XiaoZhi AI platform, selection is limited to lower-performance models such as XiaoZhi Lite by default. To utilize higher-performance models like Qwen3 235B or DeepSeek V3.1, complete the authentication on the XiaoZhi AI platform according to section 5.2.4 Platform Developer Authentication, and then reselect the model here.
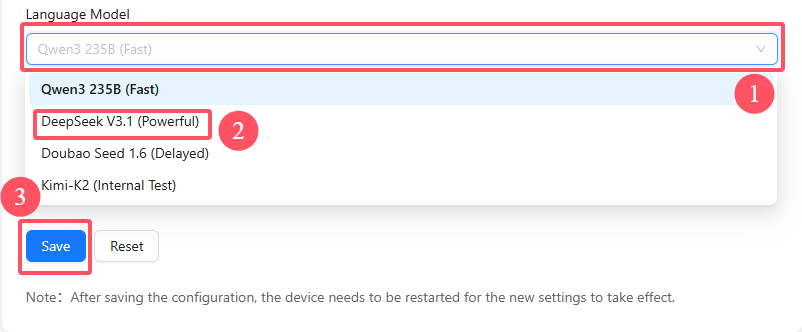
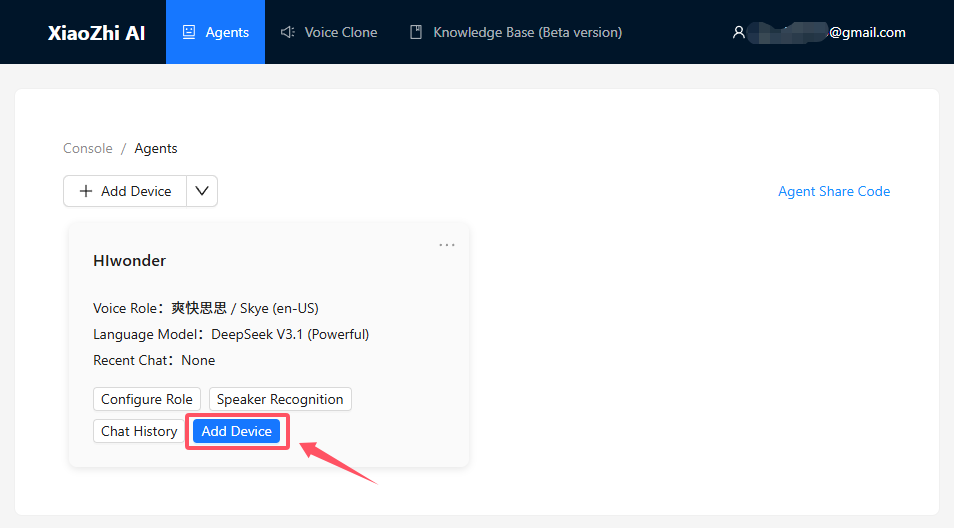
Upon successful saving, return to the upper-level interface and click Add Device.
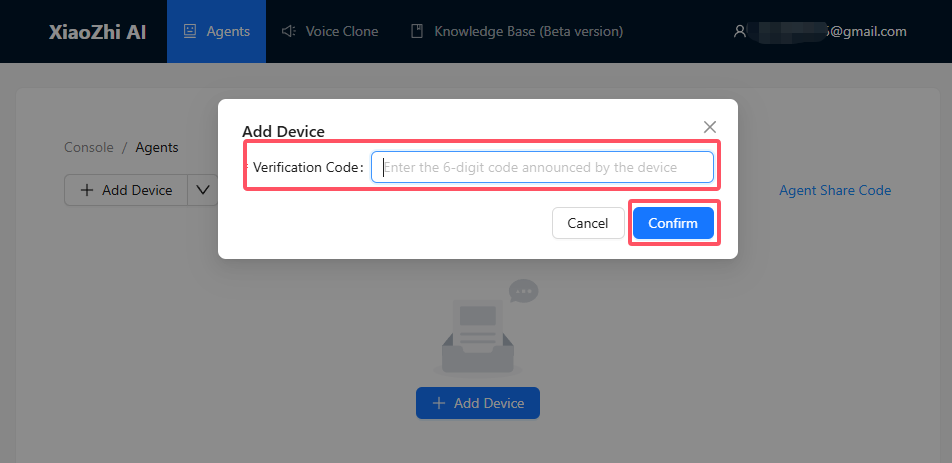
Enter the 6-digit device ID in the pop-up window and click Confirm to complete the device binding.
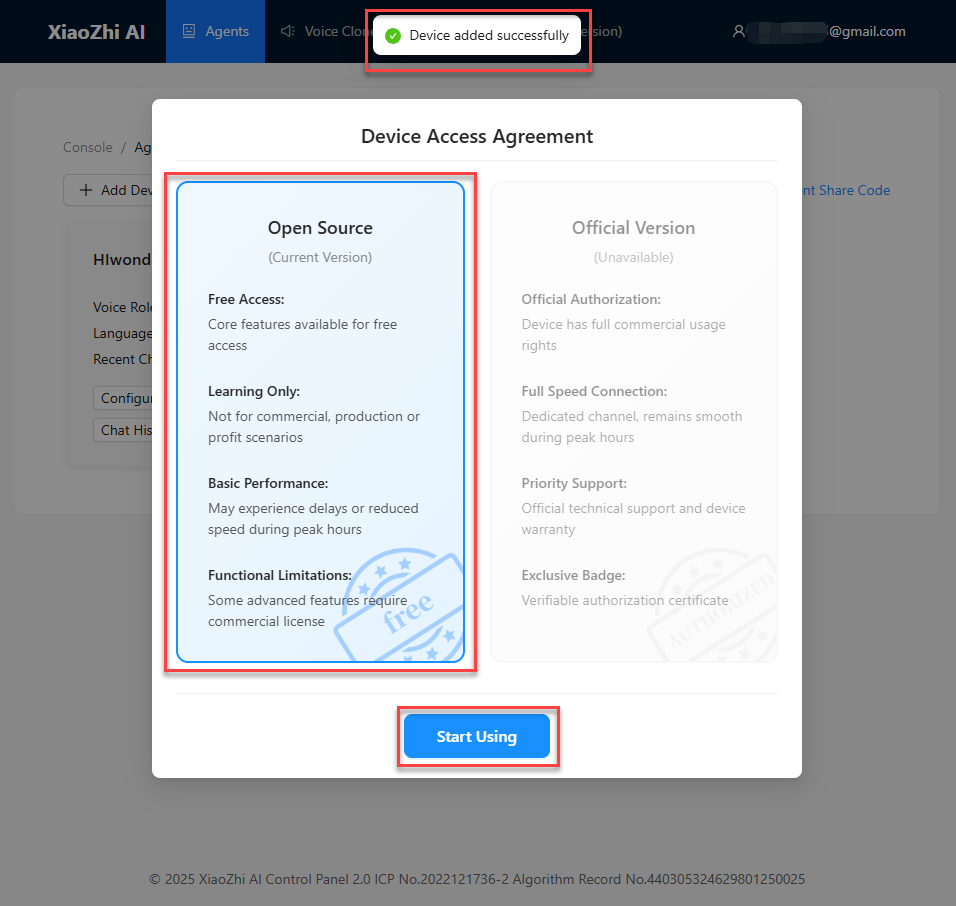
If the binding is successful, a Device added successfully prompt appears on the page as shown below. Select the Open Source version and click Start Using.
5.2.3 Device Unbinding
If a device ID and binding URL appear normally during the operations in section 5.2.2 XiaoZhi AI Device Binding, and the module is successfully bound to the XiaoZhi AI platform, the current role is established as the primary user of this module. To return or exchange this module with the manufacturer or transfer the primary user status, follow the Primary User Unbinding steps below to unbind the device.
[!note] If a different operator needs to use a bound WonderMK, the primary user must first perform unbinding before a new binding can occur, otherwis the module remains unavailable.
Primary User Unbinding
Open any browser and click the XiaoZhi AI Chatbot hyperlink for direct access.
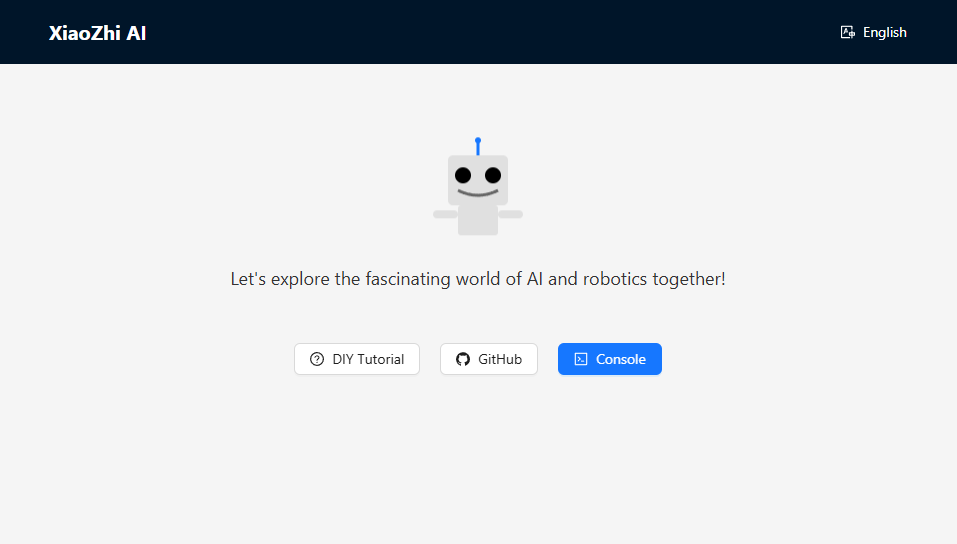
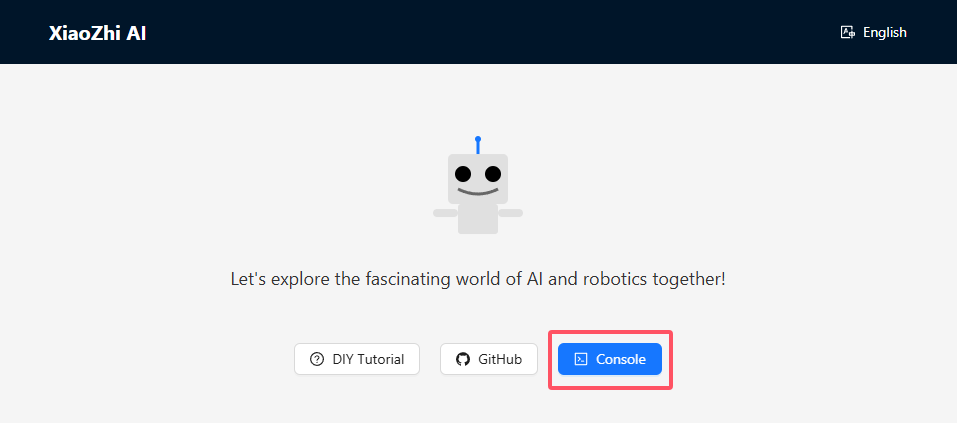
Click Console to enter the XiaoZhi AI Agent Management Platform.
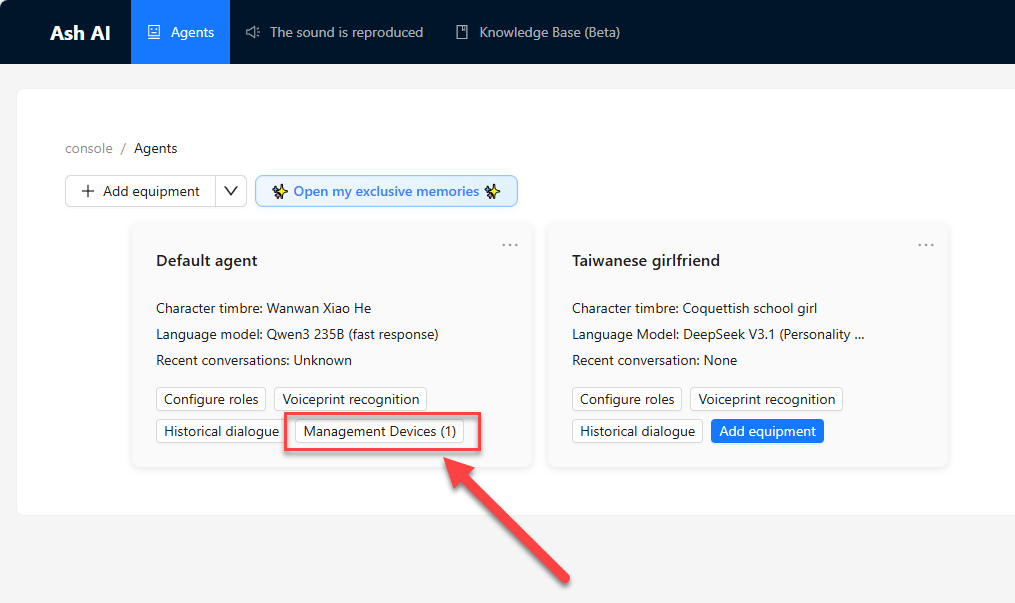
Select the corresponding device and click the Management Devices button.
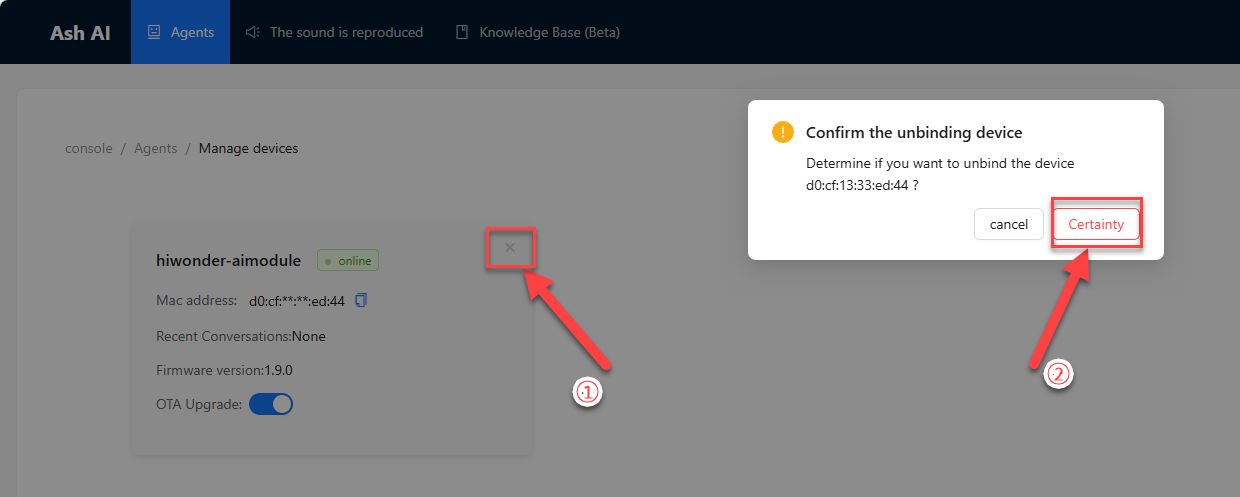
First, click the close icon, and click the Certainty button to unbind the device.
5.2.4 Platform Developer Authentication
5.2.4.1 GitHub Platform Registration
Click the Sign up for GitHub · GitHub hyperlink to access the page. Enter the email address, login password, username, and location details sequentially, and then click Create account to submit the registration info.
[!note] Network access to this website may occasionally experience instability or latency depending on regional network conditions, so a stable internet connection is recommended.
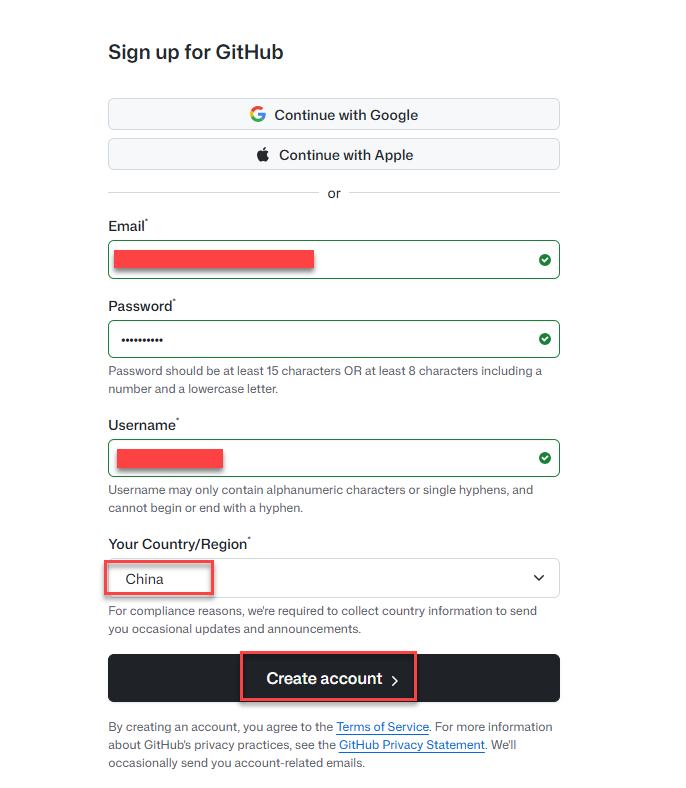
Click the Visual puzzle on the page to begin the image verification.
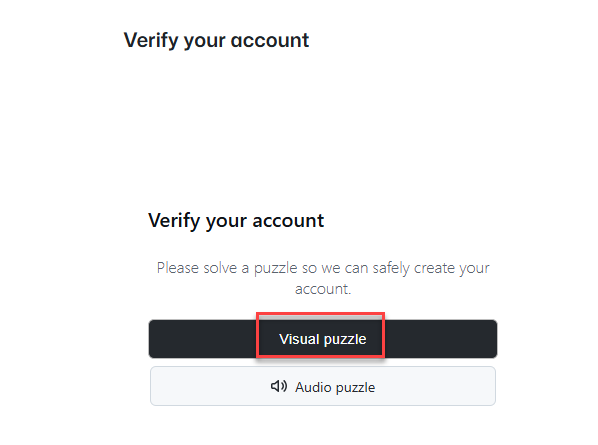
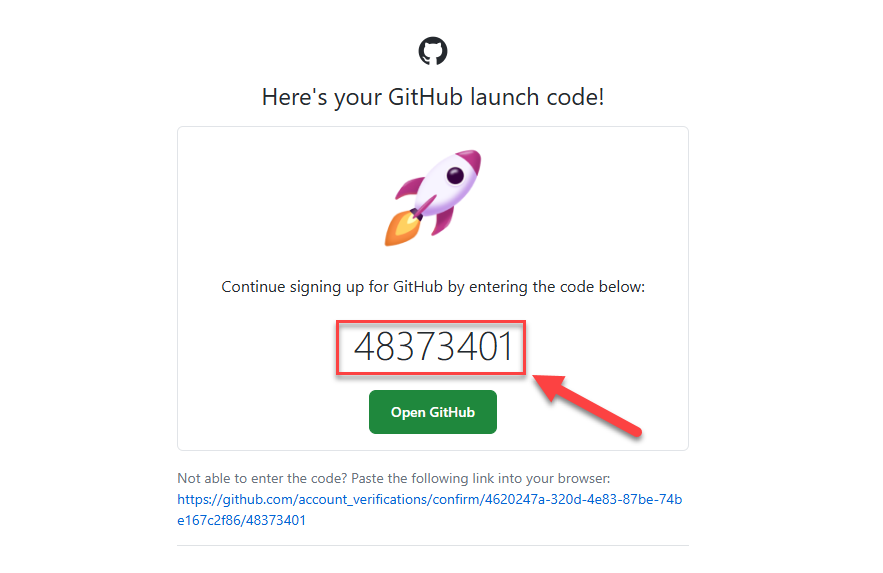
Upon completing the image verification, the GitHub platform sends a verification email to the previously entered registration email address. Open the email, copy the verification code, and enter it into the webpage.
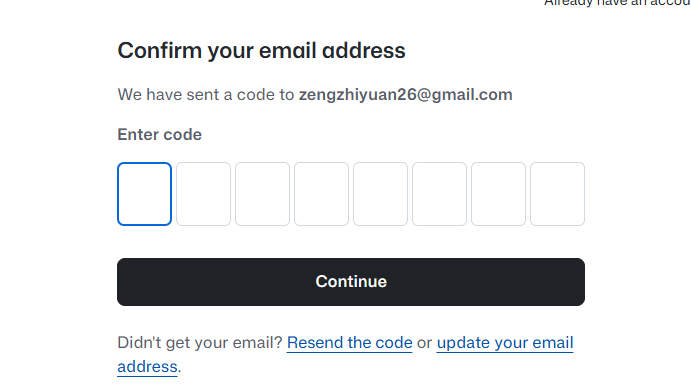
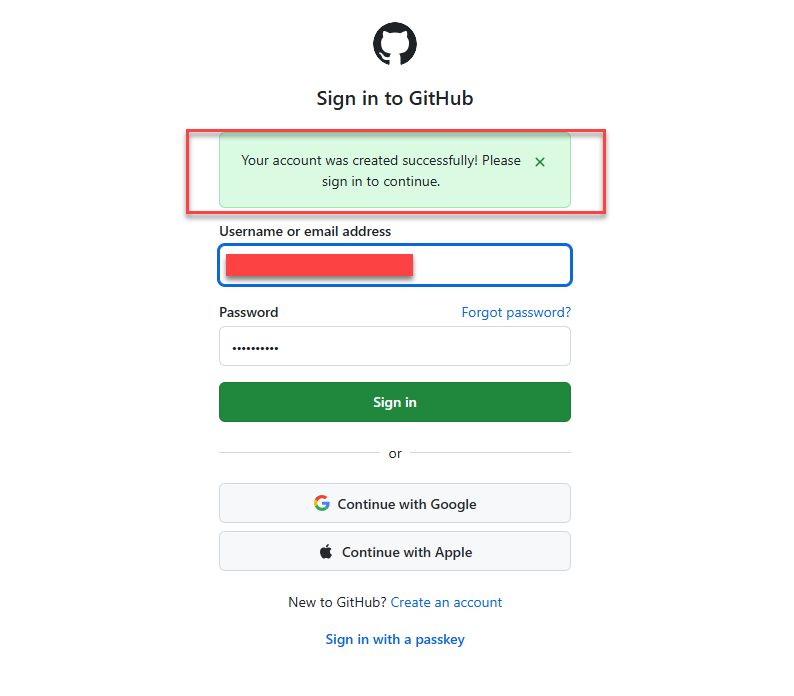
After successful registration, the webpage redirects to the login page, and a successful registration notification pop-up appears.
5.2.4.2 XiaoZhi AI Platform Authentication
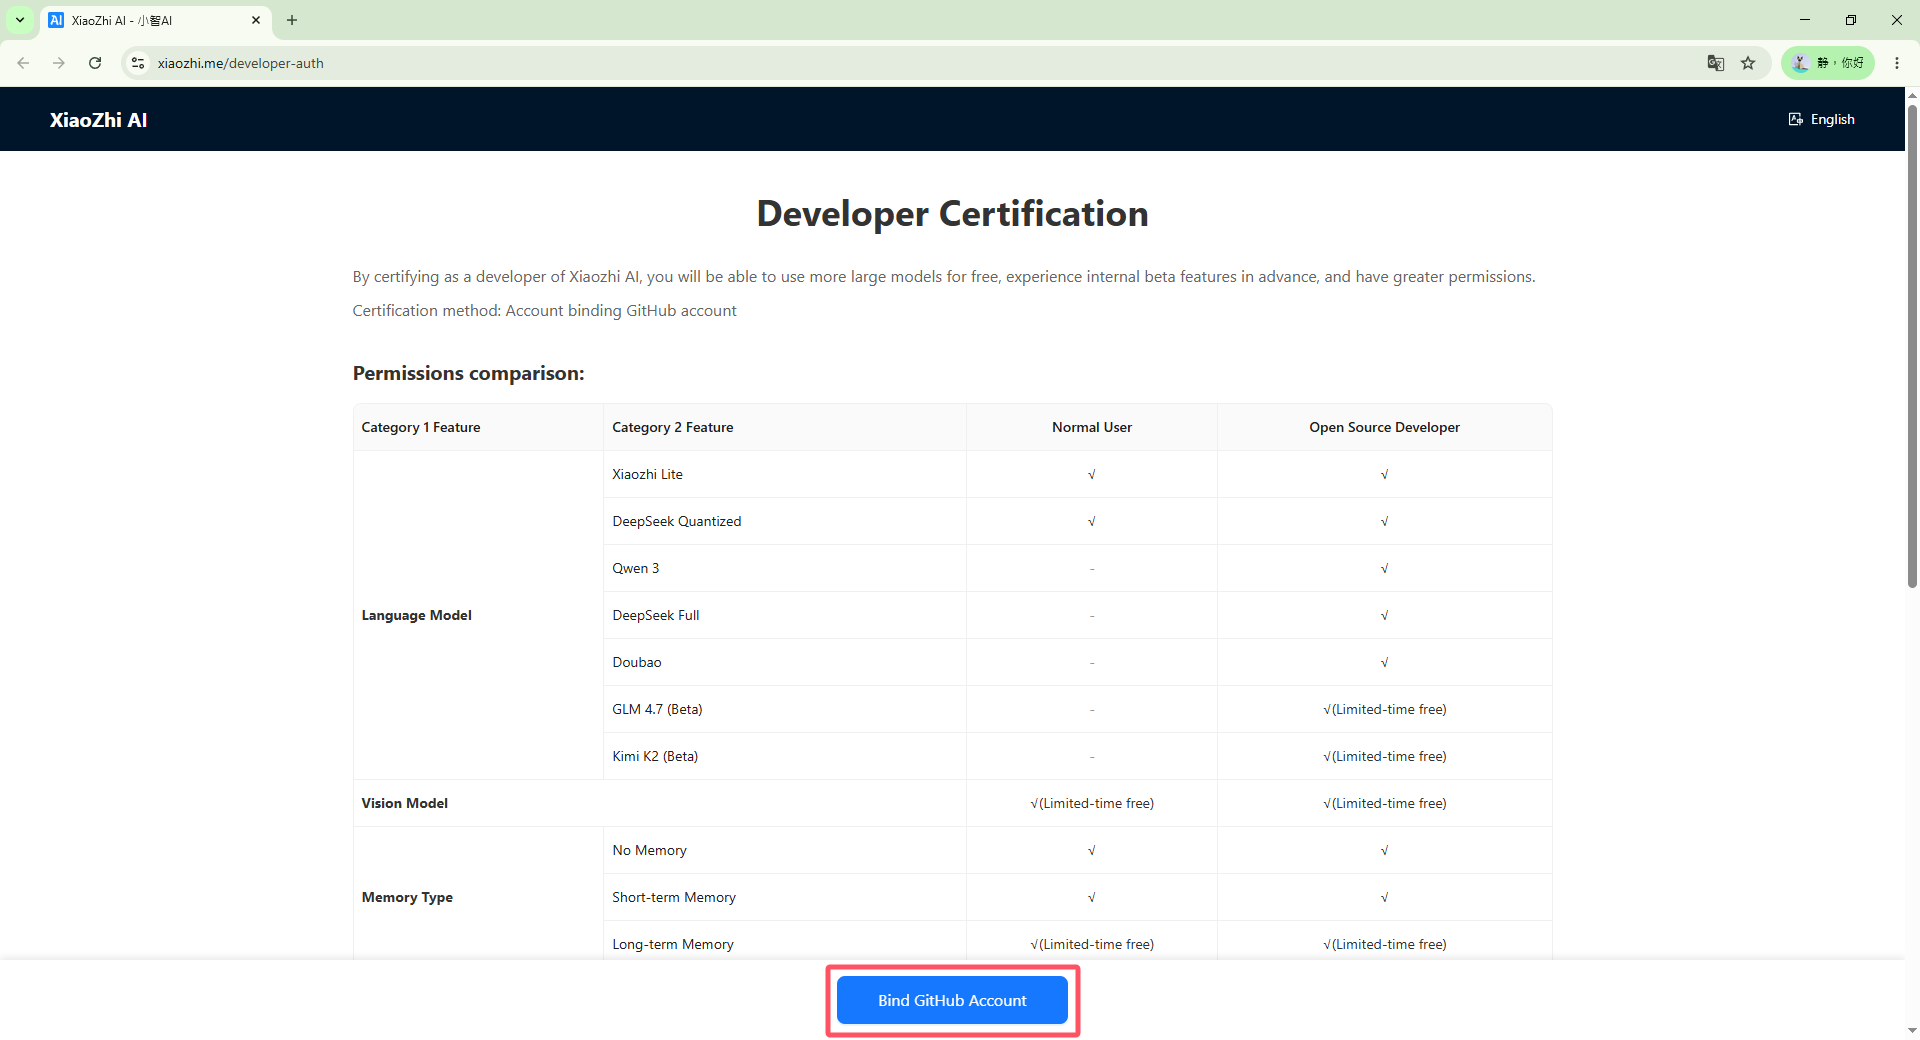
Click the Developer Authentication hyperlink to access the page. Click the Bind GitHub Account icon to start authentication.
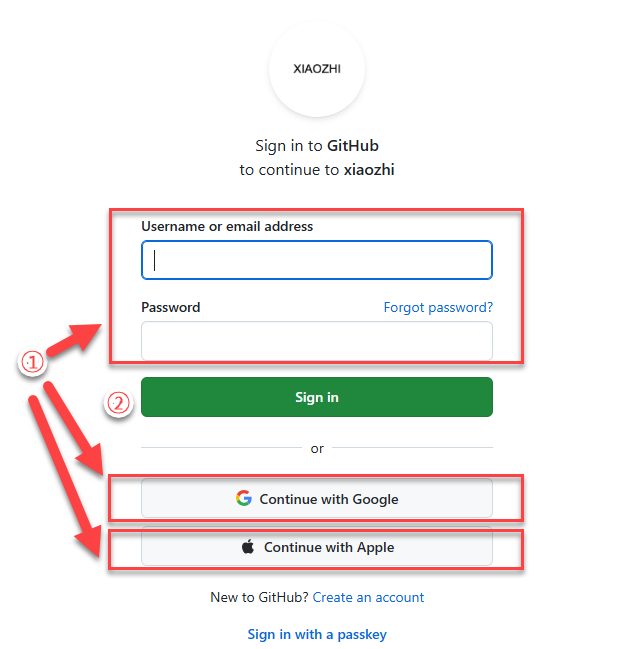
Enter the GitHub account credentials at location ① on the page, and then click Sign in at location ② to log in.
[!note] If the GitHub account is already linked with a personal Google or Apple account, logging into GitHub is also supported by clicking the corresponding icon and entering those credentials.
Click Authorize tenclass to complete the binding between the XiaoZhi AI platform and the GitHub platform.
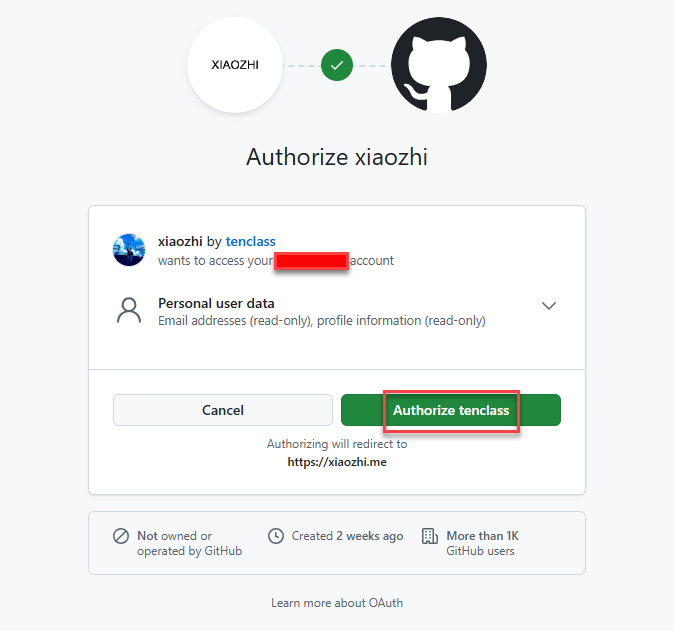
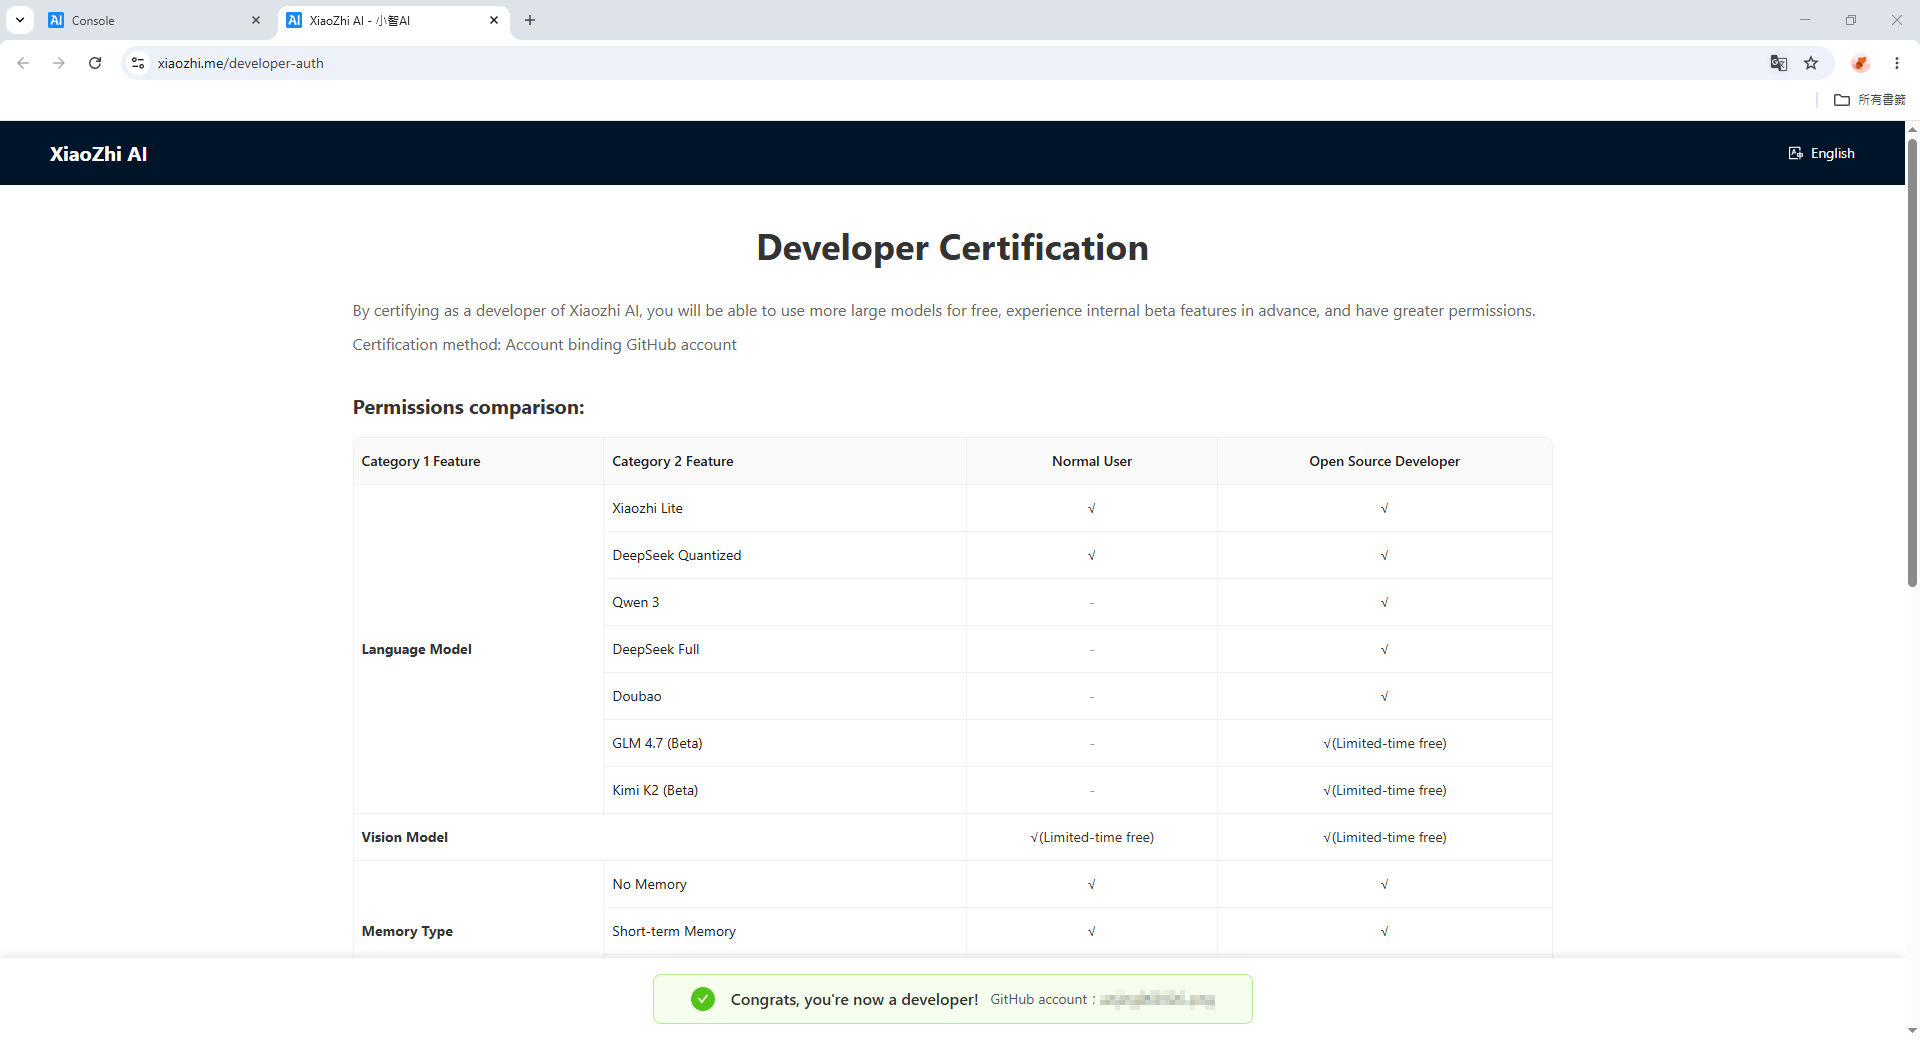
After binding, the XiaoZhi platform authentication finishes, and the page automatically returns to the previous authentication screen, where the confirmation prompt appears. Returning to the XiaoZhi AI Agent Console reveals that all previously restricted configurations are fully unlocked.
5.3 Scene Understanding
The WonderMK module features a built-in high-definition camera that supports capturing real-time frames and analyzing them via a vision large AI model. This integration enables deep interaction between the module and the external environment. This functionality can be experienced through the following steps.
[!note] Before proceeding with this section, ensure that the module has successfully completed network configuration, device binding, and XiaoZhi AI role configuration.
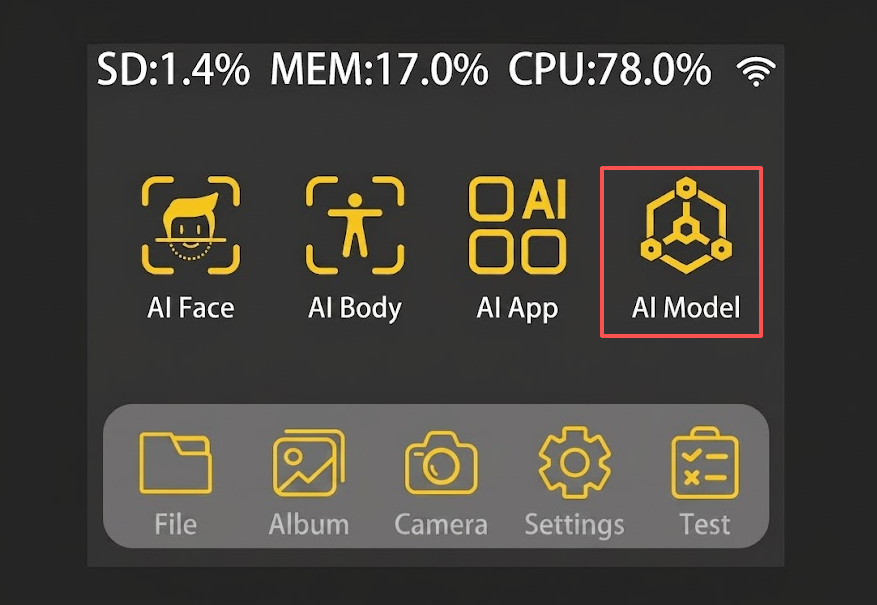
After powering on the module, open the AI Model feature and say the wake word Hello Hiwonder to enter the chat interface and activate the module.
Chat with the WonderMK module using phrases such as: ① Describe what’s in front of you or ② Take a photo to see what is ahead.
[!note]
Spoken commands do not need to strictly match the examples provided above as long as the underlying intent remains identical.
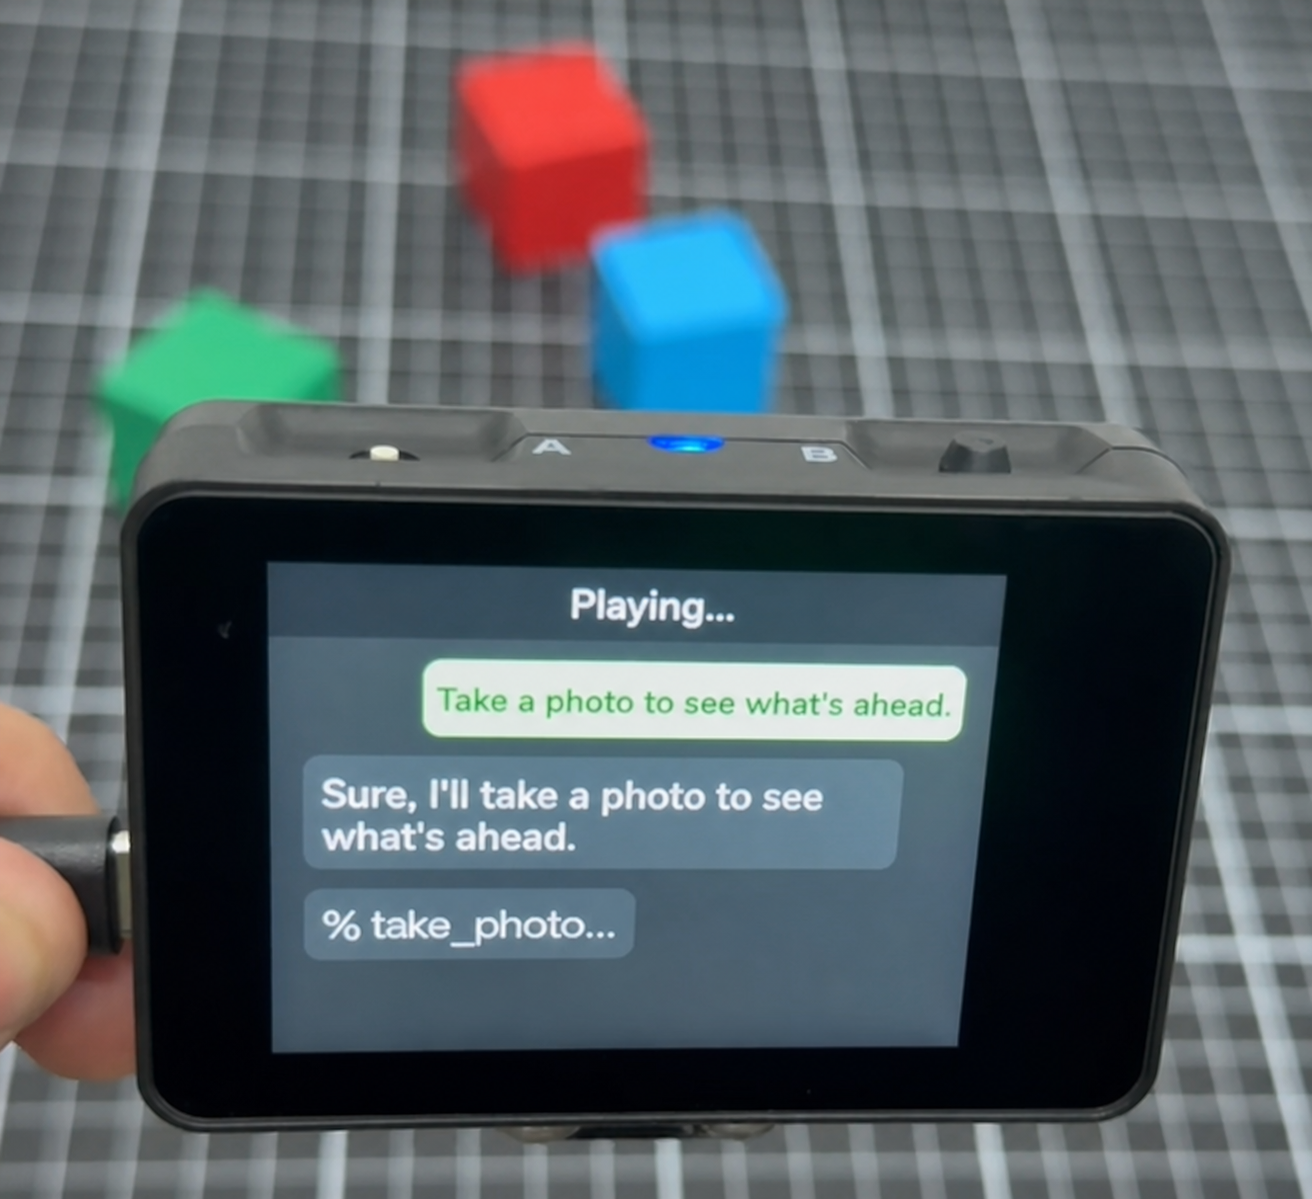
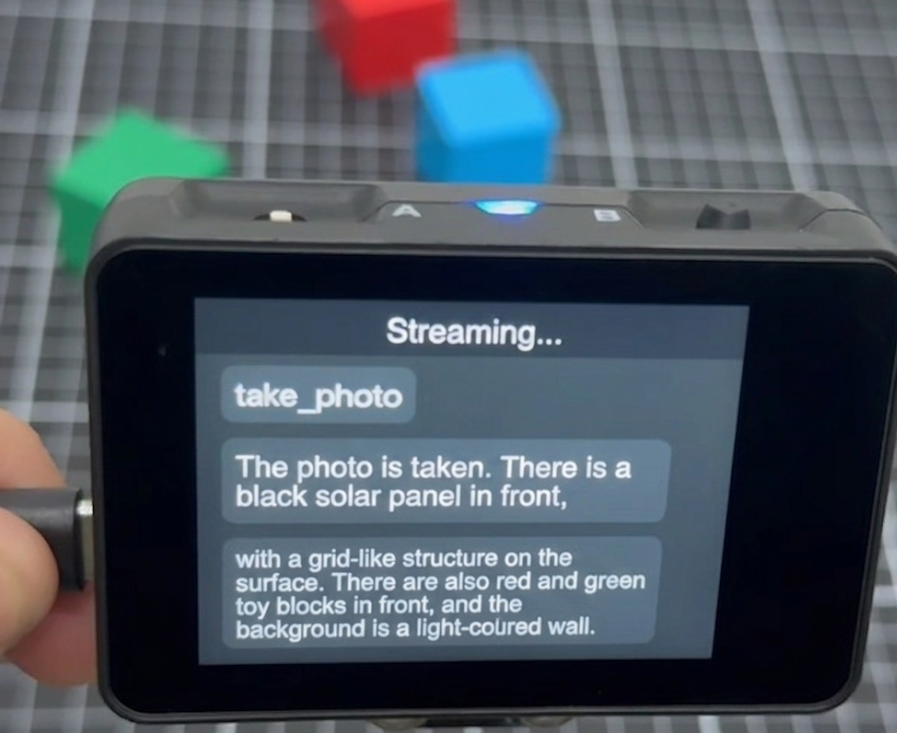
Once the module comprehends the command, the module camera activates to capture a real-time image and displays it briefly on the screen. The chat dialog returns the image capture function call, which requires no attention, and subsequently displays and broadcasts the analysis statement generated by the large AI model. Responses are randomly generated by the large AI model module, ensuring only that the underlying meaning remains appropriate.
[!note]
The scene understanding feature does not support continuous real-time observation. It only captures and analyzes a single real-time frame upon receiving a specific command.
5.4 Large AI Model Voice Interaction
After the module powers on and completes network configuration, wake the module by saying the wake word or short-pressing the right button to enter chat mode.
Natural, open-ended speech is fully supported as the module interacts with a cloud-based large AI model to process inputs and deliver text and voice responses. A built-in memory feature also enables continuous multi-turn conversations.
Following the completion of each interaction round, including after waking the WonderMK, the module continues listening. If no speech is detected within a continuous one-minute window, the module automatically terminates the listening process, and the large AI model generates an appropriate farewell response displayed in the chat interface and broadcast simultaneously. To resume interaction, wake the module again by saying the designated wake word.
During human-robot interaction, the dialogue can also be actively terminated by providing commands such as: ① Goodbye or ② Okay, let’s stop here. Upon receipt, the module replies with an appropriate farewell phrase and ends the listening process.
[!note] Spoken commands do not need to strictly match the examples provided above as long as the underlying intent remains identical.
The WonderMK module supports a voice interruption feature. During module voice playback, such as when the module responds to speech, greets, or says goodbye, short-pressing the right button immediately terminates the current voice playback and switches to listening for the next speech input.
[!note] Short-pressing the right button while the module is not speaking switches the system to expression mode, which requires a new wake word to reactivate.
The WonderMK module supports bilingual recognition and speech, including English. The operating language can be switched directly using example expressions such as: ① Can you speak English with me? or ② Can we communicate in English?
[!note] Spoken commands do not need to strictly match the examples provided above as long as the underlying intent remains identical.
5.5 Multimodal Large Models: Voice Control
5.5.1 Steps for Installing WonderMK on NexArm
Insert the SD card into the WonderMK first.
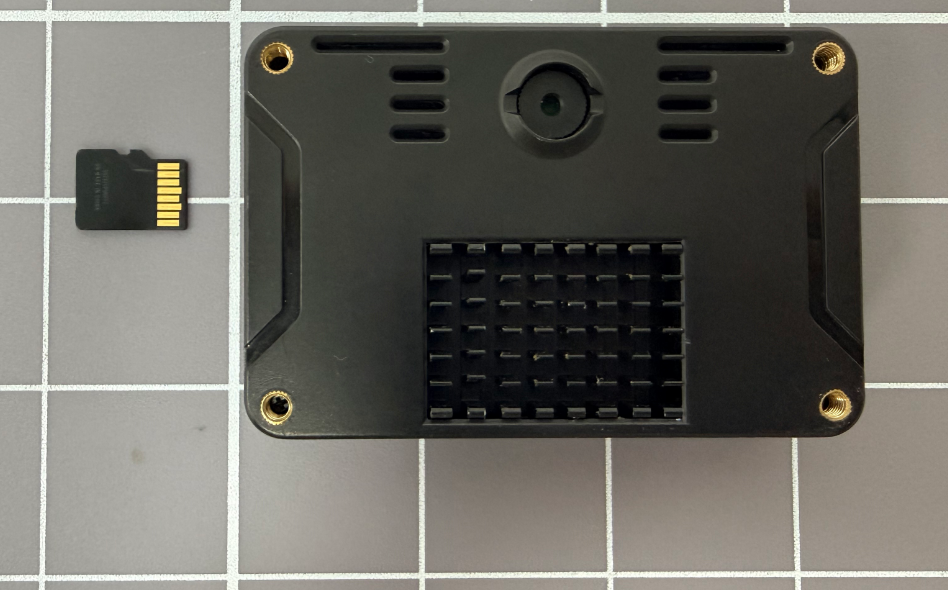
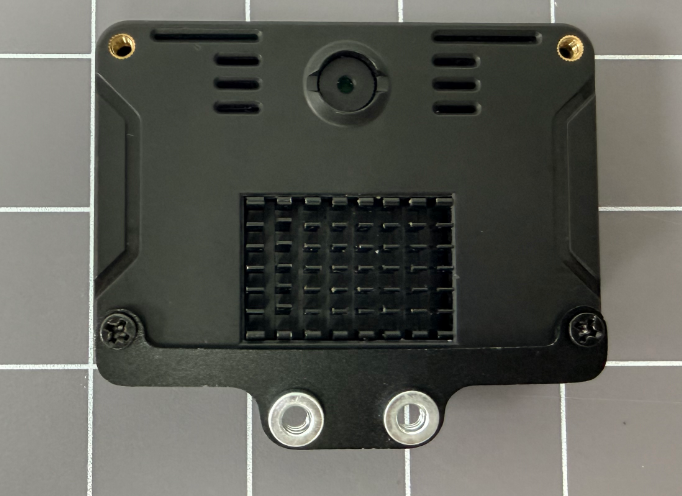
Mount the fixing bracket onto the designated holes of the WonderMK using the included round-head Phillips machine screws.
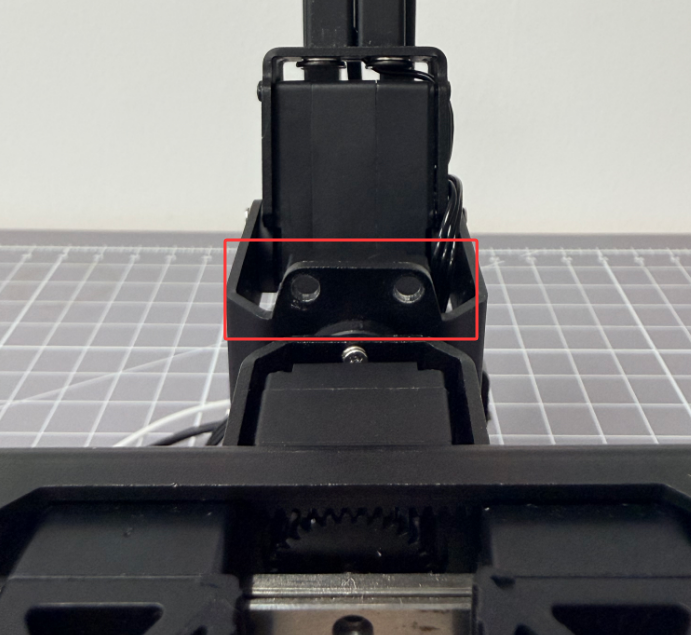
Locate the mounting holes on servo number 5 of the robotic arm.
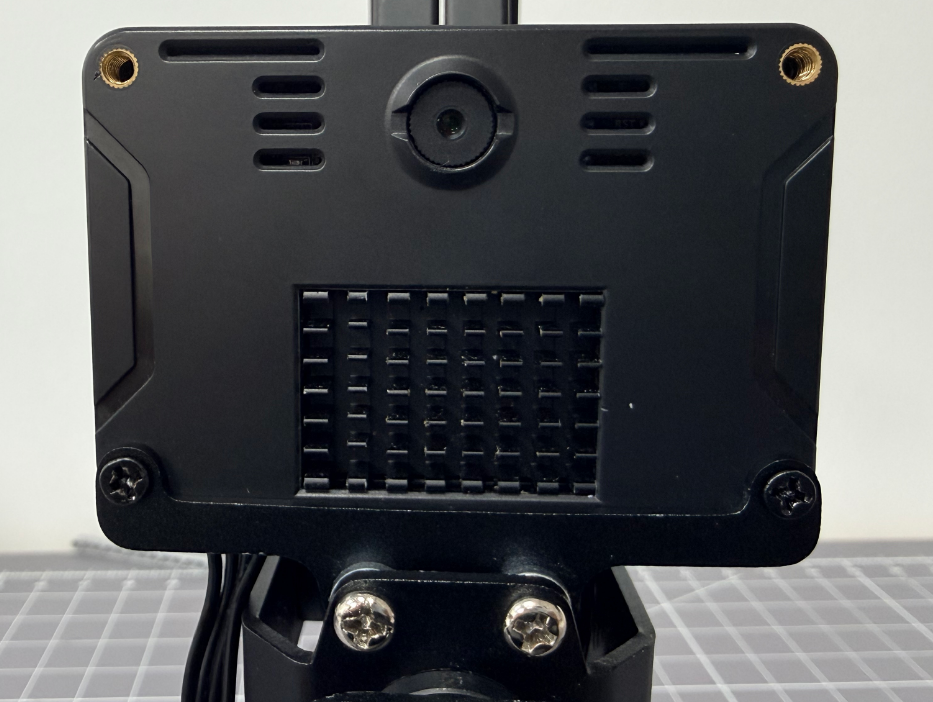
Secure the bracket-mounted WonderMK into the corresponding holes using the provided silver round-head Phillips machine screws, and connect the WonderMK to the NexArm controller using the 4-pin cable.
5.5.2 NexArm Large Model Applications
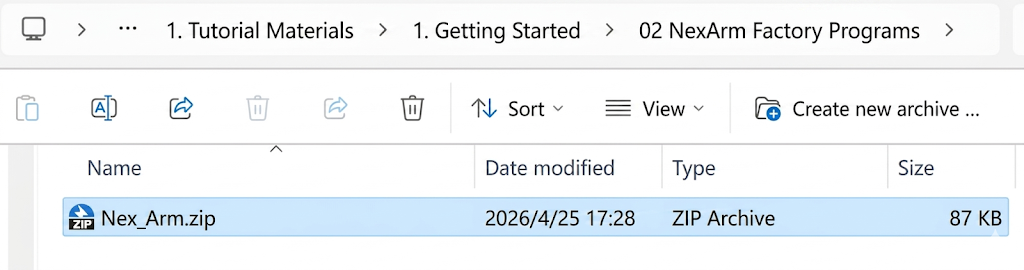
The NexArm factory firmware comes pre-programmed with the large AI model features.
Note
If alternative programs have been flashed, the factory firmware must be re-flashed. Otherwise, the corresponding large model features will remain unavailable.
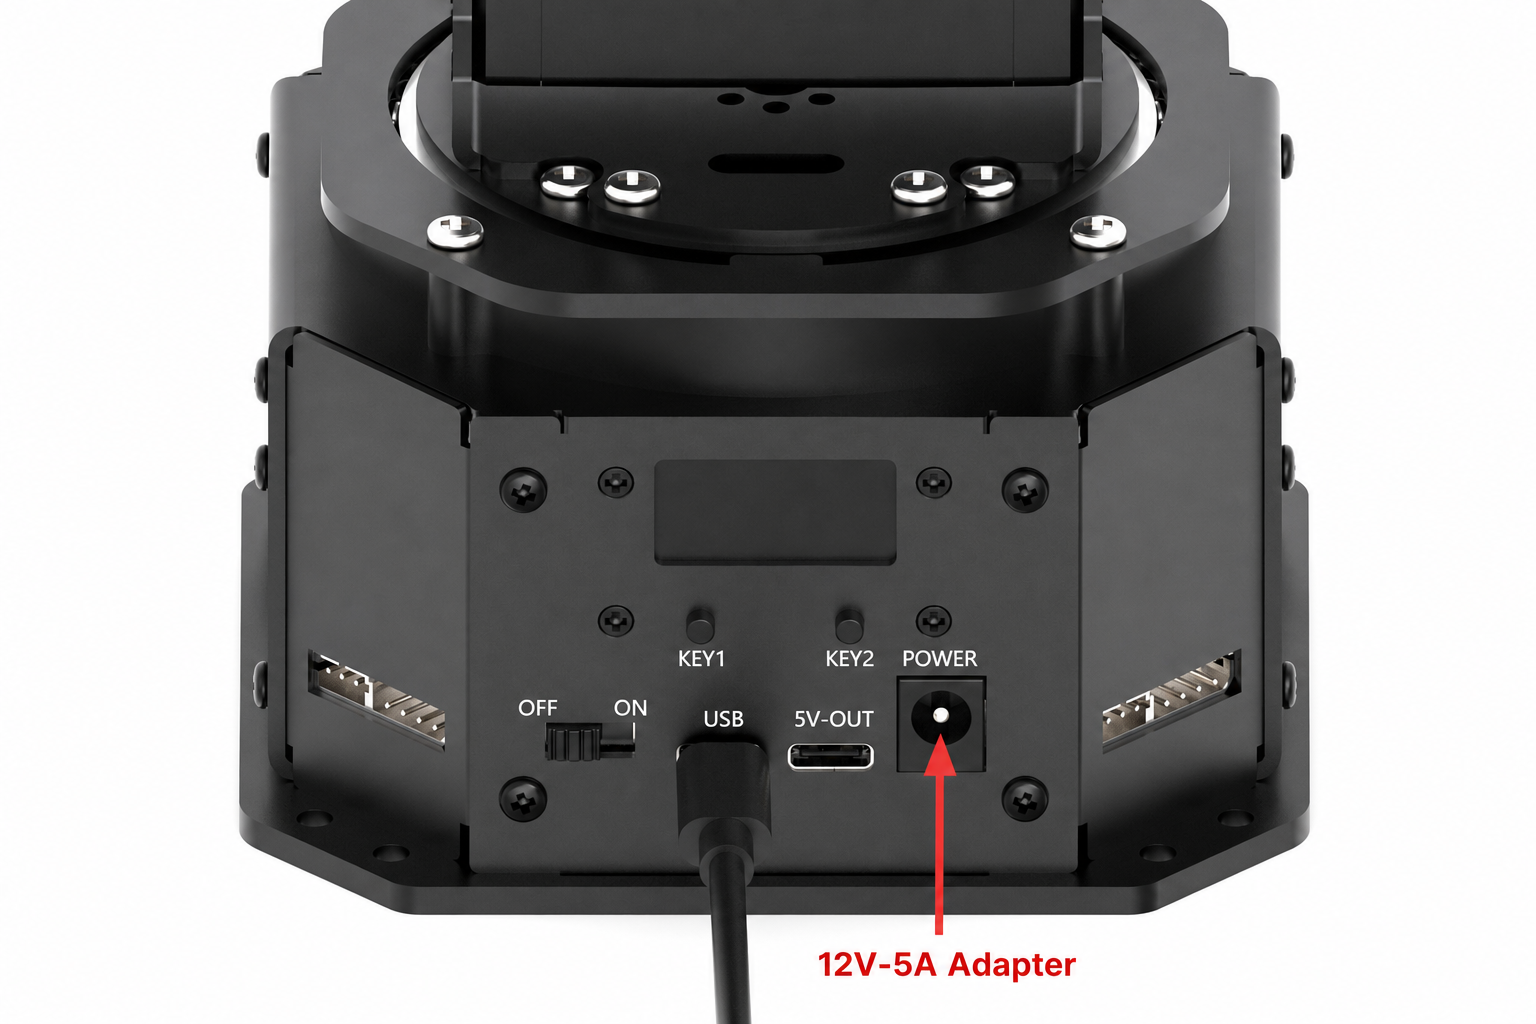
Connect the NexArm to a power supply normally and interface it with the host computer.
Open the AI Model feature on the WonderMK.
Locate the large AI model feature within the host computer software and click Start.

After waking the large AI model via the wake word Hello Hiwonder, issue commands such as “Look up”, “Nod”, or “Shake head” to control the robotic arm to execute the corresponding movements.
[!note] The large AI model executes actions by identifying keywords, meaning there is no strict or rigid grammar required for voice commands as long as the intent is clear and explicit.
5.5.3 Custom MCP Features
5.5.3.1 Factory MCP Command List
[!note] The Model Context Protocol, known as MCP, is a unified and standardized communication protocol that allows large AI models to securely and conveniently invoke various external tools, data, and services, serving as a universal interface between the AI and the external world.
The NexArm supports custom MCP integration, and the following MCP commands are already included in the factory firmware.
| Action Name | English Command | Function Description |
|---|---|---|
| Look Down | look_down | The robotic arm looks down |
| Look Up | look_up | The robotic arm looks up |
| Look Left | look_left | The robotic arm looks left |
| Look Right | look_right | The robotic arm looks right |
| Open Gripper | open_claw | The robotic arm opens the gripper |
| Close Gripper | close_claw | The robotic arm closes the gripper |
| Raise | go_up | The robotic arm raises its height |
| Lower | go_down | The robotic arm lowers its height |
| Reset | reset | The robotic arm returns to the default position |
| Nod | nod | The robotic arm executes a nodding motion |
| Shake Head | shake | The robotic arm executes a head-shaking motion |
5.5.3.2 Steps for Adding New MCP Features
The MCP voice control function is implemented by registering tools within the setupMCPTools() function in the AiLLMControl.cpp file. Each tool corresponds to a functional type, such as robotic arm control or buzzer control.
Modify the Tool Registration Function
Open the AiLLMControl.cpp file.
Locate the
setupMCPTools()function.Add the new tool definition to the array.
Action Execution Logic
Locate the
executeAction()function.Add a new conditional statement to handle the new action command.
Implement the specific action execution code.
Test the New Feature
Recompile and upload the code.
Restart the device.
Test the new feature using voice commands.
5.5.3.3 Example 1: Adding a Wave Action
Open the factory firmware and add the wave action to the existing tool descriptions inside the
setupMCPTools()function in the AiLLMControl.cpp file:
p.addString("description");
p.addString("This tool is invoked to control the robotic arm. Available actions include: 'look_down': look down, 'look_up': look up, 'look_left': look left, 'look_right': look right, "
             "'open_claw': open the gripper, 'close_claw': close the gripper, "
             "'go_up': raise, 'go_down': lower, 'reset': return to the default position, "
             "'nod': nod, 'shake': shake head, 'wave': wave");
Add the wave action handling inside the
executeAction()function:
else if (strstr(action, "wave") || strstr(action, "挥手")) {
    // Wave right
    arm.move(200, -100, 200, 0, 0, _cur_claw, 500);
    delay(500);
    // Wave left
    arm.move(200, 100, 200, 0, 0, _cur_claw, 500);
    delay(500);
    // Wave right
    arm.move(200, -100, 200, 0, 0, _cur_claw, 500);
    delay(500);
    // Return to center
    arm.move(200, 0, 200, 0, 0, _cur_claw, 500);
    _cur_y = 0;
}
5.5.3.4 Example 2: Adding a Grab Tool
Add the new tool inside the
setupMCPTools()function:
p.beginArray(2); // Modify the array size to 2
  // Existing move_arm tool...

  // Add new grab tool
  p.beginDict(3);
    p.addString("type");
    p.addString("function");

    p.addString("function");
    p.beginDict(3);
      p.addString("name");
      p.addString("grab_object");

      p.addString("description");
      p.addString("This tool is invoked to grip objects. Available actions include: 'grab': grab, 'release': release");

      p.addString("parameters");
      p.beginDict(3);
        p.addString("type");
        p.addString("object");

        p.addString("properties");
        p.beginDict(1);
          p.addString("name");
          p.beginDict(2);
            p.addString("type");
            p.addString("string");
            p.addString("description");
            p.addString("The name of the action to be executed");
          p.endDict();
        p.endDict();

        p.addString("required");
        p.beginArray(1);
          p.addString("name");
        p.endArray();
      p.endDict();
    p.endDict();

    p.addString("block");
    p.addUint8(5);
  p.endDict();
p.endArray();
Implement handling for the new tool within the
executeAction()function.
// Modify the tool detection logic in the update() function
if (memcmp(&result_data[i], "move_arm", 8) == 0) {
    is_move = true;
    break;
} else if (memcmp(&result_data[i], "grab_object", 11) == 0) {
    is_grab = true;
    break;
}

// Handle the grab_object tool
if (is_grab) {
    Serial.println(">>>> MCP grab_object call!");
    bool ok = executeGrabAction(result_data, result_len);

    DataPacker p;
    if (ok) {
        p.addString("ok, done");
    } else {
        p.addString("failed");
    }
    sendCommand(CMD_RESULT_RETURN, p.buf, p.len);
    Serial.printf(">>>> MCP result sent: %s\n", ok ? "ok" : "err");
}

// Add the executeGrabAction function, which can be renamed as needed
bool AiLLMControl::executeGrabAction(const uint8_t* data, uint16_t len) {
    char action[64] = {0};
    for (int i = 0; i <= (int)len - 4; i++) {
        if (memcmp(&data[i], "name", 4) == 0) {
            int val_off = i + 4;
            if (val_off < len && data[val_off] == TYPE_STRING) {
                uint16_t vlen = (data[val_off + 1] << 8) | data[val_off + 2];
                int vs = val_off + 3;
                if (vs + vlen <= len) {
                    int copy = (vlen < 63) ? vlen : 63;
                    memcpy(action, &data[vs], copy);
                    action[copy] = '\0';
                    break;
                }
            }
        }
    }

    if (action[0] == '\0') {
        Serial.println(">>>> No action name found");
        return false;
    }

    Serial.printf(">>>> Grab Action: '%s'\n", action);

    if (strstr(action, "grab") || strstr(action, "抓取")) {
        // Gripping action: first lower, close the gripper, then raise
        arm.move(200, 0, 100, 0, 0, -60, 1000);
        delay(1000);
        arm.move(200, 0, 100, 0, 0, 20, 500);
        delay(500);
        arm.move(200, 0, 200, 0, 0, 20, 1000);
        _cur_z = 200;
        _cur_claw = 20;
    } else if (strstr(action, "release") || strstr(action, "释放")) {
        // Releasing action: open the gripper
        arm.move(_cur_x, _cur_y, _cur_z, _cur_pitch, 0, -60, 500);
        _cur_claw = -60;
    } else {
        Serial.printf(">>>> Unknown grab action: '%s'\n", action);
        return false;
    }

    Serial.println(">>>> Grab action done!");
    return true;
}