6. External Controller Integration
Network and serial control for external controllers follow the same communication protocol. This chapter uses coordinate control commands as an illustrative example. For additional control commands, refer to section 3.3 Serial Protocol Analysis within Chapter 3. Motion Control. For those unfamiliar with Raspberry Pi and Jetson, additional guidance is available in the 03 Remote Connection Guide folder located in the same directory as this document.
6.1 Raspberry Pi Network Control of the Robotic Arm
6.1.1 Project Introduction
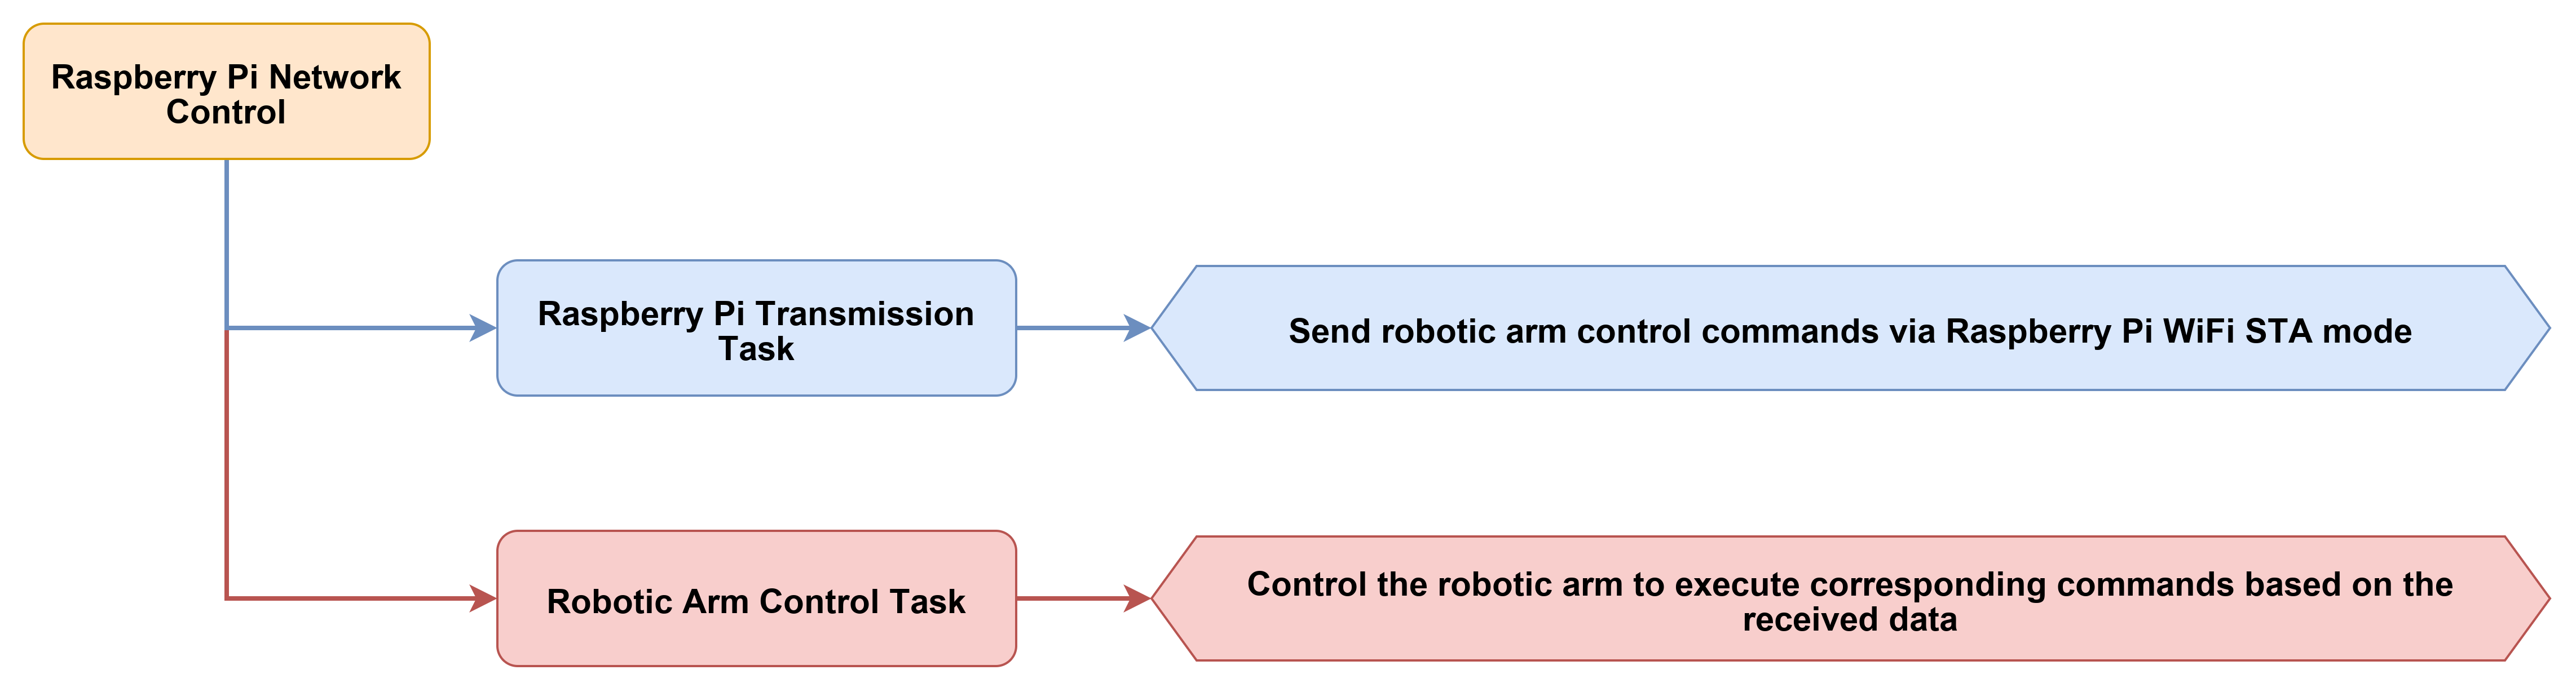
This section demonstrates connecting to the NexArm hotspot using a Python program on a Raspberry Pi and transmitting control commands over a TCP network. Upon execution, the program verifies the current wireless network status. After confirming a valid connection to the NexArm hotspot, the program establishes communication with the control port of the robotic arm. The system then issues motion commands sequentially according to a preset coordinate sequence to execute fixed-point gripping and transporting.
6.1.2 Program Flow
6.1.3 Program Download
NexArm Program Download
Before executing external controller operations, the corresponding control program must be downloaded to the robotic arm according to the following steps.
Connect the NexArm to a computer using a Type-C data cable.
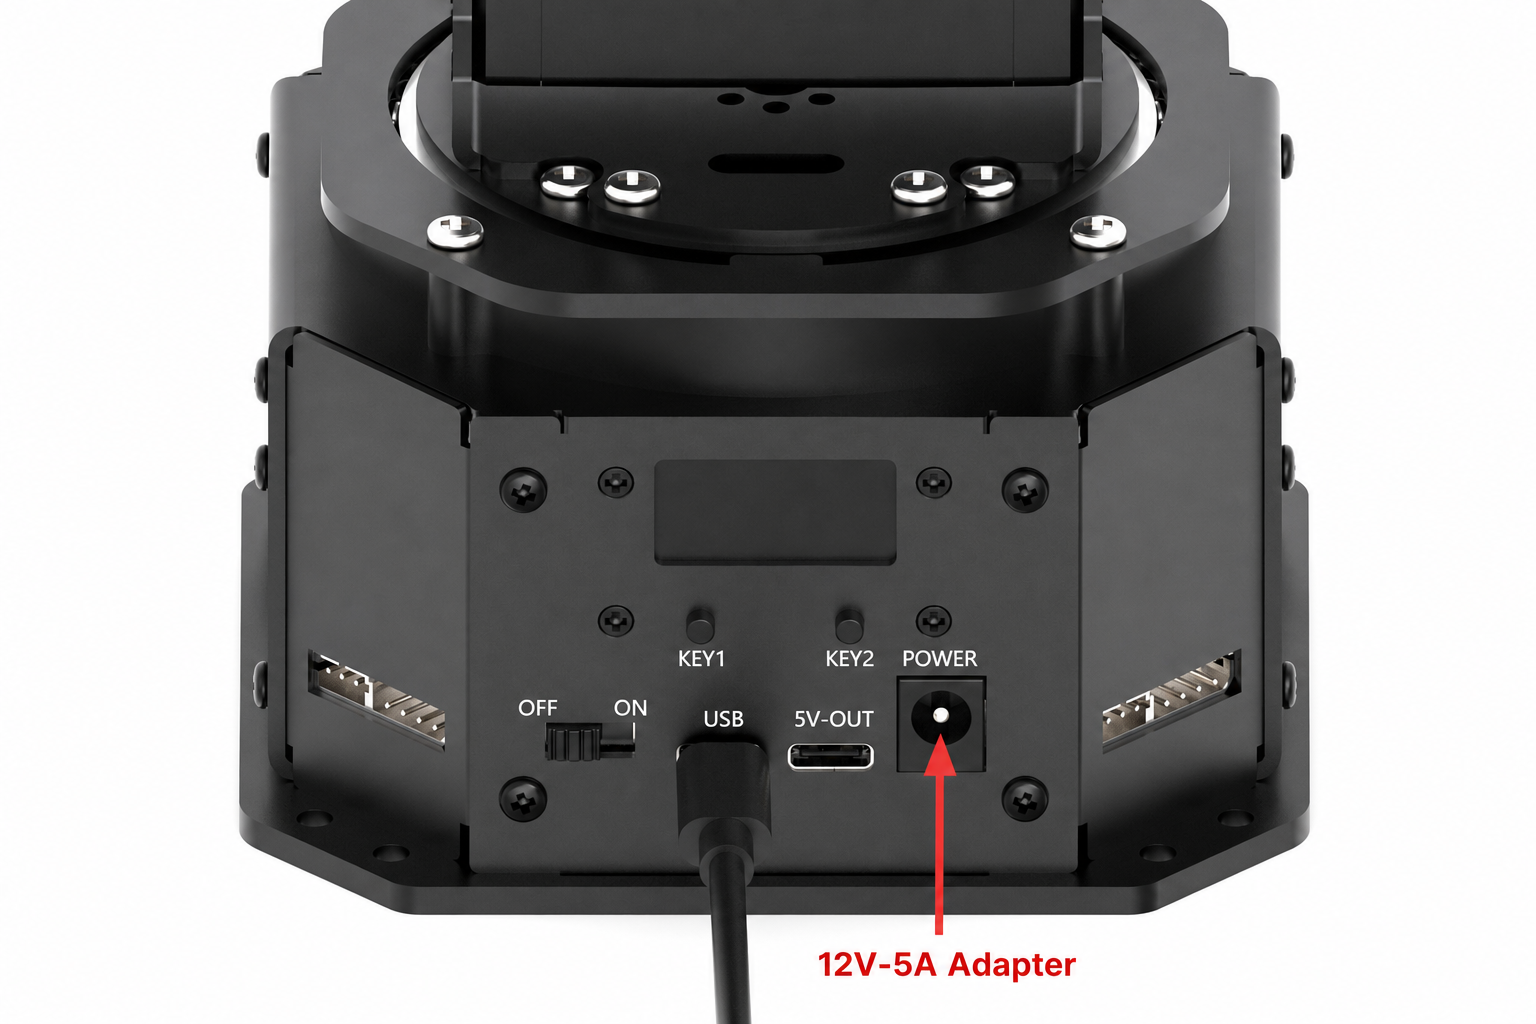
Open the corresponding .ino file located in the 1. Tutorials/6. External Controller Integration/02 Source Code/Nex_Arm.zip folder.

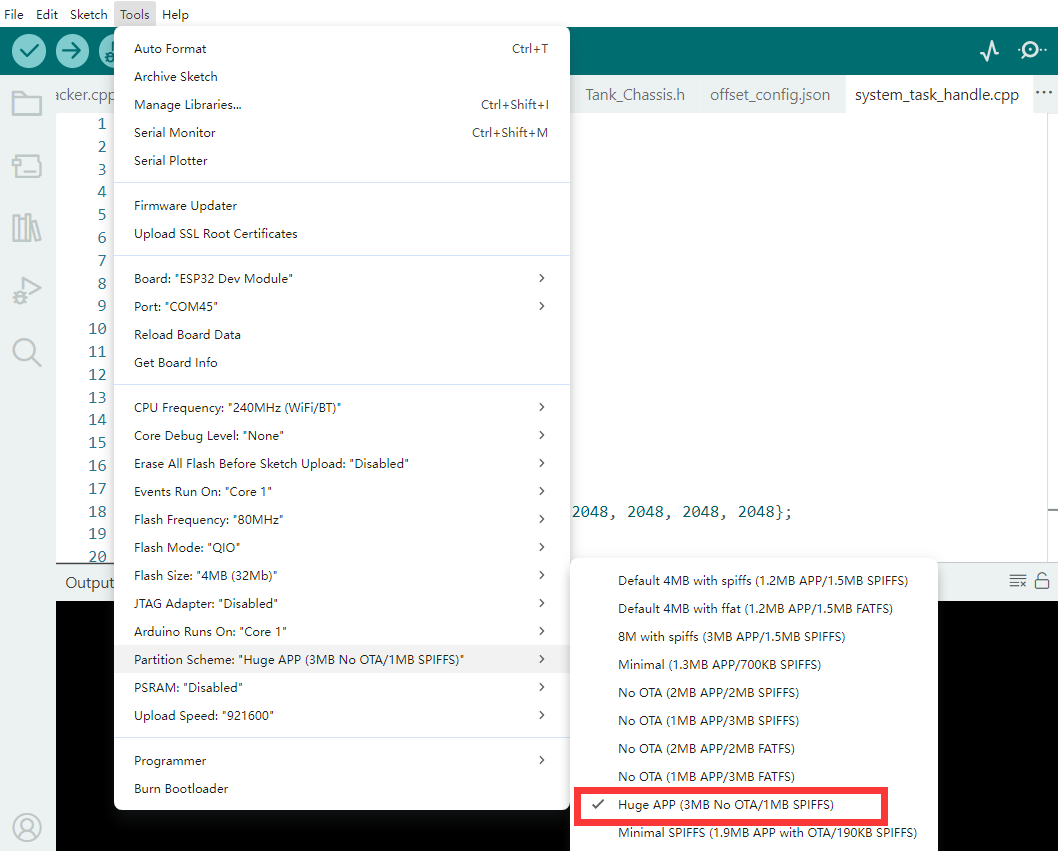
Select the development board model as illustrated in the image below.

Navigate to Tools in the menu bar and select the appropriate ESP32 development board configuration shown below.
Click the compile button
 first, and then click the upload button
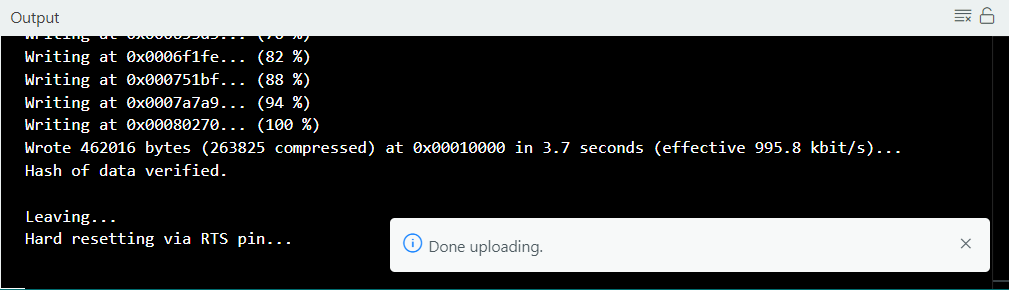
  . The output box at the bottom of the software, displaying the interface below, indicates that the program has been downloaded successfully:
Raspberry Pi Program Download
Upload the WiFi_Control folder from the 02 Source Code directory to the Raspberry Pi using a remote connection tool.
6.1.4 Program Outcome
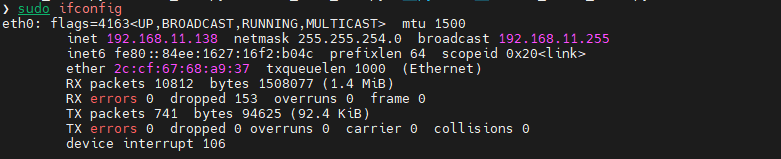
Connect the Raspberry Pi using an Ethernet cable and execute
sudo ifconfigin the terminal to locate theeth0IP address. Establish a remote connection using this wired IP address.
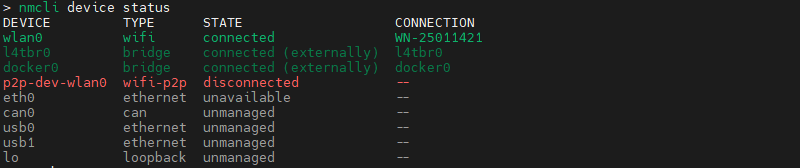
Execute
nmcli device statusto check the connection status ofwlan0, where WN-25011421 represents the network connection name.
Execute
sudo nmcli connection down "WN-25011421"in the terminal to disconnect the Wi-Fi network.

Navigate to the WiFi_Control folder and execute sudo python3 wifi_basic_demo.py to move the robotic arm according to the specified coordinates.
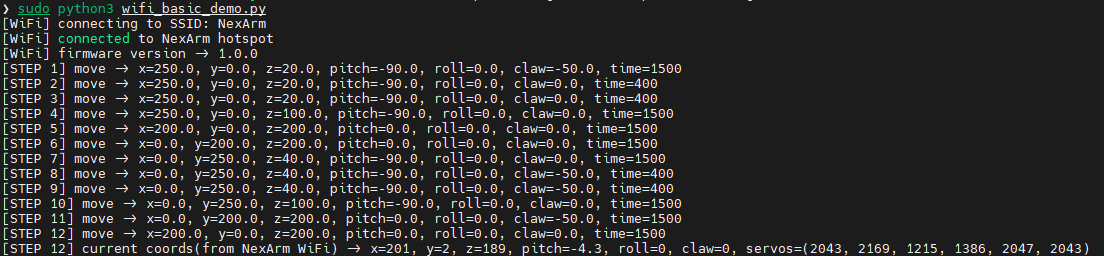
6.1.5 Program Analysis
The Wi-Fi hotspot parameters, the robotic arm TCP connection address, and the complete transporting sequence are defined in wifi_basic_demo.py. Each item within the
PICK_PLACE_SEQUENCEarray contains seven fields, includingx,y,z,pitch,roll,claw, andduration_ms.
WIFI_SSID = "NexArm"
WIFI_PASSWORD = "hiwonder"
NEXARM_HOST = "192.168.4.1"
NEXARM_PORT = 8080

PICK_PLACE_SEQUENCE = [
    (250.0,   0.0,  20.0, -90.0, 0.0, -50.0, 1500),
    (250.0,   0.0,  20.0, -90.0, 0.0,   0.0,  400),
    (200.0,   0.0, 200.0,   0.0, 0.0,   0.0, 1500),
]
Before establishing a connection, the program calls
get_active_ssid(),get_visible_ssids(), andcan_connect_nexarm()to verify the current network environment.
def connect_nexarm_wifi(ssid=WIFI_SSID, password=WIFI_PASSWORD, wait_seconds=8):
    active_ssid = get_active_ssid()
    if active_ssid == ssid:
        print("[WiFi] already connected to {0}".format(ssid))
        return

    if can_connect_nexarm():
        print("[WiFi] NexArm TCP service already reachable, skip reconnect")
        return
If the Raspberry Pi is not yet connected to the NexArm hotspot, the program scans and connects to the specified Wi-Fi network via
nmcli. Instead of initiating an immediate connection, the system rescans the hotspot list to confirm thatNexArmis visible before executingnmcli dev wifi connect.
for attempt in range(1, 4):
    subprocess.run(
        ["nmcli", "dev", "wifi", "rescan"],
        capture_output=True,
        text=True,
    )
    time.sleep(2)

    visible_ssids = get_visible_ssids()
    if ssid not in visible_ssids:
        print("[WiFi] scan {0}: SSID '{1}' not found".format(attempt, ssid))
        continue

    result = subprocess.run(
        ["nmcli", "dev", "wifi", "connect", ssid, "password", password],
        capture_output=True,
        text=True,
    )
The
NexArmWiFiClientclass within nexarm_wifi_sdk.py handles protocol packet packaging and network communication. Thebuild_frame()function encapsulates data in the sequence of frame header, ID, length, command word, payload, and checksum. Thesend_frame()function then transmits the complete frame data to the robotic arm viasock.sendall().
@classmethod
def build_frame(cls, packet_id, cmd, payload=b""):
    length = len(payload) + 2
    checksum = cls._checksum(packet_id, length, cmd, payload)
    return FRAME_HEADER + bytes([packet_id, length, cmd]) + payload + bytes([checksum])

def send_frame(self, packet_id, cmd, payload=b""):
    sock = self._ensure_connected()
    frame = self.build_frame(packet_id, cmd, payload)
    sock.sendall(frame)
    return frame
To control the robotic arm,
set_pose()multiplies thepitchvalue by 10 to convert it into an integer. The function then packsx,y,z,roll,claw, and the execution duration together in little-endian format to generate aCMD_COORDINATE_SETcommand.
def set_pose(self, x, y, z, pitch, roll, claw, duration_ms):
    payload = (
        self._i16(round(pitch * 10.0))
        + self._i16(round(x))
        + self._i16(round(y))
        + self._i16(round(z))
        + self._i16(round(roll))
        + self._i16(round(claw))
        + self._u16(duration_ms)
    )
    self.request(SYSTEM_ID, NexArmCommand.CMD_COORDINATE_SET, payload, expect_reply=False)
The
main()function first completes the hotspot connection and then creates aNexArmWiFiClientobject. It sequentially reads the firmware version, triggers a buzzer notification, and dispatches the action sequence. After completing each set of movements, the program callsget_current_coords()to actively read and print the current coordinates.
def main():
    connect_nexarm_wifi()

    with NexArmWiFiClient(host=NEXARM_HOST, port=NEXARM_PORT, timeout=1.0) as arm:
        version = arm.get_firmware_version(timeout=1.0)
        print("[WiFi] firmware version -> {0}".format(version))

        arm.set_buzzer(100, 50, 1, 2000)
        for index, pose in enumerate(PICK_PLACE_SEQUENCE, start=1):
            x, y, z, pitch, roll, claw, duration_ms = pose
            arm.set_pose(x, y, z, pitch, roll, claw, duration_ms)
            time.sleep(duration_ms / 1000.0)
        print_current_coords(arm, index)
6.2 Raspberry Pi Serial Control of the Robotic Arm
6.2.1 Project Introduction
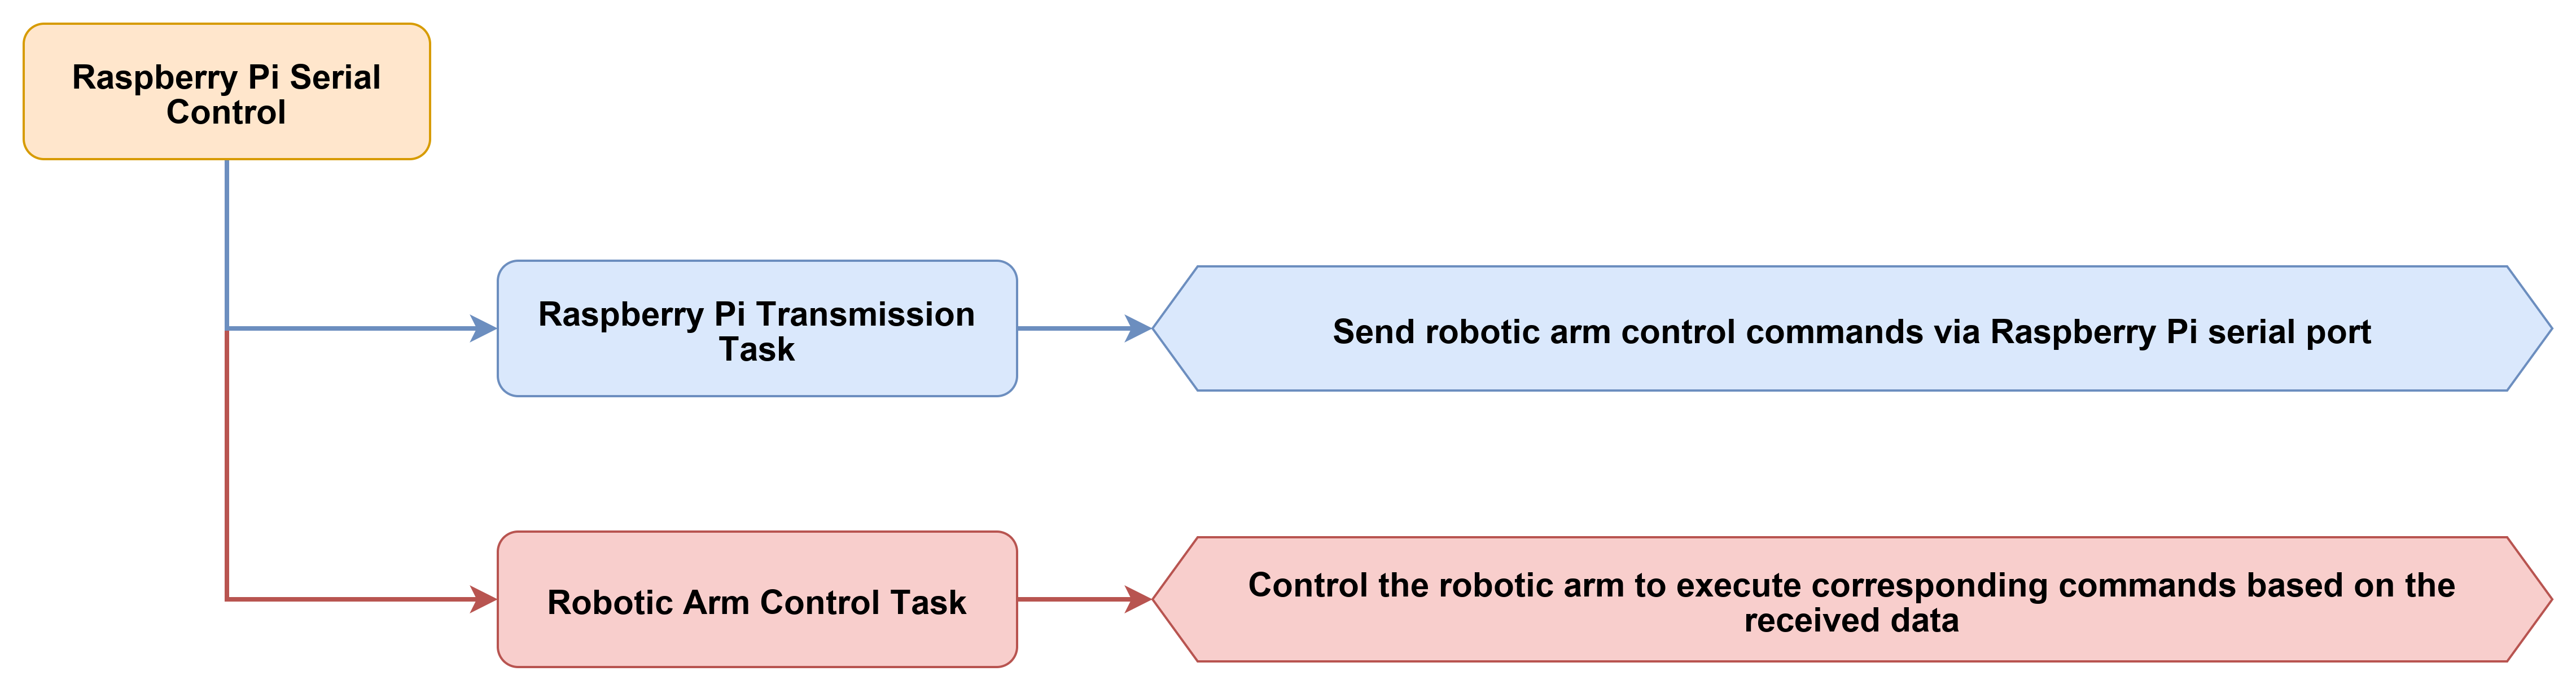
This section demonstrates direct communication with the NexArm via the Raspberry Pi serial port. A Python program on the Raspberry Pi handles protocol encapsulation and transmits control commands to the robotic arm through a USB serial port. Upon execution, the program establishes a serial connection with /dev/ttyUSB0 and sequentially dispatches the preset transporting movements.
6.2.2 Program Flow
6.2.3 Program Download
Refer to the 6.1.3 Program Download steps to download the NexArm program, and upload the UART_Control folder from the 02 Source Code directory to the Raspberry Pi.
6.2.4 Program Outcome
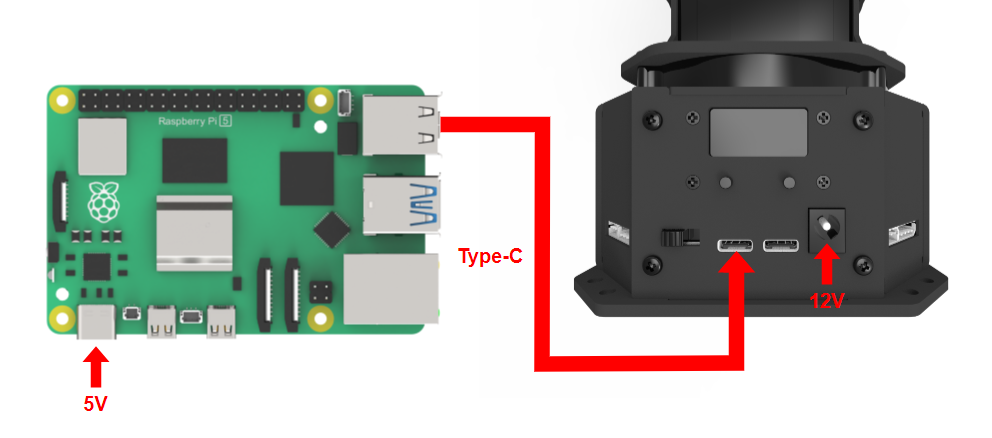
Connect the Raspberry Pi to the NexArm using a Type-C data cable.
Navigate to the UART_Control folder and execute
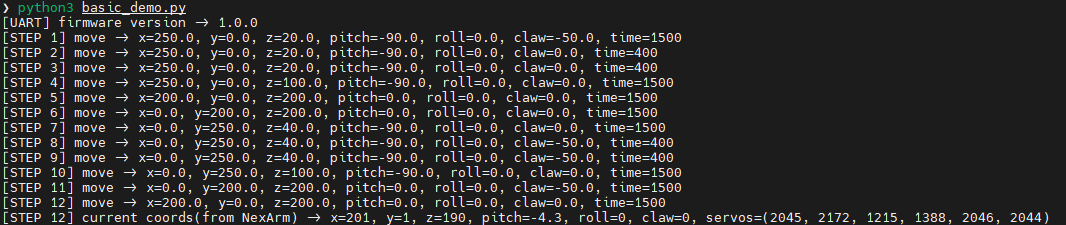
python3 basic_demo.pyto move the robotic arm according to the specified coordinates.
6.2.5 Program Analysis
The complete material transporting sequence is defined in basic_demo.py using
PICK_PLACE_SEQUENCE, where each tuple maps directly to a coordinate control command for the robotic arm.
PICK_PLACE_SEQUENCE = [
    (250.0,   0.0,  20.0, -90.0, 0.0, -50.0, 1500),
    (250.0,   0.0,  20.0, -90.0, 0.0,   0.0,  400),
    (200.0,   0.0, 200.0,   0.0, 0.0,   0.0, 1500),
]
The
NexArmClientclass records the serial port, baud rate, and timeout parameters during initialization. Theopen()function establishes the physical serial connection with the robotic arm usingserial.Serial.
class NexArmClient:
    def __init__(self, port, baudrate=1000000, timeout=0.1, write_timeout=0.1):
        self.port = port
        self.baudrate = baudrate
        self.timeout = timeout
        self.write_timeout = write_timeout
        self.serial = None

    def open(self):
        self.serial = serial.Serial(
            port=self.port,
            baudrate=self.baudrate,
            bytesize=serial.EIGHTBITS,
            parity=serial.PARITY_NONE,
            stopbits=serial.STOPBITS_ONE,
            timeout=self.timeout,
            write_timeout=self.write_timeout,
        )
Prior to transmitting data, the program calculates the verification value using
_checksum()and aggregates the complete protocol frame viabuild_frame().
@staticmethod
def _checksum(packet_id, length, cmd, payload):
    total = packet_id + length + cmd + sum(payload)
    return (~total) & 0xFF

@classmethod
def build_frame(cls, packet_id, cmd, payload=b""):
    length = len(payload) + 2
    checksum = cls._checksum(packet_id, length, cmd, payload)
    return FRAME_HEADER + bytes([packet_id, length, cmd]) + payload + bytes([checksum])
Serial data reception is managed by the
read_packetfunction, which employs a state machine to locate the frame header byte by byte, read the length, parse the command and payload, and ultimately verify the checksum.
while time.monotonic() < deadline:
    chunk = ser.read(1)
    if not chunk:
        continue
    byte = chunk[0]

    if state == 0:
        if byte == 0xFF:
            state = 1
        continue
Robotic arm coordinate control is executed via
set_pose(). This function sequentially packspitch,x,y,z,roll,claw, andduration_msaccording to protocol requirements and transmits them to the lower control board as aCMD_COORDINATE_SETcommand.
def set_pose(self, x, y, z, pitch, roll, claw, duration_ms):
    payload = (
        self._i16(round(pitch * 10.0))
        + self._i16(round(x))
        + self._i16(round(y))
        + self._i16(round(z))
        + self._i16(round(roll))
        + self._i16(round(claw))
        + self._u16(duration_ms)
    )
    self.request(SYSTEM_ID, NexArmCommand.CMD_COORDINATE_SET, payload, expect_reply=False)
During the movement demonstration, the program first checks the firmware version, triggers a single buzzer notification, and then sequentially executes all coordinates in the action array. Once all actions conclude,
print_current_coords()invokesget_current_coords()to read the actual current coordinates of the robotic arm and outputs the end-effector posture alongside the six servo positions.
with NexArmClient("/dev/ttyUSB0") as arm:
    version = arm.get_firmware_version(timeout=1.0)
    print("[UART] firmware version -> {0}".format(version))

    arm.set_buzzer(on_ms=100, off_ms=50, times=1, frequency=2000)
    for index, pose in enumerate(PICK_PLACE_SEQUENCE, start=1):
        x, y, z, pitch, roll, claw, duration_ms = pose
        arm.set_pose(x, y, z, pitch, roll, claw, duration_ms)
        time.sleep(duration_ms / 1000.0)
    print_current_coords(arm, index)
6.3 Jetson Network Control of the Robotic Arm
6.3.1 Project Introduction
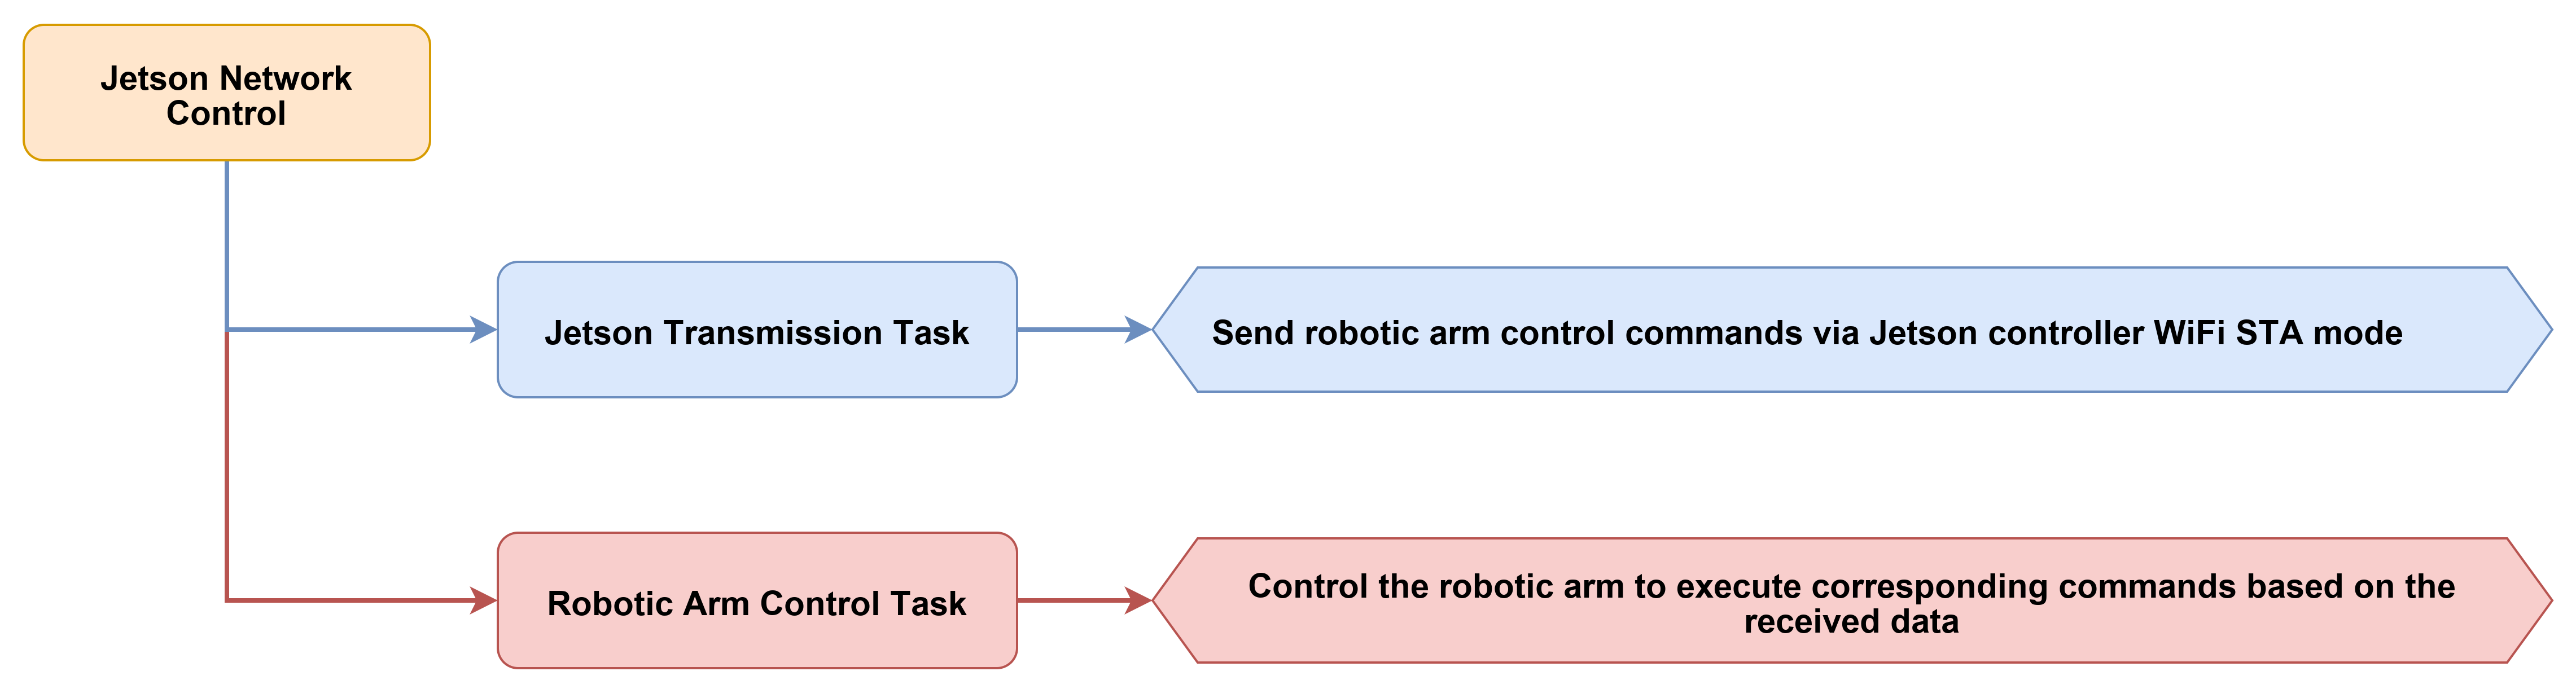
This section demonstrates connecting to the NexArm hotspot using a Jetson controller and controlling the robotic arm via a Python program over a TCP network. The Jetson-side program first verifies the current wireless connection status. After confirming a connection to the NexArm hotspot, the program connects to the open network port of the robotic arm. It then dispatches coordinate commands sequentially according to a preset transporting path to achieve remote network control.
6.3.2 Program Flow
6.3.3 Program Download
NexArm Program Download
Before executing external controller operations, the corresponding control program must be downloaded to the robotic arm according to the following steps.
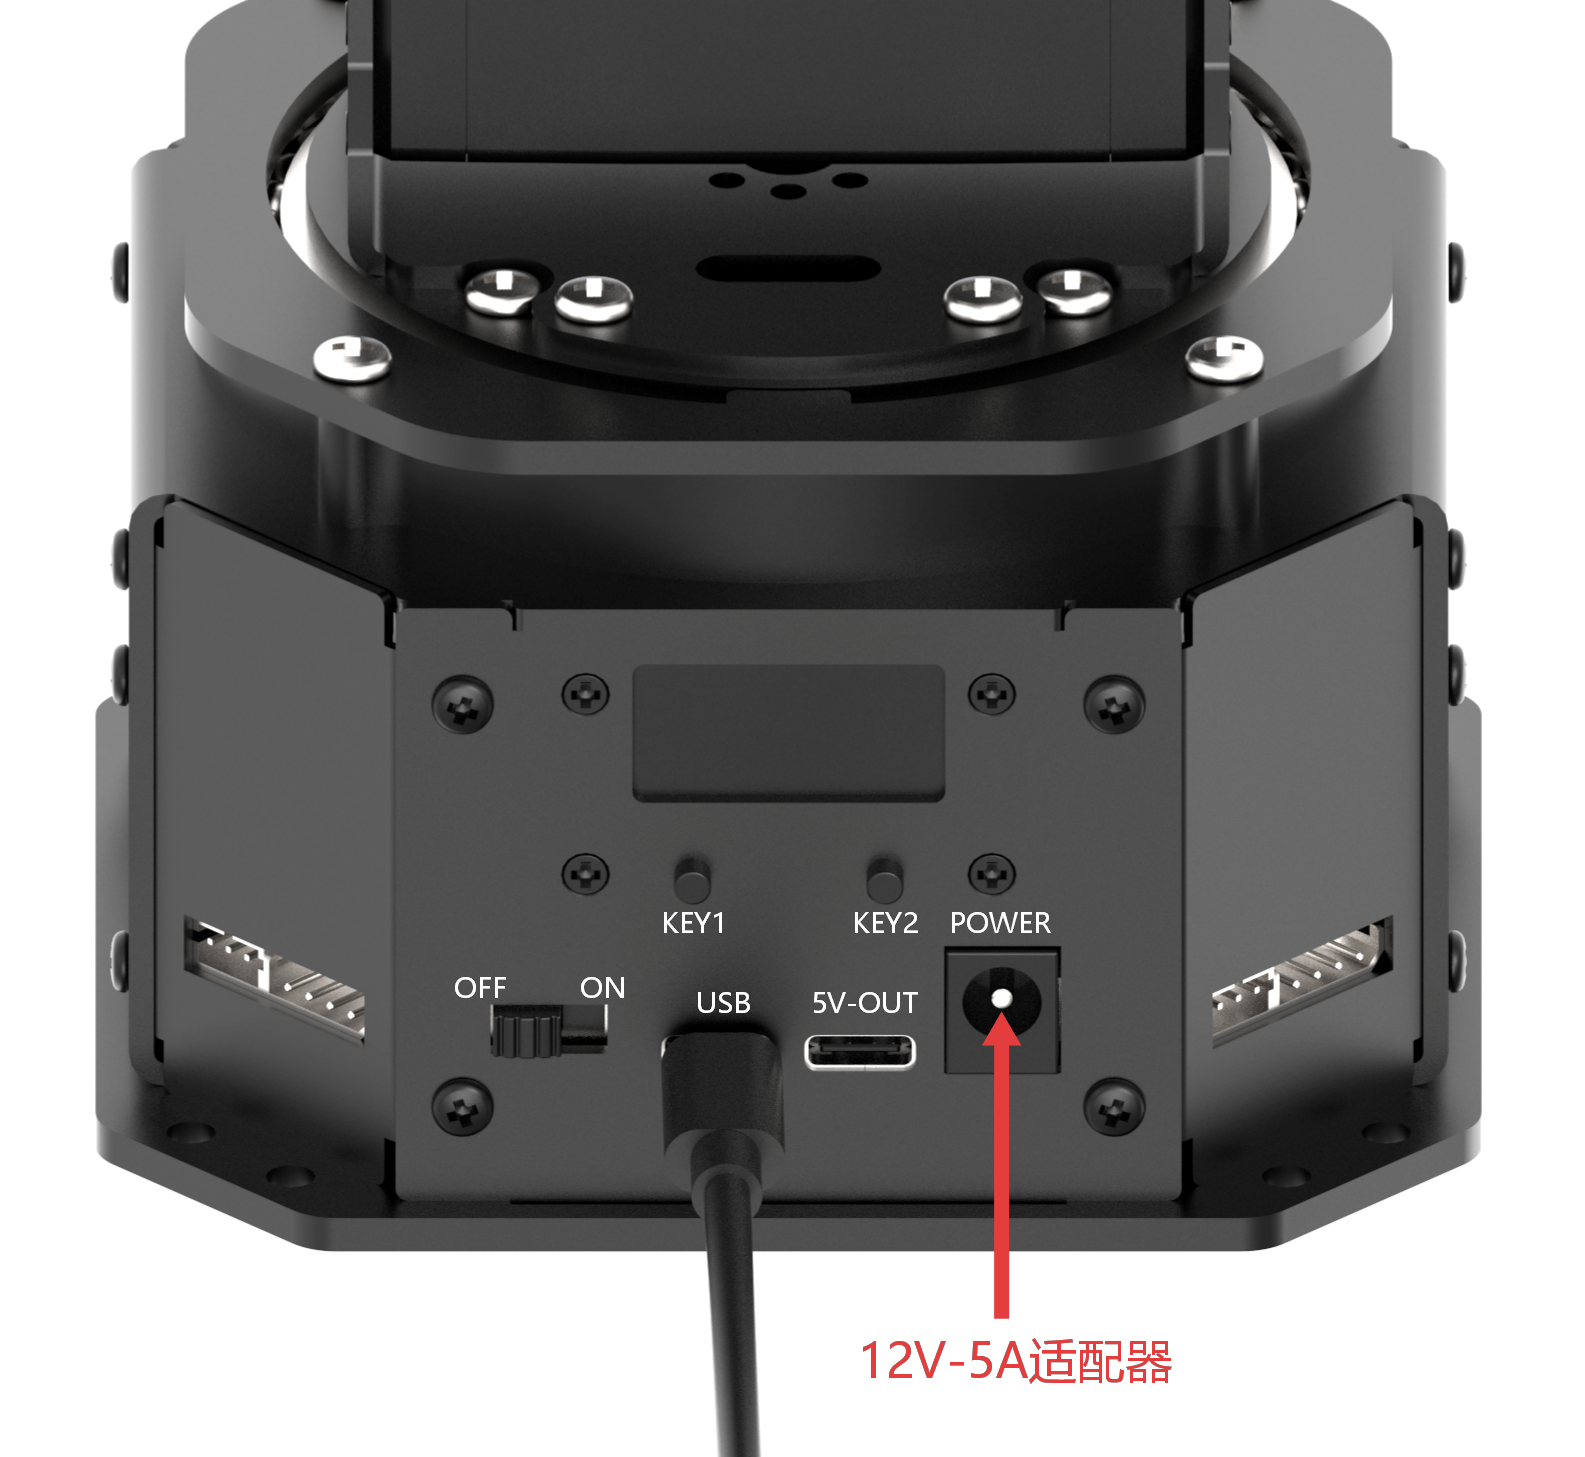
Connect the NexArm to a computer using a Type-C data cable.
Open the corresponding .ino file located in the 1. Tutorials/6. External Controller Integration/02 Source Code/Nex_Arm.zip folder.
Select the development board model as illustrated in the image below.
Navigate to Tools in the menu bar and select the appropriate ESP32 development board configuration shown below.
Click the compile button
first, and then click the upload button . The output box at the bottom of the software, displaying the interface below, indicates that the program has been downloaded successfully:
Jetson Program Download
Upload the WiFi_Control folder from the 02 Source Code directory to the Jetson controller using a remote connection tool.
6.3.4 Program Outcome
First, connect the NexArm controller to the Jetson controller using a Type-C cable and execute
sudo ifconfigin the terminal to find theeth0IP address. Connect via a remote connection tool using this wired IP address.
Execute
nmcli device statusto check the connection status ofwlan0, where WN-25011421 represents the network connection name.
Execute
sudo nmcli connection down "WN-25011421"in the terminal to disconnect the Wi-Fi network.
Navigate to the
WiFi_Controlfolder and executesudo python3 wifi_basic_demo.pyto move the robotic arm according to the specified coordinates.
6.3.5 Program Analysis
The Jetson network control section shares the same
WiFi_Controlprogram structure as the Raspberry Pi network control, and the action sequence is similarly provided byPICK_PLACE_SEQUENCE.
PICK_PLACE_SEQUENCE = [
    (250.0,   0.0,  20.0, -90.0, 0.0, -50.0, 1500),
    (250.0,   0.0,  20.0, -90.0, 0.0,   0.0,  400),
    (200.0,   0.0, 200.0,   0.0, 0.0,   0.0, 1500),
]
The network preparation phase is managed uniformly by
connect_nexarm_wifi(). The function first checks whether a connection to the target hotspot already exists and verifies if the NexArm TCP service is reachable. A rescan and hotspot reconnection vianmcliare triggered only when both checks fail.
active_ssid = get_active_ssid()
if active_ssid == ssid:
    print("[WiFi] already connected to {0}".format(ssid))
    return

if can_connect_nexarm():
    print("[WiFi] NexArm TCP service already reachable, skip reconnect")
    return
The
NexArmWiFiClientclass consolidates TCP socket communication and protocol parsing within a single class. Theconnect()method creates the socket and connects to the hotspot address of the robotic arm, whilesend_frame()handles transmitting the encapsulated protocol frame.
def connect(self):
    if self.sock:
        return
    self.sock = socket.socket(socket.AF_INET, socket.SOCK_STREAM)
    self.sock.settimeout(self.timeout)
    self.sock.connect((self.host, self.port))

def send_frame(self, packet_id, cmd, payload=b""):
    sock = self._ensure_connected()
    frame = self.build_frame(packet_id, cmd, payload)
    sock.sendall(frame)
    return frame
During Wi-Fi data reception, the program does not assume each
recv()call captures an exact single frame. Instead, received data is aggregated intorecv_buffer, and the_try_parse_packet_from_buffer()method unpacks the buffer based on the frame header, length, and checksum.
def read_packet(self, timeout=None):
    while time.monotonic() < deadline:
        packet = self._try_parse_packet_from_buffer()
        if packet is not None:
            return packet

        data = sock.recv(256)
        self.recv_buffer.extend(data)
Reading the current coordinates of the robotic arm is handled by
get_current_coords(). Upon receiving a return packet, the function first parsesx,y, andz, and then extractspitch,roll,claw, and the six servo positions based on the payload length.
def get_current_coords(self, timeout=1.0):
    packet = self.request(
        SYSTEM_ID,
        NexArmCommand.CMD_GET_CUR_COORDS,
        expect_reply=True,
        expected_cmd=NexArmCommand.CMD_GET_CUR_COORDS,
        expected_ids=(0x5A, SYSTEM_ID),
        timeout=timeout,
    )
The
main()function first completes the Wi-Fi connection, creates aNexArmWiFiClientobject, and then executes the firmware version check, buzzer notification, action array iteration, and current coordinate query.
def main():
    connect_nexarm_wifi()

    with NexArmWiFiClient(host=NEXARM_HOST, port=NEXARM_PORT, timeout=1.0) as arm:
        version = arm.get_firmware_version(timeout=1.0)
        print("[WiFi] firmware version -> {0}".format(version))

        arm.set_buzzer(100, 50, 1, 2000)
        for index, pose in enumerate(PICK_PLACE_SEQUENCE, start=1):
            x, y, z, pitch, roll, claw, duration_ms = pose
            arm.set_pose(x, y, z, pitch, roll, claw, duration_ms)
            time.sleep(duration_ms / 1000.0)
6.4 Jetson Serial Control of the Robotic Arm
6.4.1 Project Introduction
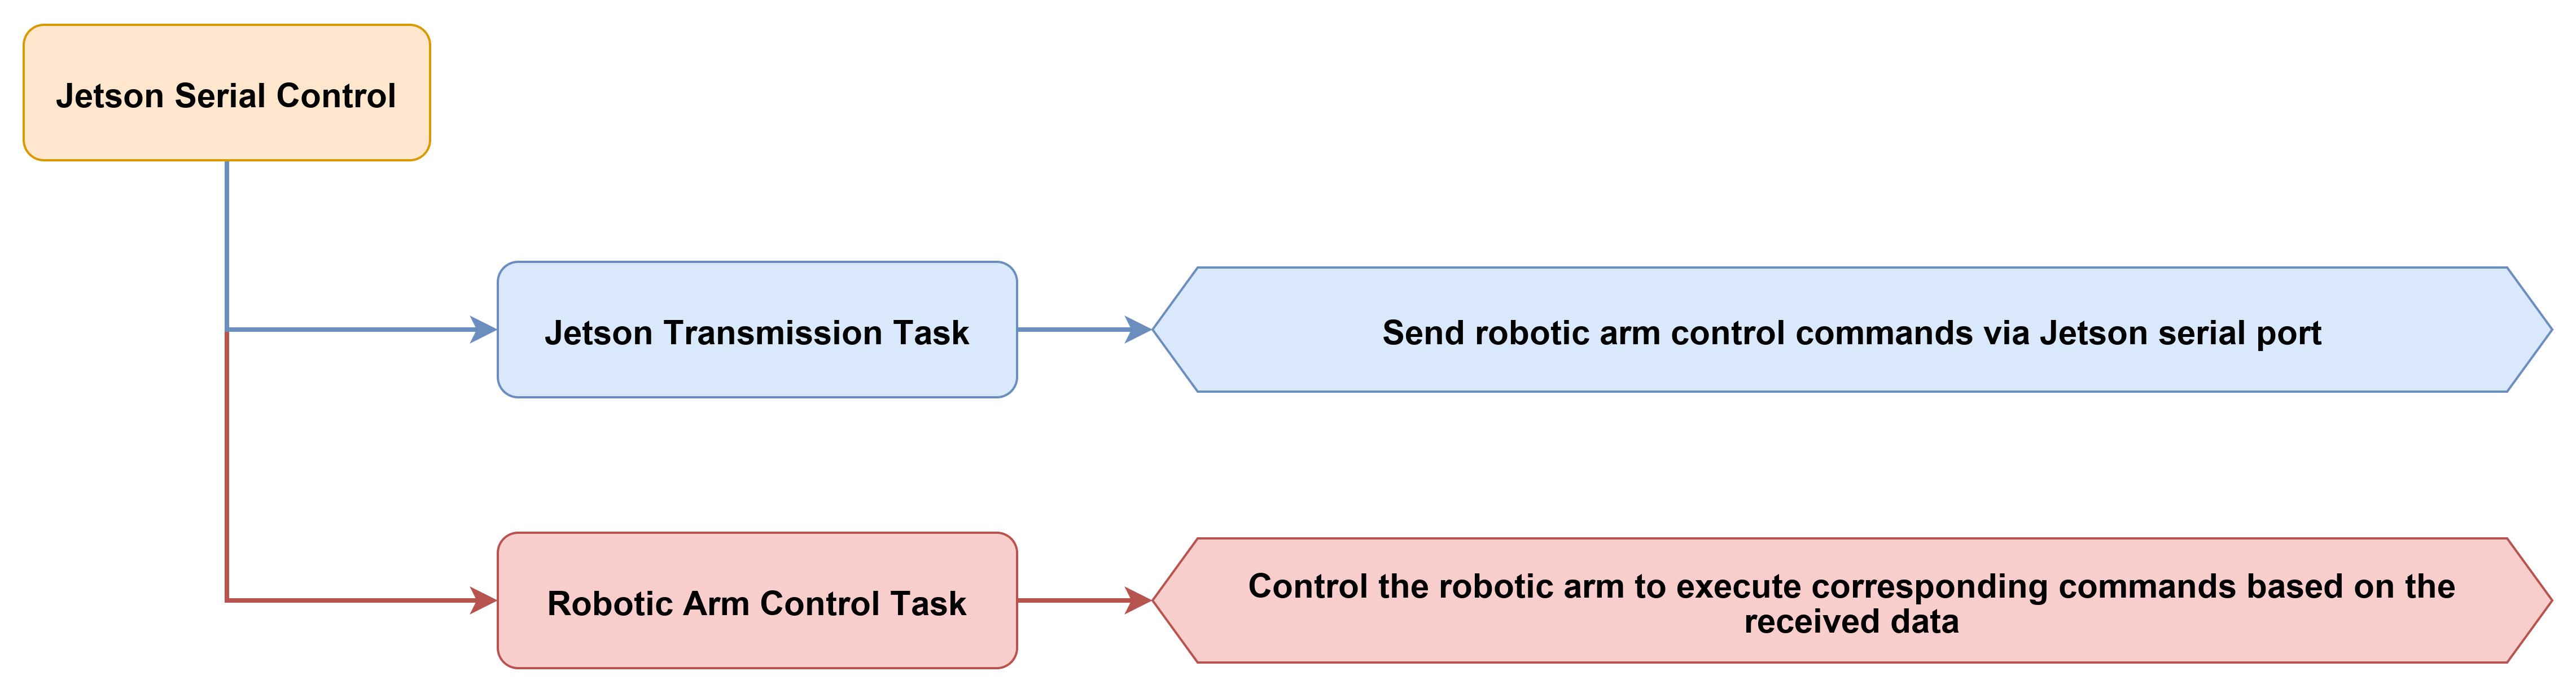
This section covers establishing direct communication with the NexArm through the Jetson USB serial port. A Python program on the Jetson handles data encapsulation, transmission, and read-back operations. Upon execution, the program opens the corresponding serial port and dispatches preset coordinate control commands to execute targeted picking and transporting.
6.4.2 Program Flow
6.4.3 Program Download
Refer to the 6.1.3 Program Download steps to download the NexArm program, and upload the UART_Control folder from the 02 Source Code directory to the Jetson controller.
6.4.4 Program Outcome
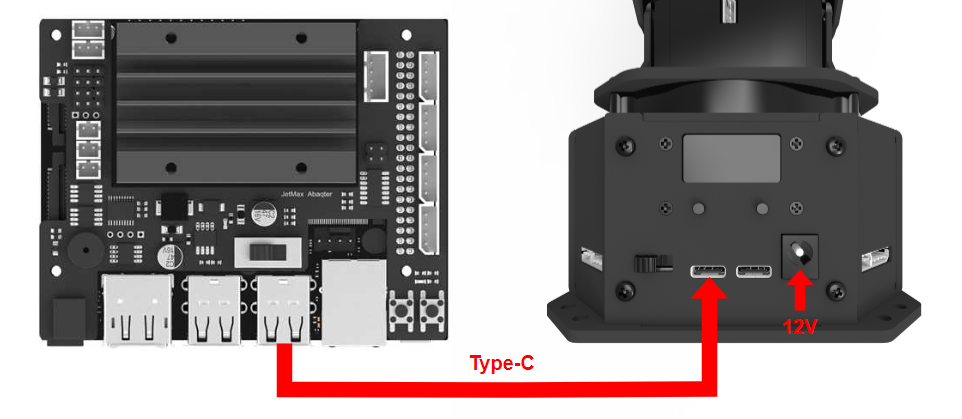
Connect the Jetson controller to the NexArm using a Type-C data cable.
Navigate to the UART_Control folder and execute
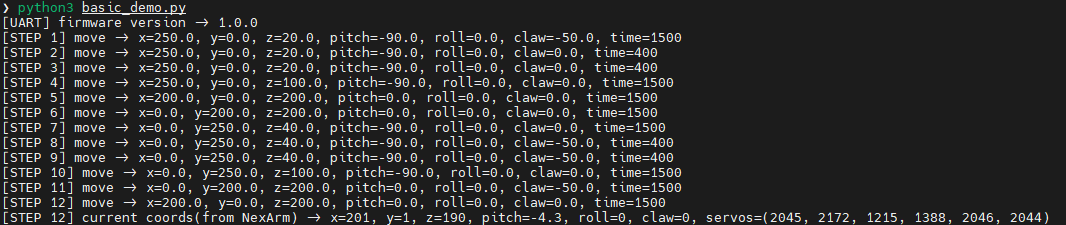
python3 basic_demo.pyto move the robotic arm according to the specified coordinates.
6.4.5 Program Analysis
The Jetson serial control section shares the
UART_Controlprogram with the Raspberry Pi serial control setup. Movement parameters are uniformly defined viaPICK_PLACE_SEQUENCE, where each item in the array contains complete target coordinates, end-effector posture, gripper angle, and execution duration.
PICK_PLACE_SEQUENCE = [
    (250.0,   0.0,  20.0, -90.0, 0.0, -50.0, 1500),
    (250.0,   0.0,  20.0, -90.0, 0.0,   0.0,  400),
    (200.0,   0.0, 200.0,   0.0, 0.0,   0.0, 1500),
]
The
NexArmClientclass opens the serial port between the main controller and the robotic arm viaserial.Serial(...)and reuses this single communication link throughout the control workflow.
def open(self):
    if self.serial and self.serial.is_open:
        return
    self.serial = serial.Serial(
        port=self.port,
        baudrate=self.baudrate,
        bytesize=serial.EIGHTBITS,
        parity=serial.PARITY_NONE,
        stopbits=serial.STOPBITS_ONE,
        timeout=self.timeout,
        write_timeout=self.write_timeout,
    )
Protocol transmission is handled through the coordination of
build_frame()andsend_frame(). Thebuild_frame()function generates a standard communication frame based on the command word and payload, andsend_frame()writes the full frame to the serial port and executes an immediateflush().
def send_frame(self, packet_id, cmd, payload=b""):
    ser = self._ensure_open()
    frame = self.build_frame(packet_id, cmd, payload)
    ser.write(frame)
    ser.flush()
    return frame
Reading reply data is managed by
read_packet(). The function reads data byte by byte using a state machine and validates the checksum upon receiving a complete frame. A ValueError is raised immediately if verification fails.
if state == 6:
    checksum = byte
    expected = self._checksum(packet_id, length, cmd, bytes(payload))
    if checksum != expected:
        raise ValueError(
            "Checksum mismatch: got 0x{0:02X}, expected 0x{1:02X}".format(
                checksum, expected
            )
        )
The SDK provides further encapsulation for upper-level control interfaces. For instance,
get_firmware_version()reads the three-byte firmware version,set_buzzer()controls the buzzer,get_current_coords()retrieves the current position, andset_pose()handles transmitting coordinate control commands.
def get_firmware_version(self, timeout=0.5):
    packet = self.request(
        SYSTEM_ID,
        NexArmCommand.CMD_FIRMWARE_VERSION_CHECK,
        expect_reply=True,
        expected_cmd=NexArmCommand.CMD_FIRMWARE_VERSION_CHECK,
        expected_ids=(SYSTEM_ID, 0x5A),
        timeout=timeout,
    )
In the main program, the Jetson side first reads the firmware version, triggers a buzzer notification, and iterates through the action array to control robotic arm movements. Once all actions finish,
print_current_coords()is called to retrieve and print the actual current coordinates of the robotic arm.
def main():
    with NexArmClient("/dev/ttyUSB0") as arm:
        version = arm.get_firmware_version(timeout=1.0)
        print("[UART] firmware version -> {0}".format(version))

        arm.set_buzzer(on_ms=100, off_ms=50, times=1, frequency=2000)
        for index, pose in enumerate(PICK_PLACE_SEQUENCE, start=1):
            x, y, z, pitch, roll, claw, duration_ms = pose
            arm.set_pose(x, y, z, pitch, roll, claw, duration_ms)
            time.sleep(duration_ms / 1000.0)
        print_current_coords(arm, index)