22 ROS2-Robot Arm Control Course
22.1 Robotic Arm Basic Control
Please click 11 ROS1-Robotic Arm Control->11.1 Robotic Arm Basic Control to get the Robotic Arm Basic Control.
22.2 Robot Arm Deviation Adjustment (Optional) V1.0
As the robotic arm is used over time, the mechanical angle deviation of the servos on the arm will gradually increase. If the joints of the robotic arm cannot reach the specified target points during operation, you will need to manually adjust the servo deviations according to the instructions in this document.
Note
Note: Before leaving the factory, the servo deviations of the robotic arm on the car have been fully adjusted. No servo deviation adjustment is required for the initial use or within a short period after receiving the product. Only if you notice significant deviations that affect normal functionality, should you refer to this document to adjust the servo deviations of the robotic arm.
22.2.1 Introduction to Robot Arm
This car features a 6-degree-of-freedom robotic arm, constructed with intelligent bus servos and metal sheet components, allowing it to move to any position within its operational space. It has six degrees of freedom: X movement, Y movement, Z movement, X rotation, Y rotation, and Z rotation, enabling it to perform actions such as extension, rotation, and lifting. Additionally, it is equipped with a depth camera (Dabai DCW) that can be used in conjunction with the robotic arm for various functions, including hand-following color block recognition and sorting, color block tracking, line-following obstacle clearance, waste sorting, and fixed-point navigation and transport.
\media\image4.png)
\media\image5.png)
JetRover is a 6-degree-of-freedom robotic arm, composed of intelligent bus servos and metal sheet components.
\media\image6.png)
\media\image7.png)
\media\image8.png)
\media\image9.png)
The JetRover’s 6-degree-of-freedom robotic arm consists of six intelligent bus servos: HTD-35H*3 (body), HTS-20H*1 (pan-tilt), HTS-21H*1 (claw), and HTD-35H bus servo (wrist).
The bus servos use serial communication to connect multiple servos through a single bus control system. This allows multiple servos to be connected through a single I/O port, providing higher precision compared to digital servos, albeit at a slightly higher cost.
The interface distribution and description are exemplified by one of the HTD-35H servos, as shown below:
\media\image10.png)
| PIN | Description |
|---|---|
| GND | Power Ground |
| VIN | Power Input |
| SIG | Signal End (Half-Duplex UART Asynchronous Serial Interface) |
22.2.2 Adjustment Steps
Adjustment Standard
Before adjusting the servo deviations, it is essential to identify and understand the corresponding ID numbers for each servo on the robotic arm. These IDs will be used during the adjustment process.
The IDs are as follows:
ID 1: Pan-tilt Servo
IDs 2, 3, 4: Robotic Arm Joint Servos
ID 5: Wrist Servo
ID 10: Claw Servo
\media\image11.png)
In total, six servos are controlled on the robotic arm. These servos may develop deviations over time, requiring adjustment to the mid-position standard of the robotic arm.
When adjusting servo deviations, refer to the standard servo deviation adjustment diagram. The robotic arm can be considered deviation-free only if it meets both of the following standards:
\media\image12.png)
Standard 1: The servos with IDs 1, 2, 3, 4, and 5 must be horizontally and vertically aligned with the base of the car in the mid-position state. As shown in the diagram, the central screws on the servo discs should form a line that vertically passes through these servos.
\media\image13.png)
Standard 2: The claw on the robotic arm must maintain an opening distance of 2-3 cm (this represents the mid-position standard for the claw servo). This can be measured using two fingers (index and middle), which should fit snugly within the gap.
Instructions
After understanding the adjustment standards, you can now adjust the deviation of the robotic arm according to these standards. Taking the deviation adjustment of Servo 3 of the JetRover robot’s arm as an example, as shown in the diagram below, Servo 3 has a deviation, causing misalignment in the positions of Servos 4, 5, and 10. Therefore, adjustment needs to be made using the robot’s upper computer software at this time.
\media\image14.png)
The detailed instructions are as below:
Access the robot system using NoMachine. Then click-on
\media\image15.png) to open the ROS1 terminal.
to open the ROS1 terminal.Execute the following command to disable the auto-start service.
sudo systemctl stop start_app_node.service
Double-click the “arm” icon on the desktop to enter the interface of the robotic arm’s PC software, as shown in the following image:
\media\image17.png)
For details about the interface and related content of the “arm” software, please refer to the “Basic Control” document. This document focuses specifically on adjusting servo deviations.
Clicking the “Reset Servo” button, it was found that Servo 3 of the robotic arm has a deviation.
\media\image18.png)
Click the “Read Deviation” button to obtain the current deviation values for the servos installed on the robotic arm.
\media\image19.png)
After the “Read Deviation Successful” popup appears, click the “OK” button.
\media\image20.png)
Check the deviation value for Servo ID: 3, as shown in the diagram below. In this diagram, each servo is identified by its respective ID number. The slider above indicates the current position, the middle number displays its position value, and the bottom slider represents the set deviation value for the servo.
\media\image21.png)
You can see that the deviation value for Servo ID: 3 is -18. When Servo 3 has such a deviation, adjustment should be made in the opposite direction until it reaches the “Standard (1)” state specified in the “2.1 Adjustment Standard.”
\media\image22.png)
Now you can see that the deviation value for Servo ID: 3 has been adjusted to “2”, bringing the robotic arm’s status to the “Standard (1)” state as specified in the “22.2.2 Adjustment Steps-> Adjustment Standard”. This completes the setting for adjusting the deviation of Servo 3. Next, you need to save the current value to the local computer of the robot. After the robot is restarted, it will use these saved values for servo control. The procedure for reading other servo IDs is the same.
Click-on ‘Download Deviation’ button.
\media\image23.png)
Wait for the prompt “Download Deviation Successful” to appear, then click “OK” to exit the window.
\media\image24.png)
This completes the adjustment of Servo 3’s deviation.
When we need the robotic arm to return to its initial state, we can select “camera” within the action group range.
\media\image25.png)
Choose ‘init’.
\media\image26.png)
Click “Execute Action” to have the robotic arm perform the “init” action group.
\media\image27.png)
After clicking, the robot’s status is as shown in the following image:
\media\image28.png)
After completing the above steps, Servo 3 of the robot’s arm has been adjusted. If other bus servos on the robot show deviations that do not meet the judgment criteria, you will need to repeat the adjustment steps to adjust the corresponding servo deviations. It is important to note that during adjustment, you should adjust the lower slider and then download the deviation for it to take effect. The specific position is indicated by the green box in the following image:
\media\image29.png)
22.2.3 FAQ
When adjusting the position of the gripper, I found that no matter how much I adjusted it beyond a certain point, the gripper on the robotic arm did not respond?
Ans:Our company has implemented mechanical limits on the gripper of the robotic arm, specifically Servo 10 corresponding to the mechanical gripper. When the position set through the PC software exceeds 700, it reaches the mechanical limit of the gripper, preventing it from further tightening. Exceeding this limit may risk damaging the servo. In such cases, simply adjust in the opposite direction.
\media\image30.png)
It is recommended to adjust Servo 10 within the range of [200, 700] during this adjustment.
After clicking “Read Deviation,” the software interface freezes
Ans:Because the bus servos communicate via serial communication, if the auto-start service is not disabled after the robot starts, it can block message transmission, causing the software interface to freeze. The solution is to disable the auto-start service by following the steps outlined in the 22.2.2 adjustment procedure.
22.3 Robotic Arm Visual Application
Application Overview
The robotic arm is a mechanical device that is able to simulate the human arms and is widely used in various fields such as industrial, medical and military. Here are several application scenarios of robotic arms:
Industrial automation: The application of robotic arms in industrial production is particularly widespread, they can be used for tasks such as handling, assembly, welding, painting, etc., greatly improving production efficiency and quality.
Medical Assistance Therapy: Robotic arms can be used in operating room to provide doctors with higher precision in surgical procedure, reducing surgical errors and other adverse outcomes.
Electronic Equipment Maintenance: Robotic arms can be used for electronic equipment maintenance, especially in compact spaces or high-risk environments, where they can prevent personnel from being injured.
Space Exploration: The application of robotic arms in space exploration missions, such as probing planetary surfaces, collecting samples, and other tasks, is an extremely important technological means.
In conclusion, the application scenarios of robotic arms are extremely diverse. With the continuous advancement of technology, the use of robotic arms in various fields will become increasingly widespread. Therefore, this document will introduce the relevant applications of the robotic arm on JetRover, allowing users to experience the different functional effects of visual robotic arms.
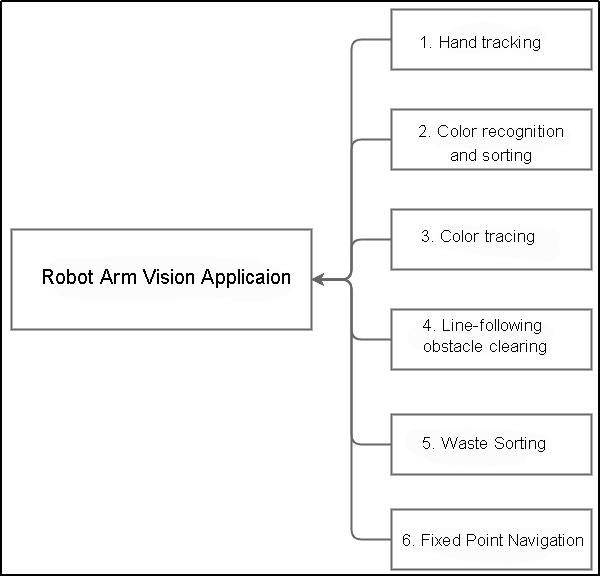
The diagram above illustrates the structure of “Robotic Arm Visual Applications” functionality, including hand tracking, color recognition and sorting, color tracking, line-following clearance, waste sorting, navigation and transportation. The following content will be written based on this diagram.
22.3.1 Hand Tracking
Program Logic
What is the application scenario of the hand tracking?
Virtual realization hand tracking technology can be used in virtual realization games, enabling players to control game characters’ movements, attacks, and other actions through gestures.
Medical hand tracking technology can be used in rehabilitation training to help patients regain hand functionality.
Educational hand tracking technology can be used in the field of education, allowing students to engage in interactive learning through gestures.
Smart home hand tracking technology can be used in smart homes, allowing users to control home devices’ switches, adjustments, and other operations through gestures.
Industrial production hand tracking technology can be used in industrial production, allowing workers to control robots’ operations through gestures, thus improving production efficiency.
The hand features detection in JetRover utilizes MediaPipe, an open-source multimedia machine learning model application framework. It can run cross-platform on mobile devices, workstations, and servers, and supports mobile GPU acceleration. It also supports the inference engines of TensorFlow and TF Lite, allowing any TensorFlow and TF Lite models to be used with MediaPipe. Additionally, on mobile and embedded platforms, MediaPipe also supports device-native GPU acceleration.
Firstly, it is necessary to build a hand recognition model and subscribe to the topic messages published by the camera node to obtain images. Then, process the images, such as flipping, and detect hand information within the images. Next, based on the lines connecting the keypoints of the hand, obtain the position of the center point of the hand. Finally, control the robotic arm to follow the up-and-down movement of the hand’s center point.
The source code of the program is located in:
/home/hiwonder/ros_ws/src/hiwonder_example/scripts/hand_track/hand_track_node.py
Operation Steps
Note
Note: The entered command should be case sensitive and “Tab” key can be used to complement the key words.
Start JetRover and connect it to NoMachine.
Double click on
 to open the ROS1 command line terminal.
Input the command and press Enter to disable the app service.
sudo systemctl stop start_app_node.service
Click-on
 to start the ROS2 command-line terminal.
Input the command to start the program.
ros2 launch example hand_track_node.launch.py
To exit this mode, press ‘Ctrl+\ on the terminal interface. If this fails, you can open a new ROS2 command line terminal and input the command to close all current ROS2 functions.
~/.stop_ros.sh
Outcome
After the game starts, the robotic arm will restore its initial posture. Place your hand in front of the camera of the robotic arm. When you move your hand up and down, robotic arm will move with your hand.
Note
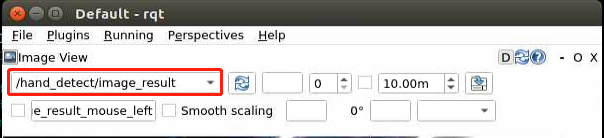
Note: This mode may cause the program to freeze when displaying the feedback screen, so the feedback screen will not be shown during execution. If you need to view the feedback screen, you can open a new command line terminal, enter the command “rqt,” and select /hand_detect/image_result.
Program Analysis
Launch Analysis:
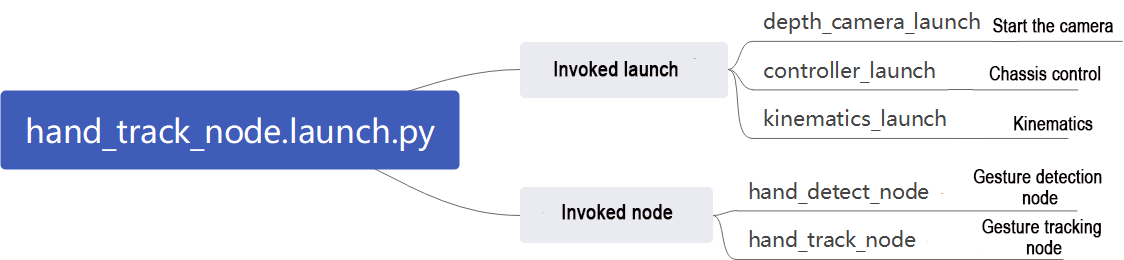
The program is saved in: ros2_ws/src/example/example/hand_track/hand_track_node.launch.py
import os
from ament_index_python.packages import get_package_share_directory

from launch_ros.actions import Node
from launch import LaunchDescription, LaunchService
from launch.actions import IncludeLaunchDescription, OpaqueFunction
from launch.launch_description_sources import PythonLaunchDescriptionSource

def launch_setup(context):
    compiled = os.environ['need_compile']
    if compiled == 'True':
        peripherals_package_path = get_package_share_directory('peripherals')
        controller_package_path = get_package_share_directory('controller')
        kinematics_package_path = get_package_share_directory('kinematics')
    else:
        peripherals_package_path = '/home/ubuntu/ros2_ws/src/peripherals'
        controller_package_path = '/home/ubuntu/ros2_ws/src/driver/controller'
        kinematics_package_path = '/home/ubuntu/ros2_ws/src/driver/kinematics'

    depth_camera_launch = IncludeLaunchDescription(
        PythonLaunchDescriptionSource(
            os.path.join(peripherals_package_path, 'launch/depth_camera.launch.py')),
    )
    controller_launch = IncludeLaunchDescription(
        PythonLaunchDescriptionSource(
            os.path.join(controller_package_path, 'launch/controller.launch.py')),
    )

    kinematics_launch = IncludeLaunchDescription(
        PythonLaunchDescriptionSource(
            os.path.join(kinematics_package_path, 'launch/kinematics_node.launch.py')),
    )
1. Read the package path
Read the paths of the peripherals, controller, and kinematics packages.
    if compiled == 'True':
        peripherals_package_path = get_package_share_directory('peripherals')
        controller_package_path = get_package_share_directory('controller')
        kinematics_package_path = get_package_share_directory('kinematics')
    else:
        peripherals_package_path = '/home/ubuntu/ros2_ws/src/peripherals'
        controller_package_path = '/home/ubuntu/ros2_ws/src/driver/controller'
        kinematics_package_path = '/home/ubuntu/ros2_ws/src/driver/kinematics'
2. Initiate other Launch files
depth_camera_launch: Used to initiate the depth camera
controller_launch: Used to initiate base control, servo control, etc.
kinematics_launch: Used to initiate kinematic algorithms
    depth_camera_launch = IncludeLaunchDescription(
        PythonLaunchDescriptionSource(
            os.path.join(peripherals_package_path, 'launch/depth_camera.launch.py')),
    )
    controller_launch = IncludeLaunchDescription(
        PythonLaunchDescriptionSource(
            os.path.join(controller_package_path, 'launch/controller.launch.py')),
    )

    kinematics_launch = IncludeLaunchDescription(
        PythonLaunchDescriptionSource(
            os.path.join(kinematics_package_path, 'launch/kinematics_node.launch.py')),
    )
3. Initiate Node
hand_detect_node: Used to launch hand detection
hand_track_node: Used to launch hand tracking
    hand_detect_node = Node(
        package='example',
        executable='hand_detect',
        output='screen',
    )

    hand_track_node = Node(
        package='example',
        executable='hand_track',
        output='screen',
    )
Source Code Analysis:
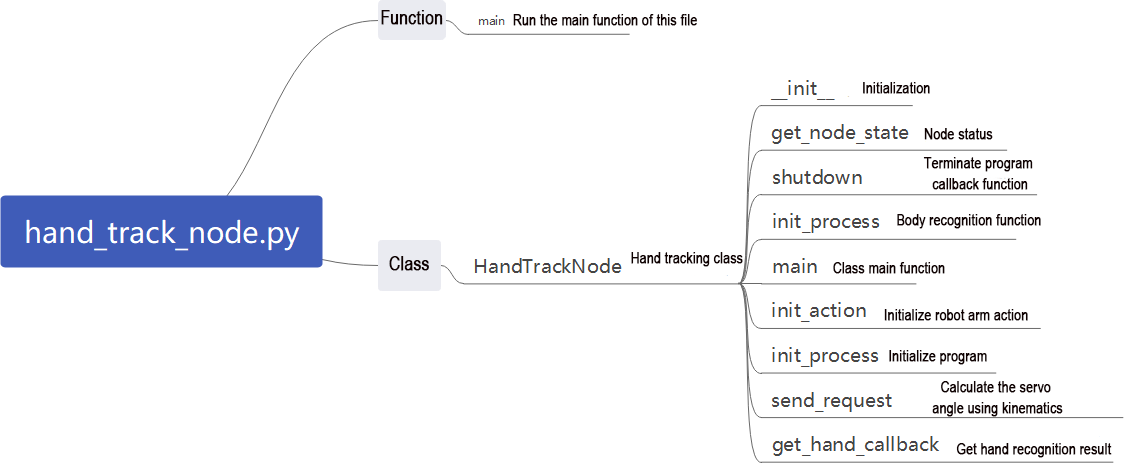
The program is saved in:
“ros2_ws/src/example/example/hand_track/hand_track_node.py”
#!/usr/bin/env python3
# encoding: utf-8
# @data:2022/11/07
# @author:aiden
# 手跟随(hand tracking)
import time
import rclpy
import signal
import threading
import sdk.pid as pid
from rclpy.node import Node
from std_srvs.srv import Trigger
from kinematics import transform
from interfaces.msg import Point2D
from geometry_msgs.msg import Twist
from kinematics_msgs.srv import SetRobotPose
from rclpy.executors import MultiThreadedExecutor
from servo_controller_msgs.msg import ServosPosition
from rclpy.callback_groups import ReentrantCallbackGroup
from kinematics.kinematics_control import set_pose_target
from servo_controller.bus_servo_control import set_servo_position

class HandTrackNode(Node):
    def __init__(self, name):
        rclpy.init()
        super().__init__(name)
        self.name = name
        self.image = None
        self.center = None
        self.running = True
        self.z_dis = 0.41
        self.y_dis = 500
        self.x_init = transform.link3 + transform.tool_link

        self.pid_z = pid.PID(0.00005, 0.0, 0.0)
        self.pid_y = pid.PID(0.04, 0.0, 0.0)

        signal.signal(signal.SIGINT, self.shutdown)

        self.mecanum_pub = self.create_publisher(Twist, '/controller/cmd_vel', 1)
        self.joints_pub = self.create_publisher(ServosPosition, '/servo_controller', 1) # 舵机控制(servo control)
4. Main Function
def main():
    node = HandTrackNode('hand_track')
    executor = MultiThreadedExecutor()
    executor.add_node(node)
    executor.spin()
    node.destroy_node()
The main function is used to invoke the hand recognition class startup node.
5. HandTrackNode Class
init_process:
    def init_process(self):
        self.timer.cancel()

        self.init_action()

        threading.Thread(target=self.main, daemon=True).start()
        self.create_service(Trigger, '~/init_finish', self.get_node_state)
        self.get_logger().info('\033[1;32m%s\033[0m' % 'start')
Initialize the action and start the main function ‘main’ to publish the initialization status of the current node.
send_request:
    def send_request(self, client, msg):
        future = client.call_async(msg)
        while rclpy.ok():
            if future.done() and future.result():
                return future.result()
Used to publish the recognized hand position to the kinematic node and obtain the servo angle of the kinematic feedback.
get_hand_callback:
    def get_hand_callback(self, msg):
        if msg.width != 0:
            self.center = msg
        else:
            self.center = None
Utilized to get the current hand recognition result.
main:
    def main(self):
        while self.running:
            if self.center is not None:
                t1 = time.time()
                self.pid_y.SetPoint = self.center.width / 2
                self.pid_y.update(self.center.width - self.center.x)
                self.y_dis += self.pid_y.output
                if self.y_dis < 200:
                    self.y_dis = 200
                if self.y_dis > 800:
                    self.y_dis = 800

                self.pid_z.SetPoint = self.center.height / 2
                self.pid_z.update(self.center.y)
                self.z_dis += self.pid_z.output
                if self.z_dis > 0.46:
                    self.z_dis = 0.46
                if self.z_dis < 0.36:
                    self.z_dis = 0.36

                msg = set_pose_target([self.x_init, 0.0, self.z_dis], 0.0, [-180.0, 180.0], 1.0)
                res = self.send_request(self.kinematics_client, msg)
                t2 = time.time()
                t = t2 - t1
                if t < 0.02:
                    time.sleep(0.02 - t)
                if res.pulse:
                    servo_data = res.pulse
                    set_servo_position(self.joints_pub, 0.02, ((10, 500), (5, 500), (4, servo_data[3]), (3, servo_data[2]), (2, servo_data[1]), (1, int(self.y_dis))))
                else:
                    set_servo_position(self.joints_pub, 0.02, ((1, int(self.y_dis)), ))

            else:
                time.sleep(0.01)

        self.init_action()
        rclpy.shutdown()
Based on the results of hand recognition, control the pan-tilt servo using PID; employ PID to control the required height of the current robotic arm, and derive servo angles through kinematics; finally, publish the current servo parameters to complete the tracking process.
22.3.2 Color Recognition and Sorting
Program Logic
With the further development of automation technology, production line in manufacturing enterprises are increasingly moving towards automation and intelligence.As a result, a large number of automated devices are gradually being introduced into the production lines. Among them, in the process if martial color recognition, positioning, and sorting, visual systems are required for tasks such as image acquisition and data analysis to effectively identify and locate the color of the samples. Motion control technology provides effective solutions for visual color recognition, positioning, and sorting to improve the production capacity of enterprises.
The vision detection method using motion control technology features fast detection speed, good reliability, and high efficiency. It can achieve non-contact and non-destructive testing. Machine vision color recognition, positioning, and sorting have good applicability in various industries and have widespread market applications.
First, subscribe to the topic messages published by the color recognition node to obtain recognition color information and images.
Next, invoke the initialization action group file to prepare the robotic arm for the desired posture.
Finally, based on the required color information, match the corresponding sorting actions and then execute the sorting actions to sort the color blocks into the respective areas.
The robot performs sorting tasks after recognizing the colored blocks from its own perspective. Prior to starting, ensure that the blocks required for this game are prepared.
The source code of the program is located in /home/hiwonder/ros_ws/src/hiwonder_example/scripts/hand_track/hand_track_node.py
Operation Steps
Note
Note: The entered command should be case sensitive and “Tab” key can be used to complement the key words.
Start JetRover and connect it to NoMachine.
Double click on
to open the ROS1 command line terminal.Input the command and press Enter to disable the app service.
sudo systemctl stop start_app_node.service
Click-on
to start the ROS2 command-line terminal.Input the command and press Enter to start the program.
ros2 launch example color_sorting_node.launch.py
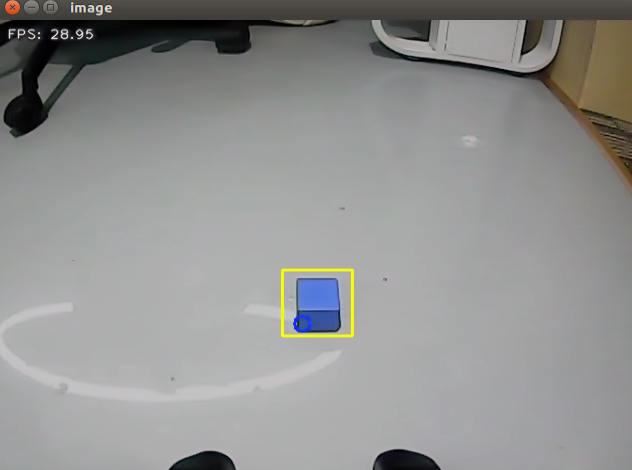
The image interface of the camera when the program starts is as follows.
To deactivate this mode, press the “Esc” key within the image interface to exit the camera view.
Press “Ctrl+C” in the command line terminal. If closing fails, please retry multiple times.
Outcome
After the game starts, the robotic arm turns left to prepare itself for the sorting. Place the target block within the yellow box in the middle of the transmitted image. Once the block is recognized, the robotic am will transport them to their corresponding areas.
The red color block will be transported to the position directly in front and center of the robot; the green color block will be transported to the position in front of the robot, towards its left side; the blue color block will be transported to the position in front of the robot, towards its right side.
Program Analysis
Launch analysis:

The program is saved in
“ros2_ws/src/example/example/color_sorting/color_sorting_node.launch.py”
import os
from ament_index_python.packages import get_package_share_directory

from launch_ros.actions import Node
from launch import LaunchDescription, LaunchService
from launch.substitutions import LaunchConfiguration
from launch.launch_description_sources import PythonLaunchDescriptionSource
from launch.actions import IncludeLaunchDescription, DeclareLaunchArgument, OpaqueFunction

def launch_setup(context):
    compiled = os.environ['need_compile']
    start = LaunchConfiguration('start', default='true')
    start_arg = DeclareLaunchArgument('start', default_value=start)
    debug = LaunchConfiguration('debug', default='false')
    debug_arg = DeclareLaunchArgument('debug', default_value=debug)
    if compiled == 'True':
        controller_package_path = get_package_share_directory('controller')
        example_package_path = get_package_share_directory('example')
    else:
        controller_package_path = '/home/ubuntu/ros2_ws/src/driver/controller'
        example_package_path = '/home/ubuntu/ros2_ws/src/example'
    color_detect_launch = IncludeLaunchDescription(
        PythonLaunchDescriptionSource(
            os.path.join(example_package_path, 'example/color_detect/color_detect_node.launch.py')),
    )
    controller_launch = IncludeLaunchDescription(
        PythonLaunchDescriptionSource(
            os.path.join(controller_package_path, 'launch/controller.launch.py')),
    )

    color_sorting_node = Node(
        package='example',
        executable='color_sorting',
        output='screen',
        parameters=[os.path.join(example_package_path, 'config/color_sorting_roi.yaml'), {'start': start}, {'debug': debug}]
    )
1.Initiate other Launch files
    color_detect_launch = IncludeLaunchDescription(
        PythonLaunchDescriptionSource(
            os.path.join(example_package_path, 'example/color_detect/color_detect_node.launch.py')),
    )
    controller_launch = IncludeLaunchDescription(
        PythonLaunchDescriptionSource(
            os.path.join(controller_package_path, 'launch/controller.launch.py')),
    )
color_detect_launch is used to launch color recognition.
controller_launch is used to launch control of the base, servos, and other components.
2. Start Node
    color_sorting_node = Node(
        package='example',
        executable='color_sorting',
        output='screen',
        parameters=[os.path.join(example_package_path, 'config/color_sorting_roi.yaml'), {'start': start}, {'debug': debug}]
    )
color_sorting_node is employed to initiate the color sorting node.
Code analysis:
Program path:
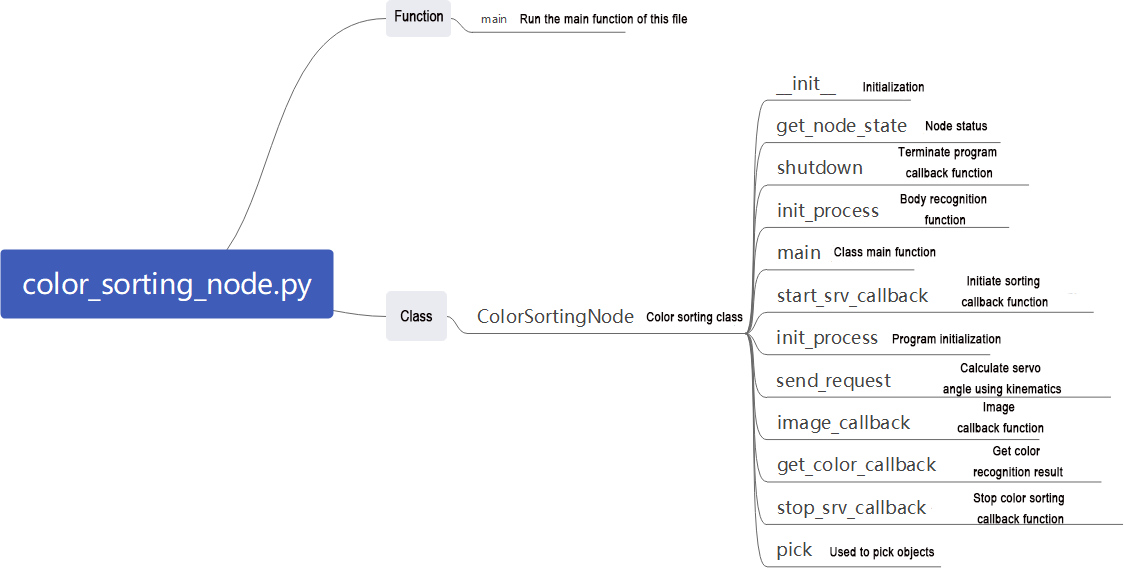
“ros2_ws/src/example/example/color_sorting/color_sorting_node.py”
3. Main Function
def main():
    node = ColorSortingNode('color_sorting')
    executor = MultiThreadedExecutor()
    executor.add_node(node)
    executor.spin()
    node.destroy_node()
The main function calls the hand recognition class to start the node.
4. ColorSortingNode
init_process:
    def init_process(self):
        self.timer.cancel()

        if self.debug:
            self.pick_roi = [20, 340, 20, 620]
            self.controller.run_action('pick_debug')
            time.sleep(5)
            self.controller.run_action('pick_init')
            time.sleep(2)
        if self.get_parameter('start').value:
            self.start_srv_callback(Trigger.Request(), Trigger.Response())

        threading.Thread(target=self.pick, daemon=True).start()
        threading.Thread(target=self.main, daemon=True).start()
        self.create_service(Trigger, '~/init_finish', self.get_node_state)
        self.get_logger().info('\033[1;32m%s\033[0m' % 'start')
Initializes arm movements and starts the pick function and main function in multiple threads, then publishes the current node state.
get_node_state:
    def get_node_state(self, request, response):
        response.success = True
        return response
Works in conjunction with init_process to initialize the node state.
shutdown:
    def shutdown(self, signum, frame):
        self.running = False
Callback function to shut down the program; sets the running parameter to false and terminates the program.
send_request:
    def send_request(self, client, msg):
        future = client.call_async(msg)
        while rclpy.ok():
            if future.done() and future.result():
                return future.result()
Publishes the recognized hand position to the kinematics node and receives servo angle feedback from kinematics.
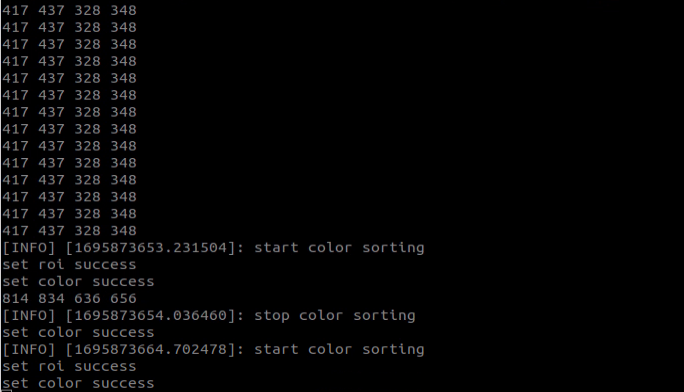
start_srv_callback:
    def start_srv_callback(self, request, response):
        self.get_logger().info('\033[1;32m%s\033[0m' % "start color sorting")
        roi = ROI()
        roi.x_min = self.pick_roi[2] - 20
        roi.x_max = self.pick_roi[3] + 20
        roi.y_min = self.pick_roi[0] - 20
        roi.y_max = self.pick_roi[1] + 20
        msg = SetCircleROI.Request()
        msg.data = roi

        res = self.send_request(self.set_roi_client, msg)
        if res.success:
            self.get_logger().info('\033[1;32m%s\033[0m' % 'set roi success')
        else:
            self.get_logger().info('\033[1;32m%s\033[0m' % 'set roi fail')

        msg = SetColorDetectParam.Request()
        msg_red = ColorDetect()
        msg_red.color_name = 'red'
        msg_red.detect_type = 'circle'
        msg_green = ColorDetect()
        msg_green.color_name = 'green'
        msg_green.detect_type = 'circle'
        msg_blue = ColorDetect()
        msg_blue.color_name = 'blue'
        msg_blue.detect_type = 'circle'
        msg.data = [msg_red, msg_green, msg_blue]
        res = self.send_request(self.set_color_client, msg)
        if res.success:
            self.get_logger().info('\033[1;32m%s\033[0m' % 'set color success')
        else:
            self.get_logger().info('\033[1;32m%s\033[0m' % 'set color fail')
        self.start = True

        response.success = True
        response.message = "start"
        return response
Upon invocation, reads ROI parameters, sets the desired color for picking, publishes color information to the color recognition node, and starts the sorting process.
stop_srv_callback:
    def stop_srv_callback(self, request, response):
        self.get_logger().info('\033[1;32m%s\033[0m' % "stop color sorting")
        self.start = False
        res = self.send_request(self.set_color_client, SetColorDetectParam.Request())
        if res.success:
            self.get_logger().info('\033[1;32m%s\033[0m' % 'set color success')
        else:
            self.get_logger().info('\033[1;32m%s\033[0m' % 'set color fail')

        response.success = True
        response.message = "stop"
        return response
Upon invocation, stops the current program and publishes empty information to the color recognition node to halt recognition.
get_color_callback:
    def get_color_callback(self, msg):
        data = msg.data
        if data != []:
            if data[0].radius > 10:
                self.center = data[0]
                self.color = data[0].color
            else:
                self.color = ''
        else:
            self.color = ''
Upon invocation, reads the color of the knife recognized by the color recognition node.
pick:
    def pick(self):
        while self.running:
            if self.start_pick:
                self.stop_srv_callback(Trigger.Request(), Trigger.Response())
                self.get_logger().info('\033[1;32mcolor: %s\033[0m' % self.target_color)
                if self.target_color == 'red':
                    self.controller.run_action('pick')
                    self.controller.run_action('place_center')
                elif self.target_color == 'green':
                    self.controller.run_action('pick')
                    self.controller.run_action('place_left')
                elif self.target_color == 'blue':
                    self.controller.run_action('pick')
                    self.controller.run_action('place_right')
                self.start_pick = False
                self.controller.run_action('pick_init')
                time.sleep(0.5)
                self.start_srv_callback(Trigger.Request(), Trigger.Response())
            else:
                time.sleep(0.01)
Upon invocation, uses action groups for gripping, runs different action groups based on recognized colors, and places objects in three different positions.
main:
    def main(self):
        count = 0
        while self.running:
            try:
                image = self.image_queue.get(block=True, timeout=1)
            except queue.Empty:
                if not self.running:
                    break
                else:
                    continue
            if self.color in ['red', 'green', 'blue'] and self.start:
                if self.pick_roi[2] < self.center.x < self.pick_roi[3] and self.pick_roi[0] < self.center.y < self.pick_roi[1] and not self.start_pick and not self.debug:
                    self.count += 1
                    if self.count > 30:
                        self.count = 0
                        self.target_color = self.color
                        self.start_pick = True
                elif self.debug:
                    count += 1
                    if count > 50:
                        count = 0
                        self.pick_roi = [self.center.y - 10, self.center.y + 10, self.center.x - 10, self.center.x + 10]
                        data = {'/**': {'ros__parameters': {'roi': {}}}}
                        roi = data['/**']['ros__parameters']['roi']
                        roi['x_min'] = self.pick_roi[2]
                        roi['x_max'] = self.pick_roi[3]
                        roi['y_min'] = self.pick_roi[0]
                        roi['y_max'] = self.pick_roi[1]
                        common.save_yaml_data(data, os.path.join(
                            os.path.abspath(os.path.join(os.path.split(os.path.realpath(__file__))[0], '../..')),
                            'config/color_sorting_roi.yaml'))
                        self.start_srv_callback(Trigger.Request(), Trigger.Response())
                        self.debug = False
                    self.get_logger().info(str([self.center.y - 10, self.center.y + 10, self.center.x - 10, self.center.x + 10]))
                    cv2.rectangle(image, (self.center.x - 25, self.center.y - 25,), (self.center.x + 25, self.center.y + 25), (0, 0, 255), 2)
                else:
                    count = 0
            if image is not None:
                if not self.start_pick and not self.debug:
                    cv2.rectangle(image, (self.pick_roi[2] - 25, self.pick_roi[0] - 25), (self.pick_roi[3] + 25, self.pick_roi[1] + 25), (0, 255, 255), 2)
                cv2.imshow('image', image)
                key = cv2.waitKey(1)
                if key == ord('q') or key == 27:  # 按q或者esc退出(press q or esc to exit)
                    self.running = False
        self.controller.run_action('init')
        rclpy.shutdown()
Upon invocation, determines whether sorting should begin based on required colors and ROI.
image_callback:
    def image_callback(self, ros_image):
        rgb_image = np.ndarray(shape=(ros_image.height, ros_image.width, 3), dtype=np.uint8,
                               buffer=ros_image.data)  # 原始 RGB 画面(original RGB image)

        if self.image_queue.full():
            # 如果队列已满,丢弃最旧的图像(if the queue is full, discard the oldest image)
            self.image_queue.get()
            # 将图像放入队列(put the image into the queue)
        self.image_queue.put(rgb_image)
Upon invocation, receives camera data and places it in a queue for easy access.
Gripping Calibration
The default recognition and gripping area of the program is located in the middle. In normal circumstances, no adjustment is necessary. However, due to differences in camera parameters, there may be situations where the robot arm cannot grip the blocks. This can be addressed by adjusting the position of this area through program instructions. The specific steps are as follow:
Start JetRover and connect it to NoMachine.
Double click on
to open the command line terminal.Input the command and press Enter to initiate the testing program.
ros2 launch example color_sorting_node.launch.py debug:=true
After the robotic arm moves to the gripping position, place the color block at the center of the gripper. Wait for the arm to reset, marking the position of the recognized box. Then, wait for the arm to perform the gripping action, marking the grip position. Upon calibration completion, the pixel coordinates of the color block in the image and a completion message will be printed in the terminal.
Run the program according to the instructions provided in ‘Operation Steps’.
22.3.3 Color Tracking
Program Logic
The first-person view is the perspective of the robot itself. In this game, robot will take the first-person view to complete the color tracking task.
Before starting the game, prepare yourself the required colored blocks.
First of all, subscribe to the topic messages published by color recognition node to obtain the color information.
Subsequently, after matching the target color, obtain the center of the target image.
Finally, by using inverse kinematics, calculate the required angle to align the center position of the screen with the center of the target image. Publish the corresponding topic message, control the servo motion and make the robotic arm follow the movement of the target.
The source code of the program is stored in:
/home/ros_ws/src/hiwonder_example/scripts/color_track/color_track_node.py
Operation Steps
Note
Note: the input command should be case sensitive, and the “Tab” key can be used to complement the key words.
Start JetRover and connect it to NoMachine.
Double click on
to open the ROS1 command line terminal.Input the command and press Enter to disable the app service.
sudo systemctl stop start_app_node.service
Click-on
to start the ROS2 command-line terminal.Input the command to start the game.
ros2 launch example color_track_node.launch.py
To deactivate this mode, you can press “Ctrl+C” in the terminal interface. If closing fails, you can open a new ROS2 command line terminal and enter a command to shut down all current ROS2 functionalities.
~/.stop_ros.sh
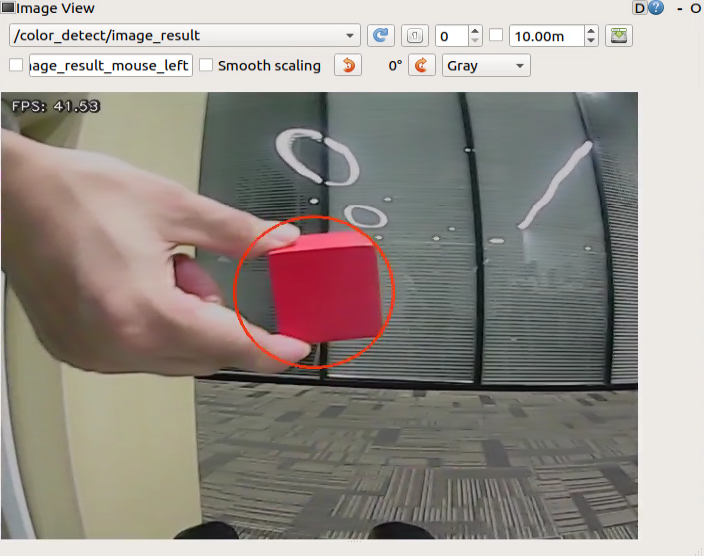
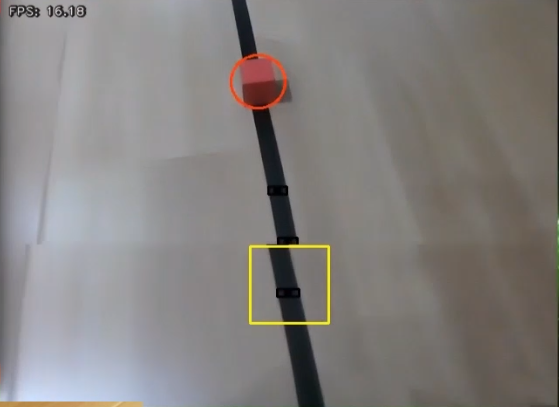
Outcome
After the game starts, place the red block in front of the camera. The recognized color will be displayed in the image and the robotic arm will follow the movement of the target block.
Program Analysis
Launch analysis:
Program path:
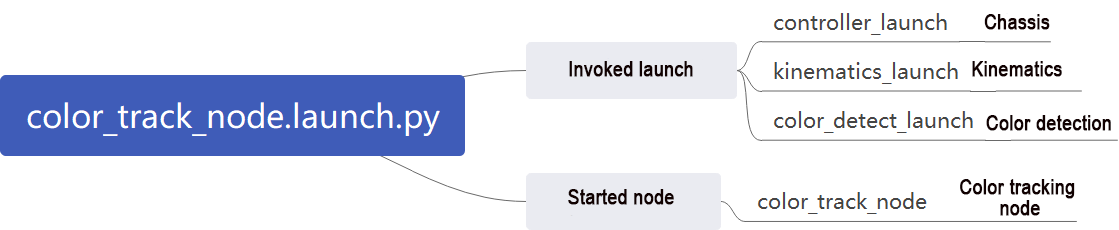
“ros2_ws/src/example/example/color_track/color_track_node.launch.py”
import os
from ament_index_python.packages import get_package_share_directory

from launch_ros.actions import Node
from launch import LaunchDescription, LaunchService
from launch.substitutions import LaunchConfiguration
from launch.launch_description_sources import PythonLaunchDescriptionSource
from launch.actions import IncludeLaunchDescription, DeclareLaunchArgument, OpaqueFunction

def launch_setup(context):
    compiled = os.environ['need_compile']
    enable_display = LaunchConfiguration('enable_display', default='false')
    enable_display_arg = DeclareLaunchArgument('enable_display', default_value=enable_display)
    start = LaunchConfiguration('start', default='true')
    start_arg = DeclareLaunchArgument('start', default_value=start)
    if compiled == 'True':
        controller_package_path = get_package_share_directory('controller')
        kinematics_package_path = get_package_share_directory('kinematics')
        example_package_path = get_package_share_directory('example')
    else:
        controller_package_path = '/home/ubuntu/ros2_ws/src/driver/controller'
        kinematics_package_path = '/home/ubuntu/ros2_ws/src/driver/kinematics'
        example_package_path = '/home/ubuntu/ros2_ws/src/example'
1. Initiate other Launch files
    controller_launch = IncludeLaunchDescription(
        PythonLaunchDescriptionSource(
            os.path.join(controller_package_path, 'launch/controller.launch.py')),
    )

    kinematics_launch = IncludeLaunchDescription(
        PythonLaunchDescriptionSource(
            os.path.join(kinematics_package_path, 'launch/kinematics_node.launch.py')),
    )

    color_detect_launch = IncludeLaunchDescription(
        PythonLaunchDescriptionSource(
            os.path.join(example_package_path, 'example/color_detect/color_detect_node.launch.py')),
        launch_arguments={
            'enable_display': enable_display
        }.items()
    )
color_detect_launch is used to launch color recognition.
controller_launch is used to launch control of the base, servos, and other components.
kinematics_launch starts the kinematics algorithm, calculating the required servo angles for the robotic arm based on the recognized information.
2. Start Node
    color_track_node = Node(
        package='example',
        executable='color_track',
        output='screen',
        parameters=[{'start': start}]
    )
color_sorting_node is employed to initiate the color sorting node.
Code analysis:
Program path:
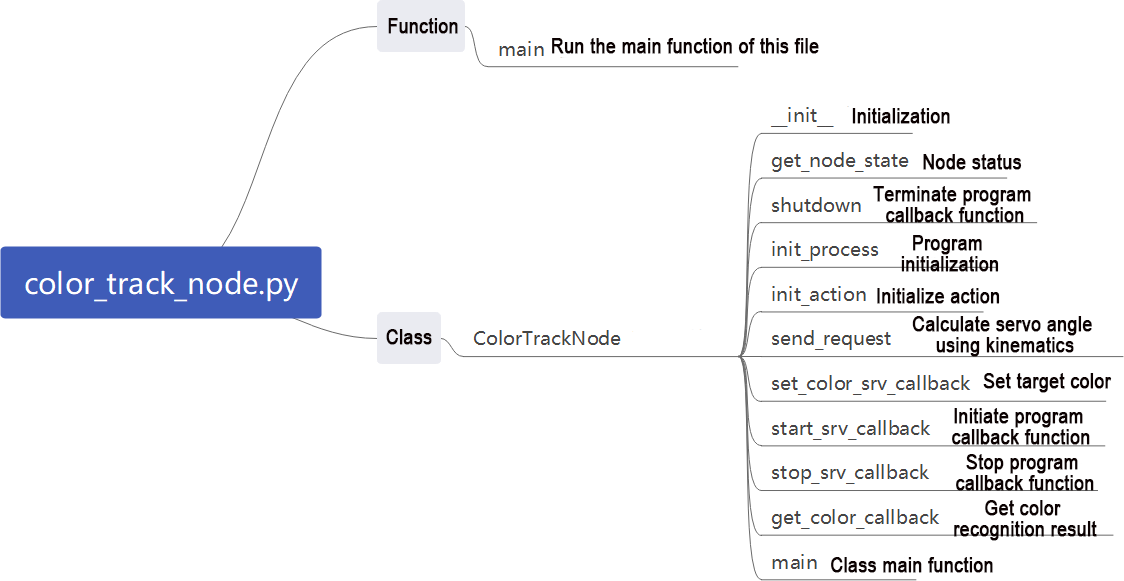
“ros2_ws/src/example/example/color_track/color_track_node.py”
3. Main Function
def main():
    node = ColorTrackNode('color_track')
    executor = MultiThreadedExecutor()
    executor.add_node(node)
    executor.spin()
    node.destroy_node()
The main function calls the hand recognition class to start the node.
4. ColorTrackNode
init_process:
    def init_process(self):
        self.timer.cancel()

        self.init_action()
        if self.get_parameter('start').value:
            self.start_srv_callback(Trigger.Request(), Trigger.Response())
            request = SetString.Request()
            request.data = 'red'
            self.set_color_srv_callback(request, SetString.Response())

        threading.Thread(target=self.main, daemon=True).start()
        self.create_service(Trigger, '~/init_finish', self.get_node_state)
        self.get_logger().info('\033[1;32m%s\033[0m' % 'start')

    def get_node_state(self, request, response):
        response.success = True
        return response
Initializes arm movements and starts the pick function and main function in multiple threads, then publishes the current node state.
init_action:
    def init_action(self):
        msg = set_pose_target([self.x_init, 0.0, self.z_dis], 0.0, [-180.0, 180.0], 1.0)
        res = self.send_request(self.kinematics_client, msg)
        if res.pulse:
            servo_data = res.pulse
            set_servo_position(self.joints_pub, 1.5, ((10, 500), (5, 500), (4, servo_data[3]), (3, servo_data[2]), (2, servo_data[1]), (1, servo_data[0])))
            time.sleep(1.8)
        self.mecanum_pub.publish(Twist())
Initialize all actions of the robot, returning the robotic arm to the gripping position.
get_node_state:
    def get_node_state(self, request, response):
        response.success = True
        return response
Works in conjunction with init_process to initialize the node state.
shutdown:
    def shutdown(self, signum, frame):
        self.running = False
Callback function to shut down the program; sets the running parameter to false and terminates the program.
send_request:
    def send_request(self, client, msg):
        future = client.call_async(msg)
        while rclpy.ok():
            if future.done() and future.result():
                return future.result()
Publishes the recognized hand position to the kinematics node and receives servo angle feedback from kinematics.
set_color_srv_callback:
    def set_color_srv_callback(self, request, response):
        self.get_logger().info('\033[1;32m%s\033[0m' % "set_color")
        msg = SetColorDetectParam.Request()
        msg_red = ColorDetect()
        msg_red.color_name = request.data
        msg_red.detect_type = 'circle'
        msg.data = [msg_red]
        res = self.send_request(self.set_color_client, msg)
        if res.success:
            self.get_logger().info('\033[1;32m%s\033[0m' % 'start_track_%s'%msg_red.color_name)
        else:
            self.get_logger().info('\033[1;32m%s\033[0m' % 'track_fail')
        response.success = True
        response.message = "set_color"
        return response
Used to set the target color for recognition, configured through a service.
start_srv_callback:
    def start_srv_callback(self, request, response):
        self.get_logger().info('\033[1;32m%s\033[0m' % "start color track")
        self.start = True
        response.success = True
        response.message = "start"
        return response
Upon invocation, reads ROI parameters, sets the desired color for picking, publishes color information to the color recognition node, and starts the sorting process.
stop_srv_callback:
    def stop_srv_callback(self, request, response):
        self.get_logger().info('\033[1;32m%s\033[0m' % "stop color track")
        self.start = False
        res = self.send_request(ColorDetect.Request())
        if res.success:
            self.get_logger().info('\033[1;32m%s\033[0m' % 'set color success')
        else:
            self.get_logger().info('\033[1;32m%s\033[0m' % 'set color fail')
        response.success = True
        response.message = "stop"
        return response
Upon invocation, stops the current program and publishes empty information to the color recognition node to halt recognition.
get_color_callback:
    def get_color_callback(self, msg):
        if msg.data != []:
            if msg.data[0].radius > 10:
                self.center = msg.data[0]
            else:
                self.center = None
        else:
            self.center = None
color currently recognized by the color recognition node.
main:
    def main(self):
        while self.running:
            if self.center is not None and self.start:
                t1 = time.time()
                center = self.center

                self.pid_y.SetPoint = center.width/2
                self.pid_y.update(center.x)
                self.y_dis += self.pid_y.output
                if self.y_dis < 200:
                    self.y_dis = 200
                if self.y_dis > 800:
                    self.y_dis = 800

                self.pid_z.SetPoint = center.height/2
                self.pid_z.update(center.y)
                self.z_dis += self.pid_z.output
                if self.z_dis > 0.46:
                    self.z_dis = 0.46
                if self.z_dis < 0.36:
                    self.z_dis = 0.36
                msg = set_pose_target([self.x_init, 0.0, self.z_dis], 0.0, [-180.0, 180.0], 1.0)
                res = self.send_request(self.kinematics_client, msg)
                t2 = time.time()
                t = t2 - t1
                if t < 0.02:
                    time.sleep(0.02 - t)
                if res.pulse:
                    servo_data = res.pulse
                    set_servo_position(self.joints_pub, 0.02, ((10, 500), (5, 500), (4, servo_data[3]), (3, servo_data[2]), (2, servo_data[1]), (1, int(self.y_dis))))
                else:
                    set_servo_position(self.joints_pub, 0.02, ((1, int(self.y_dis)), ))
            else:
                time.sleep(0.01)

        self.init_action()
        rclpy.shutdown()
Upon invocation, it will determine whether to start sorting based on the color to be sorted and the ROI.
Extension Function
The program defaults to recognize red. However, you can change the recognition color to green or blue through modifying the codes in corresponding program. In this section, the default recognition color is changed to green as example. The specific operation steps area as follow:
Start JetRover and connect it to NoMachine.
Double click on
to open the ROS1 command line terminal.Input the command and press Enter to access the program directory.
cd /home/ubuntu/ros2_ws/src/example/example/color_track/
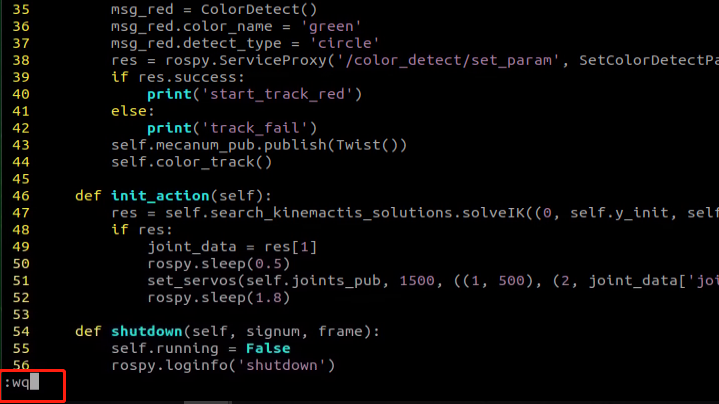
Input the command “vim color_track_node.py” to open the program file.
vim color_track_node.py
Press “i” key to enter edit mode and modify the assignment of the “msg_red.color_name” parameter to “green”.

After the modification is completed, enter “:wq” to save and exit the program file.
Operate the game based on “22.3.3 Color Tracking->Operation Steps”.
22.3.4 Line-Following Obstacle Clearance
Program Logic
During JetRover moves forward along the black line, it will automatically clear the obstacles around the black line.
Before the game starts, it’s necessary to affix the black line in advance and place JetRover in front of the black line. Ensure that there are no other objects of the same color around to prevent interference with recognition, and place the obstacle blocks along the black line.
Firstly, subscribe to the topic messages published by the color recognition node and Lidar node to obtain the recognition color information, captured image data, and Lidar data.
Next, obtain the coordinates of the center position of the line within the image. Calculate the deviation from the center position of the image, update the PID data, and correct the robot’s driving direction.
Finally, when obstacles are detected on the line, call the obstacle-clearing action group and remove the block obstacles.
The source code of this program is stored in
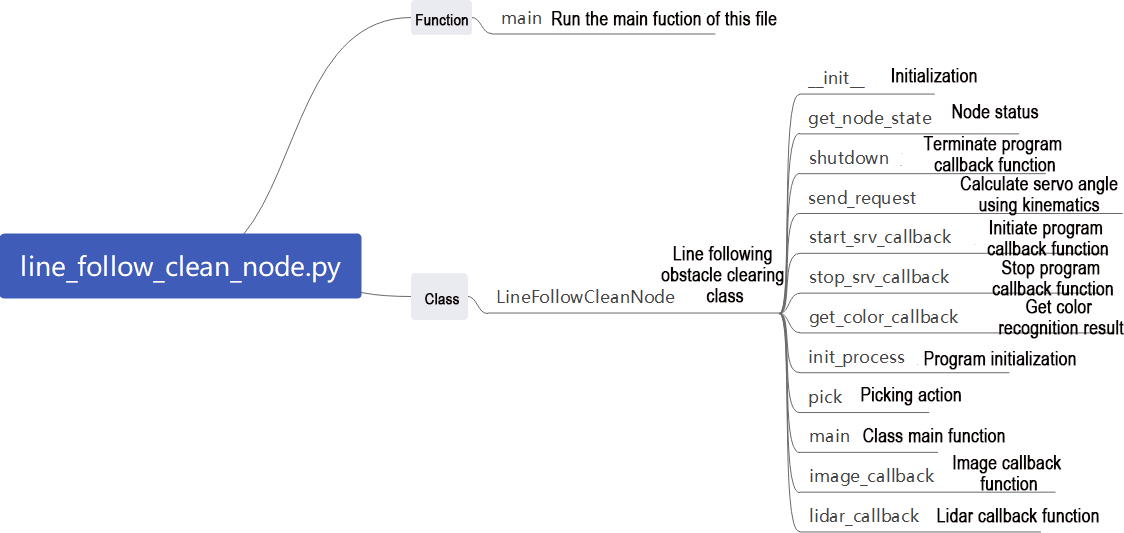
/home/ros_ws/src/hiwonder_example/example/line_follow_clean/line_follow_clean_node.py
class LineFollowCleanNode(Node):
    def __init__(self, name):
        rclpy.init()
        super().__init__(name, allow_undeclared_parameters=True, automatically_declare_parameters_from_overrides=True)
        self.running = True
        self.count = 0
        self.count_stop = 0
        self.stop = False
        self.line_color = 'black'
        self.line_x = None
        self.temp_line_x = None
        self.object_blue = 'blue'
        self.object_red = 'red'
        self.object_green = 'green'
        self.center = None
        self.temp_center = None
        self.stop_threshold = 0.4
        self.scan_angle = math.radians(90)  # radians
        self.pid = pid.PID(0.008, 0.0, 0.0)
        self.pid_x = pid.PID(0.001, 0.0, 0.0)
        pick_roi = self.get_parameters_by_prefix('roi')
        self.pick_roi = [pick_roi['y_min'].value, pick_roi['y_max'].value, pick_roi['x_min'].value, pick_roi['x_max'].value] #[y_min, y_max, x_min, x_max]
        self.start_pick = False
Operation Steps
Note
Note: the input command should be case sensitive, and the “Tab” key can be used to complement the key words.
Start JetRover and connect it to NoMachine.
Double click on
to open the ROS1 command line terminal.Input the command and press Enter to disable the app service.
sudo systemctl stop start_app_node.service
Click-on
to open the ROS2 command-line terminal.
Input the command to start the game.
ros2 launch example line_follow_clean_node.launch.py
The camera image interface when the program starts is shown below.
To deactivate this mode, press the “Esc” key within the image interface to exit the camera view.
Press “Ctrl+C” in the command line terminal. If closing fails, please retry multiple times.
Outcome
After the game starts, JetRover moves alone the recognized black line. When it encounters the colored block obstacles along the way, it will pause, grip the obstacle and place it on the left side. Afterward, it will continue moving forward.
Program Analysis
Launch Analysis:

Program path:
“ros2_ws/src/example/example/line_follow_clean/line_follow_clean_node.launch.py”
import os
from ament_index_python.packages import get_package_share_directory

from launch_ros.actions import Node
from launch import LaunchDescription, LaunchService
from launch.substitutions import LaunchConfiguration
from launch.launch_description_sources import PythonLaunchDescriptionSource
from launch.actions import IncludeLaunchDescription, DeclareLaunchArgument, OpaqueFunction

def launch_setup(context):
    compiled = os.environ['need_compile']
    debug = LaunchConfiguration('debug', default='false')
    debug_arg = DeclareLaunchArgument('debug', default_value=debug)
    if compiled == 'True':
        peripherals_package_path = get_package_share_directory('peripherals')
        controller_package_path = get_package_share_directory('controller')
        example_package_path = get_package_share_directory('example')
    else:
        peripherals_package_path = '/home/ubuntu/ros2_ws/src/peripherals'
        controller_package_path = '/home/ubuntu/ros2_ws/src/driver/controller'
        example_package_path = '/home/ubuntu/ros2_ws/src/example'
1. Starting Other Launch Files
    lidar_launch = IncludeLaunchDescription(
        PythonLaunchDescriptionSource(
            os.path.join(peripherals_package_path, 'launch/lidar.launch.py')),
    )

    color_detect_launch = IncludeLaunchDescription(
        PythonLaunchDescriptionSource(
            os.path.join(example_package_path, 'example/color_detect/color_detect_node.launch.py')),
    )
    controller_launch = IncludeLaunchDescription(
        PythonLaunchDescriptionSource(
            os.path.join(controller_package_path, 'launch/controller.launch.py')),
    )
color_detect_launch is used to start color recognition.
controller_launch is used to start control of the base, servos, and other components.
lidar_launch starts the lidar.
2. Initiate Node
    line_follow_clean_node = Node(
        package='example',
        executable='line_follow_clean',
        output='screen',
        parameters=[os.path.join(example_package_path, 'config/line_follow_clean_roi.yaml'), {'debug': debug}]
    )
line_follow_clean_node is used to start the line-following sorting node.
Source code analysis:
Program path:
“/ros2_ws/src/example/example/line_follow_clean/line_follow_clean_node.py”
3. Main Function
def main():
    node = LineFollowCleanNode('line_follow_clean')
    executor = MultiThreadedExecutor()
    executor.add_node(node)
    executor.spin()
    node.destroy_node()
The main function calls the hand recognition class to start the node.
4. LineFollowCleanNode
init_process:
    def init_process(self):
        self.timer.cancel()

        self.mecanum_pub.publish(Twist())
        self.controller.run_action('line_follow_init')
        if self.debug:
            self.controller.run_action('move_object_debug')
            time.sleep(5)
            self.controller.run_action('line_follow_init')
            time.sleep(2)

        self.start_srv_callback(Trigger.Request(), Trigger.Response())

        threading.Thread(target=self.pick, daemon=True).start()
        threading.Thread(target=self.main, daemon=True).start()
        self.create_service(Trigger, '~/init_finish', self.get_node_state)
        self.get_logger().info('\033[1;32m%s\033[0m' % 'start')
Initializes the robotic arm actions, starts the pick and main functions in multiple threads, and publishes the current node state.
get_node_state:
    def get_node_state(self, request, response):
        response.success = True
        return response
Works in conjunction with `init_process` to initialize the node state.
shutdown:
    def shutdown(self, signum, frame):
        self.running = False
Callback function to shut down the program, sets the `running` parameter to false, and terminates the program.
send_request:
    def send_request(self, client, msg):
        future = client.call_async(msg)
        while rclpy.ok():
            if future.done() and future.result():
                return future.result()
Publishes the recognized hand position to the kinematics node and receives servo angle feedback.
start_srv_callback:
def start_srv_callback(self, request, response):
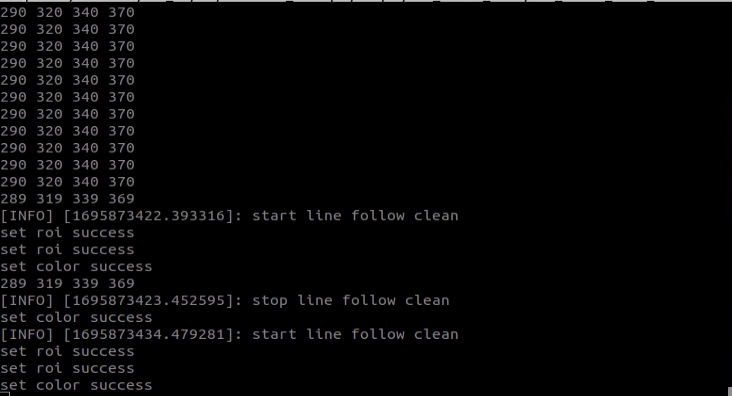
self.get_logger().info('\033[1;32m%s\033[0m' % "start line follow clean")
line_roi = LineROI()
line_roi.roi_up.x_min = 0
line_roi.roi_up.x_max = 640
line_roi.roi_up.y_min = 200
line_roi.roi_up.y_max = 210
line_roi.roi_up.scale = 0.0
line_roi.roi_center.x_min = 0
line_roi.roi_center.x_max = 640
line_roi.roi_center.y_min = 260
line_roi.roi_center.y_max = 270
line_roi.roi_center.scale = 0.1
line_roi.roi_down.x_min = 0
line_roi.roi_down.x_max = 640
line_roi.roi_down.y_min = 320
line_roi.roi_down.y_max = 330
line_roi.roi_down.scale = 0.9
msg = SetLineROI.Request()
msg.data = line_roi
res = self.send_request(self.set_line_client, msg)
if res.success:
self.get_logger().info('set roi success')
else:
self.get_logger().info('set roi fail')
object_roi = ROI()
object_roi.x_min = 0
object_roi.x_max = 640
object_roi.y_min = 0
object_roi.y_max = 300
msg = SetCircleROI.Request()
msg.data = object_roi
res = self.send_request(self.set_circle_client, msg)
if res.success:
self.get_logger().info('set roi success')
else:
self.get_logger().info('set roi fail')
Upon invocation, reads ROI parameters, sets the desired color for picking, publishes color information to the color recognition node, and starts the sorting process.
stop_srv_callback:
    def stop_srv_callback(self, request, response):
        self.get_logger().info('\033[1;32m%s\033[0m' % "stop line follow clean")
        res = self.send_request(self.set_color_client, SetColorDetectParam.Request())
        if res.success:
            self.get_logger().info('set color success')
        else:
            self.get_logger().info('set color fail')

        response.success = True
        response.message = "stop"
        return response
Upon invocation, stops the current program and publishes empty information to the color recognition node to halt recognition.
get_color_callback:
    def get_color_callback(self, msg):
        line_x = None
        center = None
        for i in msg.data:
            if i.color == self.line_color:
                line_x = i.x
            elif i.color == self.object_blue or i.color == self.object_red or i.color == self.object_green:
                center = i
        self.temp_line_x = line_x
        self.temp_center = center
Upon invocation, reads the color currently recognized by the color recognition node.
pick:
    def pick(self):
        while self.running:
            if self.start_pick:
                self.stop_srv_callback(Trigger.Request(), Trigger.Response())
                self.mecanum_pub.publish(Twist())
                time.sleep(0.5)
                self.controller.run_action('move_object')
                self.controller.run_action('line_follow_init')
                time.sleep(0.5)
                self.start_pick = False
                self.start_srv_callback(Trigger.Request(), Trigger.Response())
            else:
                time.sleep(0.01)
Upon invocation, executes the picking and obstacle clearing action groups.
main:
    def main(self):
        count = 0
        while self.running:
            try:
                image = self.image_queue.get(block=True, timeout=1)
            except queue.Empty:
                if not self.running:
                    break
                else:
                    continue
            self.line_x = self.temp_line_x
            self.center = self.temp_center
            if self.line_x is not None and not self.start_pick:
                twist = Twist()
                if self.center is not None:
                    if self.center.y > 100 and abs(self.center.x - self.line_x) < 100 and not self.debug:
                        self.pid_x.SetPoint = (self.pick_roi[1] + self.pick_roi[0])/2
                        self.pid_x.update(self.center.y)
                        self.pid.SetPoint = (self.pick_roi[2] + self.pick_roi[3])/2
                        self.pid.update(self.center.x)
                        twist.linear.x = common.set_range(self.pid_x.output, -0.1, 0.1)
                        twist.angular.z = common.set_range(self.pid.output, -0.5, 0.5)
                        if abs(twist.linear.x) <= 0.0065 and abs(twist.angular.z) <= 0.05:
                            self.count += 1
                            time.sleep(0.01)
                            if self.count > 50:
                                self.count = 0
                                self.start_pick = True
                        else:
                            self.count = 0
                    elif self.debug:
                        count += 1
                        if count > 50:
                            count = 0
                            self.pick_roi = [self.center.y - 15, self.center.y + 15, self.center.x - 15, self.center.x + 15]
                            data = {'/**': {'ros__parameters': {'roi': {}}}}
                            roi = data['/**']['ros__parameters']['roi']
                            roi['x_min'] = self.pick_roi[2]
                            roi['x_max'] = self.pick_roi[3]
                            roi['y_min'] = self.pick_roi[0]
                            roi['y_max'] = self.pick_roi[1]
                            common.save_yaml_data(data, os.path.join(
                                os.path.abspath(os.path.join(os.path.split(os.path.realpath(__file__))[0], '../..')),
                                'config/line_follow_clean_roi.yaml'))
                            self.debug = False
                            self.start_srv_callback(Trigger.Request(), Trigger.Response())
                        self.get_logger().info(str([self.center.y - 15, self.center.y + 15, self.center.x - 15, self.center.x + 15]))
                        cv2.rectangle(image, (self.center.x - 25, self.center.y - 25,), (self.center.x + 25, self.center.y + 25), (0, 0, 255), 2)
                    else:
                        self.pid.SetPoint = 320
                        self.pid.update(self.line_x)
                        twist.linear.x = 0.08
                        twist.angular.z = common.set_range(self.pid.output, -0.8, 0.8)
                elif not self.debug:
                    self.pid.SetPoint = 320
                    self.pid.update(self.line_x)
                    twist.linear.x = 0.15
                    twist.angular.z = common.set_range(self.pid.output, -0.8, 0.8)
                if not self.stop:
                    self.mecanum_pub.publish(twist)
                else:
                    self.mecanum_pub.publish(Twist())
            else:
                self.mecanum_pub.publish(Twist())
                time.sleep(0.01)
            if image is not None:
                if not self.start_pick and not self.debug:
                    cv2.rectangle(image, (self.pick_roi[2] - 30, self.pick_roi[0] - 30), (self.pick_roi[3] + 30, self.pick_roi[1] + 30), (0, 255, 255), 2)
                cv2.imshow('image', image)
                key = cv2.waitKey(1)
                if key == ord('q') or key == 27:  # 按q或者esc退出(press q or esc to exit)
                    self.running = False
        self.mecanum_pub.publish(Twist())
        self.controller.run_action('line_follow_init')
        rclpy.shutdown()
Upon invocation, determines whether to start sorting based on the required colors and ROI.
image_callback:
    def image_callback(self, ros_image):
        rgb_image = np.ndarray(shape=(ros_image.height, ros_image.width, 3), dtype=np.uint8, buffer=ros_image.data) # 原始 RGB 画面(original RGB image)
        if self.image_queue.full():
            # 如果队列已满,丢弃最旧的图像(if the queue is full, discard the oldest image)
            self.image_queue.get()
        # 将图像放入队列(put the image into the queue)
        self.image_queue.put(rgb_image)
Reads image information and places it in a queue for easy access.
lidar_callback:
    def lidar_callback(self, lidar_data):
        # 数据大小 = 扫描角度/每扫描一次增加的角度(data size = Scanning angle / Angle added per scan)
        if self.lidar_type != 'G4':
            max_index = int(math.radians(MAX_SCAN_ANGLE / 2.0) / lidar_data.angle_increment)
            left_ranges = lidar_data.ranges[:max_index]  # 左半边数据(left half of the data)
            right_ranges = lidar_data.ranges[::-1][:max_index]  # 右半边数据(right half of the data)
        elif self.lidar_type == 'G4':
            min_index = int(math.radians((360 - MAX_SCAN_ANGLE) / 2.0) / lidar_data.angle_increment)
            max_index = int(math.radians(180) / lidar_data.angle_increment)
            left_ranges = lidar_data.ranges[::-1][min_index:max_index][::-1] # 左半边数据(left half of the data)
            right_ranges = lidar_data.ranges[min_index:max_index][::-1] # 右半边数据(right half of the data)

        # 根据设定取数据(get data based on the settings)
        angle = self.scan_angle / 2
        angle_index = int(angle / lidar_data.angle_increment + 0.50)
        left_range, right_range = np.array(left_ranges[:angle_index]), np.array(right_ranges[:angle_index])

        left_nonzero = left_range.nonzero()
        right_nonzero = right_range.nonzero()
        # 取左右最近的距离(get the nearest distance on both sides)
        min_dist_left = left_range[left_nonzero].min()
        min_dist_right = right_range[right_nonzero].min()
        if min_dist_left < self.stop_threshold or min_dist_right < self.stop_threshold:
            self.stop = True
        else:
            self.count_stop += 1
            if self.count_stop > 5:
                self.count_stop = 0
                self.stop = False
Reads Lidar information, processes data based on the model, and calculates the nearest position.
Gripping Adjustment
In the program, the recognition and gripping area are located in the middle of the image by default, no need for adjustment. However, due to the discrepancy in camera parameters, there might be cases where the robot arm cannot grip the color black. In such situations, you can adjust the position of this area using commands. Here are the specific steps:
Start JetRover and connect it to NoMachine.
Double click on
to open the ROS1 command line terminal.Input the command and press Enter to disable the app service.
ros2 launch example line_follow_clean_node.launch.py debug:=truey
In this mode, the robot will terminate line following but retain the block picking action. After JetRover reaches the gripping position, place the block in the middle of the gripper and wait for robotic arm to restore its initial posture, mark the position of the recognition box, then wait for the robotic arm to perform the gripping action. Once the calibration is complete, it will print out the pixel coordinates of the block on the screen and a completion message in the terminal.
Finally, run the program according to “22.3.4 Line-Following Obstacle Clearance->Operation Steps”.
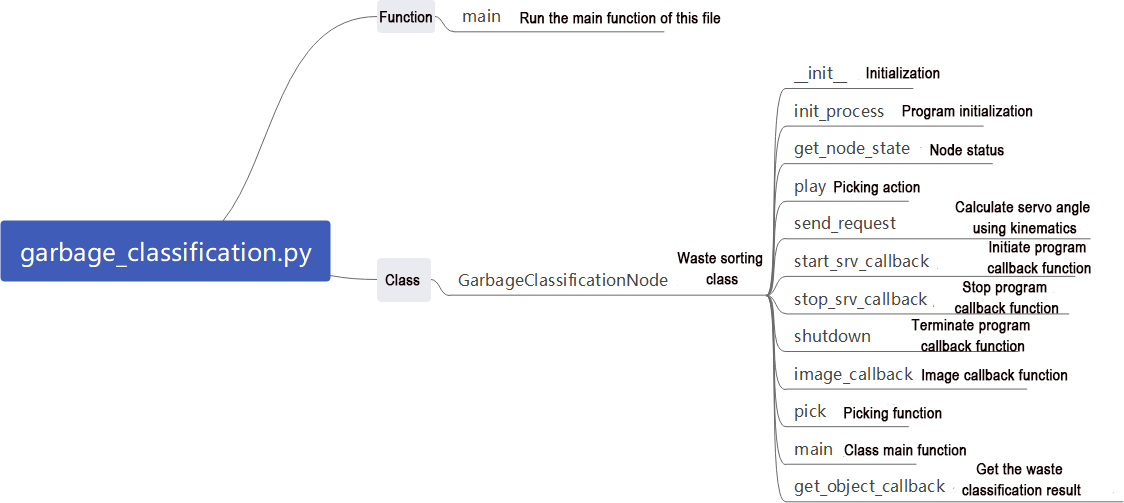
22.3.5 Waste Sorting
Program Logic
Waste sorting involves the robot recognizing waste cards in front of the camera, and transporting them to the fixed waste card classification areas.
Before the game, prepare the waste cards. You can find the image collection of the waste cards under the same directory and print them out.
First, subscribe to the topic massage published by the YOLOv5 target detection node to obtain the recognized card information and the card images.
Next, match the obtained card information to find out the corresponding waste classification.
Finally, based on the waste classification, execute the corresponding sorting action group to complete the task.
The source code of the program is stored in
/home/ros_ws/src/hiwonder_example/scripts/garbage_classification/main.py
Operation Steps
Note
Note: the input command should be case sensitive, and the “Tab” key can be used to complement the key words.
Start JetRover and connect it to NoMachine.
Double click on
to open the ROS1 command line terminal.Input the command “sudo systemctl stop start_app_node.service” and press Enter to disable the app service.
sudo systemctl stop start_app_node.service
Enter the command in the current ROS1 command line terminal and press Enter to start the garbage sorting mode:
roslaunch hiwonder_example garbage_classification_base.launch
If you want to terminate the game, please press “Ctrl+C” in the terminal. If fail to do so, please try multiple times.
Bridge:
Click-on
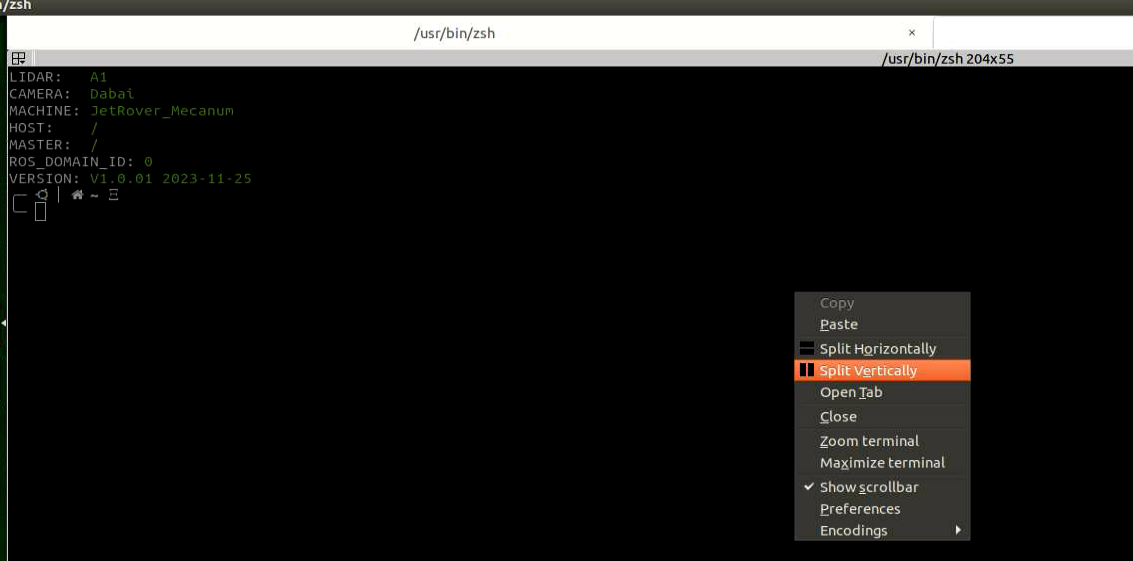
 to open the command-line terminal.
Right-click the blank area, and choose Split Vertically.
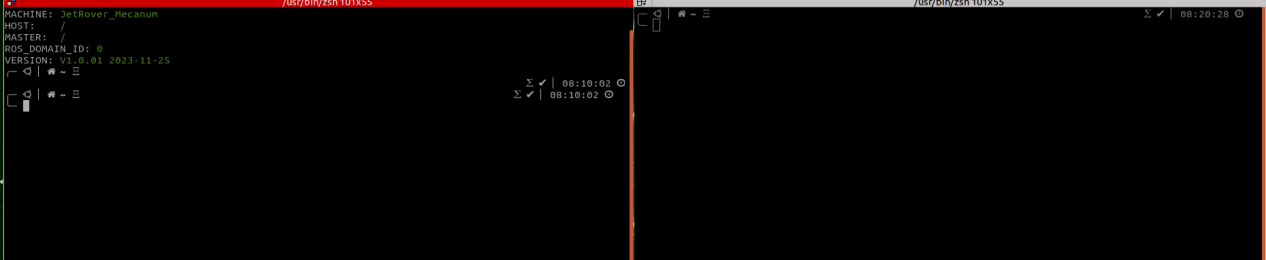
In the first command line terminal, enter the command and press Enter:
source ~/noetic_ws/install_isolated/setup.zsh
In the first command line terminal, enter the command and press Enter:
source ~/third_party_ros2/ros1_bridge_ws/install/setup.zsh
In the first command line terminal, enter the command and press Enter:
ros2 run ros1_bridge parameter_bridge
In the second command line terminal, enter the command and press Enter:
ros2 launch example garbage_classification.launch.py
To close the program, click on the corresponding terminal window of the program and use the shortcut key “Ctrl+C” to shut down the program.
Outcome
After the game starts, JetRover recognizes the waste card within the image. Then place the waste card within the yellow box on the image, the robotic arm will grip the card and transport it to the respective waste classification area.
Program Analysis
Launch Analysis:

Program path:
“/ros2_ws/src/example/example/garbage_classification/garbage_classification.launch.py”
import os
from ament_index_python.packages import get_package_share_directory

from launch_ros.actions import Node
from launch import LaunchDescription, LaunchService
from launch.substitutions import LaunchConfiguration
from launch.launch_description_sources import PythonLaunchDescriptionSource
from launch.actions import IncludeLaunchDescription, DeclareLaunchArgument, OpaqueFunction

def launch_setup(context):
    compiled = os.environ['need_compile']
    start = LaunchConfiguration('start', default='true')
    start_arg = DeclareLaunchArgument('start', default_value=start)
    debug = LaunchConfiguration('debug', default='false')
    debug_arg = DeclareLaunchArgument('debug', default_value=debug)
    broadcast = LaunchConfiguration('broadcast', default='false')
    broadcast_arg = DeclareLaunchArgument('broadcast', default_value=broadcast)
    if compiled == 'True':
        controller_package_path = get_package_share_directory('controller')
        example_package_path = get_package_share_directory('example')
    else:
        controller_package_path = '/home/ubuntu/ros2_ws/src/driver/controller'
        example_package_path = '/home/ubuntu/ros2_ws/src/example'

    controller_launch = IncludeLaunchDescription(
        PythonLaunchDescriptionSource(
            os.path.join(controller_package_path, 'launch/controller.launch.py')),
    )
1. Launching Other Launch Files
    controller_launch = IncludeLaunchDescription(
        PythonLaunchDescriptionSource(
            os.path.join(controller_package_path, 'launch/controller.launch.py')),
    )
controller_launch is used to start control of the base, servos, and other components.
2.Starting Node
    garbage_classification_node = Node(
        package='example',
        executable='garbage_classification',
        output='screen',
        parameters=[os.path.join(example_package_path, 'config/garbage_classification_roi.yaml'), {'start': start}, {'debug': debug}, {'broadcast': broadcast}],
    )
garbage_classification_node is used to start the garbage classification node.
Source Code Analysis:
Program path:
“/ros2_ws/src/example/example/garbage_classification/garbage_classification.py”
3. Main Function
def main():
    node = GarbageClassificationNode('garbage_classification')
    executor = MultiThreadedExecutor()
    executor.add_node(node)
    executor.spin()
    node.destroy_node()
    rclpy.shutdown()
The main function calls the hand recognition class to start the node.
4. GarbageClassificationNode
init_process:
    def init_process(self):
        self.timer.cancel()

        self.mecanum_pub.publish(Twist())
        self.controller.run_action('garbage_pick_init')
        if self.debug:
            self.pick_roi = [30, 450, 30, 610]
            self.controller.run_action('garbage_pick_debug')
            time.sleep(5)
            self.controller.run_action('garbage_pick_init')
            time.sleep(2)

        if self.get_parameter('start').value:
            self.start_srv_callback(Trigger.Request(), Trigger.Response())

        threading.Thread(target=self.pick, daemon=True).start()
        threading.Thread(target=self.main, daemon=True).start()
        self.create_service(Trigger, '~/init_finish', self.get_node_state)
        self.get_logger().info('\033[1;32m%s\033[0m' % 'start')
v
Initializes the robotic arm actions, starts the pick and main functions in multiple threads, and publishes the current node state.
get_node_state:
    def get_node_state(self, request, response):
        response.success = True
        return response
Works in conjunction with init_process to initialize the node state.
play:
    def play(self, name):
        if self.broadcast:
            voice_play.play(name, language=self.language)
Upon invocation, plays the corresponding category of garbage voice prompt.
shutdown:
    def shutdown(self, signum, frame):
        self.running = False
Callback function to shut down the program; sets the `running` parameter to false and terminates the program.
send_request:
    def send_request(self, client, msg):
        future = client.call_async(msg)
        while rclpy.ok():
            if future.done() and future.result():
                return future.result()
Publishes the recognized hand position to the kinematics node and receives servo angle feedback.
start_srv_callback:
    def start_srv_callback(self, request, response):
        self.get_logger().info('\033[1;32m%s\033[0m' % "start garbage classification")

        self.send_request(self.start_yolov5_client, Trigger.Request())
        response.success = True
        response.message = "start"
        return response
Upon invocation, starts YOLOv5 recognition for garbage classification, providing feedback on the current program status.
stop_srv_callback:
    def stop_srv_callback(self, request, response):
        self.get_logger().info('\033[1;32m%s\033[0m' % "stop garbage classification")
        self.send_request(self.stop_yolov5_client, Trigger.Request())
        response.success = True
        response.message = "stop"
        return response
Upon invocation, stops the current program and halts YOLOv5 recognition.
image_callback:
    def image_callback(self, ros_image):
        rgb_image = np.ndarray(shape=(ros_image.height, ros_image.width, 3), dtype=np.uint8, buffer=ros_image.data) # 原始 RGB 画面(original RGB image)
        if self.image_queue.full():
            # 如果队列已满,丢弃最旧的图像(if the queue is full, discard the oldest image)
            self.image_queue.get()
        # 将图像放入队列(put the image into the queue)
        self.image_queue.put(rgb_image)
Reads image information and places it in a queue for easy access.
pick:
    def pick(self):
        while self.running:
            waste_category = None
            if self.start_pick:
                time.sleep(0.2)
                for k, v in WASTE_CLASSES.items():
                    if self.current_class_name in v:
                        waste_category = k
                        break
                self.class_name = None
                self.get_logger().info('\033[1;32m%s\033[0m' % waste_category)
                self.stop_srv_callback(Trigger.Request(), Trigger.Response())
                self.controller.run_action('garbage_pick')
                if waste_category == 'food_waste':
                    self.play('food_waste')
                    self.controller.run_action('place_food_waste')
                elif waste_category == 'hazardous_waste':
                    self.play('hazardous_waste')
                    self.controller.run_action('place_hazardous_waste')
                elif waste_category == 'recyclable_waste':
                    self.play('recyclable_waste')
                    self.controller.run_action('place_recyclable_waste')
                elif waste_category == 'residual_waste':
                    self.play('residual_waste')
                    self.controller.run_action('place_residual_waste')
                self.controller.run_action('garbage_pick_init')
                time.sleep(0.5)
                self.start_pick = False
                self.start_srv_callback(Trigger.Request(), Trigger.Response())
            else:
                time.sleep(0.01)
Upon invocation, calls the corresponding action group based on the recognized garbage category.
main:
    def main(self):
        count = 0
        while self.running:
            try:
                image = self.image_queue.get(block=True, timeout=1)
            except queue.Empty:
                if not self.running:
                    break
                else:
                    continue
            if self.class_name is not None and not self.start_pick and not self.debug:
                self.count += 1
                if self.count > 50:
                    self.current_class_name = self.class_name
                    self.start_pick = True
                    self.count = 0
            elif self.debug and self.class_name is not None:
                count += 1
                if count > 50:
                    count = 0
                    self.pick_roi = [self.center[1] - 15, self.center[1] + 15, self.center[0] - 15, self.center[0] + 15]
                    data = {'/**': {'ros__parameters': {'roi': {}}}}
                    roi = data['/**']['ros__parameters']['roi']
                    roi['x_min'] = self.pick_roi[2]
                    roi['x_max'] = self.pick_roi[3]
                    roi['y_min'] = self.pick_roi[0]
                    roi['y_max'] = self.pick_roi[1]
                    common.save_yaml_data(data, os.path.join(
                        os.path.abspath(os.path.join(os.path.split(os.path.realpath(__file__))[0], '../..')),
                        'config/garbage_classification_roi.yaml'))
                    self.debug = False
                self.get_logger().info(str([self.center[1] - 15, self.center[1] + 15, self.center[0] - 15, self.center[0] + 15]))
                cv2.rectangle(image, (self.center[0] - 45, self.center[1] - 45), (self.center[0] + 45, self.center[1] + 45), (0, 0, 255), 2)
            else:
                self.count = 0
                time.sleep(0.01)
            if image is not None:
                if not self.start_pick and not self.debug:
                    cv2.rectangle(image, (self.pick_roi[2] - 30, self.pick_roi[0] - 30), (self.pick_roi[3] + 30, self.pick_roi[1] + 30), (0, 255, 255), 2)
                cv2.imshow('image', image)
                key = cv2.waitKey(1)
                if key == ord('q') or key == 27:  # 按q或者esc退出(press q or esc to exit)
                    self.running = False
        self.mecanum_pub.publish(Twist())
        self.controller.run_action('garbage_pick_init')
Upon invocation, determines whether to start sorting based on the required colors and ROI.
get_object_callback:
    def get_object_callback(self, msg):
        objects = msg.objects
        if objects == []:
            self.center = None
            self.class_name = None
        else:
            for i in objects:
                center = (int((i.box[0] + i.box[2])/2), int((i.box[1] + i.box[3])/2))
                if self.pick_roi[2] < center[0] < self.pick_roi[3] and self.pick_roi[0] < center[1] < self.pick_roi[1]:
                    self.center = center
                    self.class_name = i.class_name
Reads recognition information from YOLOv5.
22.3.6 Fixed Point Navigation
Program Logic
First, subscribe to the topics published by the camera node to obtain images.
Next, activate the navigation service to receive the location information of the destination.
Finally, upon reaching the destination and detecting the target block, the servo control node publishes topic messages to command the robotic arm to complete the gripping and transporting tasks.
Operation Steps
Note
Note: the input command should be case sensitive, and the “Tab” key can be used to complement the key words.
Before starting the game, it’s necessary to complete the mapping task in the field of the navigation and transportation, prepare the colored blocks and mark the placement position in red within the area.
Start JetRover and connect it to NoMachine.
Click-on
 to start the ROS1 command-line terminal.
Input the command and press Enter to disable the app service.
sudo systemctl stop start_app_node.service
Click-on
 to open the ROS2 command-line terminal.
Input the command to start the game.
ros2 launch example navigation_transport.launch.py map:=map_01
Note
(Note: by default, after gripping the colored block, the robot will directly place ti down upon reaching the next target point. If you need to place it at a specific target location, you can add “place_without_color:=false” to the end of the command.)
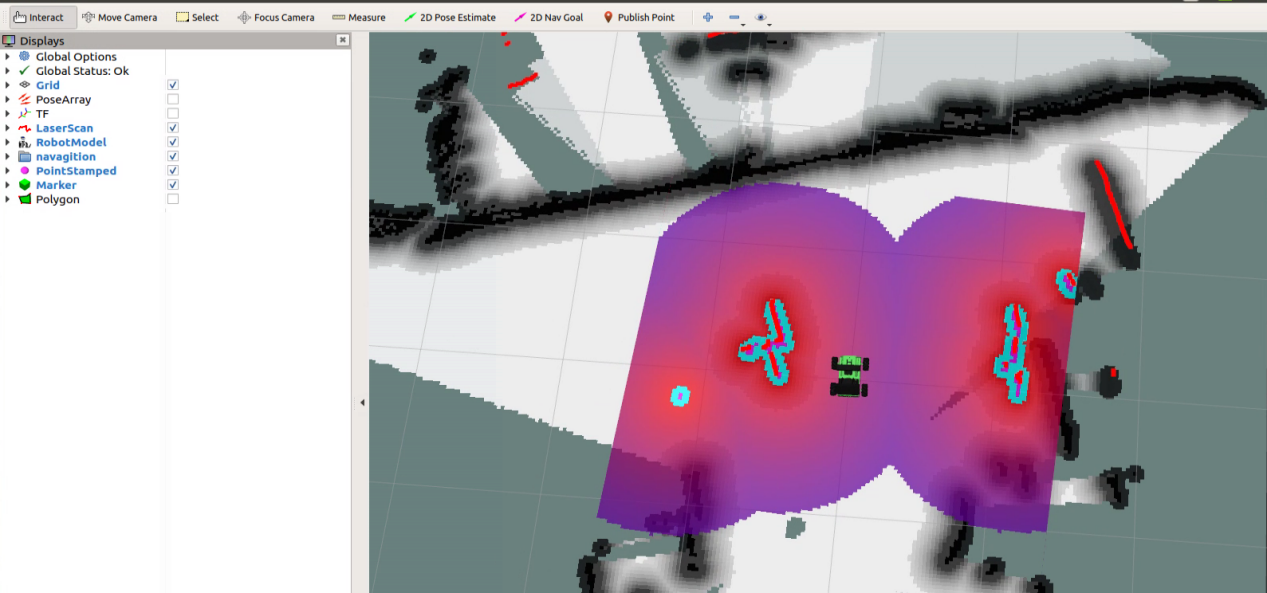
If you want to terminate the game, please press “Ctrl+C” in the terminal. If fail to do so, please try multiple times.
Outcome
After opening RVIZ, you need to first check if the position of the robot on the map aligns with its actual potion. If they do not align, manual adjustment may be required. You can utilize the “2D Pose Estimate” tool in RVIZ to perform this adjustment.
There are three tools in the menu bar, including 2D Pose Estimate, 2D Nav Goal and Publish Point.

“2D Pose Estimate” is used to set the initial position of JetRover, “2D Nav Goal” is used to set a target point and “Publish Point” is used to set multiple target points.
Click “2D Nav Goal” in the menu bar, and select one point by clicking the mouse as the target destination. After the point is set, JetRover will automatically generate the route and move toward the point.

After navigating to the location with the blue block, the robot will automatically grasp the block upon recognition. Then, it will navigate to the placement area with the red mark. Upon arrival, the robot will automatically place the block, completing the transportation task.
Note
Note: when the program starts, it can merely complete the entire process once. If you need to perform another gripping and placing cycle, you will need to restart the game.
Program Analysis
Launch analysis:
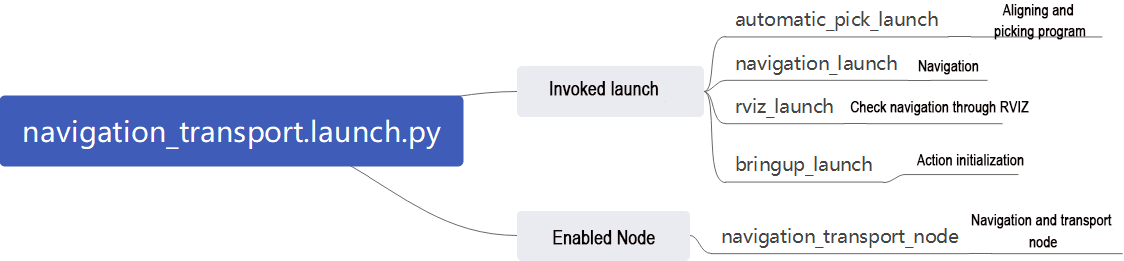
The source code of this program is located in
“ros2_ws/src/example/example/navigation_transport/navigation_transport.launch.py”
import os
from ament_index_python.packages import get_package_share_directory

from launch_ros.actions import Node
from launch_ros.actions import PushRosNamespace
from launch import LaunchDescription, LaunchService
from launch.substitutions import LaunchConfiguration
from launch.launch_description_sources import PythonLaunchDescriptionSource
from launch.actions import DeclareLaunchArgument, IncludeLaunchDescription, GroupAction, OpaqueFunction, TimerAction

def launch_setup(context):
    compiled = os.environ['need_compile']
    if compiled == 'True':
        jetrover_description_package_path = get_package_share_directory('jetrover_description')
        slam_package_path = get_package_share_directory('slam')
        navigation_package_path = get_package_share_directory('navigation')
        example_package_path = get_package_share_directory('example')
    else:
        jetrover_description_package_path = '/home/ubuntu/ros2_ws/src/simulations/jetrover_description'
        slam_package_path = '/home/ubuntu/ros2_ws/src/slam'
        navigation_package_path = '/home/ubuntu/ros2_ws/src/navigation'
        example_package_path = '/home/ubuntu/ros2_ws/src/example'
1. Start other Launch files
    automatic_pick_launch = IncludeLaunchDescription(
        PythonLaunchDescriptionSource(os.path.join(example_package_path, 'example/navigation_transport/automatic_pick.launch.py')),
        launch_arguments={
            'broadcast': broadcast,
            'debug': debug,
            'place_without_color': place_without_color,
            'place_position': place_position,
            'master_name': master_name,
            'robot_name': robot_name
        }.items(),
    )

    navigation_launch = IncludeLaunchDescription(
        PythonLaunchDescriptionSource(os.path.join(navigation_package_path, 'launch/include/bringup.launch.py')),
        launch_arguments={
            'use_sim_time': 'false',
            'map': os.path.join(slam_package_path, 'maps', map_name + '.yaml'),
            'params_file': os.path.join(navigation_package_path, 'config', 'nav2_params.yaml'),
            'namespace': robot_name,
            'use_namespace': 'false',
            'autostart': 'true',
        }.items(),
    )

    navigation_transport_node = Node(
        package='example',
        executable='navigation_transport',
        output='screen',
        parameters=[{'map_frame': 'map', 'nav_goal': '/nav_goal'}]
    )

    rviz_launch = IncludeLaunchDescription(
            PythonLaunchDescriptionSource(os.path.join(jetrover_description_package_path, 'launch/rviz.launch.py')),
            launch_arguments={
                              'namespace': '',
                              'use_namespace': 'false',
                              'rviz_config': LaunchConfiguration('rviz', default=os.path.join(navigation_package_path, 'rviz/navigation_transport.rviz')).perform(context)}.items())

    bringup_launch = GroupAction(
     actions=[
         PushRosNamespace(robot_name),
         automatic_pick_launch,
         TimerAction(
             period=10.0,  # 延时等待其它节点启动好(wait for other nodes to start up with a delay)
             actions=[navigation_launch],
         ),
      ]
    )
automatic_pick_launch: Automatically picks up items based on color alignment.
navigation_launch: Launches navigation.
rviz_launch: Uses RVIZ to visualize navigation effects.
bringup_launch: Initializes actions.
2. Start the Node
    navigation_transport_node = Node(
        package='example',
        executable='navigation_transport',
        output='screen',
        parameters=[{'map_frame': 'map', 'nav_goal': '/nav_goal'}]
    )
navigation_transport_node: Starts the navigation transport node.
Source Code Analysis
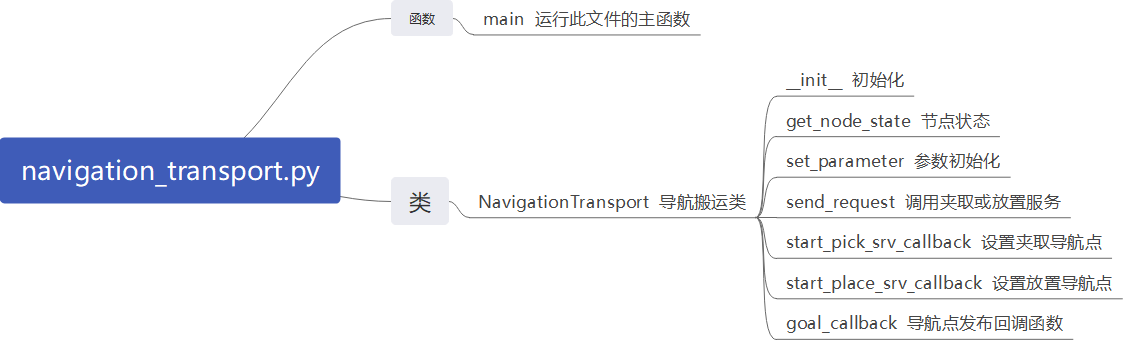
Program Path:
“ros2_ws/src/example/example/navigation_transport/navigation_transport.py”
3. Main Function
def main():
    node = NavigationTransport('navigation_transport')
    executor = MultiThreadedExecutor()
    executor.add_node(node)
    executor.spin()
    node.destroy_node()
The main function calls the hand recognition class to start the node.
4. NavigationTransport
get_node_state:
    def get_node_state(self, request, response):
        response.success = True
        return response
Works in conjunction with init_process to initialize the node state.
send_request:
    def send_request(self, client, msg):
        future = client.call_async(msg)
        while rclpy.ok():
            if future.done() and future.result():
                return future.result()
Publishes certain recognized information to a specific service
start_pick_srv_callback:
    def start_pick_srv_callback(self, request, response):
        self.get_logger().info('start navigaiton pick')

        marker_Array = MarkerArray()
        marker = Marker()
        marker.header.frame_id = self.map_frame
        marker.action = Marker.DELETEALL
        marker_Array.markers.append(marker)

        self.mark_pub.publish(marker_Array)

        markerArray = MarkerArray()
        pose = PoseStamped()
        pose.header.frame_id = self.map_frame
        pose.header.stamp = self.navigator.get_clock().now().to_msg()
        data = request.data
        q = common.rpy2qua(math.radians(data.roll), math.radians(data.pitch), math.radians(data.yaw))
        pose.pose.position.x = data.x
        pose.pose.position.y = data.y
        pose.pose.orientation = q

        # 用数字标记来显示点(mark the point with number to display)
        marker = Marker()
        marker.header.frame_id = self.map_frame

        marker.type = marker.MESH_RESOURCE
        marker.mesh_resource = "package://example/resource/flag.dae"
        marker.action = marker.ADD
        # 大小(size)
        marker.scale.x = 0.08
        marker.scale.y = 0.08
        marker.scale.z = 0.2
        # 颜色(color)
        color = list(np.random.choice(range(256), size=3))
        marker.color.a = 1.0
        marker.color.r = color[0] / 255.0
        marker.color.g = color[1] / 255.0
        marker.color.b = color[2] / 255.0
        # marker.lifetime = rospy.Duration(10)  # 显示时间,没有设置默认一直保留(display time. If not set, it will be kept by default)
        # 位置姿态(position posture)
        marker.pose.position.x = pose.pose.position.x
        marker.pose.position.y = pose.pose.position.y
        marker.pose.orientation = pose.pose.orientation
        markerArray.markers.append(marker)

        self.mark_pub.publish(markerArray)
        self.nav_pub.publish(pose)

        response.success = True
        response.message = "navigation pick"
        return response
Upon invocation, sets navigation points in RVIZ to begin picking up items based on their location.
start_place_srv_callback:
    def start_place_srv_callback(self, request, response):
        self.get_logger().info('start navigaiton place')

        markerArray = MarkerArray()
        pose = PoseStamped()
        pose.header.frame_id = self.map_frame
        pose.header.stamp = self.navigator.get_clock().now().to_msg()
        data = request.data
        q = common.rpy2qua(math.radians(data.roll), math.radians(data.pitch), math.radians(data.yaw))
        pose.pose.position.x = data.x
        pose.pose.position.y = data.y
        pose.pose.orientation = q

        # 用数字标记来显示点(mark the point with number to display)
        marker = Marker()
        marker.header.frame_id = self.map_frame
Upon invocation, sets navigation points in RVIZ to begin placing items based on their location.
goal_callback:
    def goal_callback(self, msg):
        # 获取要发布的导航点(get the navigation points to be published)
        self.get_logger().info('\033[1;32m%s\033[0m' % str(msg))

        get_parameters_request = GetParameters.Request()
        get_parameters_request.names = ['status']
        status = self.send_request(self.get_param_client, get_parameters_request).values[0].string_value
        self.get_logger().info('\033[1;32m%s\033[0m' % status)
        if status == 'start' or status == 'place_finish':  # 处于可以pick的状态(in a pickable state)
            self.pick = True
            self.place = False
            self.get_logger().info('\033[1;32m%s\033[0m' % 'nav pick')

            self.navigator.goToPose(msg)
            self.haved_publish_goal = True
        elif status == 'pick_finish':  # 处于可以place的状态(in a placeable state)
            self.pick = False
            self.place = True
            self.get_logger().info('\033[1;32m%s\033[0m' % 'nav place')

            self.navigator.goToPose(msg)
            self.haved_publish_goal = True
Callback function for navigation points; switches between pick and place modes based on the current set navigation points.
Gripping Calibration
The default recognition and gripping area of the program is located in the center of the image. No adjustments are required for the normal circumstance. If the robotic arm fails to grip the colored blocks during the game, you can adjust the position of this area through the program command. The specific steps are as follow:
Start JetRove and connect it to Nomachine remote control software.
Click on
 to open the command line terminal.
Input the command to disable the app auto-start service:
sudo systemctl stop start_app_node.service
Click-on
to start the command-line terminal and execute the following command:ros2 launch example automatic_pick.launch.py debug:=true
After the robotic arm reaches the gripping position, place the colored block at the center of the gripper and wait for the robotic arm to reset before griping again, indicating the calibration is completed. Upon the completion of the calibration, the terminal will print the pixel coordinates of the colored block in the image and the “pick finish” prompt message.
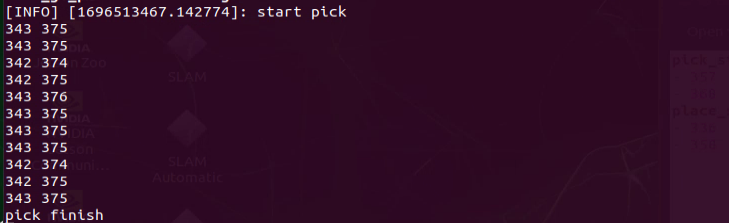
The data after automatic calibration will be saved in the “/home/ros_ws/src/hiwonder_example/config/automatic_pick_rol.yaml” file.
“pick_stop_pixel_coordinate” refers to the pixel coordinates of the gripping position in the image. The first parameter represents the x-axis coordinate. Decreasing this value shifts the horizontal position to the left, while increasing it shifts the gripping horizontal position to the right. The second parameter represents the y-axis coordinate. Decreasing this value moves the gripping position closer, while increasing it moves the gripping position farther away. Generally, you can rely on automatic calibration results, but you can also adjust it according to your personal preference.
“place_stop_pixel_coordinate” refers the pixel coordinates of the placement position in the image. The first parameter represents the x-axis coordinate. Increasing this value shifts the placement position to the left, while decreasing it shifts the placement position to the right. The second parameter represents the y-axis coordinate. Decreasing this value adjusts the placement position closer, while increasing it moves the gripping position farther away. (Note: Automatic calibration solely calibrates the coordinates of the gripping position. The coordinates of the placement position are not automatically calibrated. If a placement target is set and the placement effect is not satisfactory, manual adjustment is required. )

Upon the completion of the modification, please start the game according to “22.3.6 Fixed Point Navigation->Operation Steps”.
22.4 3D Vision
22.4.1 Edge Detection
Overview
When the robot moves, it may encounter various situations where the road has steps or the sunken ground. If there is no corresponding detection and handling measures, the robot takes the risk of falling. When the route is relatively flat and smooth, the ranging distance remains relatively consistent within two different areas, the distance change is relatively continuous. However, when there are steps or depressions ahead, there is a significant discontinuity in the ranging distance values. Therefore, during the autonomous navigation, it is of great importance to ensure the safety of the robot’s movement. To tackle this issue, it is possible to assess the safety of the robot’s forward direction by utilizing depth information obtained through depth camera.
Operation Steps
Note
Note: the entered command should be case sensitive, and the “Tab” key can used to complemented the key words.
Start JetRover and connect it to Nomachine remote control system. Regarding the Remote desktop tool installation and connection, please refer to “JetRover/2. Software/2. Remote Desktop Software.”
Double click on
 to open the ROS1 command line terminal.
Input the command and press Enter to disable the app service.
sudo systemctl stop start_app_node.service
Click-on
 to open ROS2 command-line terminal.
Input the command to start the game. The performance effect and notices refer to Outcome.
ros2 launch example prevent_falling.launch.py debug:=true
If you want to exit this game, press “Ctrl+C” in the terminal. Fail to do so requires multiple tries.
Outcome
After the game starts, JetRover will automatically move forward. When When the terrain ahead of the robot is relatively higher or lower, the robot will automatically turn in place. Then it will assess whether the position ahead is flat. If it is flat, the robot will continue to move forward; otherwise, it will continue to turn in place until the terrain ahead is relatively flat.
Note
Note: when using the robot for the first time or when changing the its placement position, it is mandatory to run the command “ros2 launch example prevent_falling.launch.py debug:=true” to evaluate the current environment to obtain a safe state. Subsequently, when the robot operates, execute “ros2 launch example prevent_falling.launch.py” to achieve the same effect as the calibration performed at the previous position.
Program Analysis
1. launch Analysis

The path to the source code of the program is as follow:
~/ros2_ws/src/example/example/rgbd_function/prevent_falling.launch.py
(1) Initiate Other Launch Files
    depth_camera_launch = IncludeLaunchDescription(
        PythonLaunchDescriptionSource(
            os.path.join(peripherals_package_path, 'launch/depth_camera.launch.py')),
    )
    controller_launch = IncludeLaunchDescription(
        PythonLaunchDescriptionSource(
            os.path.join(controller_package_path, 'launch/controller.launch.py')),
    )
The depth_camera_launch is used to start the depth camera.
The controller_launch is used to start the chassis, servos, and other controls.
(2) Start Node
    prevent_falling_node = Node(
        package='example',
        executable='prevent_falling',
        output='screen',
        parameters=[os.path.join(example_package_path, 'config/plane_distance.yaml'), {'debug': debug}]
    )
The prevent_falling_node is used to start the anti-fall node.
2. Python Program Analysis
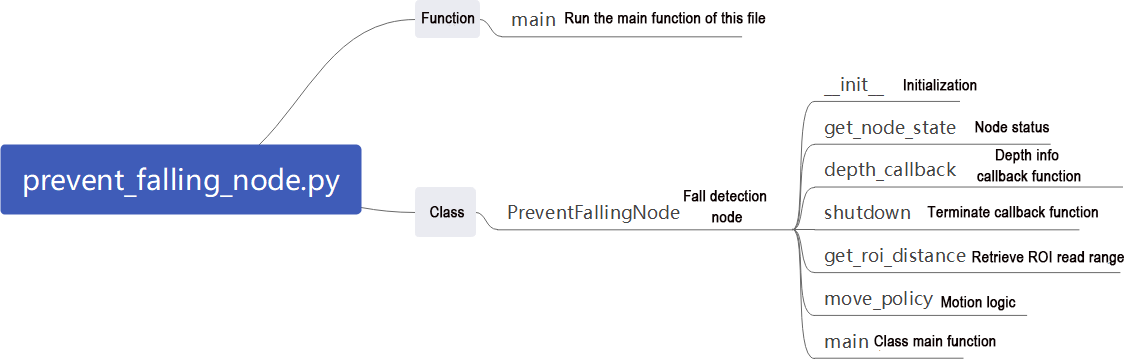
This section will analyze the code for the anti-fall feature. The source code is located at: ~/ros2_ws/src/example/example/rgbd_function/prevent_falling_node.py.
Function:
Main:
def main():
    node = PreventFallingNode('prevent_falling')
    rclpy.spin(node)
    node.destroy_node()
Start the anti-fall node.
Class:
PreventFallingNode:
class PreventFallingNode(Node):
    def __init__(self, name):
        rclpy.init()
        super().__init__(name, allow_undeclared_parameters=True, automatically_declare_parameters_from_overrides=True)
        signal.signal(signal.SIGINT, self.shutdown)
        self.running = True
        self.turn = False
Init:
    def __init__(self, name):
        rclpy.init()
        super().__init__(name, allow_undeclared_parameters=True, automatically_declare_parameters_from_overrides=True)
        signal.signal(signal.SIGINT, self.shutdown)
        self.running = True
        self.turn = False
        self.plane_high = self.get_parameter('plane_distance').value
        self.debug = self.get_parameter('debug').value
        self.time_stamp = time.time()
        self.image_queue = queue.Queue(maxsize=2)
        self.left_roi = [290, 300, 95, 105]
        self.center_roi = [290, 300, 315, 325]
        self.right_roi = [290, 300, 535, 545]

        self.joints_pub = self.create_publisher(ServosPosition, '/servo_controller', 1) # 舵机控制(servo control)
        self.mecanum_pub = self.create_publisher(Twist, '/controller/cmd_vel', 1)  # 底盘控制(chassis control)
        self.create_subscription(Image, '/depth_cam/depth/image_raw', self.depth_callback, 1)
        self.client = self.create_client(SetBool, '/depth_cam/set_ldp_enable')
        self.client.wait_for_service()
        msg = SetBool.Request()
        msg.data = False
        future = self.client.call_async(msg)
        rclpy.spin_until_future_complete(self, future)
        self.client = self.create_client(Trigger, '/controller_manager/init_finish')
        self.client.wait_for_service()

        self.mecanum_pub.publish(Twist())
        set_servo_position(self.joints_pub, 1, ((1, 500), (2, 700), (3, 85), (4, 150), (5, 500), (10, 200)))
        time.sleep(1)

        threading.Thread(target=self.main, daemon=True).start()
        self.create_service(Trigger, '~/init_finish', self.get_node_state)
        self.get_logger().info('\033[1;32m%s\033[0m' % 'start')
Initialize parameters required for anti-fall, call servo control, chassis control, camera node, and initialize actions by calling the main function.
get_node_state:
    def get_node_state(self, request, response):
        response.success = True
        return responsee
Initialize node state.
depth_callback:
    def depth_callback(self, ros_depth_image):
        depth_image = np.ndarray(shape=(ros_depth_image.height, ros_depth_image.width), dtype=np.uint16, buffer=ros_depth_image.data)
        if self.image_queue.full():
            # 如果队列已满,丢弃最旧的图像(if the queue is full, discard the oldest image)
            self.image_queue.get()
        # 将图像放入队列(put the image into the queue)
        self.image_queue.put(depth_image)
Used to read depth information and store it in a queue.
shutdown:
    def shutdown(self, signum, frame):
        self.running = False
Callback function to shut down the program, setting the ‘running’ parameter to false.
get_roi_distance:
    def get_roi_distance(self, depth_image, roi):
        roi_image = depth_image[roi[0]:roi[1], roi[2]:roi[3]]
        try:
            distance = round(float(np.mean(roi_image[np.logical_and(roi_image>0, roi_image<30000)])/1000), 3)
        except:
            distance = 0
        return distance

    def move_policy(self, left_distance, center_distance, right_distance):
        if abs(left_distance - self.plane_high) > 0.02 or abs(center_distance - self.plane_high) > 0.02 or abs(right_distance - self.plane_high) > 0.02:
            twist = Twist()
            twist.angular.z = 0.8
            self.turn = True
            self.time_stamp = time.time() + 0.3
            self.mecanum_pub.publish(twist)
        else:
            if self.turn:
                self.current_time_stamp = time.time()
                if self.time_stamp < self.current_time_stamp:
                    self.turn = False
                    self.mecanum_pub.publish(Twist())
                    self.time_stamp = time.time() + 0.2
            else:
                self.current_time_stamp = time.time()
                if self.time_stamp < self.current_time_stamp:
                    twist = Twist()
                    twist.linear.x = 0.2
                    self.mecanum_pub.publish(twist)
Get depth information of the cropped image after ROI.
move_policy:
    def move_policy(self, left_distance, center_distance, right_distance):
        if abs(left_distance - self.plane_high) > 0.02 or abs(center_distance - self.plane_high) > 0.02 or abs(right_distance - self.plane_high) > 0.02:
            twist = Twist()
            twist.angular.z = 0.8
            self.turn = True
            self.time_stamp = time.time() + 0.3
            self.mecanum_pub.publish(twist)
        else:
            if self.turn:
                self.current_time_stamp = time.time()
                if self.time_stamp < self.current_time_stamp:
                    self.turn = False
                    self.mecanum_pub.publish(Twist())
                    self.time_stamp = time.time() + 0.2
            else:
                self.current_time_stamp = time.time()
                if self.time_stamp < self.current_time_stamp:
                    twist = Twist()
                    twist.linear.x = 0.2
                    self.mecanum_pub.publish(twist)
Movement strategy function that prevents the robot from falling based on recognized depth information.
main:
    def main(self):
        count = 0
        while self.running:
            try:
                depth_image = self.image_queue.get(block=True, timeout=1)
            except queue.Empty:
                if not self.running:
                    break
                else:
                    continue
            depth_color_map = cv2.applyColorMap(cv2.convertScaleAbs(depth_image, alpha=0.45), cv2.COLORMAP_JET)
            cv2.circle(depth_color_map, (int((self.left_roi[2] + self.left_roi[3]) / 2), int((self.left_roi[0] + self.left_roi[1]) / 2)), 10, (0, 0, 0), -1)
            cv2.circle(depth_color_map, (int((self.center_roi[2] + self.center_roi[3]) / 2), int((self.center_roi[0] + self.center_roi[1]) / 2)), 10, (0, 0, 0), -1)
            cv2.circle(depth_color_map, (int((self.right_roi[2] + self.right_roi[3]) / 2), int((self.right_roi[0] + self.right_roi[1]) / 2)), 10, (0, 0, 0), -1)
            left_distance = self.get_roi_distance(depth_image, self.left_roi)
            center_distance = self.get_roi_distance(depth_image, self.center_roi)
            right_distance = self.get_roi_distance(depth_image, self.right_roi)
            self.get_logger().info(str([left_distance, center_distance, right_distance]))
Main function of the anti-fall class. First, it reads depth information, crops the image based on ROI, extracts recognition information from the cropped image, applies a movement strategy based on the recognized information, and displays the image.
22.4.2 Cross the Single-plank Bridge
Overview
The crossing of the single-plank bridge by a robot involves various aspects of technology such as balance control and environmental perception.
In order to maintain balance, the robot needs to process precise posture control capabilities, encompassing precise control of the center of gravity and limb joints angles. It is necessary to leverage robot’s dynamic model and control algorithms such as PID control and fuzzy logic. Additionally, environmental perception also plays an important role in this task because the robot needs to be able to perceive the real-time information about surrounding environment, including the width, height and slope of the single-plank bridge for posture adjustment. All in all, the realization of this functionality requires substantial experimentation and meticulous calibration.
Operation Steps
Note
Note: the entered command should be case sensitive, and the “Tab” key can used to complemented the key words.
Start JetRover and connect it to Nomachine remote control system. Regarding the Remote desktop tool installation and connection, please refer to “JetRover/2. Software/2. Remote Desktop Software.”
Double click on
to open the ROS1 command line terminal.Input the command and press Enter to disable the app service.
sudo systemctl stop start_app_node.service
Click-on
to start the ROS2 command-line terminal.Execute the command to start the game. If you
ros2 launch example cross_bridge.launch.py debug:=true
For usage instructions and precautions, please refer to the section Outcome.

If you want to exit this game, press “Ctrl+C” in the terminal. Fail to do so requires multiple tries.
Outcome
After placing the props and initiating the program, JetRover will automatically adjust its altitude, enabling itself to perform smooth traversal along the single-plank bridge without falling off.
Note
Note: when executing this function for the first time (or whenever the robot’s position changes), it is imperative to run the command “ros2 launch example cross_bridge.launch.py debug:=true” to make a calibration for the current sate of single-plank bridge, obtaining a standard detection status. Then run the command “ros2 launch example cross_bridge.launch.py” to perform the same effect as the previous calibration at the specified position.
Program Analysis
1. Program Analysis

Program path:
~/ros2_ws/src/example/example/rgbd_function/cross_bridge.launch.py
(1) Initiate other Launch files
    depth_camera_launch = IncludeLaunchDescription(
        PythonLaunchDescriptionSource(
            os.path.join(peripherals_package_path, 'launch/depth_camera.launch.py')),
    )
    controller_launch = IncludeLaunchDescription(
        PythonLaunchDescriptionSource(
            os.path.join(controller_package_path, 'launch/controller.launch.py')),
    )
depth_camera_launch is used to initiate the camera.
controller_launch is used to initiate control of the chassis, servos, and other components.
(2) Start Node
    cross_bridge_node = Node(
        package='example',
        executable='cross_bridge',
        output='screen',
        parameters=[os.path.join(example_package_path, 'config/bridge_plane_distance.yaml'), {'debug': debug}]
    )
cross_bridge_node is used to launch the node for crossing a log bridge.
2. Python Program Analysis
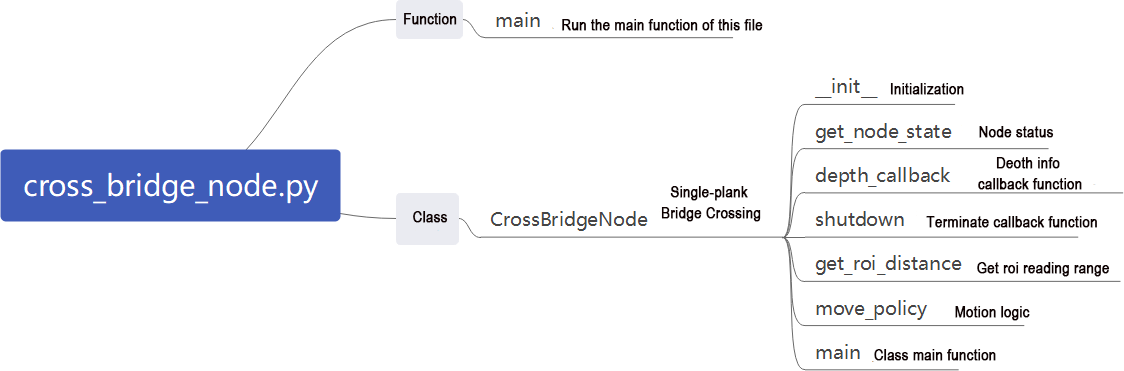
This document analyzes the programming of anti-fall game. The program source code is located at: ~/ros2_ws/src/example/example/rgbd_function/cross_bridge_node.py
Functions:
Main:
def main():
    node = CrossBridgeNode('cross_bridge')
    rclpy.spin(node)
    node.destroy_node()
Launches the anti-fall node.
Class:
CrossBridgeNode:
class CrossBridgeNode(Node):
    def __init__(self, name):
        rclpy.init()
        super().__init__(name, allow_undeclared_parameters=True, automatically_declare_parameters_from_overrides=True)
        self.name = name
        signal.signal(signal.SIGINT, self.shutdown)
        self.running = True
        self.turn = False
        self.plane_high = self.get_parameter('plane_distance').value
        self.debug = self.get_parameter('debug').value
Init:
    def __init__(self, name):
        rclpy.init()
        super().__init__(name, allow_undeclared_parameters=True, automatically_declare_parameters_from_overrides=True)
        self.name = name
        signal.signal(signal.SIGINT, self.shutdown)
        self.running = True
        self.turn = False
        self.plane_high = self.get_parameter('plane_distance').value
        self.debug = self.get_parameter('debug').value
        self.twist = Twist()
        self.image_queue = queue.Queue(maxsize=2)
        self.left_roi = [290, 300, 165, 175]
        self.center_roi = [290, 300, 315, 325]
        self.right_roi = [290, 300, 465, 475]
        self.debug = self.get_parameter('debug').value
        self.joints_pub = self.create_publisher(ServosPosition, '/servo_controller', 1) # 舵机控制(servo control)
        self.mecanum_pub = self.create_publisher(Twist, '/controller/cmd_vel', 1)  # 底盘控制(chassis control)
        self.create_subscription(Image, '/depth_cam/depth/image_raw', self.depth_callback, 1)
        self.client = self.create_client(SetBool, '/depth_cam/set_ldp_enable')
        self.client.wait_for_service()
        msg = SetBool.Request()
        msg.data = False
        future = self.client.call_async(msg)
        rclpy.spin_until_future_complete(self, future)
        self.client = self.create_client(Trigger, '/controller_manager/init_finish')
        self.client.wait_for_service()
Initializes parameters required for crossing the log bridge, calls servo control, chassis control, camera node, and initializes actions by calling the main function.
get_node_state:
    def get_node_state(self, request, response):
        response.success = True
        return response
Initializes node state
depth_callback:
    def depth_callback(self, ros_depth_image):
        depth_image = np.ndarray(shape=(ros_depth_image.height, ros_depth_image.width), dtype=np.uint16,
                                 buffer=ros_depth_image.data)
        if self.image_queue.full():
            # 如果队列已满,丢弃最旧的图像(if the queue is full, discard the oldest image)
            self.image_queue.get()
        # 将图像放入队列(put the image into the queue)
        self.image_queue.put(depth_image)
Reads depth information and stores it in a queue.
shutdown:
    def shutdown(self, signum, frame):
        self.running = False
        self.get_logger().info('\033[1;32m%s\033[0m' % "shutdown")
Callback function to shut down the program; sets the parameter ‘running’ to false to close the program.
get_roi_distance:
    def get_roi_distance(self, depth_image, roi):
        roi_image = depth_image[roi[0]:roi[1], roi[2]:roi[3]]
        try:
            distance = round(float(np.mean(roi_image[np.logical_and(roi_image > 0, roi_image < 30000)]) / 1000), 3)
        except:
            distance = 0
        return distance

    def move_policy(self, left_distance, center_distance, right_distance):
        if abs(left_distance - self.plane_high) > 0.02:
            self.twist.angular.z = -0.1
        elif abs(right_distance - self.plane_high) > 0.02:
            self.twist.angular.z = 0.1
        else:
            self.twist.angular.z = 0.0
        if abs(center_distance - self.plane_high) > 0.02:
            self.twist = Twist()
            #self.running = False
        else:
            self.twist.linear.x = 0.2

        self.mecanum_pub.publish(self.twist)
Retrieves depth information of the image after ROI cropping.
move_policy:
    def move_policy(self, left_distance, center_distance, right_distance):
        if abs(left_distance - self.plane_high) > 0.02:
            self.twist.angular.z = -0.1
        elif abs(right_distance - self.plane_high) > 0.02:
            self.twist.angular.z = 0.1
        else:
            self.twist.angular.z = 0.0
        if abs(center_distance - self.plane_high) > 0.02:
            self.twist = Twist()
            #self.running = False
        else:
            self.twist.linear.x = 0.2

        self.mecanum_pub.publish(self.twist)
Movement strategy function; adjusts robot direction based on recognized depth information to prevent falls and ensure stable crossing on the log bridge.
Main:
    def main(self):
        count = 0
        while self.running:
            try:
                depth_image = self.image_queue.get(block=True, timeout=1)
            except queue.Empty:
                if not self.running:
                    break
                else:
                    continue
            depth_color_map = cv2.applyColorMap(cv2.convertScaleAbs(depth_image, alpha=0.45), cv2.COLORMAP_JET)
            cv2.circle(depth_color_map, (int((self.left_roi[2] + self.left_roi[3]) / 2), int((self.left_roi[0] + self.left_roi[1]) / 2)), 10, (0, 0, 0), -1)
            cv2.circle(depth_color_map, (int((self.center_roi[2] + self.center_roi[3]) / 2), int((self.center_roi[0] + self.center_roi[1]) / 2)), 10, (0, 0, 0), -1)
            cv2.circle(depth_color_map, (int((self.right_roi[2] + self.right_roi[3]) / 2), int((self.right_roi[0] + self.right_roi[1]) / 2)), 10, (0, 0, 0), -1)
            left_distance = self.get_roi_distance(depth_image, self.left_roi)
            center_distance = self.get_roi_distance(depth_image, self.center_roi)
            right_distance = self.get_roi_distance(depth_image, self.right_roi)
Main function of the cross bridge class. First reads depth information, performs image cropping using ROI to obtain recognition information within the cropped image, applies movement strategy based on the recognized information, and displays the image.
22.4.3 Object Tracking
Overview
Object Tracking involves implementing vision-based object tracking and robot motion control. It combines functionalities such as image processing, point cloud processing, PID control, robot motion control, visualization, and interaction. It can be used to guide the robot to automatically track and approach specific objects.
Operation Steps
Note
Note: the entered command should be case sensitive, and the “Tab” key can used to complemented the key words.
Start JetRover and connect it to Nomachine remote control system. Regarding the Remote desktop tool installation and connection, please refer to “JetRover/2. Software/2. Remote Desktop Software.”
Double click on
to open the ROS1 command line terminal.Input the command and press Enter to disable the app service.
sudo systemctl stop start_app_node.service
Click-on
to start the ROS2 command-line terminal.Input the command to start the game.
ros2 launch example track_object.launch.py
You can review the implementation for usage effects and notes.

If you want to exit this game, press “Ctrl+C” in the terminal. Fail to do so requires multiple tries.
Outcome
After initiating the game, the camera will track the object and control the robot to move accordingly.
Program Analysis
1. launch Analysis

Program path:
~/ros2_ws/src/example/example/rgbd_function/track_object.launch.py
(1) Initiate Other Launch Files
    depth_camera_launch = IncludeLaunchDescription(
        PythonLaunchDescriptionSource(
            os.path.join(peripherals_package_path, 'launch/depth_camera.launch.py')),
    )
    controller_launch = IncludeLaunchDescription(
        PythonLaunchDescriptionSource(
            os.path.join(controller_package_path, 'launch/controller.launch.py')),
    )
depth_camera_launch is used to start the camera.
controller_launch is used to start chassis, servo, and other controls.
(2) Start the Node
    track_object_node = Node(
        package='example',
        executable='track_object',
        output='screen',
    )
track_object_node is used to launch the object tracking node.
2. Python Program Analysis
This section analyzes the programming of anti-fall game. The program source code is located at:
~/ros2_ws/src/example/example/rgbd_function/track_object_node.py
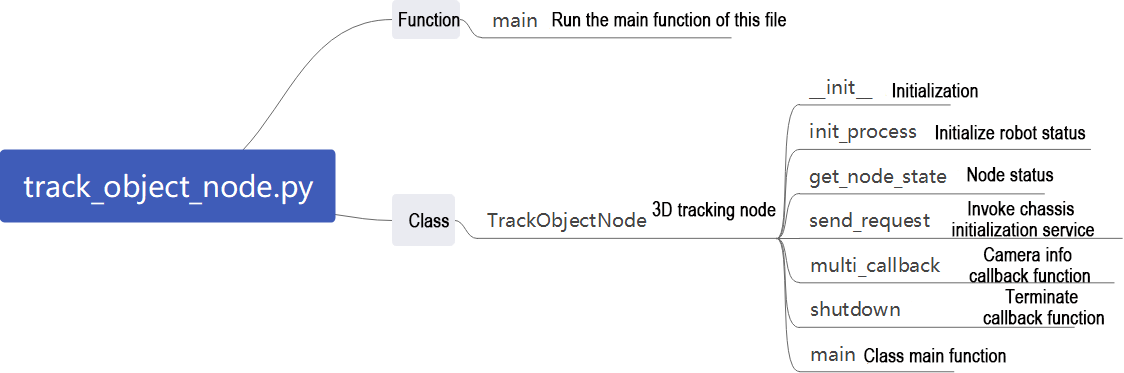
Function:
Main:
def main():
    node = TrackObjectNode('track_object')
    executor = MultiThreadedExecutor()
    executor.add_node(node)
    executor.spin()
    node.destroy_node()
Initiate object tracking node.
Class:
CrossBridgeNode:
class TrackObjectNode(Node):
    def __init__(self, name):
        rclpy.init()
        super().__init__(name, allow_undeclared_parameters=True, automatically_declare_parameters_from_overrides=True)
        signal.signal(signal.SIGINT, self.shutdown)
Init:
    def __init__(self, name):
        rclpy.init()
        super().__init__(name, allow_undeclared_parameters=True, automatically_declare_parameters_from_overrides=True)
        signal.signal(signal.SIGINT, self.shutdown)
        self.pid_x = pid.PID(1.5, 0, 0)
        self.pid_y = pid.PID(1.5, 0, 0)
        self.x_speed, self.y_speed = 0.007, 0.007
        self.stop_distance = 0.4
        self.x_stop = -0.04
        self.scale = 4
        self.proc_size = [int(640/self.scale), int(480/self.scale)]
        self.linear_x, self.linear_y = 0, 0
        self.haved_add = False
        self.get_point = False
        self.display = 1
        self.running = True
        self.pc_queue = queue.Queue(maxsize=1)
        self.target_cloud = o3d.geometry.PointCloud() # 要显示的点云(the point cloud to be displayed)
        # 裁剪roi(crop roi)
        # x, y, z
        roi = np.array([
            [-0.8, -1.5, 0],
            [-0.8, 0.3, 0],
            [0.8,  0.3, 0],
            [0.8,  -1.5, 0]],
            dtype = np.float64)
        # y 近+, x左-(positive for y direction is forward, and negative for x direction is left)
        self.vol = o3d.visualization.SelectionPolygonVolume()
        # 裁剪z轴,范围(crop z-axis, range)
        self.vol.orthogonal_axis = 'Z'
        self.vol.axis_max = 0.9
        self.vol.axis_min = -0.3
        self.vol.bounding_polygon = o3d.utility.Vector3dVector(roi)

        self.t0 = time.time()
        self.joints_pub = self.create_publisher(ServosPosition, '/servo_controller', 1) # 舵机控制(servo control)
        self.mecanum_pub = self.create_publisher(Twist, '/controller/cmd_vel', 1)  # 底盘控制(chassis control)

        timer_cb_group = ReentrantCallbackGroup()

        self.client = self.create_client(Trigger, '/controller_manager/init_finish')
        self.client.wait_for_service()

        self.client = self.create_client(SetBool, '/depth_cam/set_ldp_enable')
        self.client.wait_for_service()

        camera_name = 'depth_cam'
        rgb_sub = message_filters.Subscriber(self, Image, '/%s/rgb/image_raw' % camera_name)
        depth_sub = message_filters.Subscriber(self, Image, '/%s/depth/image_raw' % camera_name)
        info_sub = message_filters.Subscriber(self, CameraInfo, '/%s/depth/camera_info' % camera_name)
Initializes parameters required for object tracking, calls servo control, chassis control, and camera node. This includes using RGB and depth information from the camera, synchronizing the timestamps of both data to ensure real-time recognition.
init_process:
    def init_process(self):
        self.timer.cancel()

        self.mecanum_pub.publish(Twist())
        set_servo_position(self.joints_pub, 1, ((1, 500), (2, 765), (3, 85), (4, 150), (5, 500), (10, 200)))

        msg = SetBool.Request()
        msg.data = False
        self.send_request(self.client, msg)

        threading.Thread(target=self.main, daemon=True).start()
        self.create_service(Trigger, '~/init_finish', self.get_node_state)
        self.get_logger().info('\033[1;32m%s\033[0m' % 'start')
Initializes the robotic arm posture and starts the main function.
get_node_state:
    def get_node_state(self, request, response):
        response.success = True
        return response
Initializes node state.
send_request:
    def send_request(self, client, msg):
        future = client.call_async(msg)
        while rclpy.ok():
            if future.done() and future.result():
                return future.result()
Publishes service requests.
multi_callback:
    def multi_callback(self, ros_rgb_image, ros_depth_image, depth_camera_info):
        try:
            # ros格式转为numpy(convert the ros format to numpy)
            rgb_image = np.ndarray(shape=(ros_rgb_image.height, ros_rgb_image.width, 3), dtype=np.uint8, buffer=ros_rgb_image.data)
            depth_image = np.ndarray(shape=(ros_depth_image.height, ros_depth_image.width), dtype=np.uint16, buffer=ros_depth_image.data)

            rgb_image = cv2.resize(rgb_image, tuple(self.proc_size), interpolation=cv2.INTER_NEAREST)
            depth_image = cv2.resize(depth_image, tuple(self.proc_size), interpolation=cv2.INTER_NEAREST)
            # self.get_logger().info('\033[1;32m%s\033[0m' % str(depth_camera_info))
            intrinsic = o3d.camera.PinholeCameraIntrinsic(int(depth_camera_info.width / self.scale),
                                                               int(depth_camera_info.height / self.scale),
                                                               int(depth_camera_info.k[0] / self.scale), int(depth_camera_info.k[4] / self.scale),
                                                               int(depth_camera_info.k[2] / self.scale), int(depth_camera_info.k[5] / self.scale))
            o3d_image_rgb = o3d.geometry.Image(rgb_image)
            o3d_image_depth = o3d.geometry.Image(np.ascontiguousarray(depth_image))
Reads depth and RGB images, constructs RGBD data, generates a point cloud image, and filters out the ground to retain objects for recognition.
shutdown:
    def shutdown(self, signum, frame):
        self.running = False
Callback function to shut down the program; sets the ‘running’ parameter to false to close the program.
main:
    def main(self):
        if self.display:
            # 创建可视化窗口(create a visualization window)
            vis = o3d.visualization.Visualizer()
            vis.create_window(window_name='point cloud', width=320, height=240, visible=1)
        while self.running:
            if not self.haved_add:
                if self.display:
                    try:
                        point_cloud = self.pc_queue.get(block=True, timeout=2)
                    except queue.Empty:
                        continue
                    vis.add_geometry(point_cloud)
                self.haved_add = True
            if self.haved_add:
                try:
                    point_cloud = self.pc_queue.get(block=True, timeout=2)
                except queue.Empty:
                    continue
                # 刷新(refresh)
                points = np.asarray(point_cloud.points)
                if len(points) > 0:
                    min_index = np.argmax(points[:, 2])
                    min_point = points[min_index]
                    point_cloud.colors[min_index] = [255, 255, 0]
Main function of the object tracking class. It creates a visualization window and uses PID control to track objects with the robotic arm.
22.4.4 Tracking and Gripping
Overview
Combining depth vision and robot control techniques, this system identifies and tracks objects of specific colors, completing precise grasping actions. It utilizes a depth camera to capture images and depth information, employs color tracking algorithms to locate the target object, and uses a robotic arm for object operations. Features include using the OpenCV library to identify objects of specific colors in images, computing the exact position of objects in three-dimensional space using depth information, adjusting the movement of the robotic arm using PID controllers to precisely track and approach the target object. This system can be applied in automated production lines to achieve precise object picking and placing tasks, such as in service robots and automation.
Operation Steps
Note
Note: the entered command should be case sensitive, and the “Tab” key can used to complemented the key words.
Start JetRover and connect it to Nomachine remote control system. Regarding the Remote desktop tool installation and connection, please refer to “JetRover/2. Software/2. Remote Desktop Software.”
Double click on
to open the ROS1 command line terminal.Input the command and press Enter to disable the app service.
sudo systemctl stop start_app_node.service
Click-on
to start the ROS2 command-line terminal.Input the command to start the game.
ros2 launch example track_and_grab.launch.py
You can check the implementation for usage effects and notes.

If you want to exit this game, press “Ctrl+C” in the terminal. Fail to do so requires multiple tries.
Outcome
After initiating the game, the robot will identify objects such as cylinders, cubes, spheres, etc., in the scene, then the robotic arm will track there items and perform gripping action once they are recognized.
Program Analysis
1. launch Analysis

Program path:
~/ros2_ws/src/example/example/rgbd_function/track_and_grab.launch.py
(1) Initiate other Launch files
    depth_camera_launch = IncludeLaunchDescription(
        PythonLaunchDescriptionSource(
            os.path.join(peripherals_package_path, 'launch/depth_camera.launch.py')),
    )
    controller_launch = IncludeLaunchDescription(
        PythonLaunchDescriptionSource(
            os.path.join(controller_package_path, 'launch/controller.launch.py')),
    )

    kinematics_launch = IncludeLaunchDescription(
        PythonLaunchDescriptionSource(
            os.path.join(kinematics_package_path, 'launch/kinematics_node.launch.py')),
    )
depth_camera_launch is used to start the camera.
controller_launch is used to start the chassis, servos, and other controls.
kinematics_launch starts the kinematics node, which computes the servo angles required for three-dimensional coordinates.
(2) Start the Node
    track_and_grab_node = Node(
        package='example',
        executable='track_and_grab',
        output='screen',
        parameters=[{'color': color}, {'start': start}]
    )
track_and_grab_node is used to launch the tracking and grasping node.
2. Python Program Analysis
This section will analyze the programming of the anti-fall gameplay. The source code is located at:
~/ros2_ws/src/example/example/rgbd_function/track_and_grab.py
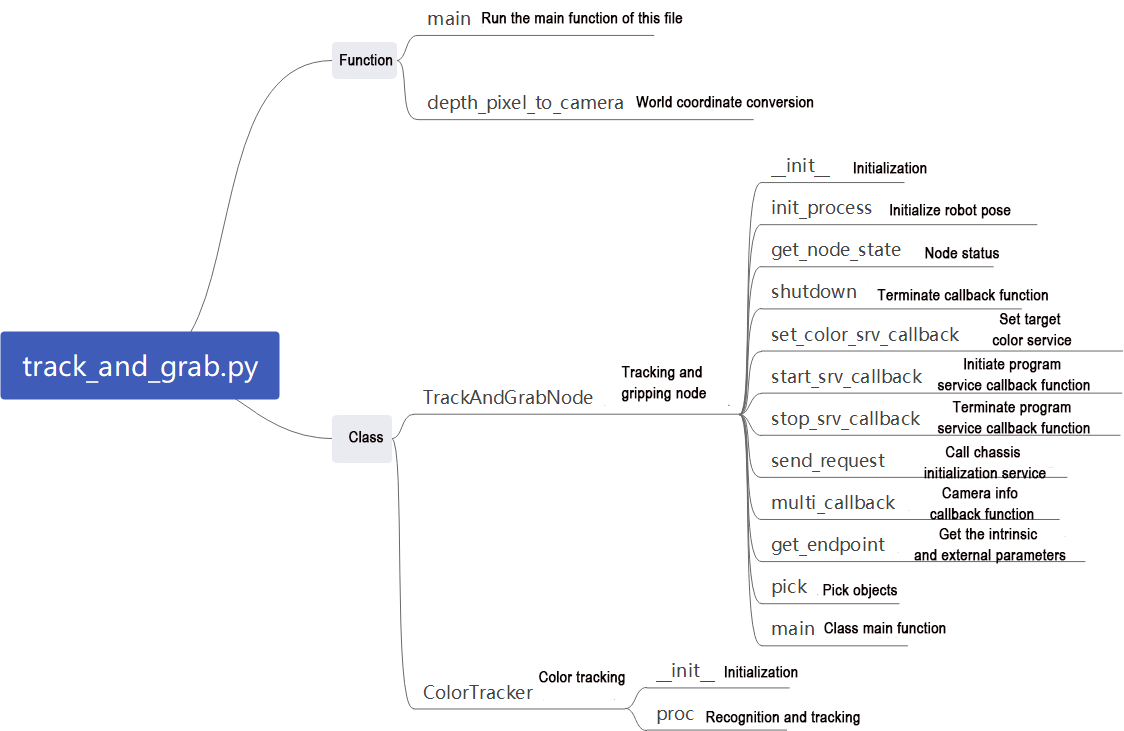
Functions:
Main:
def main():
    node = TrackAndGrabNode('track_and_grab')
    executor = MultiThreadedExecutor()
    executor.add_node(node)
    executor.spin()
    node.destroy_node()
Starts the tracking and grasping node.
depth_pixel_to_camera:
def depth_pixel_to_camera(pixel_coords, depth, intrinsics):
    fx, fy, cx, cy = intrinsics
    px, py = pixel_coords
    x = (px - cx) * depth / fx
    y = (py - cy) * depth / fy
    z = depth
    return np.array([x, y, z])
Converts pixel coordinates to world coordinate system.
Classes:
ColorTracker:
class ColorTracker:
    def __init__(self, target_color):
        self.target_color = target_color
        self.pid_yaw = pid.PID(20.5, 1.0, 1.2)
        self.pid_pitch = pid.PID(20.5, 1.0, 1.2)
        self.yaw = 500
        self.pitch = 150
Init:
    def __init__(self, target_color):
        self.target_color = target_color
        self.pid_yaw = pid.PID(20.5, 1.0, 1.2)
        self.pid_pitch = pid.PID(20.5, 1.0, 1.2)
        self.yaw = 500
        self.pitch = 150
Initialize the parameters required for tracking and grasping.
Proc:
    def proc(self, source_image, result_image, color_ranges):
        h, w = source_image.shape[:2]
        color = color_ranges['lab']['Stereo'][self.target_color]

        img = cv2.resize(source_image, (int(w/2), int(h/2)))
        img_blur = cv2.GaussianBlur(img, (3, 3), 3) # 高斯模糊(Gaussian blur)
        img_lab = cv2.cvtColor(img_blur, cv2.COLOR_RGB2LAB) # 转换到 LAB 空间(convert to the LAB space)
        mask = cv2.inRange(img_lab, tuple(color['min']), tuple(color['max'])) # 二值化(binarilization)

        # 平滑边缘,去除小块,合并靠近的块(smooth the edges, remove small patches, and merge adjacent patches)
        eroded = cv2.erode(mask, cv2.getStructuringElement(cv2.MORPH_RECT, (3, 3)))
        dilated = cv2.dilate(eroded, cv2.getStructuringElement(cv2.MORPH_RECT, (3, 3)))
        # 找出最大轮廓(find out the contour with the maximal area)
        contours = cv2.findContours(dilated, cv2.RETR_EXTERNAL, cv2.CHAIN_APPROX_NONE)[-2]
        min_c = None
        for c in contours:
            if math.fabs(cv2.contourArea(c)) < 50:
                continue
            (center_x, center_y), radius = cv2.minEnclosingCircle(c) # 最小外接圆(the minimum circumcircle)
            if min_c is None:
                min_c = (c, center_x)
            elif center_x < min_c[1]:
                if center_x < min_c[1]:
                    min_c = (c, center_x)
Recognize colors based on the specified tracking color, and process the recognized images.
TrackAndGrabNode:
class TrackAndGrabNode(Node):
    hand2cam_tf_matrix = [
    [0.0, 0.0, 1.0, -0.101],
    [-1.0, 0.0, 0.0, 0.011],
    [0.0, -1.0, 0.0, 0.045],
    [0.0, 0.0, 0.0, 1.0]
]

    def __init__(self, name):
        rclpy.init()
        super().__init__(name, allow_undeclared_parameters=True, automatically_declare_parameters_from_overrides=True)
Init:
        super().__init__(name, allow_undeclared_parameters=True, automatically_declare_parameters_from_overrides=True)
        self.fps = fps.FPS()
        self.moving = False
        self.count = 0
        self.start = False
        self.running = True
        self.last_pitch_yaw = (0, 0)

        self.enable_disp = 1
        signal.signal(signal.SIGINT, self.shutdown)
        self.lab_data = common.get_yaml_data("/home/ubuntu/share/lab_tool/lab_config.yaml")
        self.last_position = (0, 0, 0)
        self.stamp = time.time()

        self.joints_pub = self.create_publisher(ServosPosition, '/servo_controller', 1)

        self.target_color = None

        self.get_current_pose_client = self.create_client(GetRobotPose, '/kinematics/get_current_pose')
        self.get_current_pose_client.wait_for_service()
        self.set_pose_target_client = self.create_client(SetRobotPose, '/kinematics/set_pose_target')
        self.set_pose_target_client.wait_for_service()

        self.create_service(Trigger, '~/start', self.start_srv_callback)
        self.create_service(Trigger, '~/stop', self.stop_srv_callback)
        self.create_service(SetString, '~/set_color', self.set_color_srv_callback)
        self.tracker = None

        self.image_queue = queue.Queue(maxsize=2)
        self.endpoint = None

        self.start_stamp = time.time() + 3

        self.client = self.create_client(Trigger, '/controller_manager/init_finish')
        self.client.wait_for_service()
        self.client = self.create_client(SetBool, '/depth_cam/set_ldp_enable')
        self.client.wait_for_service()

        rgb_sub = message_filters.Subscriber(self, Image, '/depth_cam/rgb/image_raw')
        depth_sub = message_filters.Subscriber(self, Image, '/depth_cam/depth/image_raw')
        info_sub = message_filters.Subscriber(self, CameraInfo, '/depth_cam/depth/camera_info')

        # 同步时间戳, 时间允许有误差在0.03s(synchronize timestamps, allowing a time deviation of up to 0.03 seconds)
        sync = message_filters.ApproximateTimeSynchronizer([rgb_sub, depth_sub, info_sub], 3, 0.02)
        sync.registerCallback(self.multi_callback) #执行反馈函数(execute feedback function)

        timer_cb_group = ReentrantCallbackGroup()
        self.timer = self.create_timer(0.0, self.init_process, callback_group=timer_cb_group)
Initialize the parameters required for tracking and grasping, including servo control, chassis control, camera node, and kinematics node. Implement services like start, stop, and set_color. Utilize RGB and depth information from the camera, synchronizing their timestamps to ensure real-time recognition.
init_process:
    def init_process(self):
        self.timer.cancel()

        msg = SetBool.Request()
        msg.data = False
        self.send_request(self.client, msg)

        set_servo_position(self.joints_pub, 1, ((1, 500), (2, 720), (3, 100), (4, 120), (5, 500), (10, 200)))
        time.sleep(1)
        if self.get_parameter('start').value:
            self.target_color = self.get_parameter('color').value

            msg = SetString.Request()
            msg.data = self.target_color
            self.set_color_srv_callback(msg, SetString.Response())

        threading.Thread(target=self.main, daemon=True).start()
        self.create_service(Trigger, '~/init_finish', self.get_node_state)
        self.get_logger().info('\033[1;32m%s\033[0m' % 'start')
Initialize the robotic arm posture and start the main function.
get_node_state:
    def get_node_state(self, request, response):
        response.success = True
        return response
Initialize node status.
shutdown:
    def shutdown(self, signum, frame):
        self.running = False
The callback function for shutting down the program sets the parameter ‘running’ to false and closes the program.
set_color_srv_callback:
    def set_color_srv_callback(self, request, response):
        self.get_logger().info('\033[1;32m%s\033[0m' % "set_color")
        self.target_color = request.data
        self.tracker = ColorTracker(self.target_color)
        self.get_logger().info('\033[1;32mset color: %s\033[0m' % self.target_color)
        self.start = True
        response.success = True
        response.message = "set_color"
        return response
The set_color service allows you to directly set the color for the robot to track using a string.
start_srv_callback:
    def start_srv_callback(self, request, response):
        self.get_logger().info('\033[1;32m%s\033[0m' % "start")
        self.start = True
        response.success = True
        response.message = "start"
        return response
Initialize tracking and griping service.
send_request:
    def send_request(self, client, msg):
        future = client.call_async(msg)
        while rclpy.ok():
            if future.done() and future.result():
                return future.result()
Used to send service request.
multi_callback:
    def multi_callback(self, ros_rgb_image, ros_depth_image, depth_camera_info):
        if self.image_queue.full():
            # 如果队列已满,丢弃最旧的图像(if the queue is full, discard the oldest image)
            self.image_queue.get()
        # 将图像放入队列(put the image into the queue)
        self.image_queue.put((ros_rgb_image, ros_depth_image, depth_camera_info))
Read depth information and RGB images, synchronize them, and then push them into the queue.
get_endpoint:
    def get_endpoint(self):
        endpoint = self.send_request(self.get_current_pose_client, GetRobotPose.Request()).pose
        self.endpoint = common.xyz_quat_to_mat([endpoint.position.x, endpoint.position.y, endpoint.position.z],
                                        [endpoint.orientation.w, endpoint.orientation.x, endpoint.orientation.y, endpoint.orientation.z])
        return self.endpoint
Used to read the camera’s intrinsic and extrinsic parameters, facilitating the conversion between world coordinates and pixel coordinates.
Pick:
    def pick(self, position):
        if position[2] < 0.2:
            yaw = 80
        else:
            yaw = 30
        msg = set_pose_target(position, yaw, [-180.0, 180.0], 1.0)
        res = self.send_request(self.set_pose_target_client, msg)
        if res.pulse:
            servo_data = res.pulse
            set_servo_position(self.joints_pub, 1, ((1, servo_data[0]), ))
            time.sleep(1)
            set_servo_position(self.joints_pub, 1.5, ((1, servo_data[0]),(2, servo_data[1]), (3, servo_data[2]),(4, servo_data[3]), (5, servo_data[4])))
            time.sleep(1.5)
        set_servo_position(self.joints_pub, 0.5, ((10, 600),))
        time.sleep(1)
        position[2] += 0.03

        msg = set_pose_target(position, yaw, [-180.0, 180.0], 1.0)
        res = self.send_request(self.set_pose_target_client, msg)
        if res.pulse:
            servo_data = res.pulse
            set_servo_position(self.joints_pub, 1, ((1, servo_data[0]),(2, servo_data[1]), (3, servo_data[2]),(4, servo_data[3]), (5, servo_data[4])))
            time.sleep(1)
        set_servo_position(self.joints_pub, 1, ((1, 500), (2, 720), (3, 100), (4, 120), (5, 500), (10, 600)))
        time.sleep(1)
        set_servo_position(self.joints_pub, 1, ((1, 125), (2, 635), (3, 120), (4, 200), (5, 500)))
        time.sleep(1)
        set_servo_position(self.joints_pub, 1.5, ((1, 125), (2, 325), (3, 200), (4, 290), (5, 500)))
        time.sleep(1.5)
        set_servo_position(self.joints_pub, 1, ((1, 125), (2, 325), (3, 200), (4, 290), (5, 500), (10, 200)))
        time.sleep(1.5)
        set_servo_position(self.joints_pub, 1, ((1, 500), (2, 720), (3, 100), (4, 150), (5, 500), (10, 200)))
        time.sleep(2)
        self.tracker.yaw = 500
        self.tracker.pitch = 150
        self.tracker.pid_yaw.clear()
        self.tracker.pid_pitch.clear()
        self.stamp = time.time()
        self.moving = False
The robotic arm’s grasping strategy requires input of world coordinates, which are passed to the kinematics node. If the robotic arm can reach this position, it returns the servo angles. The servos are then controlled based on these angles, enabling the arm to grasp objects in the 3D space.
main:
    def main(self):
        while self.running:
            try:
                ros_rgb_image, ros_depth_image, depth_camera_info = self.image_queue.get(block=True, timeout=1)
            except queue.Empty:
                if not self.running:
                    break
                else:
                    continue
            try:
                rgb_image = np.ndarray(shape=(ros_rgb_image.height, ros_rgb_image.width, 3), dtype=np.uint8, buffer=ros_rgb_image.data)
                depth_image = np.ndarray(shape=(ros_depth_image.height, ros_depth_image.width), dtype=np.uint16, buffer=ros_depth_image.data)
                result_image = np.copy(rgb_image)

                h, w = depth_image.shape[:2]
                depth = np.copy(depth_image).reshape((-1, ))
                depth[depth<=0] = 55555

                sim_depth_image = np.clip(depth_image, 0, 2000).astype(np.float64)

                sim_depth_image = sim_depth_image / 2000.0 * 255.0
                bgr_image = cv2.cvtColor(rgb_image, cv2.COLOR_RGB2BGR)

                depth_color_map = cv2.applyColorMap(sim_depth_image.astype(np.uint8), cv2.COLORMAP_JET)

                if self.tracker is not None and self.moving == False and time.time() > self.start_stamp and self.start:
                    result_image, p_y, center, r = self.tracker.proc(rgb_image, result_image, self.lab_data)
                    if p_y is not None:
                        set_servo_position(self.joints_pub, 0.02, ((1, int(p_y[1])), (4, int(p_y[0]))))
                        center_x, center_y = center
                        if center_x > w:
                            center_x = w
                        if center_y > h:
                            center_y = h
This is the main function of the tracking and grasping class. It utilizes camera data for simple localization based on color, then adds depth information to convert to world coordinates. Based on the current state of the robotic arm, it can then begin tracking and grasping.
22.4.5 Object Classification
Overview
Object classification has widespread applications in industry, such as part sorting on production lines and goods classification in logistics warehouses. These applications require rapid and accurate identification and classification of objects to improve production efficiency and automation levels.
In part sorting on production lines, robots can use machine vision and image processing techniques to identify different types of parts and sort them to different locations based on predefined classification criteria. This can enhance production efficiency and accuracy while reducing manual intervention and error rates.
Furthermore, object classification has many other applications in industry, such as quality inspection, defect detection, and automated assembly. These applications also require rapid and accurate identification and classification of objects to ensure the stability and quality of the production process.
This functionality simulates object classification in industrial applications, enabling robots to recognize objects of different shapes and colors in the current environment.
Operation Steps
Note
Note: the entered command should be case sensitive, and the “Tab” key can used to complemented the key words.
Start JetRover and connect it to Nomachine remote control system. Regarding the Remote desktop tool installation and connection, please refer to “JetRover/2. Software/2. Remote Desktop Software.”
Double click on
to open the ROS1 command line terminal.Input the command and press Enter to disable the app service.
sudo systemctl stop start_app_node.service
Click-on
to start the ROS2 command-line terminal.Input the command “roslaunch hiwonder_example object_classification.launch” to start the game.
ros2 launch example object_classification.launch.py
You can review the implementation to see the usage effects and notes.

If you want to exit this game, press “Ctrl+C” in the terminal. Fail to do so requires multiple tries.
Outcome
Bring the object to be recognized (which can be rectangular prisms, spheres, cylinders, and their respective colors) to the front of the camera. Then, the camera will perform recognition and gripping actions in sequence based on their distance from the center of the camera’s viewpoint, starting from the closest to the farther. After successfully picking up an object, it will sort them according to their different categories and place them in their designated positions.
Program Analysis
1. launch Analysis

Program path:
~/ros2_ws/src/example/example/rgbd_function/track_and_grab.launch.py
(1) Initiate Other Launch Files
    depth_camera_launch = IncludeLaunchDescription(
        PythonLaunchDescriptionSource(
            os.path.join(peripherals_package_path, 'launch/depth_camera.launch.py')),
    )
    controller_launch = IncludeLaunchDescription(
        PythonLaunchDescriptionSource(
            os.path.join(controller_package_path, 'launch/controller.launch.py')),
    )

    kinematics_launch = IncludeLaunchDescription(
        PythonLaunchDescriptionSource(
            os.path.join(kinematics_package_path, 'launch/kinematics_node.launch.py')),
    )
depth_camera_launch is used to start the camera.
controller_launch is used to start the control of the chassis, servos, and other components.
kinematics_launch starts the kinematics node to obtain the required servo angles from three-dimensional coordinates.
2. Python Program Analysis
This section will analyze the programming of the anti-fall game. The program source code is located at:
~/ros2_ws/src/example/example/rgbd_function/object_classification.py
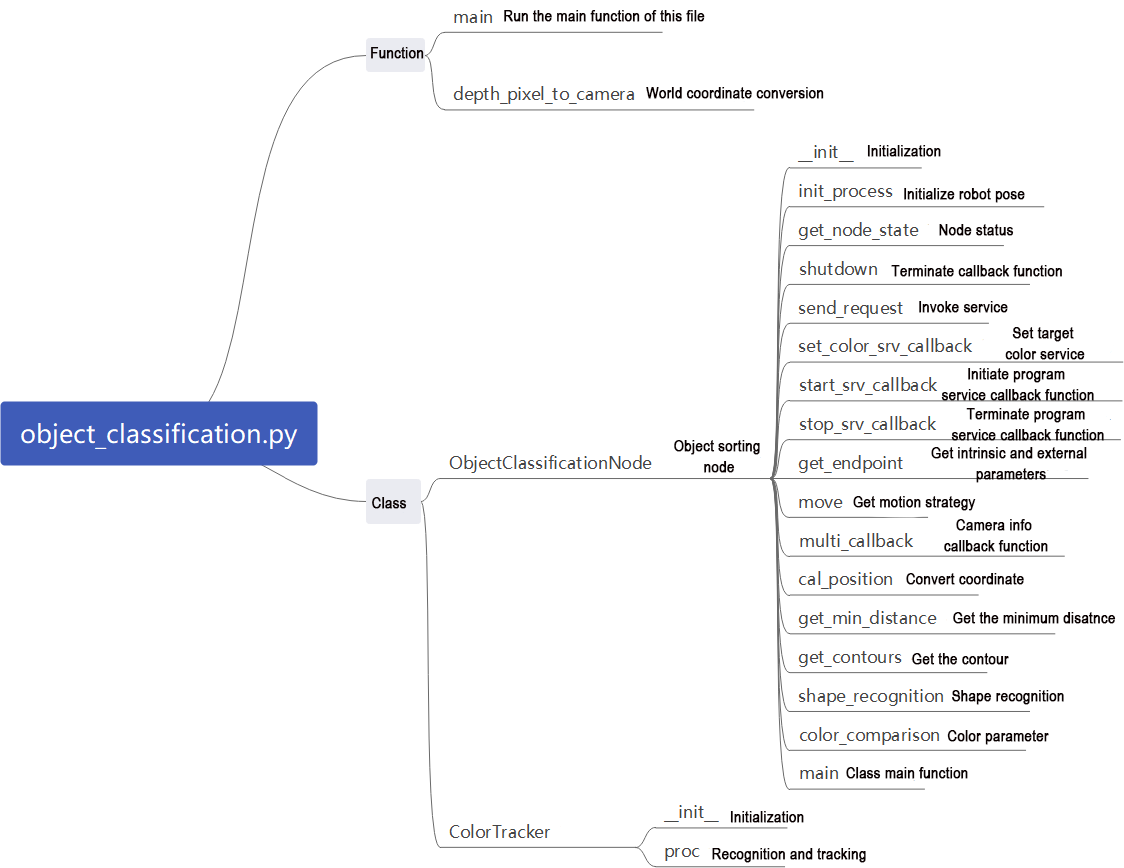
Function:
Main:
def main():
    node = ObjectClassificationNode('object_classification')
    executor = MultiThreadedExecutor()
    executor.add_node(node)
    executor.spin()
    node.destroy_node()
Starts the object classification and grasping node.
depth_pixel_to_camera:
def depth_pixel_to_camera(pixel_coords, intrinsic_matrix):
    fx, fy, cx, cy = intrinsic_matrix[0], intrinsic_matrix[4], intrinsic_matrix[2], intrinsic_matrix[5]
    px, py, pz = pixel_coords
    x = (px - cx) * pz / fx
    y = (py - cy) * pz / fy
    z = pz
    return np.array([x, y, z])
Converts pixel coordinates to world coordinates.
Classes:
ObjectClassificationNode:
class ObjectClassificationNode(Node):
    hand2cam_tf_matrix = [
        [0.0, 0.0, 1.0, -0.101],
        [-1.0, 0.0, 0.0, 0.011],
        [0.0, -1.0, 0.0, 0.045],
        [0.0, 0.0, 0.0, 1.0]
    ]
    pick_offset = [-0.01, -0.01, 0.0, -0.005, 0.0]  # x1, x2, y1, y2, z
Init:
    def __init__(self, name):
        rclpy.init()
        super().__init__(name, allow_undeclared_parameters=True, automatically_declare_parameters_from_overrides=True)
        self.fps = fps.FPS()
        self.moving = False
        self.count = 0
        self.running = True
        self.start = False
        self.shapes = None
        self.colors = None
        self.target_shapes = ''
        self.roi = [30, 240, 170, 470]
        self.endpoint = None
        self.last_position = 0, 0
        self.last_object_info_list = []
        signal.signal(signal.SIGINT, self.shutdown)
        self.language = os.environ['ASR_LANGUAGE']
        self.image_queue = queue.Queue(maxsize=2)

        self.lab_data = common.get_yaml_data("/home/ubuntu/share/lab_tool/lab_config.yaml")
        self.joints_pub = self.create_publisher(ServosPosition, '/servo_controller', 1)
        self.buzzer_pub = self.create_publisher(BuzzerState, '/ros_robot_controller/set_buzzer', 1)

        self.create_service(Trigger, '~/start', self.start_srv_callback)
        self.create_service(Trigger, '~/stop', self.stop_srv_callback)
        self.create_service(SetStringList, '~/set_shape', self.set_shape_srv_callback)
        self.create_service(SetStringList, '~/set_color', self.set_color_srv_callback)

        rgb_sub = message_filters.Subscriber(self, Image, '/depth_cam/rgb/image_raw')
        depth_sub = message_filters.Subscriber(self, Image, '/depth_cam/depth/image_raw')
        info_sub = message_filters.Subscriber(self, CameraInfo, '/depth_cam/depth/camera_info')

        # 同步时间戳, 时间允许有误差在0.03s(synchronize timestamps, allowing a time discrepancy of up to 0.03 seconds)
        sync = message_filters.ApproximateTimeSynchronizer([rgb_sub, depth_sub, info_sub], 3, 0.02)
        sync.registerCallback(self.multi_callback)
        self.client = self.create_client(Trigger, '/controller_manager/init_finish')
        self.client.wait_for_service()
        self.client = self.create_client(SetBool, '/depth_cam/set_ldp_enable')
        self.client.wait_for_service()

        timer_cb_group = ReentrantCallbackGroup()
        self.set_joint_value_target_client = self.create_client(SetJointValue, '/kinematics/set_joint_value_target', callback_group=timer_cb_group)
        self.set_joint_value_target_client.wait_for_service()
        self.kinematics_client = self.create_client(SetRobotPose, '/kinematics/set_pose_target')
        self.kinematics_client.wait_for_service()

        self.controller = ActionGroupController(self.create_publisher(ServosPosition, 'servo_controller', 1), '/home/ubuntu/share/arm_pc/ActionGroups')

        self.timer = self.create_timer(0.0, self.init_process, callback_group=timer_cb_group)
Initializes parameters required for object classification, calls servo control, chassis control, camera node, and kinematics node. Implements services like start, stop, set_shape, and set_color. Utilizes RGB and depth information from the camera, synchronizing their timestamps to ensure real-time recognition.
init_process:
    def init_process(self):
        self.timer.cancel()

        msg = SetBool.Request()
        msg.data = False
        self.send_request(self.client, msg)

        self.goto_default()

        if self.get_parameter('start').value:
            if self.get_parameter('category').value == 'shape':
                msg = SetStringList.Request()
                msg.data = ['sphere', 'cuboid', 'cylinder']
                self.set_shape_srv_callback(msg, SetStringList.Response())
            else:
                msg = SetStringListi.Request()
                msg.data = ['red', 'green', 'blue']
                self.set_color_srv_callback(msg, SetStringList.Response())

        threading.Thread(target=self.main, daemon=True).start()
        self.create_service(Trigger, '~/init_finish', self.get_node_state)
        self.get_logger().info('\033[1;32m%s\033[0m' % 'start')
Initializes robotic arm posture, shape, and color, then calls the main function.
get_node_state:
    def get_node_state(self, request, response):
        response.success = True
        return response
Initializes node state.
shutdown:
    def shutdown(self, signum, frame):
        self.running = False
        self.get_logger().info('\033[1;32m%s\033[0m' % "shutdown")
Callback function to shut down the program; sets the ‘running’ parameter to false to close the program.
send_request:
    def send_request(self, client, msg):
        future = client.call_async(msg)
        while rclpy.ok():
            if future.done() and future.result():
                return future.result()
Publishes service requests.
set_shape_srv_callback:
    def set_shape_srv_callback(self, request, response):
        self.get_logger().info('\033[1;32m%s\033[0m' % "set_shape")
        self.colors = None
        self.shapes = request.data
        self.start = True
        response.success = True
        response.message = "set_shape"
        return response
Service callback to set the shape for the robot to recognize using a string.
set_color_srv_callback:
    def set_color_srv_callback(self, request, response):
        self.get_logger().info('\033[1;32m%s\033[0m' % "set_color")
        self.shapes = None
        self.colors = request.data
        self.start = True
        response.success = True
        response.message = "set_color"
        return response
Service callback to set the color for the robot to recognize using a string.
start_srv_callback:
    def start_srv_callback(self, request, response):
        self.get_logger().info('\033[1;32m%s\033[0m' % "start")
        self.start = True
        response.success = True
        response.message = "start"
        return response
Service callback to start object classification.
stop_srv_callback:
    def stop_srv_callback(self, request, response):
        self.get_logger().info('\033[1;32m%s\033[0m' % "stop")
        self.start = False
        self.colors = None
        self.shapes = None
        self.moving = False
        self.count = 0
        self.target_shapes = ''
        self.last_position = 0, 0
        self.last_object_info_list = []
        response.success = True
        response.message = "stop"
        return response
Service callback to stop object classification, clearing or closing various parameters to halt operation.
goto_default:
    def goto_default(self):
        msg = set_joint_value_target([500.0, 470.0, 220.0, 90.0, 500.0])
        endpoint = self.send_request(self.set_joint_value_target_client, msg)
        pose_t = endpoint.pose.position
        pose_r = endpoint.pose.orientation
        set_servo_position(self.joints_pub, 1, ((1, 500), (2, 470), (3, 220), (4, 90), (5, 500), (10, 200)))
        self.endpoint = common.xyz_quat_to_mat([pose_t.x, pose_t.y, pose_t.z], [pose_r.w, pose_r.x, pose_r.y, pose_r.z])
Retrieves camera intrinsic and extrinsic parameters for converting between world and pixel coordinates.
Move:
    def move(self, obejct_info):
        shape, pose_t = obejct_info[:2]
        color, angle = obejct_info[-2:]
        msg = BuzzerState()
        msg.freq = 1900
        msg.on_time = 0.2
        msg.off_time = 0.01
        msg.repeat = 1
        self.buzzer_pub.publish(msg)
        time.sleep(1)
        if 'sphere' in shape:
            offset_z = -0.015 + self.pick_offset[-1]
        else:
            offset_z = 0.01 + self.pick_offset[-1]
        if pose_t[0] > 0.21:
            offset_x = self.pick_offset[0]
        else:
            offset_x = self.pick_offset[1]
        if pose_t[1] > 0:
            offset_y = self.pick_offset[2]
        else:
            offset_y = self.pick_offset[3]
        pose_t[0] += offset_x
        pose_t[1] += offset_y
        pose_t[2] += offset_z
        msg = kinematics_control.set_pose_target(pose_t, 85)
        res1 = self.send_request(self.kinematics_client, msg)
        if res1.pulse:
            servo_data = res1.pulse
            set_servo_position(self.joints_pub, 1.5, ((1, servo_data[0]), (2, servo_data[1]), (3, servo_data[2]), (4, servo_data[3]), (5, servo_data[4])))
            time.sleep(1.5)
        pose_t[2] -= 0.05
        msg = kinematics_control.set_pose_target(pose_t, 85)
        res2 = self.send_request(self.kinematics_client, msg)
        if angle != 0:
            if 'sphere' in shape or ('cylinder' in shape and 'cylinder_horizontal_' not in shape):
                angle = 500
Grasping strategy for the robotic arm. Takes world coordinates as input, computes servo angles through the kinematics node if reachable, controls the servos to grasp objects, and uses different action sets for classification based on the object’s shape.
multi_callback:
    def multi_callback(self, ros_rgb_image, ros_depth_image, depth_camera_info):
        if self.image_queue.full():
            # 如果队列已满,丢弃最旧的图像(if the queue is full, discard the oldest image)
            self.image_queue.get()
        # 将图像放入队列(put the image into the queue)
        self.image_queue.put((ros_rgb_image, ros_depth_image, depth_camera_info))
Reads depth and RGB images, synchronizes them, and pushes them into a queue.
cal_position:
    def cal_position(self, x, y, depth, intrinsic_matrix):
        position = depth_pixel_to_camera([x, y, depth / 1000], intrinsic_matrix)
        position[0] -= 0.01
        pose_end = np.matmul(self.hand2cam_tf_matrix, common.xyz_euler_to_mat(position, (0, 0, 0)))
        world_pose = np.matmul(self.endpoint, pose_end)
        pose_t, pose_r = common.mat_to_xyz_euler(world_pose)
        return pose_t
Converts pixel coordinates to world coordinates using the calibration matrix between the gripper and the camera.
get_min_distance:
    def get_min_distance(self, depth_image):
        ih, iw = depth_image.shape[:2]
        # 屏蔽掉一些区域,降低识别条件,使识别跟可靠(mask certain areas to lower recognition conditions and enhance reliability)
        depth_image[:, :self.roi[2]] = np.array([[1000, ] * self.roi[2]] * ih)
        depth_image[:, self.roi[3]:] = np.array([[1000, ] * (iw - self.roi[3])] * ih)
        depth_image[self.roi[1]:, :] = np.array([[1000, ] * iw] * (ih - self.roi[1]))
        depth_image[:self.roi[0], :] = np.array([[1000, ] * iw] * self.roi[0])
        depth = np.copy(depth_image).reshape((-1,))
        depth[depth <= 0] = 55555  # 距离为0可能是进入死区,或者颜色问题识别不到,将距离赋一个大值(a distance of 0 may indicate entry into a dead zone or failure to recognize due to color issues. Assign a large value to the distance)

        min_index = np.argmin(depth)  # 距离最小的像素(the pixel with the minimum distance)
        min_y = min_index // iw
        min_x = min_index - min_y * iw

        min_dist = depth_image[min_y, min_x]  # 获取最小距离值(get the minimum distance)
        return min_dist

    def get_contours(self, depth_image, min_dist):
        depth_image = np.where(depth_image > 280, 0, depth_image)
        depth_image = np.where(depth_image > min_dist + 40, 0, depth_image)  # 将深度值大于最小距离15mm的像素置0(set pixels with depth values greater than the minimum distance of 15mm to 0)
        sim_depth_image_sort = np.clip(depth_image, 0, 280).astype(np.float64) / 280 * 255
        depth_gray = sim_depth_image_sort.astype(np.uint8)
        _, depth_bit = cv2.threshold(depth_gray, 1, 255, cv2.THRESH_BINARY)
        # cv2.imshow('depth_bit', depth_bit)
        contours, hierarchy = cv2.findContours(depth_bit, cv2.RETR_EXTERNAL, cv2.CHAIN_APPROX_NONE)

        return contours
Masks parts of the image to enhance recognition reliability, outputs the distance to the nearest point from the camera using cropping and comparison methods.
get_contours:
    def get_contours(self, depth_image, min_dist):
        depth_image = np.where(depth_image > 280, 0, depth_image)
        depth_image = np.where(depth_image > min_dist + 40, 0, depth_image)  # 将深度值大于最小距离15mm的像素置0(set pixels with depth values greater than the minimum distance of 15mm to 0)
        sim_depth_image_sort = np.clip(depth_image, 0, 280).astype(np.float64) / 280 * 255
        depth_gray = sim_depth_image_sort.astype(np.uint8)
        _, depth_bit = cv2.threshold(depth_gray, 1, 255, cv2.THRESH_BINARY)
        # cv2.imshow('depth_bit', depth_bit)
        contours, hierarchy = cv2.findContours(depth_bit, cv2.RETR_EXTERNAL, cv2.CHAIN_APPROX_NONE)

        return contours
Masks areas using numpy functions to enable the robot to recognize various objects.
shape_recognition:
    def shape_recognition(self, rgb_image, depth_image, depth_color_map, intrinsic_matrix, min_dist):
        object_info_list = []
        image_height, image_width = depth_image.shape[:2]
        if min_dist <= 300:
            sphere_index = 0
            cuboid_index = 0
            cylinder_index = 0
            cylinder_horizontal_index = 0
            contours = self.get_contours(depth_image, min_dist)

            for obj in contours:
                area = cv2.contourArea(obj)
                if area < 300:
                    continue
                # cv2.drawContours(depth_color_map, obj, -1, (255, 255, 0), 10)  # 绘制轮廓线(draw contour line)
                perimeter = cv2.arcLength(obj, True)  # 计算轮廓周长(calculate the perimeter of the contour)
                approx = cv2.approxPolyDP(obj, 0.035 * perimeter, True)  # 获取轮廓角点坐标(get the coordinates of the contour vertices)
                # cv2.drawContours(depth_color_map, approx, -1, (255, 0, 0), 4)  # 绘制轮廓线(get contour line)
Performs shape recognition based on contour area size, calculates contour width, height, and angle using OpenCV, and determines shapes based on standard deviation calculations on the contour.
color_comparison:
    def color_comparison(self, rgb):
        if rgb[0] > rgb[1] and rgb[0] > rgb[2]:
            return 'red'
        elif rgb[2] > rgb[1] and rgb[2] > rgb[1]:
            return 'blue'
        else:
            return None
Compares recognized contours to verify if they match the required color.
Main:
    def main(self):
        while self.running:
            try:
                ros_rgb_image, ros_depth_image, depth_camera_info = self.image_queue.get(block=True, timeout=1)
            except queue.Empty:
                if not self.running:
                    break
                else:
                    continue
            try:
                rgb_image = np.ndarray(shape=(ros_rgb_image.height, ros_rgb_image.width, 3), dtype=np.uint8, buffer=ros_rgb_image.data)
                depth_image = np.ndarray(shape=(ros_depth_image.height, ros_depth_image.width), dtype=np.uint16, buffer=ros_depth_image.data)
                # cv2.imshow('rgb', cv2.applyColorMap(depth_image.astype(np.uint8), cv2.COLORMAP_JET))
                depth_image = depth_image.copy()
                min_dist = self.get_min_distance(depth_image)
                sim_depth_image = np.clip(depth_image, 0, 350).astype(np.float64) / 350 * 255
                depth_color_map = cv2.applyColorMap(sim_depth_image.astype(np.uint8), cv2.COLORMAP_JET)
                if not self.moving:
                    object_info_list = self.shape_recognition(rgb_image, depth_image, depth_color_map, depth_camera_info.k, min_dist)
                    if self.start:
                        reorder_object_info_list = object_info_list
                        if object_info_list:
                            if self.last_object_info_list:
                                # 对比上一次的物体的位置来重新排序(reorder based on the contrast of the previous object's position)
                                reorder_object_info_list = position_reorder(object_info_list, self.last_object_info_list, 20)
                        if reorder_object_info_list:
                            if not self.target_shapes:
                                if self.shapes is not None:
                                    indices = [i for i, info in enumerate(reorder_object_info_list) if info[0].split('_')[0] in self.shapes]
                                else:
                                    indices = [i for i, info in enumerate(reorder_object_info_list) if self.color_comparison(info[-2]) in self.colors]
                                if indices:
                                    min_depth_index = min(indices, key=lambda i: reorder_object_info_list[i][2])
                                    self.target_shapes = reorder_object_info_list[min_depth_index][0].split('_')[0]
                            else:
                                # for i, info in enumerate(reorder_object_info_list):

                                target_index = [i for i, info in enumerate(reorder_object_info_list) if info[0].split('_')[0] == self.target_shapes]
                                if target_index:
                                    target_index = target_index[0]
                                    obejct_info = reorder_object_info_list[target_index]
                                    x, y, w, h, center, width, height = obejct_info[3]
                                    angle = obejct_info[-1]
                                    cv2.putText(depth_color_map, self.target_shapes, (x + w // 2, y + (h // 2) - 10), cv2.FONT_HERSHEY_COMPLEX, 1.0,
                                                (0, 0, 0), 2, cv2.LINE_AA)
                                    cv2.putText(depth_color_map, self.target_shapes, (x + w // 2, y + (h // 2) - 10), cv2.FONT_HERSHEY_COMPLEX, 1.0,
                                                (255, 255, 255), 1)
                                    cv2.drawContours(depth_color_map, [np.int0(cv2.boxPoints((center, (width, height), angle)))], -1,
                                                     (0, 0, 255), 2, cv2.LINE_AA)
                                    position = obejct_info[1]
                                    e_distance = round(math.sqrt(pow(self.last_position[0] - position[0], 2)) + math.sqrt(
                                        pow(self.last_position[1] - position[1], 2)), 5)
                                    if e_distance <= 0.005:
                                        self.count += 1
                                    else:
                                        self.count = 0
                                    if self.count > 5:
                                        self.count = 0
                                        self.target_shapes = None
                                        self.moving = True
                                        if self.colors is not None:
                                            voice_play.play(self.color_comparison(obejct_info[-2]), language=self.language)
                                        else:
                                            voice_play.play(obejct_info[0].split('_')[0], language=self.language)
                                        threading.Thread(target=self.move, args=(obejct_info,)).start()
                                    self.last_position = position
                                else:
                                    self.target_shapes = None
Main function of the object classification class. Uses camera data to identify shapes based on depth information, compares RGB images to verify if recognized contours match the target color, sorts objects by height, and performs grasping and classification after sorting.