25 AI Large Language Model Course (Overseas Version)
25.1 Multi-modal Models Application
25.1.1 Configure the Large Model API Key
Note
Note: This section requires registering on the official OpenAI website and obtaining an API key for accessing large language models.
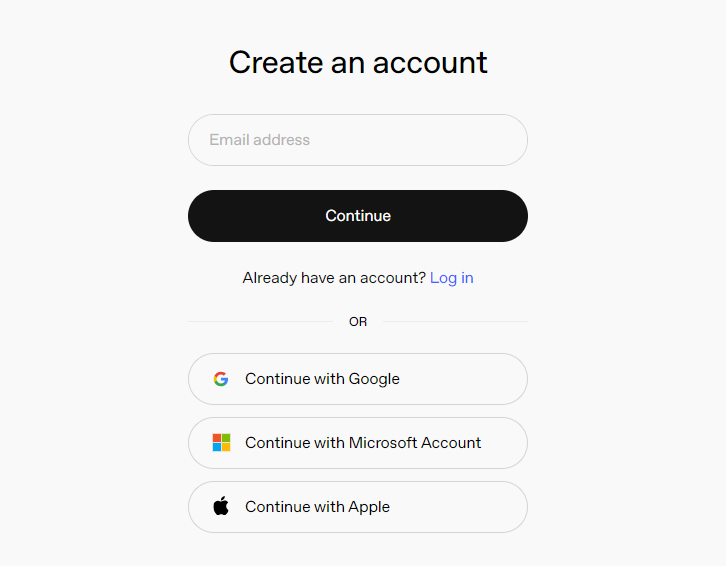
Register and Deploy OpenAI Account
Copy and open the following URL:

Register and log in using a Google, Microsoft, or Apple account, as prompted.

After logging in, click the Settings button, then go to Billing, and click Payment Methods to add a payment method. Recharge your account to purchase tokens as needed.

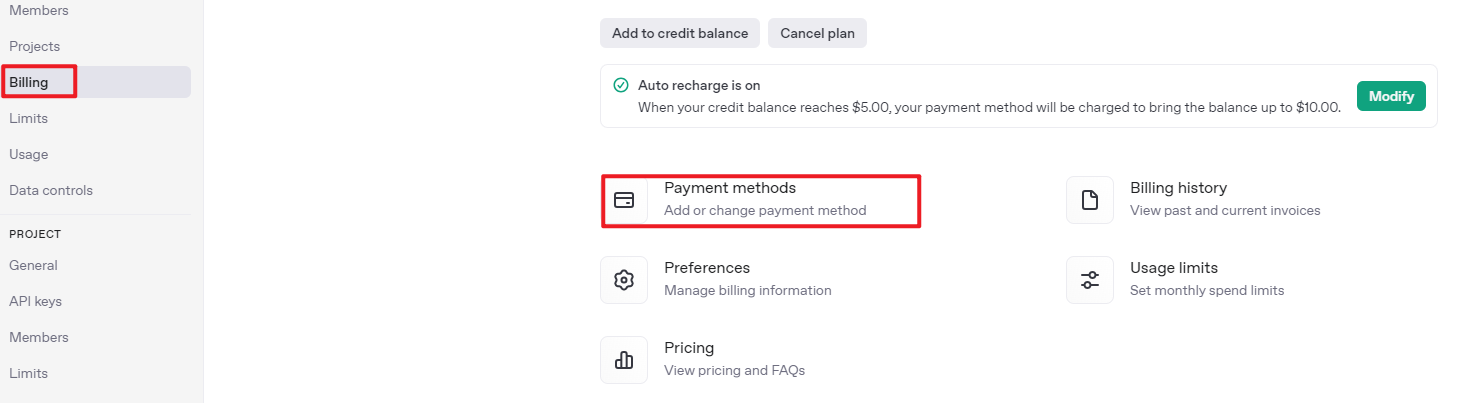
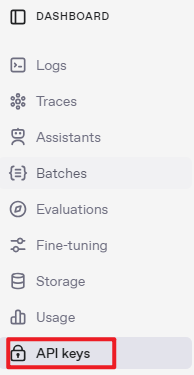
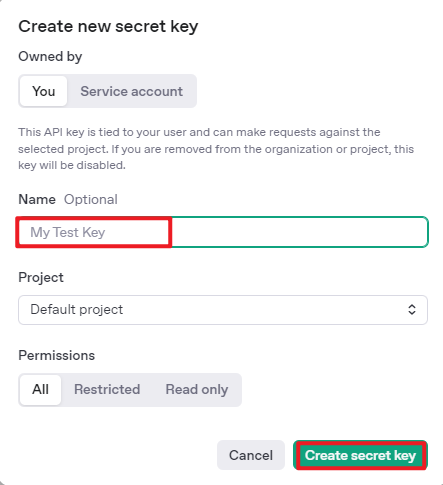
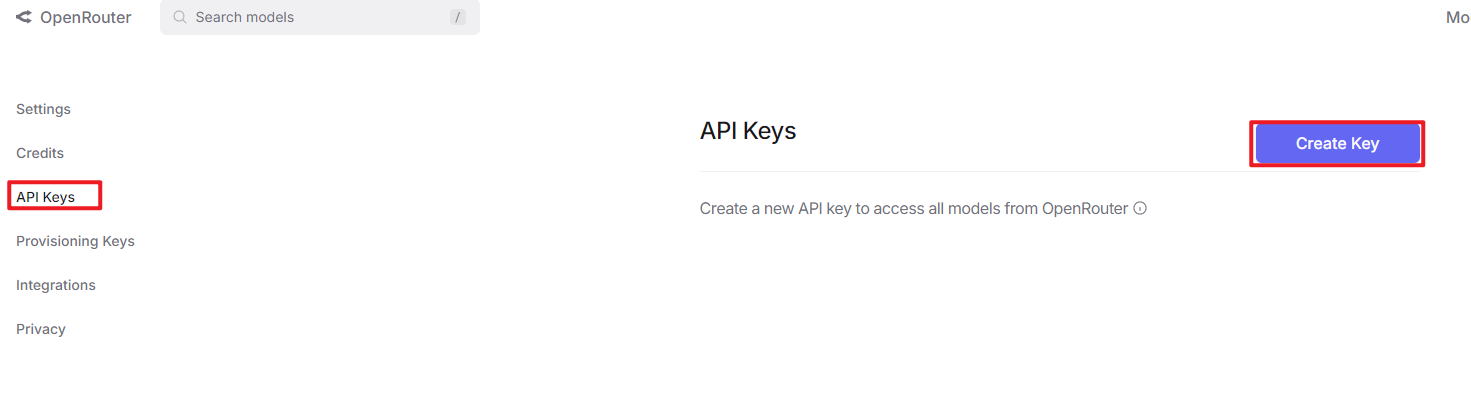
Once your account is set up, go to the API Keys section and click Create new key. Follow the instructions to generate a new API key and save it securely for later use.


The creation and deployment of the large model have been completed. This API will be used in subsequent lessons.
Register and Deploy openrouter Account
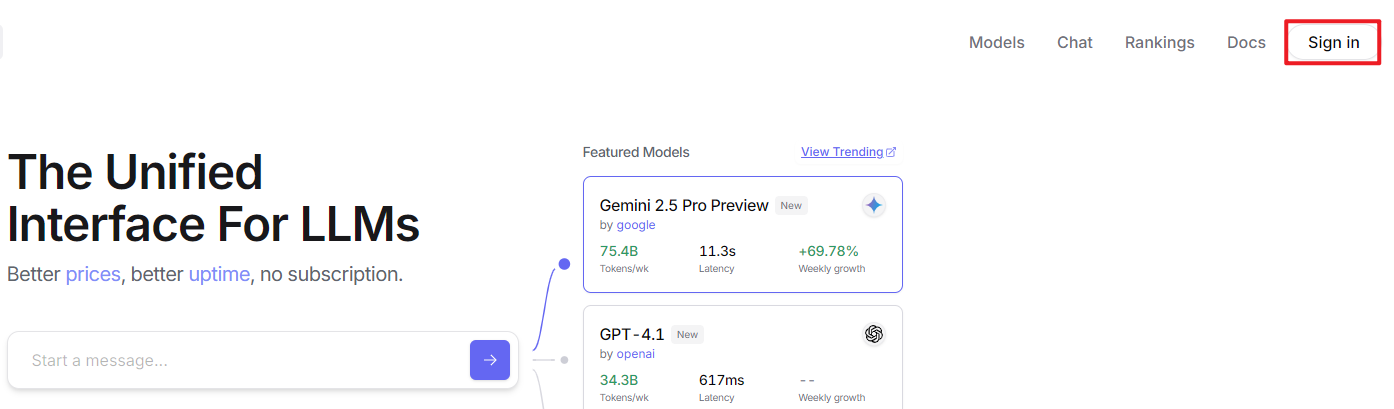
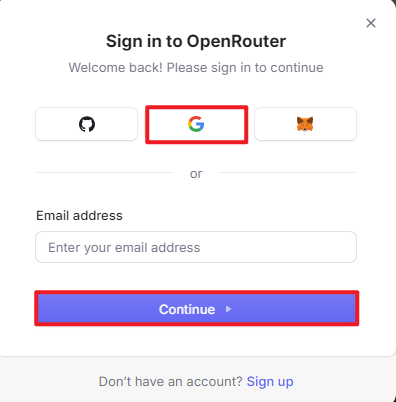
Copy and open the following URL:https://openrouter.ai/. Click “Log In”, and register or sign in using Google or another available account.


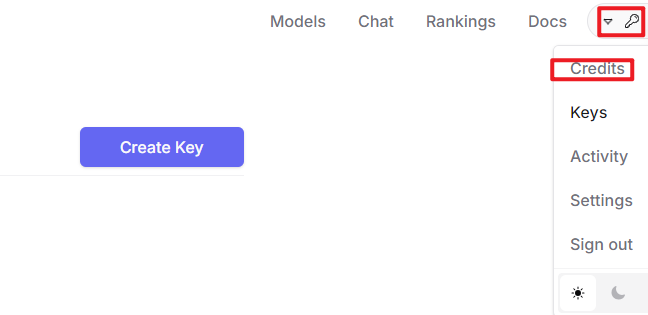
After logging in, click the icon in the top-right corner, then select “Credits” to add a payment method.


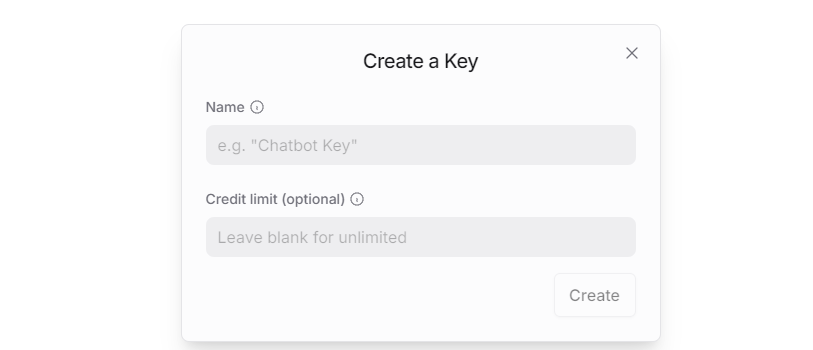
Create an API key. Go to “API Keys”, then click “Create Key”. Follow the prompts to generate a key. Save the API key securely for later use.


At this point, the creation and deployment of the large model have been completed; this API will be used in subsequent lessons.
25.1.2 Version Confirmation
Before starting this feature, verify that the correct microphone configuration is set in the system.
Log in to the machine remotely via NoMachine. Then click the desktop icon
 to access the configuration interface.
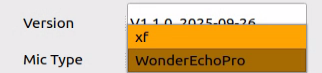
On the right side of the interface, select the appropriate microphone type based on the hardware being used.

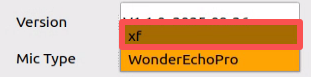
For the Six-Microphone Array, select xf as the microphone type as shown in the figure.


Then, click Save.

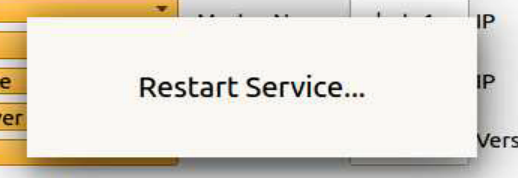
Click “Apply” and wait until the “Service is restarting” notification disappears; once it does, the configuration has been saved to the system environment.

Then, click Exit to close the interface.

25.1.3 Voice Control with Multimodal Models
Brief Overview of Operation
Once the program starts, Circular Microphone Array will announce: “I’m Ready.”
To activate the voice device, speak the designated wake words: “hello hiwonder.” Upon successful activation, the voice device will respond with “I’m Here.” You can then control the robot by voice to perform the corresponding actions—for example, “move forward, backward, left, right, strafe, then drift.” The voice device will announce the generated response after processing and execute the matching movements.
Getting Ready
1. Version Confirmation
Before starting this feature, verify Version Confirmation that the correct microphone configuration is set in the system.
2. Configuring the Large Model API-KEY
Open a new command-line terminal and enter the following command to access the configuration file.
vim /home/ubuntu/ros2_ws/src/large_models/large_models/large_models/config.py
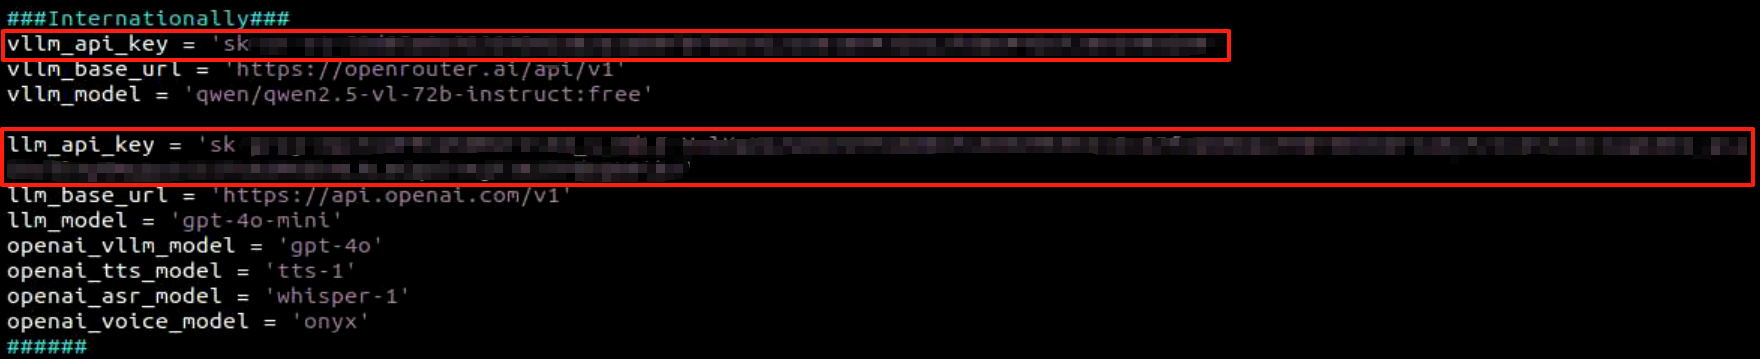
Refer to 25.1.1 Configure the Large Model API Key to obtain the large model API-KEY: paste the vision model (from the OpenRouter website) into the vllm_api_key parameter, and the LLM model (from the OpenAI website) into the llm_api_key parameter, as indicated by the red boxes in the figure below.
Enabling and Disabling the Feature
Note
 Command input is case-sensitive and space-sensitive.
The robot must be connected to the Internet, either in STA (LAN) mode or AP (direct connection) mode via Ethernet.
Open the command line terminal from the left side of the system interface.
 In the terminal window, enter the following command and press Enter to stop the auto-start service
Enter the command to disable the auto-start service of the mobile app.
sudo systemctl stop start_app_node.service
Open the command line terminal from the left side of the system interface.
In the terminal window, enter the following command and press Enter to run the voice control feature.ros2 launch large_models_examples llm_control_move.launch.py
When the terminal displays output shown in the figure Circular Microphone Array announces “I’m ready”, the device has completed initialization. Then, you can say the wake words: “hello hiwonder”.

When the terminal displays the corresponding output shown in the figure and the voice device responds with “I’m here”, it indicates successful activation. The system will begin recording the user’s voice command.

When the terminal displays the next output as the reference image, it shows the recognized speech transcribed by the voice device.

Upon successful recognition by the speech recognition service of cloud-based large speech model, the parsed command will be displayed under the
publish_asr_resultoutput in the terminal.
Upon receiving user input shown in the figure, the terminal will display output indicating that the cloud-based large language model has been successfully invoked. The model will interpret the command, generate a language response, and execute a corresponding action based on the meaning of the command.
The response is automatically generated by the model. While the semantic content is accurate, the wording and structure may vary due to randomness in language generation.
When the terminal shows the output shown in the figure indicating the end of one interaction cycle, the system is ready for the next round. To initiate another interaction, repeat step 4 by speaking the wake words again.

To exit the feature, press Ctrl+C in the terminal. If the feature does not shut down immediately, press Ctrl+C multiple times. If it still fails to exit, open a new terminal window and run the following command to terminate all active ROS processes and related programs.
~/.stop_ros.sh
Project Outcome
Once the mode is activated, you can phrase commands naturally—for example, “move forward, backward, left, right, strafe, then drift”—and the robot will translate, slide sideways, and finish with a spinning drift.
Program Brief Analysis
1. Launch File Analysis
File Path:
/home/ubuntu/ros2_ws/src/large_models_examples/large_models_examples/llm_control_move.launch.py
(1) Import Libraries
import os
from ament_index_python.packages import get_package_share_directory

from launch_ros.actions import Node
from launch.substitutions import LaunchConfiguration
from launch import LaunchDescription, LaunchService
from launch.launch_description_sources import PythonLaunchDescriptionSource
from launch.actions import IncludeLaunchDescription, DeclareLaunchArgument, OpaqueFunction
os: used for handling file paths and operating system-related functions.
ament_index_python.packages.get_package_share_directory: retrieves the share directory path of ROS 2 package.launch_ros.actions.Node: used to define ROS 2 nodes.launch.substitutions.LaunchConfiguration: retrieves parameter values defined in the Launch file.LaunchDescription, LaunchService: used to define and start the Launch file.launch_description_sources PythonLaunchDescriptionSource: enables the inclusion of other Launch files.launch.actions.IncludeLaunchDescription, DeclareLaunchArgument, OpaqueFunction: used to define actions and arguments within the Launch file.
(2) Definition of the launch_setup Function
def launch_setup(context):
    mode = LaunchConfiguration('mode', default=1)
    mode_arg = DeclareLaunchArgument('mode', default_value=mode)

    controller_package_path = get_package_share_directory('controller')
    large_models_package_path = get_package_share_directory('large_models')

    controller_launch = IncludeLaunchDescription(
        PythonLaunchDescriptionSource(
            os.path.join(controller_package_path, 'launch/controller.launch.py')),
    )

    large_models_launch = IncludeLaunchDescription(
        PythonLaunchDescriptionSource(
            os.path.join(large_models_package_path, 'launch/start.launch.py')),
        launch_arguments={'mode': mode}.items(),
    )


    llm_control_move_node = Node(
        package='large_models_examples',
        executable='llm_control_move',
        output='screen',
    )

    return [mode_arg,
            controller_launch,
            large_models_launch,
            llm_control_move_node,
            ]
This function is used to configure and initialize launch actions.
mode = LaunchConfiguration('mode', default=1)defines a launch argument named mode with a default value of 1.mode_arg = DeclareLaunchArgument('mode', default_value=mode)declares the mode argument and includes it in the launch description.Controller_pathandlarge_models_package_pathrepresent the shared directory paths for the controller package responsible for robot movement and thelarge_models package.controller_launchincludes the controller.launch.py Launch file from the controller package using IncludeLaunchDescription.large_models_launchincludes the start.launch.py Launch file from thelarge_models packageusing IncludeLaunchDescription and passes the mode argument to it.The function returns a list of all defined launch actions.
(3) Definition of the generate_launch_description Function
def generate_launch_description():
    return LaunchDescription([
        OpaqueFunction(function = launch_setup)
    ])
This function is responsible for generating the complete launch description.
The
launch_setupfunction is incorporated using OpaqueFunction.
(4) Main Program Entry
if __name__ == '__main__':
    # Create a LaunchDescription object(创建一个LaunchDescription对象)
    ld = generate_launch_description()

    ls = LaunchService()
    ls.include_launch_description(ld)
    ls.run()
ld = generate_launch_description()generates the launch description object.ls = LaunchService()creates the launch service object.ls.include_launch_description(ld)adds the launch description to the service.ls.run()starts the service and execute all launch actions.
2. Python File Analysis
File Path:
/home/ubuntu/ros2_ws/src/large_models_examples/large_models_examples/llm_control_move.py
(1) Prompt Template Definition
else:
    PROMPT = '''
**Role
You are an intelligent car that can be controlled via linear velocity on the x and y axes (in meters per second), and angular velocity on the z axis (in radians per second). The movement duration is controlled by t (in seconds).
Your job is to generate a corresponding instruction based on user input.

**Requirements
- Ensure valid velocity ranges:
Linear velocity: x, y ∈ [-1.0, 1.0] (negative values mean reverse direction)
Angular velocity: z ∈ [-1.0, 1.0] (negative: clockwise, positive: counterclockwise)
- Execute multiple actions sequentially, returning a list of movement instructions under the action field.
- Always append a stop command [0.0, 0.0, 0.0, 0.0] at the end to ensure the car halts.
- Default values:
x and y: 0.2
z: 1.0
t: 2.0
- For each action sequence, craft a short (5–10 characters), witty, and endlessly variable response to make interactions fun and engaging.
- Output only the final JSON result. No explanations, no extra output.
- Format:
{
  "action": [[x1, y1, z1, t1], [x2, y2, z2, t2], ..., [0.0, 0.0, 0.0, 0.0]],
  "response": "short response"
}
- Possess strong mathematical reasoning to interpret and compute physical quantities like distance, time, and velocity.

## Special Notes
The "action" key should contain an array of stringified movement instructions in execution order. If no valid command is found, output an empty array [].
The "response" key should contain a creatively written, concise reply that matches the required tone and length.
If the input command implies a backward-left direction, then the output values of X and Z will be negative.
If the input command implies a backward-right direction, then the output values of X will be negative and Z will be positive.

**Examples
Input: Move forward for 2 seconds, then rotate clockwise for 1 second
Output:
{
  "action": [[0.2, 0.0, 0.0, 2.0], [0.0, 0.0, 1.0, 1.0], [0.0, 0.0, 0.0, 0.0]],
  "response": "Full speed ahead, spin and go!"
}

Input: Move forward 1 meter
Output:
{
  "action": [[0.2, 0.0, 0.0, 5.0], [0.0, 0.0, 0.0, 0.0]],
  "response": "Got it!"
}
    '''
(2) Variable Initialization
	class LLMControlMove(Node):
    def __init__(self, name):
        rclpy.init()
        super().__init__(name)

        self.action = []
        self.llm_result = ''
        self.running = True
        self.interrupt = False
        self.action_finish = False
        self.play_audio_finish = False
self.action: stores the list of actions parsed from LLM responses.
self.llm_result: stores the result received from the LLM.
self.running: a flag indicating whether the main loop is actively running.
self.interrupt: a flag indicating whether the current function has been interrupted or stopped.
Self.action_finish: a flag indicating whether the current action has been completed.
self.play_audio_finish: a flag indicating whether the audio playback has finished.
(3) Publisher Creation
self.tts_text_pub = self.create_publisher(String, 'tts_node/tts_text', 1)
Creates a publisher that sends String messages to the topic /tts_node/tts_text. This topic is used to send text-to-speech (TTS) content for voice feedback.
(4) Subscriber Creation
	        self.create_subscription(String, 'agent_process/result', self.llm_result_callback, 1)
        self.create_subscription(Bool, 'vocal_detect/wakeup', self.wakeup_callback, 1, callback_group=timer_cb_group)
        self.create_subscription(Bool, 'tts_node/play_finish', self.play_audio_finish_callback, 1, callback_group=timer_cb_group)
        self.set_model_client = self.create_client(SetModel, 'agent_process/set_model')
        self.set_model_client.wait_for_service()
(5) Create A Timer
self.timer = self.create_timer(0.0, self.init_process, callback_group=timer_cb_group)
(6) LLM Model Configuration
        msg = SetModel.Request()
        # msg.model = 'qwen-plus-latest'
        msg.model = llm_model
        msg.model_type = 'llm'
        msg.api_key = api_key
        msg.base_url = base_url
        self.send_request(self.set_model_client, msg)
(7) play_audio_finish_callback Method:
	    def play_audio_finish_callback(self, msg):
        msg = SetBool.Request()
        msg.data = True
        self.send_request(self.awake_client, msg)
        # msg = SetInt32.Request()
        # msg.data = 1
        # self.send_request(self.set_mode_client, msg)
        self.play_audio_finish = msg.data
Callback function triggered after voice playback finishes. Re-enables voice wake up functionality.
(8) process Method
    def process(self):
        while self.running:
            if self.llm_result:
                msg = String()
                if 'action' in self.llm_result:  # If a corresponding action is returned, extract and process it (如果有对应的行为返回那么就提取处理)
                    result = eval(self.llm_result[self.llm_result.find('{'):self.llm_result.find('}') + 1])
                    self.get_logger().info(str(result))
                    action_list = []
                    if 'action' in result:
                        action_list = result['action']
                    if 'response' in result:
                        response = result['response']
                    msg.data = response
                    self.tts_text_pub.publish(msg)
                    for i in action_list:
                        msg = Twist()
                        msg.linear.x = float(i[0])
                        msg.linear.y = float(i[1])
                        msg.angular.z = float(i[2])
                        self.mecanum_pub.publish(msg)
                        time.sleep(i[3])
                        if self.interrupt:
                            self.interrupt = False
                            self.mecanum_pub.publish(Twist())
                            break
                else:  # If there is no corresponding action, only respond (没有对应的行为,只回答)
                    response = self.llm_result
                    msg.data = response
                    self.tts_text_pub.publish(msg)
                self.action_finish = True
                self.llm_result = ''
            else:
                time.sleep(0.01)
            if self.play_audio_finish and self.action_finish:
                self.play_audio_finish = False
                self.action_finish = False
                # msg = SetInt32.Request()
                # msg.data = 2
                # self.send_request(self.set_mode_client, msg)
        rclpy.shutdown()
The method acts as the main loop responsible for handling commands from the LLM, interpreting them, and executing corresponding actions. It also supports generating and broadcasting voice feedback.
(9) main Function
def main():
    node = LLMControlMove('llm_control_move')
    executor = MultiThreadedExecutor()
    executor.add_node(node)
    executor.spin()
    node.destroy_node()
The function initializes a ROS 2 node.
Start a multi-threaded executor to handle callbacks.
Clean up and destroys the node upon program exit to release resources.
25.1.4 Autonomous Line Following with Multimodal Models
Brief Overview of Operation
Once the program starts, Circular Microphone Array will announce: “I’m Ready.”
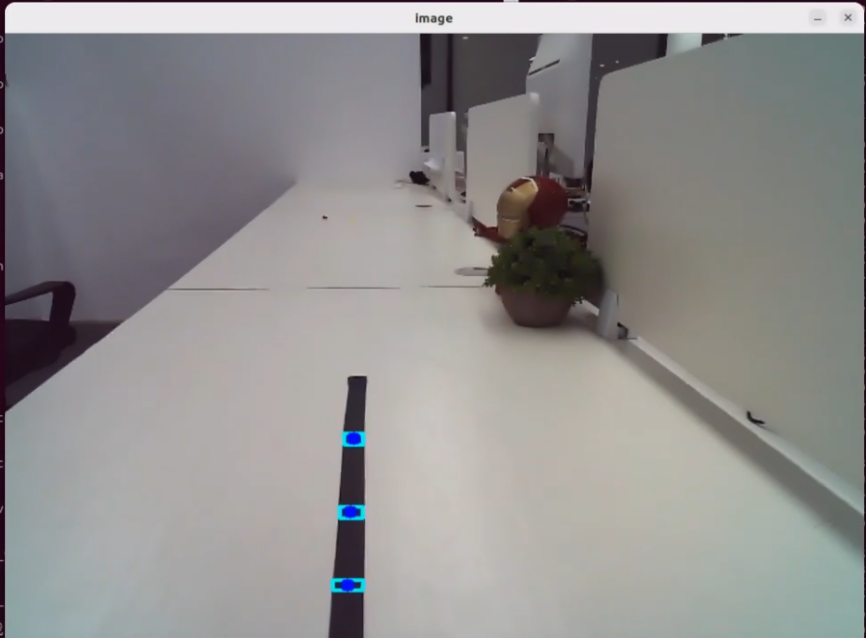
To activate the voice device, speak the designated wake words: “hello hiwonder.” Upon successful activation, the voice device will respond with “I’m Here.” After that you can control the robot by voice—for example, “Follow the black line and stop when you meet an obstacle.” The terminal prints the recognized speech, the circular microphone array announces the generated response, the camera detects the black line, and the robot halts as soon as an obstacle appears in front.
Getting Ready
1. Version Confirmation
Before starting this feature, verify Version Confirmation that the correct microphone configuration is set in the system.
2. Configuring the Large Model API-KEY
Open a new command-line terminal and enter the following command to access the configuration file.
vim /home/ubuntu/ros2_ws/src/large_models/large_models/large_models/config.py
Refer to 25.1.1 Configure the Large Model API Key to obtain the large model API-KEY: paste the vision model (from the OpenRouter website) into the vllm_api_key parameter, and the LLM model (from the OpenAI website) into the llm_api_key parameter, as indicated by the red boxes in the figure below.
Enabling and Disabling the Feature
Note
Command input is case-sensitive and space-sensitive.
The robot must be connected to the Internet, either in STA (LAN) mode or AP (direct connection) mode via Ethernet.
Open the command line terminal from the left side of the system interface.
In the terminal window, enter the following command and press Enter to stop the auto-start serviceEnter the command to disable the auto-start service of the mobile app.
sudo systemctl stop start_app_node.service
Open the command line terminal from the left side of the system interface.
In the terminal window, enter the following command and press Enter to run the visual line following feature.ros2 launch large_models_examples llm_visual_patrol.launch.py
When the terminal displays output shown in the figure and Circular Microphone Array announces “I’m ready”, the device has completed initialization. Then, you can say the wake words: “hello hiwonder”.

When the terminal displays the corresponding output shown in the figure and the voice device responds with “I’m here”, it indicates successful activation. The system will begin recording the user’s voice command.

When the command line shows the output below, it means Circular Microphone Array has printed the recognized speech. Then say the command, “Follow the black line and stop when you meet an obstacle.”

Upon successful recognition by the speech recognition service of cloud-based large speech model, the parsed command will be displayed under the
publish_asr_resultoutput in the terminal.
Upon receiving user input shown in the figure, the terminal will display output indicating that the cloud-based large language model has been successfully invoked. The model will interpret the command, generate a language response, and execute a corresponding action based on the meaning of the command.
Note
The response is automatically generated by the model. While the semantic content is accurate, the wording and structure may vary due to randomness in language generation.

When the terminal shows the output shown in the figure indicating the end of one interaction cycle, the system is ready for the next round. To initiate another interaction, repeat step 4 by speaking the wake words again.

To exit the feature, press Ctrl+C in the terminal. If the feature does not exit immediately, press Ctrl+C multiple times.
Project Outcome
Once the feature is activated, feel free to give commands in your own words. For instance, “Follow the black line and stop when you encounter an obstacle.” The robot uses its camera to detect and follow the black line, and it will stop when an obstacle is detected in its path. The system is pre-configured to recognize four line colors: red, blue, green, and black.
Program Brief Analysis
1.Launch File Analysis
File Path:
/home/ubuntu/ros2_ws/src/large_models_examples/large_models_examples/llm_visual_patrol.launch.py
(1) Import Libraries
import os
from ament_index_python.packages import get_package_share_directory

from launch_ros.actions import Node
from launch.substitutions import LaunchConfiguration
from launch import LaunchDescription, LaunchService
from launch.launch_description_sources import PythonLaunchDescriptionSource
from launch.actions import IncludeLaunchDescription, DeclareLaunchArgument, OpaqueFunction
os: used for handling file paths and operating system-related functions.
ament_index_python.packages.get_package_share_directory: retrieves the share directory path of ROS 2 package.launch_ros.actions.Node: used to define ROS 2 nodes.launch.substitutions.LaunchConfiguration: retrieves parameter values defined in the Launch file.LaunchDescription, LaunchService: used to define and start the Launch file.launch_description_sources PythonLaunchDescriptionSource: enables the inclusion of other Launch files.launch.actions.IncludeLaunchDescription, DeclareLaunchArgument, OpaqueFunction: used to define actions and arguments within the Launch file.
(2) Definition of the launch_setup Function
def launch_setup(context):
    mode = LaunchConfiguration('mode', default=1)
    mode_arg = DeclareLaunchArgument('mode', default_value=mode)

    app_package_path = get_package_share_directory('app')
    large_models_package_path = get_package_share_directory('large_models')

    line_following_node_launch = IncludeLaunchDescription(
        PythonLaunchDescriptionSource(
            os.path.join(app_package_path, 'launch/line_following_node.launch.py')),
        launch_arguments={
            'debug': 'true',
        }.items(),
    )

    large_models_launch = IncludeLaunchDescription(
        PythonLaunchDescriptionSource(
            os.path.join(large_models_package_path, 'launch/start.launch.py')),
        launch_arguments={'mode': mode}.items(),
    )

    llm_visual_patrol_node = Node(
        package='large_models_examples',
        executable='llm_visual_patrol',
        output='screen',
    )

    return [mode_arg,
            line_following_node_launch,
            large_models_launch,
            llm_visual_patrol_node,
            ]
This function is used to configure and initialize launch actions.
mode = LaunchConfiguration(‘mode’, default=1) defines a launch argument named mode with a default value of 1.
mode_arg = DeclareLaunchArgument(‘mode’, default_value=mode) declares the mode argument and includes it in the launch description.
large_models_package_path: retrieves the shared directory path of the large_models package.waste_classification_launch: includes the waste_classification_launch file using IncludeLaunchDescription.large_models_launch: includes the start.launch.py Launch file from the large_models package using IncludeLaunchDescription and passes the mode argument to it.llm_vision_pratrol: defines a ROS 2 node from the large_models package, executes the executable files from the llm_vision_patrol, and prints the node’s output to the screen.The function returns a list of all defined launch actions.
(3) Definition of the generate_launch_description Function
def generate_launch_description():
    return LaunchDescription([
        OpaqueFunction(function = launch_setup)
    ])
This function is responsible for generating the complete launch description.
The
launch_setupfunction is incorporated using OpaqueFunction.
(4) Main Program Entry
if __name__ == '__main__':
    # Create a LaunchDescription object(创建一个LaunchDescription对象)
    ld = generate_launch_description()

    ls = LaunchService()
    ls.include_launch_description(ld)
    ls.run()
ld = generate_launch_description()generates the launch description object.ls = LaunchService()creates the launch service object.ls.include_launch_description(ld)adds the launch description to the service.ls.run()starts the service and execute all launch actions.
2. Python File Analysis
File Path:
/home/ubuntu/ros2_ws/src/large_models_examples/large_models_examples/llm_visual_patrol.py
(1) Import Libraries
import os
import re
import time
import rclpy
import threading
from speech import speech
from rclpy.node import Node
from std_msgs.msg import String, Bool
from std_srvs.srv import Trigger, SetBool, Empty

from interfaces.srv import SetString as SetColor
from large_models.config import *
from large_models_msgs.srv import SetModel, SetString, SetInt32

from rclpy.executors import MultiThreadedExecutor
from rclpy.callback_groups import ReentrantCallbackGroup
(2) Prompt Template Definition
else:
    PROMPT = '''
**Role
You are a smart robot that generates corresponding JSON commands based on user input.

**Requirements
- For every user input, search for matching commands in the action function library and output the corresponding JSON instruction.
- For each action sequence, craft a witty and creative response (10 to 30 characters) to make interactions delightful.
- Directly return the JSON result — do not include any explanations or extra text.
- There are four target colors: red, green, blue, and black.
- Format:
{
  "action": ["xx", "xx"],
  "response": "xx"
}

**Special Notes
The "action" field should contain a list of function names as strings, ordered by execution. If no matching action is found, output an empty list: [].
The "response" field should provide a concise and charming reply, staying within the word and tone guidelines.

**Action Function Library
Follow a line of a given color: line_following('black')

**Example
Input: Follow the red line
Output:
{
  "action": ["line_following('red')"],
  "response": "Roger that!"
}
    '''
(3) Variable Initialization
	    self.action = []
        self.stop = True
        self.llm_result = ''
self.action: stores the list of actions parsed from LLM responses.
self.llm_result: stores the result received from the LLM.self.running: a flag indicating whether the main loop is actively running.
(4) Publisher Creation
self.tts_text_pub = self.create_publisher(String, 'tts_node/tts_text', 1)
Creates a publisher that sends String messages to the topic /tts_node/tts_text. This topic is used to send text-to-speech (TTS) content for voice feedback.
(5) Subscriber Creation
		self.create_subscription(String, 'agent_process/result', self.llm_result_callback, 1)
        self.create_subscription(Bool, 'vocal_detect/wakeup', self.wakeup_callback, 1, callback_group=timer_cb_group)
        self.create_subscription(Bool, 'tts_node/play_finish', self.play_audio_finish_callback, 1, callback_group=timer_cb_group)
(6) Necessary Services Creation
	        self.set_model_client = self.create_client(SetModel, 'agent_process/set_model')
        self.set_model_client.wait_for_service()
        self.set_prompt_client = self.create_client(SetString, 'agent_process/set_prompt')
        self.set_prompt_client.wait_for_service()
        self.enter_client = self.create_client(Trigger, 'line_following/enter')
        self.enter_client.wait_for_service()
        self.start_client = self.create_client(SetBool, 'line_following/set_running')
        self.start_client.wait_for_service()
        self.set_target_client = self.create_client(SetColor, 'line_following/set_color')
        self.set_target_client.wait_for_service()
(7) LLM Model Configuration
        msg = SetModel.Request()
        msg.model = llm_model
        msg.model_type = 'llm'
        msg.api_key = api_key
        msg.base_url = base_url
        self.send_request(self.set_model_client, msg)
(8) Enter
self.send_request(self.set_prompt_client, msg)
(9) Play Startup Audio
speech.play_audio(start_audio_path)
(10) Process LLM Commands to Create Speech Feedback Messages
msg = SetString.Request()
(11) Check if the Command Contains Actions
	                if 'action' in self.llm_result: # If a corresponding action is returned, extract and process it (如果有对应的行为返回那么就提取处理)
                    result = eval(self.llm_result[self.llm_result.find('{'):self.llm_result.find('}')+1])
(12) Parse the Command
result = eval(self.llm_result[self.llm_result.find('{'):self.llm_result.find('}')+1])
(13) Extract the Recognized Results
if 'action' in result:
                        text = result['action']
                        # Use regular expressions to extract all strings inside parentheses (使用正则表达式提取括号中的所有字符串)
                        pattern = r"line_following\('([^']+)'\)"
(14) Set Target Color Request
								color = match.group(1)
                                self.get_logger().info(str(color))
                                color_msg = SetColor.Request()
                                color_msg.data = color
                                self.send_request(self.set_target_client, color_msg)
Create a SetStringList. Request message to specify the target for waste classification. Use the send_request method to send the request to the waste_classification/set_target service, setting the waste classification target.
(15) Initiate and Send Request to Start Line Following
	                            start_msg = SetBool.Request()
                                start_msg.data = True
                                self.send_request(self.start_client, start_msg)
Create a SetBool. Request message to enable the waste classification transport feature. Use the send_request method to send a request to the waste_classification/enable_transport service, starting the waste classification transport.
(16) main Function
	def main():
    node = LLMColorTrack('llm_line_following')
    executor = MultiThreadedExecutor()
    executor.add_node(node)
    executor.spin()
    node.destroy_node()
The function initializes a ROS 2 node.
Start a multi-threaded executor to handle callbacks.
Clean up and destroys the node upon program exit to release resources.
25.1.5 Color Tracking with Multimodal Models
Brief Overview of Operation
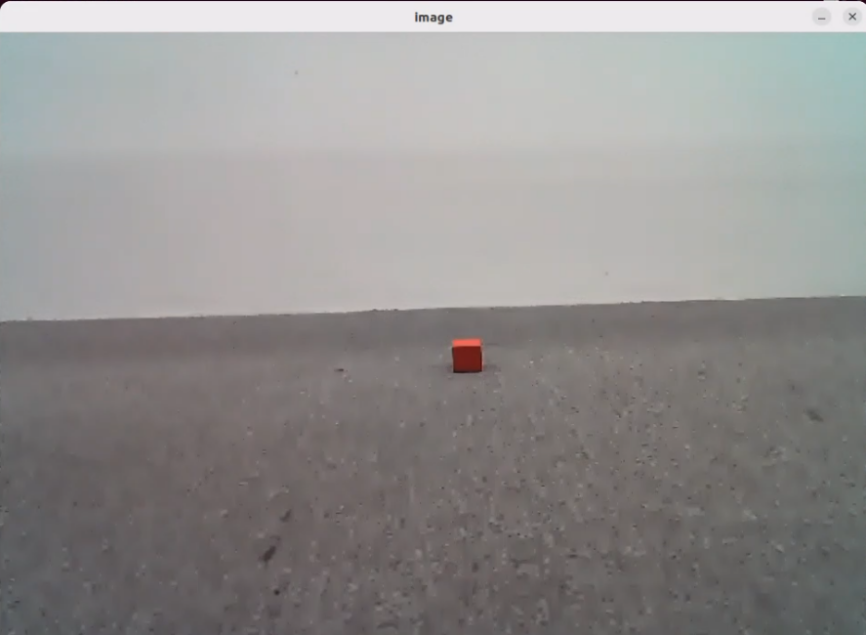
Once the program starts, Circular Microphone Array will announce: “I’m Ready.” To activate the voice device, speak the designated wake words: “hello hiwonder.” Upon successful activation, the voice device will respond with “I’m Here.” Once activated, voice commands such as “Follow the red object” can be issued. The terminal will display the recognized command, and the voice device will respond with a generated reply after processing. The robot will then autonomously identify the red object captured by its camera and begin tracking it.
Getting Ready
1. Version Confirmation
Before starting this feature, verify Version Confirmation that the correct microphone configuration is set in the system.
2. Configuring the Large Model API-KEY
Open a new command-line terminal and enter the following command to access the configuration file.
vim /home/ubuntu/ros2_ws/src/large_models/large_models/large_models/config.py
Refer to 25.1.1 Configure the Large Model API Key to obtain the large model API-KEY: paste the vision model (from the OpenRouter website) into the vllm_api_key parameter, and the LLM model (from the OpenAI website) into the llm_api_key parameter, as indicated by the red boxes in the figure below.
Enabling and Disabling the Feature
Note
Command input is case-sensitive and space-sensitive.
The robot must be connected to the Internet, either in STA (LAN) mode or AP (direct connection) mode via Ethernet.
Open the command line terminal from the left side of the system interface.
In the terminal window, enter the following command and press Enter to stop the auto-start serviceOpen the command line terminal from the left side of the system interface.
In the terminal window, enter the following command to stop the auto-start servicesudo systemctl stop start_app_node.service
Enter the following command and press Enter to launch the color tracking feature.
ros2 launch large_models_examples llm_color_track.launch.py
When the terminal displays output shown in the figure and Circular Microphone Array announces “I’m ready”, the device has completed initialization. Then, you can say the wake words: “hello hiwonder”.

After the program has loaded successfully, the camera feed will appear on screen.
When the terminal displays the corresponding output shown in the figure and the voice device responds with “I’m here”, it indicates successful activation. The system will begin recording the user’s voice command.
When the command line shows the output below, it means the Circular Microphone Array has printed the recognized speech. Then say the command, “Follow the red object.”

Upon successful recognition by the speech recognition service of cloud-based large speech model, the parsed command will be displayed under the publish_asr_result output in the terminal.

Upon receiving user input shown in the figure, the terminal will display output indicating that the cloud-based large language model has been successfully invoked. The model will interpret the command, generate a language response, and execute a corresponding action based on the meaning of the command.
Note
The response is automatically generated by the model. While the semantic content is accurate, the wording and structure may vary due to randomness in language generation.

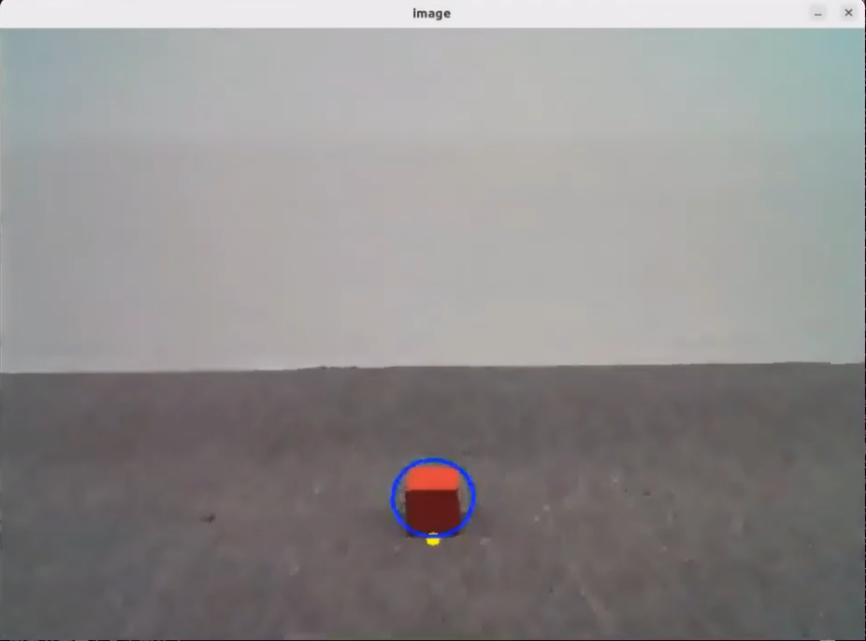
Then, the robot will detect the red object in its camera feed and begin tracking it in real time.
When the terminal shows the output shown in the figure indicating the end of one interaction cycle, the system is ready for the next round. To initiate another interaction, repeat step 4 by speaking the wake words again.

To exit the feature, press Ctrl+C in the terminal. If the feature does not shut down immediately, press Ctrl+C multiple times. If it still fails to exit, open a new terminal window and run the following command to terminate all active ROS processes and related programs.
/.stop_ros.sh
Project Outcome
Once the feature is activated, feel free to give commands in your own words. For instance, “Follow the red object.” The robot will use the camera feed to identify and track the red object. Similarly, commands like “Follow the blue object” or “Follow the green object” can be used to instruct the robot to track objects of the specified colors.
Program Brief Analysis
1. Launch File Analysis
File Path:
/home/ubuntu/ros2_ws/src/large_models_examples/large_models_examples/llm_color_track.launch.py
(1) Import Libraries
import os
from ament_index_python.packages import get_package_share_directory

from launch_ros.actions import Node
from launch.substitutions import LaunchConfiguration
from launch import LaunchDescription, LaunchService
from launch.launch_description_sources import PythonLaunchDescriptionSource
from launch.actions import IncludeLaunchDescription, DeclareLaunchArgument, OpaqueFunction
os: used for handling file paths and operating system-related functions.
ament_index_python.packages.get_package_share_directory: retrieves the share directory path of ROS 2 package.launch_ros.actions.Node: used to define ROS 2 nodes.launch.substitutions.LaunchConfiguration: retrieves parameter values defined in the Launch file.LaunchDescription, LaunchService: used to define and start the Launch file.launch_description_sources PythonLaunchDescriptionSource: enables the inclusion of other Launch files.launch.actions.IncludeLaunchDescription, DeclareLaunchArgument, OpaqueFunction: used to define actions and arguments within the Launch file.
(2) Definition of the launch_setup Function
def launch_setup(context):
    mode = LaunchConfiguration('mode', default=1)
    mode_arg = DeclareLaunchArgument('mode', default_value=mode)

    app_package_path = get_package_share_directory('app')
    large_models_package_path = get_package_share_directory('large_models')

    object_tracking_node_launch = IncludeLaunchDescription(
        PythonLaunchDescriptionSource(
            os.path.join(app_package_path, 'launch/object_tracking_node.launch.py')),
        launch_arguments={
            'debug': 'true',
        }.items(),
    )

    large_models_launch = IncludeLaunchDescription(
        PythonLaunchDescriptionSource(
            os.path.join(large_models_package_path, 'launch/start.launch.py')),
        launch_arguments={'mode': mode}.items(),
    )

    llm_color_track_node = Node(
        package='large_models_examples',
        executable='llm_color_track',
        output='screen',
    )

    return [mode_arg,
            object_tracking_node_launch,
            large_models_launch,
            llm_color_track_node,
            ]
This function is used to configure and initialize launch actions.
mode = LaunchConfiguration(‘mode’, default=1) defines a launch argument named mode with a default value of 1.
mode_arg = DeclareLaunchArgument(‘mode’, default_value=mode) declares the mode argument and includes it in the launch description.
objet_sorting_launch: includes the object_sorting_node.launch.py Launch file from the large_models package using IncludeLaunchDescription and passes the mode argument to it.large_models_launch: includes the start.launch.py file from thelarge_modelspackage using IncludeLaunchDescription and passes the mode argument to it.llm_color_track_node: defines a ROS 2 node from thelarge_models package, executes the executable files from thellm_color_track, and prints the node’s output to the screen.The function returns a list of all defined launch actions.
(3) Definition of the generate_launch_description Function
def generate_launch_description():
    return LaunchDescription([
        OpaqueFunction(function = launch_setup)
    ])
This function is responsible for generating the complete launch description.
The
launch_setupfunction is incorporated using OpaqueFunction.
(4) Main Program Entry
if __name__ == '__main__':
    # Create a LaunchDescription object(创建一个LaunchDescription对象)
    ld = generate_launch_description()

    ls = LaunchService()
    ls.include_launch_description(ld)
    ls.run()
ld = generate_launch_description()generates the launch description object.ls = LaunchService()creates the launch service object.ls.include_launch_description(ld)adds the launch description to the service.ls.run()starts the service and execute all launch actions.
2. Python File Analysis
File Path:
/home/ubuntu/ros2_ws/src/large_models_examples/large_models_examples/llm_color_track.py
(1) Import Libraries
import os
import re
import time
import rclpy
import threading
from rclpy.node import Node
from std_msgs.msg import String, Bool
from std_srvs.srv import Trigger, SetBool, Empty

from speech import speech
from interfaces.srv import SetString as SetColor
from large_models.config import *
from large_models_msgs.srv import SetModel, SetString, SetInt32

from rclpy.executors import MultiThreadedExecutor
from rclpy.callback_groups import ReentrantCallbackGroup
(2) Prompt Template Definition
else:
    PROMPT = '''
**Role
You are an intelligent companion robot. Your job is to generate corresponding JSON commands based on the user’s input.

**Requirements
- For every user input, search the action function library for matching commands and return the corresponding JSON instruction.
- Craft a witty, ever-changing, and concise response (between 10 to 30 characters) for each action sequence to make interactions lively and fun.
- Output only the JSON result — do not include explanations or any extra text.
- Output format:{"action": ["xx", "xx"], "response": "xx"}

**Special Notes
The "action" key holds an array of function name strings arranged in execution order. If no match is found, return an empty array [].
The "response" key must contain a cleverly worded, short reply (10–30 characters), adhering to the tone and length guidelines above.

**Action Function Library
Track an object of a specific color: color_track('red')

**Example
Input: Track a green object
Output:
{"action": ["color_track('green')"], "response": "Got it!"}
    '''
(3) Variable Initialization
	    self.action = []
        self.stop = True
        self.llm_result = ''
self.action: stores the list of actions parsed from LLM responses.self.llm_result: stores the result received from the LLM.self.running: a flag indicating whether the main loop is actively running.
(4) Publisher Creation
self.tts_text_pub = self.create_publisher(String, 'tts_node/tts_text', 1)
Creates a publisher that sends String messages to the topic /tts_node/tts_text. This topic is used to send text-to-speech (TTS) content for voice feedback.
(5) Subscriber Creation
        self.create_subscription(String, 'agent_process/result', self.llm_result_callback, 1)
        self.create_subscription(Bool, 'vocal_detect/wakeup', self.wakeup_callback, 1, callback_group=timer_cb_group)
        self.create_subscription(Bool, 'tts_node/play_finish', self.play_audio_finish_callback, 1, callback_group=timer_cb_group)
        self.awake_client = self.create_client(SetBool, 'vocal_detect/enable_wakeup')
(6) Necessary Services Creation
	        self.set_model_client = self.create_client(SetModel, 'agent_process/set_model')
        self.set_model_client.wait_for_service()
        self.set_prompt_client = self.create_client(SetString, 'agent_process/set_prompt')
        self.set_prompt_client.wait_for_service()
        self.enter_client = self.create_client(Trigger, 'object_tracking/enter')
        self.enter_client.wait_for_service()
        self.start_client = self.create_client(SetBool, 'object_tracking/set_running')
        self.start_client.wait_for_service()
        self.set_target_client = self.create_client(SetColor, 'object_tracking/set_color')
        self.set_target_client.wait_for_service()
(7) LLM Model Configuration
        msg = SetModel.Request()
        msg.model = llm_model
        msg.model_type = 'llm'
        msg.api_key = api_key
        msg.base_url = base_url
        self.send_request(self.set_model_client, msg)
(8) Sending Prompt Service
self.send_request(self.set_model_client, msg)
(9) Play Startup Audio
speech.play_audio(start_audio_path)
(10) process Method
    def process(self):
        while self.running:
            if self.llm_result:
                msg = String()
                if 'action' in self.llm_result: # If a corresponding action is returned, extract and process it (如果有对应的行为返回那么就提取处理)
                    result = eval(self.llm_result[self.llm_result.find('{'):self.llm_result.find('}')+1])
                    if 'action' in result:
                        text = result['action']
                        # Use regular expressions to extract all strings inside parentheses (使用正则表达式提取括号中的所有字符串)
                        pattern = r"color_track\('([^']+)'\)"
                        # Use re.search to find the matching result (使用re.search找到匹配的结果)
                        for i in text:
                            match = re.search(pattern, i)
                            # Extract the result (提取结果)
                            if match:
                                # Get all parameter sections, which are the contents inside parentheses (获取所有的参数部分(括号内的内容))
                                color = match.group(1)
                                self.get_logger().info(str(color))
                                color_msg = SetColor.Request()
                                color_msg.data = color
                                self.send_request(self.set_target_client, color_msg)
                                # Start the sorting process (开启分拣)
                                start_msg = SetBool.Request()
                                start_msg.data = True
                                self.send_request(self.start_client, start_msg)
                    if 'response' in result:
                        msg.data = result['response']
                else: # If there is no corresponding action, only respond (没有对应的行为,只回答)
                    msg.data = self.llm_result
                self.tts_text_pub.publish(msg)
                self.action_finish = True
The method acts as the main loop responsible for handling commands from the LLM, interpreting them, and executing corresponding actions.
If a new command is received:
A String message is created to deliver voice feedback.
If the command includes an ‘action’ field:
The JSON data within the command is parsed using eval.
The send_request method is called to send a request to the object_sorting/set_target service, specifying the object sorting target.
The send_request method is also called to send a request to the object_sorting/enable_sorting service, enabling the object sorting function.
If the command includes a ‘response’ field, voice feedback is sent.
If the command does not include an ‘action’, only voice feedback is provided.
The
self.llm_resultfield is then cleared to prepare for the next command.
If no new command is received, the system waits for 10 milliseconds.
When self.running is set to False, the loop exits and the ROS 2 node is shut down.
(11) main Function
	def main():
    node = LLMColorTrack('llm_color_track')
    executor = MultiThreadedExecutor()
    executor.add_node(node)
    executor.spin()
    node.destroy_node()
The function initializes a ROS 2 node.
Start a multi-threaded executor to handle callbacks.
Clean up and destroys the node upon program exit to release resources.
25.2 Embodied AI Application
25.2.1 Obtain and Configure the Large Model API Key
Note
Note: This section requires registering on the official OpenAI website and obtaining an API key for accessing large language models.
Register and Deploy OpenAI Account
Copy and open the following URL: https://platform.openai.com/docs/overview

Register and log in using a Google, Microsoft, or Apple account, as prompted.
After logging in, click the Settings button, then go to Billing, and click Payment Methods to add a payment method. Recharge your account to purchase tokens as needed.


Once your account is set up, go to the API Keys section and click Create new key. Follow the instructions to generate a new API key and save it securely for later use.


At this point, the creation and deployment of the large model have been completed; this API will be used in subsequent lessons.
Register and Deploy openrouter Account
Copy and open the following URL: Click “Log In”, and register or sign in using Google or another available account.
After logging in, click the icon in the top-right corner, then select “Credits” to add a payment method.

Create an API key. Go to “API Keys”, then click “Create Key”. Follow the prompts to generate a key. Save the API key securely for later use.
At this point, the creation and deployment of the large model have been completed; this API will be used in subsequent lessons.
25.2.2 Version Confirmation
Before starting this feature, verify that the correct microphone configuration is set in the system.
Log in to the machine remotely via NoMachine. Then click the desktop icon
 to access the configuration interface.
On the right side of the interface, select the appropriate microphone type based on the hardware being used.
For the Six-Microphone Array, select xf as the microphone type as shown in the figure.

Then, click Save.

Click “Apply” and wait until the “Service is restarting” notification disappears; once it does, the configuration has been saved to the system environment.


Then, click Exit to close the interface.

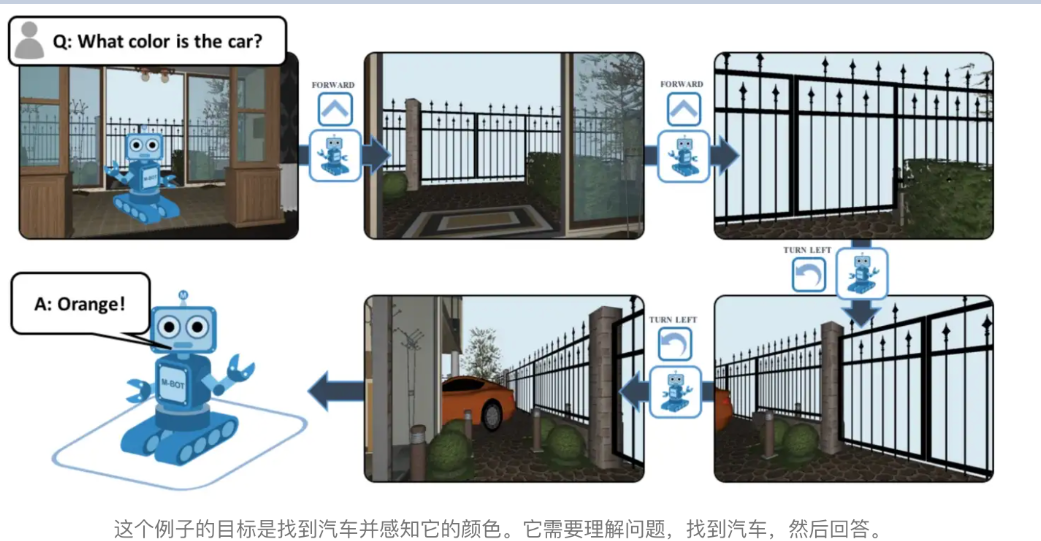
25.2.3 Overview of Embodied Intelligence
Overview of Embodied Intelligence
Embodied Intelligence represents a key branch of artificial intelligence that emphasizes learning and decision-making through the interaction between a physical entity and its environment. At its core lies the principle that intelligence emerges from the dynamic interplay between an agent’s physical embodiment and its environment. This approach moves beyond the limitations of traditional AI, which often relies solely on static data. Embodied intelligence has found broad applications across industries such as manufacturing, healthcare, service, education, and military.
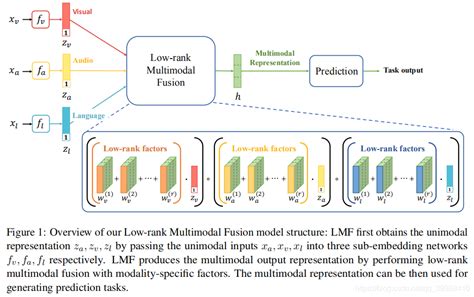
Multimodal Information Fusion
An important feature of embodied intelligence is multimodal information fusion, which refers to the effective integration of data from different modalities—such as text, images, and speech—to produce a more comprehensive and accurate representation of information. This process is especially critical in artificial intelligence, as real-world data is inherently multimodal. Relying on a single modality often fails to provide sufficient context or detail. Multimodal fusion aims to enhance model performance and robustness by leveraging the complementary strengths of multiple data sources.
Several common approaches to multimodal information fusion include the following:
Early Fusion: Combines data from different modalities at an early stage of processing. This typically occurs at the input level, where raw data is aligned and transformed into a shared space to create a richer, more expressive representation. For example, image and speech data can be concatenated directly and fed into a neural network.
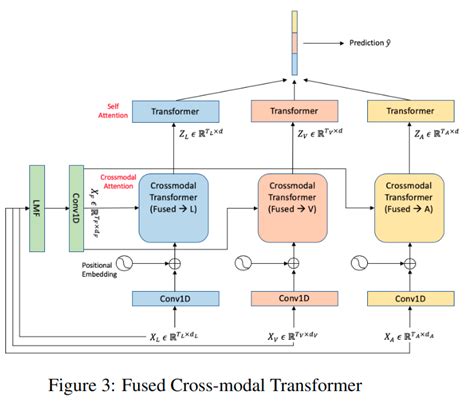
Late Fusion: Integrates data from multiple modalities at intermediate or output stages of the model. This approach allows each modality to be processed independently using specialized algorithms, making it easier to add or replace modalities in the future. For instance, results from image recognition and text analysis can be combined to support final decision-making.
Hybrid Fusion: Leverages both early and late fusion techniques by performing integration at multiple stages. This method takes advantage of modality complementarity and can improve both performance and model robustness.
Feature-Level Fusion: Involves extracting features from each modality and mapping them into a unified feature vector, which is then passed to a classifier for decision-making. Fusion occurs during the feature extraction phase, enabling the model to learn correlations across modalities.
Decision-Level Fusion: Merges outputs from individual modality-specific decisions to produce the final outcome. This technique offers strong noise resistance and places fewer demands on sensor types or quality, though it may result in some loss of information.
Deep Fusion: Takes place during feature extraction, where multimodal data is blended in the feature space to generate fused features that can compensate for missing or weak signals from any single modality. These fused features are then used for classification or regression tasks during prediction.
Multimodal information fusion holds not only theoretical significance but also substantial practical value. It has been widely applied in fields such as autonomous driving, medical image analysis, and human-computer interaction, where it has significantly improved system performance and reliability.
25.2.4 Real-Time Detection in Embodied AI Applications
The large model used in this lesson operates online, requiring a stable network connection for the main controller in use.
Overview of Operation
Once the program starts, Circular Microphone Array will announce: “I’m Ready.” To activate the voice device, speak the designated wake words: “hello hiwonder.” Upon successful activation, the voice device will respond with “I’m Here.” Once activated, voice commands such as “Please describe what you saw.” can be issued. The terminal will display the recognized command, and the voice device will respond with a generated reply after processing. The robot will autonomously recognize the images captured by the camera and describe the content of the images.
Preparation
1. Version Confirmation
Before starting this feature, verify Version Confirmation that the correct microphone configuration is set in the system.
2. Configuring the Large Model API-KEY
Open a new command-line terminal and enter the following command to access the configuration file.
vim /home/ubuntu/ros2_ws/src/large_models/large_models/large_models/config.py
Refer to 25.1.1 Obtain and Configure the Large Model API Key to obtain the large-model API-KEY: paste the vision model (from the OpenRouter website) into the vllm_api_key parameter, and the LLM model (from the OpenAI website) into the llm_api_key parameter, as indicated by the red boxes in the figure below.

Enabling and Disabling the Feature
Open the command line terminal from the left side of the system interface.
 In the terminal window, enter the following command and press Enter to stop the auto-start service
Enter the command to disable the auto-start service of the mobile app.
sudo systemctl stop start_app_node.service
Open the command line terminal from the left side of the system interface.
In the terminal window, enter the following command and press Enter to run the Real-time detection feature.ros2 launch large_models_examples vllm_with_camera.launch.py
When the terminal displays output shown in the figure and Circular Microphone Array announces “I’m ready”, the device has completed initialization. Then, you can say the wake words: “hello hiwonder”.

When the terminal displays the corresponding output shown in the figure and the voice device responds with “I’m here”, it indicates successful activation. The system will begin recording the user’s voice command.

When the terminal displays the next output as the reference image, it shows the recognized speech transcribed by the voice device.

Upon successful recognition by the speech recognition service of cloud-based large speech model, the parsed command will be displayed under the publish_asr_result output in the terminal.
Upon receiving user input shown in the figure, the terminal will display output indicating that the cloud-based large language model has been successfully invoked. The model will interpret the command and generate a language response.

Note
 The response is automatically generated by the model. While the semantic content is accurate, the wording and structure may vary due to randomness in language generation.
When the terminal shows the output shown in the figure indicating the end of one interaction cycle, the system is ready for the next round. To initiate another interaction, repeat step 4 by speaking the wake words again.

To exit the feature, press Ctrl+C in the terminal. If the feature does not exit immediately, press Ctrl+C multiple times.
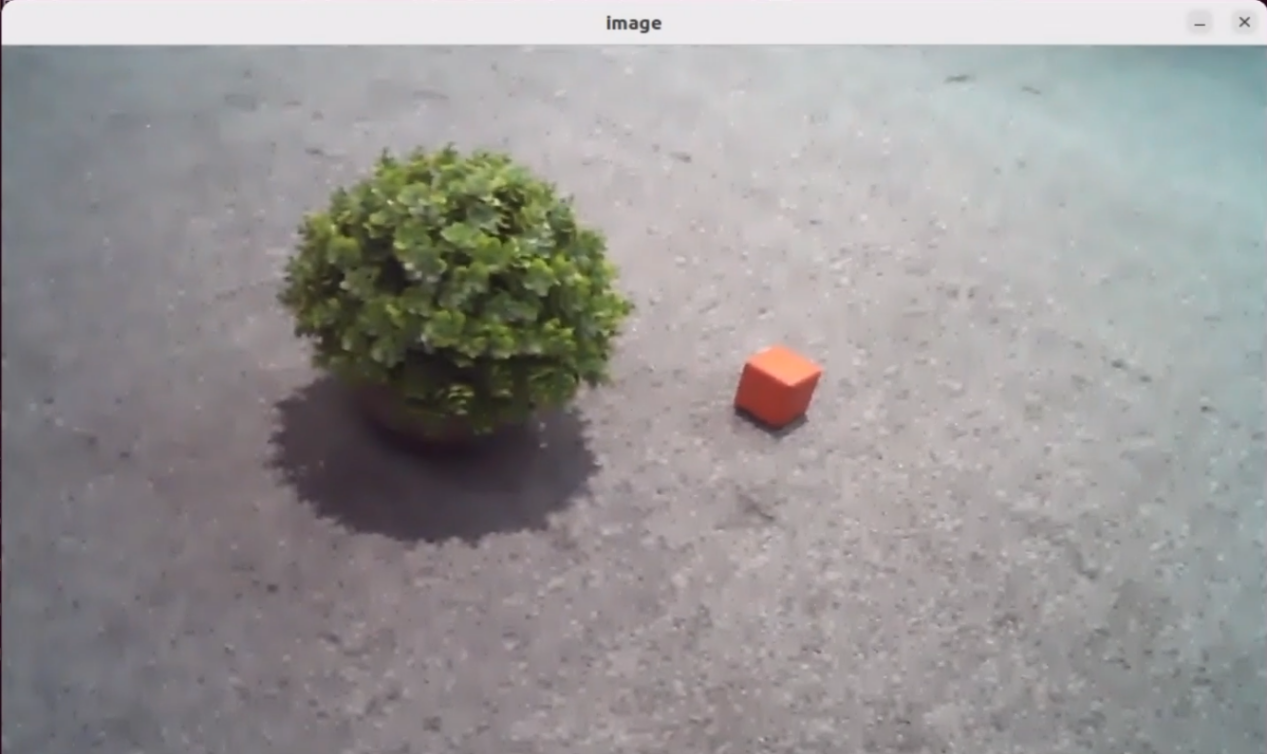
Project Outcome
Once the feature is activated, you can speak freely—for example: “Describe what you saw.” The robot will automatically analyze the scene within its field of view, think about what it sees, and describe the scene content in detail.
Program Brief Analysis
1. Launch File Analysis
File Path:
/home/ubuntu/ros2_ws/src/large_models_examples/large_models_examples/vllm_with_camera.launch.py
(1) Import Libraries
import os
from ament_index_python.packages import get_package_share_directory

from launch_ros.actions import Node
from launch.substitutions import LaunchConfiguration
from launch import LaunchDescription, LaunchService
from launch.launch_description_sources import PythonLaunchDescriptionSource
from launch.actions import IncludeLaunchDescription, DeclareLaunchArgument, OpaqueFunction
os: used for handling file paths and operating system-related functions.
ament_index_python.packages.get_package_share_directory: retrieves the share directory path of ROS 2 package.launch_ros.actions.Node: used to define ROS 2 nodes.launch.substitutions.LaunchConfiguration: retrieves parameter values defined in the Launch file.LaunchDescription, LaunchService: used to define and start the Launch file.launch_description_sources PythonLaunchDescriptionSource: enables the inclusion of other Launch files.launch.actions.IncludeLaunchDescription, DeclareLaunchArgument, OpaqueFunction: used to define actions and arguments within the Launch file.
(2) Definition of the launch_setup Function
def launch_setup(context):
    mode = LaunchConfiguration('mode', default=1)
    mode_arg = DeclareLaunchArgument('mode', default_value=mode)

    camera_topic = LaunchConfiguration('camera_topic', default='depth_cam/rgb/image_raw')
    camera_topic_arg = DeclareLaunchArgument('camera_topic', default_value=camera_topic)

    controller_package_path = get_package_share_directory('controller')
    peripherals_package_path = get_package_share_directory('peripherals')
    large_models_package_path = get_package_share_directory('large_models')

    controller_launch = IncludeLaunchDescription(
        PythonLaunchDescriptionSource(
            os.path.join(controller_package_path, 'launch/controller.launch.py')),
    )

    depth_camera_launch = IncludeLaunchDescription(
        PythonLaunchDescriptionSource(
            os.path.join(peripherals_package_path, 'launch/depth_camera.launch.py')),
    )

    large_models_launch = IncludeLaunchDescription(
        PythonLaunchDescriptionSource(
            os.path.join(large_models_package_path, 'launch/start.launch.py')),
        launch_arguments={'mode': mode, 'camera_topic': camera_topic}.items(),
    )

    vllm_with_camera_node = Node(
        package='large_models_examples',
        executable='vllm_with_camera',
        output='screen',
        parameters=[{"camera_topic": camera_topic}],
    )
This function is used to configure and initialize launch actions.
mode = LaunchConfiguration(‘mode’, default=1) defines a launch argument named mode with a default value of 1.
mode_arg = DeclareLaunchArgument(‘mode’, default_value=mode) declares the mode argument and includes it in the launch description.
depth_camera_launch: uses IncludeLaunchDescription to bring in the depth_camera.launch.py launch file from the large_models package and passes the mode argument.Sdk_launchincludes the jetarm_sdk.launch.py Launch file from the large_models package using IncludeLaunchDescription and passes the mode argument to it.large_models_launch: includes the start.launch.py file from the large_models package using IncludeLaunchDescription and passes the mode argument to it.Vllm_with_cameradefines a ROS 2 node from the large_models package, executes the executable files from thevllm_with_camera, and prints the node’s output to the screen.The function returns a list of all defined launch actions.
(3) Definition of the generate_launch_description Function
def generate_launch_description():
    return LaunchDescription([
        OpaqueFunction(function = launch_setup)
    ])
This function is responsible for generating the complete launch description.
The
launch_setupfunction is incorporated using OpaqueFunction.
(4) Main Program Entry
if __name__ == '__main__':
    # Create a LaunchDescription object(创建一个LaunchDescription对象)
    ld = generate_launch_description()

    ls = LaunchService()
    ls.include_launch_description(ld)
    ls.run()
ld = generate_launch_description()generates the launch description object.ls = LaunchService()creates the launch service object.ls.include_launch_description(ld)adds the launch description to the service.ls.run()starts the service and execute all launch actions.
2. Python File Analysis
The source code for this program is located at:
/home/ubuntu/ros2_ws/src/large_models_examples/large_models_examples/vllm_with_camera.py
(1) Import the Necessary Libraries
import os
import cv2
import json
import queue
import rclpy
import threading
import numpy as np

from rclpy.node import Node
from cv_bridge import CvBridge
from sensor_msgs.msg import Image
from std_msgs.msg import String, Bool
from std_srvs.srv import Trigger, SetBool, Empty
from rclpy.executors import MultiThreadedExecutor
from rclpy.callback_groups import ReentrantCallbackGroup

from speech import speech
from large_models.config import *
from large_models_msgs.srv import SetModel, SetString, SetInt32
from servo_controller.bus_servo_control import set_servo_position
from servo_controller_msgs.msg import ServosPosition, ServoPosition
cv2: Utilized for image processing and display using OpenCV.
time: manages execution delays and time-related operations.
queue: handles image queues between threads.
rclpy: provides tools for creating and communicating between ROS 2 nodes.
threading: enables multithreading for concurrent task processing.
config: contains configuration file.
numpy (np): supports matrix and vector operations.
std_srvs.srv: contains standard ROS service types, used to define standard service.std_msgs.msg:contains standard ROS message types.sensor_msgs.msg.Image: used for receiving image messages from the camera.servo_controller_msgs.msg.ServosPosition: custom message type for controlling servo motors.servo_controller.bus_servo_control.set_servo_position: function used to set the servo angle.rclpy.callback_groups.ReentrantCallbackGroup: supports concurrent callback handling.rclpy.executors.MultiThreadedExecutor: multithreaded executor in ROS 2 for handling concurrent tasks.Rclpy.node: node class in ROS 2.Speech: module related to large model voice interaction.
large_models_msgs.srv: custom service types for large models.Large_models.config: configuration file for large models.
(2) VLLMWithCamera Class
class VLLMWithCamera(Node):
    def __init__(self, name):
        rclpy.init()
        super().__init__(name)
        self.image_queue = queue.Queue(maxsize=2)
        self.set_above = False
        self.vllm_result = ''
        self.running = True
        self.action_finish = False
        self.play_audio_finish = False
        self.bridge = CvBridge()
        self.client = speech.OpenAIAPI(api_key, base_url)
        self.declare_parameter('camera_topic', '/depth_cam/rgb/image_raw')
        camera_topic = self.get_parameter('camera_topic').value

        timer_cb_group = ReentrantCallbackGroup()
        self.joints_pub = self.create_publisher(ServosPosition, 'servo_controller', 1)
        self.tts_text_pub = self.create_publisher(String, 'tts_node/tts_text', 1)
        self.create_subscription(Image, camera_topic, self.image_callback, 1)
        self.create_subscription(String, 'agent_process/result', self.vllm_result_callback, 1)
        self.create_subscription(Bool, 'tts_node/play_finish', self.play_audio_finish_callback, 1, callback_group=timer_cb_group)
        self.awake_client = self.create_client(SetBool, 'vocal_detect/enable_wakeup')
        self.awake_client.wait_for_service()
        self.set_model_client = self.create_client(SetModel, 'agent_process/set_model')
        self.set_model_client.wait_for_service()
        self.set_mode_client = self.create_client(SetInt32, 'vocal_detect/set_mode')
        self.set_mode_client.wait_for_service()
        self.set_prompt_client = self.create_client(SetString, 'agent_process/set_prompt')
        self.set_prompt_client.wait_for_service()
        self.timer = self.create_timer(0.0, self.init_process, callback_group=timer_cb_group)
Display_size: defines the size of the display window.Rclpy.init(): initializes the ROS 2 node.Super().init(name): calls the constructor of the superclass to initialize the node with the specified name.Self.image_queue: creates a queue to store image data, with a maximum size of 2.self.vllm_result: stores results received from the agent_process/result topic.self.running: a flag variable used to control the running state of the program.Timer_cb_group: creates a reentrant callback group for managing timer callbacks.Self.joints_pub: a publisher is created for sending robotic arm’s joint position information.self.tts_text_pub: a publisher is created for sending text data to the text-to-speech node.self.create_subscription: creates subscribers to receive image messages, VLLM results, and playback completion signals.self.awake_client and self.set_model_client: creates service clients for triggering the wake-up and model configuration services.self.timer: creates a timer that triggers the init_process function.
(3) get_node_state Method
    def get_node_state(self, request, response):
        return response
return response: returns a response object.
(4) init_process Method
    def init_process(self):
        self.timer.cancel()

        msg = SetModel.Request()
        msg.model_type = 'vllm'
        if os.environ['ASR_LANGUAGE'] == 'Chinese':
            msg.model = stepfun_vllm_model
            msg.api_key = stepfun_api_key
            msg.base_url = stepfun_base_url
        else:
            msg.model = vllm_model
            msg.api_key = vllm_api_key
            msg.base_url = vllm_base_url
        self.send_request(self.set_model_client, msg)

        msg = SetString.Request()
        msg.data = VLLM_PROMPT
        self.send_request(self.set_prompt_client, msg)

        set_servo_position(self.joints_pub, 1.0,
                           ((1, 500), (2, 645), (3, 135), (4, 80), (5, 500), (10, 220)))  # 设置机械臂初始位置
        speech.play_audio(start_audio_path)
        threading.Thread(target=self.process, daemon=True).start()
        self.create_service(Empty, '~/init_finish', self.get_node_state)
        self.get_logger().info('\033[1;32m%s\033[0m' % 'start')
Self.timer.cancel(): stops the timer.SetModel.Request: creates a request message to configure the model.Self.send_request: sends the request to the corresponding service.Set_servo_position: sets the initial joint positions of the robotic arm.Speech.play_audio: plays an audio file.threading.Thread: creates a new thread to run the process function.Self.create_service: registers a service to notify that the initialization process is complete.Self.get_logger().info: logs informational messages to the console.
(5) send_request Method
    def send_request(self, client, msg):
        future = client.call_async(msg)
        while rclpy.ok():
            if future.done() and future.result():
                return future.result()
Client.call_async(msg): makes an asynchronous service call.future.done()andfuture.result(): check if the service call is complete and retrieve the result.
(6) vllm_result_callback Method
    def vllm_result_callback(self, msg):
        self.vllm_result = msg.data
This callback receives results from the agent_process/result topic and stores them in self.vllm_result.
(7) process Method
    def process(self):
        # box = []
        while self.running:
            image = self.image_queue.get(block=True)
            if self.vllm_result:
                msg = String()
                # self.get_logger().info('vllm_result: %s' % self.vllm_result)
                msg.data = self.vllm_result
                self.tts_text_pub.publish(msg)
                # if self.vllm_result.startswith("```") and self.vllm_result.endswith("```"):
                    # self.vllm_result = self.vllm_result.strip("```").replace("json\n", "").strip()
                # self.vllm_result = json.loads(self.vllm_result)
                # box = self.vllm_result['xyxy']
                # if box:
                    # self.get_logger().info('box: %s' % str(box))
                    # if isinstance(box[0], float):
                        # box = [int(box[0] * 640), int(box[1] * 360), int(box[2] * 640), int(box[3] * 360)]
                    # else:
                        # self.client.data_process(box, 640, 360)
                    # box[0] = int(box[0] / 640 * display_size[0])
                    # box[1] = int(box[1] / 360 * display_size[1])
                    # box[2] = int(box[2] / 640 * display_size[0])
                    # box[3] = int(box[3] / 360 * display_size[1])
                    # self.get_logger().info('box: %s' % str(box))
                self.vllm_result = ''
                self.action_finish = True
            if self.play_audio_finish and self.action_finish:
                self.play_audio_finish = False
                self.action_finish = False
                # msg = SetInt32.Request()
                # msg.data = 1
                # self.send_request(self.set_mode_client, msg)
                msg = SetBool.Request()
cv2.namedWindow and cv2.moveWindow: create and position a window for image display.
Self.image_queue.get: retrieves image data from the queue.Self.vllm_result: if a VLLM result is available, publishes it to the text-to-speech node.Cv2.imshow: displays the image on the screen.cv2.waitKey: waits for a keyboard event.cv2.destroyAllWindows: closes all OpenCV display windows.
(8) Play_audio_finish_callback Method
    def play_audio_finish_callback(self, msg):
        self.play_audio_finish = msg.data
It sends a request to enable the wake-up feature once audio playback is complete.
(9) image_callback Method
    def image_callback(self, ros_image):
        cv_image = self.bridge.imgmsg_to_cv2(ros_image, "rgb8")
        rgb_image = np.array(cv_image, dtype=np.uint8)

        if self.image_queue.full():
            # If the queue is full, discard the oldest image (如果队列已满,丢弃最旧的图像)
            self.image_queue.get()
            # Put the image into the queue (将图像放入队列)
        self.image_queue.put(rgb_image)
It converts received ROS image messages to NumPy arrays and stores them in the queue.
(10) main Method
def main():
    node = VLLMWithCamera('vllm_with_camera')
    executor = MultiThreadedExecutor()
    executor.add_node(node)
    executor.spin()
    node.destroy_node()
Create an instance of the VLLMWithCamera node.
A multithreaded executor is used to handle the node’s tasks.
Call
executor.spin()to start processing ROS events.Upon shutdown, the node is properly destroyed using
node.destroy_node().
25.2.5 Vision Tracking in Embodied AI Applications
The large model used in this lesson operates online, requiring a stable network connection for the main controller in use.
Overview of Operation
Once the program starts, Circular Microphone Array will announce: “I’m Ready.”
To activate the voice device, speak the designated wake words: “hello hiwonder.” Upon successful activation, the voice device will respond with “I’m Here.” After that you can control the robot by voice—for example, “Follow the person wearing white clothes ahead.” The terminal prints the recognized speech, the Circular microphone Array announces the generated response, the camera detects the black line, and the robot halts as soon as an obstacle appears in front.
Preparation
1. Version Confirmation
Before starting this feature, verify Version Confirmation that the correct microphone configuration is set in the system.
2. Configuring the Large Model API-KEY
Open a new command-line terminal and enter the following command to access the configuration file.
vim /home/ubuntu/ros2_ws/src/large_models/large_models/large_models/config.py
Refer to 25.1.1 Obtain and Configure the Large Model API Key to obtain the large-model API-KEY: paste the vision model (from the OpenRouter website) into the vllm_api_key parameter, and the LLM model (from the OpenAI website) into the llm_api_key parameter, as indicated by the red boxes in the figure below.
Enabling and Disabling the Feature
Note
Command input is case-sensitive and space-sensitive.
The robot must be connected to the Internet, either in STA (LAN) mode or AP (direct connection) mode via Ethernet.
Click
 to launch the command bar, enter the command, and press Enter to disable the auto-start service.
Enter the command to disable the auto-start service of the mobile app.
sudo systemctl stop start_app_node.service
Open the command line terminal from the left side of the system interface.
In the terminal window, enter the following command and press Enter to run the voice control feature.ros2 launch large_models_examples vllm_track.launch.py
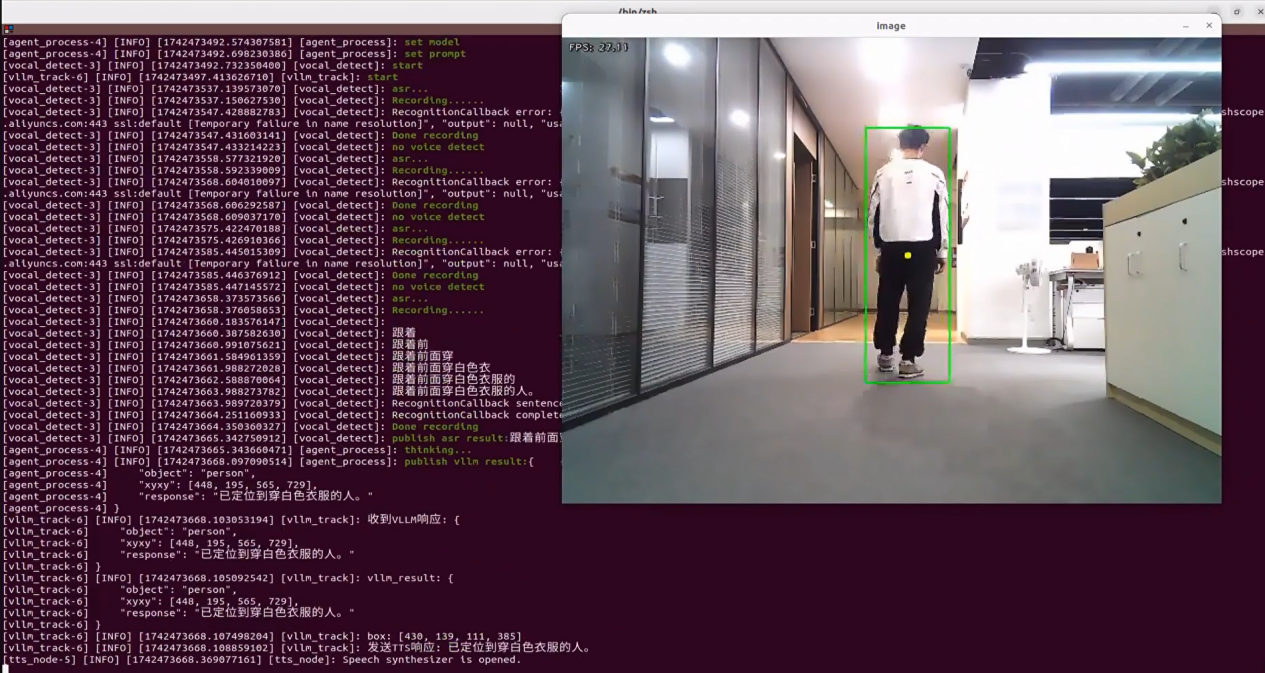
When the command line shows the output below and the device announces “Ready,” it means the microphone array has finished initializing and the YOLOv8 model has also been loaded. At this point you can say the wake word: “Hello, HiWonder.”


When the terminal displays the corresponding output shown in the figure and the voice device responds with “I’m here”, it indicates successful activation. The system will begin recording the user’s voice command.

When the terminal displays the next output as the reference image, it shows the recognized speech transcribed by the voice device.

Upon successful recognition by the speech recognition service of cloud-based large speech model, the parsed command will be displayed under the publish_asr_result output in the terminal.
Upon receiving user input shown in the figure, the terminal will display output indicating that the cloud-based large language model has been successfully invoked. The model will interpret the command, generate a language response, and execute a corresponding action based on the meaning of the command.
Note
The response is automatically generated by the model. While the semantic content is accurate, the wording and structure may vary due to randomness in language generation.
When the terminal shows the output shown in the figure indicating the end of one interaction cycle, the system is ready for the next round. To initiate another interaction, repeat step 4 by speaking the wake words again.

To exit the feature, press Ctrl+C in the terminal. If the feature does not exit immediately, press Ctrl+C multiple times.
Project Outcome
Once the feature is activated, natural language commands such as “Follow the person in white in front.” can be used. The robot will identify the person wearing white in the camera view and begin following them. It will automatically stop once a certain distance has been reached.
Program Brief Analysis
1. Launch File Analysis
File Path:
/home/ubuntu/ros2_ws/src/large_models_examples/large_models_examples/vllm_track.launch.py
(1) Import Libraries
import os
from ament_index_python.packages import get_package_share_directory

from launch_ros.actions import Node
from launch.substitutions import LaunchConfiguration
from launch import LaunchDescription, LaunchService
from launch.launch_description_sources import PythonLaunchDescriptionSource
from launch.actions import IncludeLaunchDescription, DeclareLaunchArgument, OpaqueFunction
os: used for handling file paths and operating system-related functions.
ament_index_python.packages.get_package_share_directory: retrieves the share directory path of ROS 2 package.launch_ros.actions.Node: used to define ROS 2 nodes.launch.substitutions.LaunchConfiguration: retrieves parameter values defined in the Launch file.LaunchDescription, LaunchService: used to define and start the Launch file.launch_description_sources PythonLaunchDescriptionSource: enables the inclusion of other Launch files.launch.actions.IncludeLaunchDescription, DeclareLaunchArgument, OpaqueFunction: used to define actions and arguments within the Launch file.
(2) Definition of the launch_setup Function
def launch_setup(context):
    mode = LaunchConfiguration('mode', default=1)
    mode_arg = DeclareLaunchArgument('mode', default_value=mode)

    slam_package_path = get_package_share_directory('slam')
    large_models_package_path = get_package_share_directory('large_models')

    base_launch = IncludeLaunchDescription(
        PythonLaunchDescriptionSource(
            os.path.join(slam_package_path, 'launch/include/robot.launch.py')),
        launch_arguments={
            'sim': 'false',
            'master_name': os.environ['MASTER'],
            'robot_name': os.environ['HOST']
        }.items(),
    )

    large_models_launch = IncludeLaunchDescription(
        PythonLaunchDescriptionSource(
            os.path.join(large_models_package_path, 'launch/start.launch.py')),
        launch_arguments={'mode': mode}.items(),
    )

    vllm_track_node = Node(
        package='large_models_examples',
        executable='vllm_track',
        output='screen',
    )

    # rqt
    calibrate_rqt_reconfigure_node = Node(
        package='rqt_reconfigure',
        executable='rqt_reconfigure',
        name='calibrate_rqt_reconfigure'
    )

    return [mode_arg,
            base_launch,
            large_models_launch,
            vllm_track_node,
            # calibrate_rqt_reconfigure_node,
            ]
The
launch_setupfunction includes the robot.launch.py file from the slam package, which is responsible for launching the robot’s chassis control and initializing related peripheral connections with corresponding parameters.It also includes the start.launch.py file from the
large_modelspackage, which launches the intelligent agent equipped with the capabilities of “seeing, listening, thinking, and speaking.”Additionally, it includes the
vllm_trackexecutable from the large_models_examples package, which serves as the main node for the visual tracking functionality.
(3) Definition of the generate_launch_description Function
def generate_launch_description():
    return LaunchDescription([
        OpaqueFunction(function = launch_setup)
    ])
This function is responsible for generating the complete launch description.
The
launch_setupfunction is incorporated using OpaqueFunction.
(4) Main Program Entry
if __name__ == '__main__':
    # Create a LaunchDescription object(创建一个LaunchDescription对象)
    ld = generate_launch_description()

    ls = LaunchService()
    ls.include_launch_description(ld)
    ls.run()
ld = generate_launch_description()generates the launch description object.ls = LaunchService()creates the launch service object.ls.include_launch_description(ld)adds the launch description to the service.ls.run()starts the service and execute all launch actions.
2. Python File Analysis
The source code for this program is located at:
/home/ubuntu/ros2_ws/src/large_models_examples/large_models_examples/vllm_track.py
(1) Import the Necessary Libraries
import os
import cv2
import json
import time
import queue
import rclpy
import threading
import PIL.Image
import numpy as np
import sdk.fps as fps
import message_filters
from sdk import common
from rclpy.node import Node
from sensor_msgs.msg import Image
from geometry_msgs.msg import Twist
from std_msgs.msg import String, Float32, Bool
from std_srvs.srv import Trigger, SetBool, Empty
from rcl_interfaces.msg import SetParametersResult
from rclpy.executors import MultiThreadedExecutor
from rclpy.callback_groups import ReentrantCallbackGroup

from speech import speech
from large_models.config import *
from large_models_msgs.srv import SetString, SetModel, SetInt32
from large_models_examples.track_anything import ObjectTracker
from servo_controller.bus_servo_control import set_servo_position
from servo_controller_msgs.msg import ServosPosition, ServoPosition
from large_models_examples.tracker import Tracker
Image Processing
cv2: provides core functions for image processing and display using OpenCV.PIL.Image and numpy: used for image data manipulation and numerical computations.ROS Communication and Synchronization
rclpy: core library for creating ROS 2 nodes and handling communication.message_filters: ensures time synchronization between multi-sensor data streams, such as RGB and depth images.sensor_msgs, geometry_msgs, std_msgs, std_srvs, rcl_interfaces: core message and service types used for ROS data and service exchange.MultiThreadedExecutor and ReentrantCallbackGroup: enable concurrent callbacks and multithreaded scheduling to maintain system responsiveness and real-time performance.
(2) PROMPT String
    '''
else:
    PROMPT = '''
**Role
You are a smart car with advanced visual recognition capabilities. Your task is to analyze an image sent by the user, perform object detection, and follow the detected object. Finally, return the result strictly following the specified output format.

Step 1: Understand User Instructions
You will receive a sentence. From this sentence, extract the object name to be detected.
Note: Use English for the object value, do not include any objects not explicitly mentioned in the instruction.

Step 2: Understand the Image
You will also receive an image. Locate the target object in the image and return its coordinates as the top-left and bottom-right pixel positions in the form [xmin, ymin, xmax, ymax].
Note: If the object is not found, then "xyxy" should be an empty list: [], only detect and report objects mentioned in the user instruction.The coordinates (xmin, ymin, xmax, ymax) must be normalized to the range [0, 1]

**Important: Accurately understand the spatial position of the object. The "response" must reflect both the user’s instruction and the detection result.

**Output Format (strictly follow this format, do not output anything else.The coordinates (xmin, ymin, xmax, ymax) must be normalized to the range [0, 1])
{
    "object": "name",
    "xyxy": [xmin, ymin, xmax, ymax],
    "response": "reflect both the user’s instruction and the detection result (5–30 characters)"
}

**Example
Input: track the person
Output:
{
    "object": "person",
    "xyxy": [0.1, 0.3, 0.4, 0.6],
    "response": "I have detected a person in a white T-shirt and will track him now."
}
    '''
It defines a prompt string (PROMPT) used to guide how user commands and image data are processed. It specifies the recognition task logic and expected output format.
(3) VLLMTrack Class
display_size = [int(640*6/4), int(360*6/4)]
class VLLMTrack(Node):
    def __init__(self, name):
        rclpy.init()
        super().__init__(name)
        self.fps = fps.FPS() # Frame rate counter(帧率统计器)
        self.image_queue = queue.Queue(maxsize=2)
        self.vllm_result = ''
        # self.vllm_result = '''json{"object":"red cube", "xyxy":[521, 508, 637, 683]}''' (self.vllm_result = '''json{"object":"红色方块", "xyxy":[521, 508, 637, 683]}''')
        self.set_above = False
        self.running = True
        self.data = []
        self.box = []
        self.stop = True
        self.start_track = False
        self.action_finish = False
        self.play_audio_finish = False
        self.track = ObjectTracker(use_mouse=True, automatic=True, log=self.get_logger())

        timer_cb_group = ReentrantCallbackGroup()
        self.client = speech.OpenAIAPI(api_key, base_url)
        self.joints_pub = self.create_publisher(ServosPosition, 'servo_controller', 1)
        self.mecanum_pub = self.create_publisher(Twist, '/controller/cmd_vel', 1)  # Chassis control (底盘控制)
        self.tts_text_pub = self.create_publisher(String, 'tts_node/tts_text', 1)
        self.create_subscription(Bool, 'tts_node/play_finish', self.play_audio_finish_callback, 1, callback_group=timer_cb_group)
        self.create_subscription(String, 'agent_process/result', self.vllm_result_callback, 1)
        self.create_subscription(Bool, 'vocal_detect/wakeup', self.wakeup_callback, 1)

        self.awake_client = self.create_client(SetBool, 'vocal_detect/enable_wakeup')
        self.awake_client.wait_for_service()
        self.set_model_client = self.create_client(SetModel, 'agent_process/set_model')
        self.set_model_client.wait_for_service()
        self.set_mode_client = self.create_client(SetInt32, 'vocal_detect/set_mode')
        self.set_mode_client.wait_for_service()
        self.set_prompt_client = self.create_client(SetString, 'agent_process/set_prompt')
        self.set_prompt_client.wait_for_service()

        image_sub = message_filters.Subscriber(self, Image, 'depth_cam/rgb/image_raw')
        depth_sub = message_filters.Subscriber(self, Image, 'depth_cam/depth/image_raw')

        # Synchronize timestamps, allowing an error margin of up to 0.03 seconds (同步时间戳, 时间允许有误差在0.03s)
        sync = message_filters.ApproximateTimeSynchronizer([depth_sub, image_sub], 3, 0.02)
        sync.registerCallback(self.multi_callback)

        # Define PID parameters (定义 PID 参数)
        # 0.07, 0, 0.001
        self.pid_params = {
            'kp1': 0.1, 'ki1': 0.0, 'kd1': 0.00,
            'kp2': 0.002, 'ki2': 0.0, 'kd2': 0.0,
        }
Display_size: defines the size of the display window.rclpy.init(): initializes the ROS 2 system.super().init(name): calls the initializer of the parent class (Node) to create a ROS 2 node.fps.FPS(): creates an instance of a frame rate tracker.queue.Queue(maxsize=2): creates a queue with a maximum capacity of 2.self.vllm_result: stores the results processed by the model.self.running: a boolean flag used to control the runtime state of the program.self.data: an empty list used for storing intermediate data.self.start_track: a boolean flag used to control the start or stop of target tracking.self.track = ObjectTracker(): instantiates an object tracker.timer_cb_group: creates a reentrant callback group to allow concurrent callback execution.speech.OpenAIAPI(): instantiates a speech interaction client.self.joints_pub: creates a publisher for sending servo motor position commands.self.tts_text_pub: a publisher is created for sending text data to the text-to-speech node.self.create_subscription: subscribes to image data, speech playback completion signals, and image recognition results.self.create_client: creates service clients for tasks such as wake-up control, model configuration, and motion control.Each PID parameter in self.pid_params is declared as a ROS 2 dynamic parameter with a default value.
Current values are retrieved using
self.get_parameter()and used to update self.pid_params.self.track.update_pid(): passes the updated PID parameters to the object tracker to adjust its PID controller.self.pid_params: contains the PID controller parameters used in the target tracking control logic.self.add_on_set_parameters_callback: registers a callback function to handle parameter updates dynamically.self.timer: creates a timer used to trigger the initialization process.
(4) on_parameter_update Method
    def on_parameter_update(self, params):
        """Parameter update callback (参数更新回调)"""
        for param in params:
            if param.name in self.pid_params.keys():
                self.pid_params[param.name] = param.value
        # self.get_logger().info(f'PID parameters updated: {self.pid_params}')
        # Update PID parameters (更新 PID 参数)
        self.track.update_pid([self.pid_params['kp1'], self.pid_params['ki1'], self.pid_params['kd1']],
                      [self.pid_params['kp2'], self.pid_params['ki2'], self.pid_params['kd2']])
self.pid_params: a dictionary storing PID parameters.self.track.update_pid: updates the PID parameters used by the target tracking module.
(5) create_update_callback Method
    def create_update_callback(self, param_name):
        """Generate dynamic update callback (生成动态更新回调)"""
        def update_param(msg):
            new_value = msg.data
            self.pid_params[param_name] = new_value
            self.set_parameters([Parameter(param_name, Parameter.Type.DOUBLE, new_value)])
            self.get_logger().info(f'Updated {param_name}: {new_value}')
            # Update PID parameters (更新 PID 参数)
It generates a dynamic update callback function for each PID parameter.
(6) get_node_state Method
    def get_node_state(self, request, response):
        return response
return response: returns a response object.
(7) init_process Method
    def init_process(self):
        self.timer.cancel()

        msg = SetModel.Request()
        msg.model_type = 'vllm'
        if language == 'Chinese':
            msg.model = stepfun_vllm_model
            msg.api_key = stepfun_api_key
            msg.base_url = stepfun_base_url
        else:
            msg.api_key = vllm_api_key
            msg.base_url = vllm_base_url
            msg.model = vllm_model
        self.send_request(self.set_model_client, msg)

        msg = SetString.Request()
        msg.data = PROMPT
        self.send_request(self.set_prompt_client, msg)

        set_servo_position(self.joints_pub, 1.5, ((10, 300), (5, 500), (4, 100), (3, 100), (2, 750), (1, 500)))
        self.mecanum_pub.publish(Twist())
        time.sleep(1.8)
        speech.play_audio(start_audio_path)
        threading.Thread(target=self.process, daemon=True).start()
        threading.Thread(target=self.display_thread, daemon=True).start()
        self.create_service(Empty, '~/init_finish', self.get_node_state)
        self.get_logger().info('\033[1;32m%s\033[0m' % 'start')
        self.get_logger().info('\033[1;32m%s\033[0m' % PROMPT)
self.timer.cancel(): cancels the timer.SetModel.Request(): creates a request message to set the model.SetString.Request(): creates a request message to set the prompt string.set_pose_target: sets the robot’s initial position.self.send_request: Sends a service request.set_servo_position: sets the position of servo joints.Speech.play_audio: plays an audio file.threading.Thread: starts a new thread for image processing and tracking.Self.create_service: registers a service to notify that the initialization process is complete.self.get_logger().info: prints log messages.
(8) send_request Method
    def send_request(self, client, msg):
        future = client.call_async(msg)
        while rclpy.ok():
            if future.done() and future.result():
                return future.result()
client.call_async(msg): makes an asynchronous service call.future.done()andfuture.result(): check if the service call is complete and retrieve the result.
(9) vllm_result_callback Method
    def vllm_result_callback(self, msg):
        self.vllm_result = msg.data
This callback receives results from the agent_process/result topic and stores them in self.vllm_result.
(10) Play_audio_finish_callback Method
    def play_audio_finish_callback(self, msg):
        self.play_audio_finish = msg.data
The play_audio_finish_callback method sends a wake-up signal after audio playback is completed.
(11) Process Method
    def process(self):
        box = ''
        while self.running:
            if self.vllm_result:
                try:
                    # self.get_logger().info('vllm_result: %s' % self.vllm_result)
                    if self.vllm_result.startswith("```") and self.vllm_result.endswith("```"):
                        self.vllm_result = self.vllm_result.strip("```").replace("json\n", "").strip()
                    self.vllm_result = json.loads(self.vllm_result)
                    response = self.vllm_result['response']
                    msg = String()
                    msg.data = response
                    self.tts_text_pub.publish(msg)
                    box = self.vllm_result['xyxy']
                    if box:
                        if language == 'Chinese':
                            box = self.client.data_process(box, 640, 480)
                            self.get_logger().info('box: %s' % str(box))
                        else:
                            box = [int(box[0] * 640), int(box[1] * 480), int(box[2] * 640), int(box[3] * 480)]
                        box = [box[0], box[1], box[2] - box[0], box[3] - box[1]]
                        box[0] = int(box[0] / 640 * display_size[0])
                        box[1] = int(box[1] / 360 * display_size[1])
                        box[2] = int(box[2] / 640 * display_size[0])
                        box[3] = int(box[3] / 360 * display_size[1])
                        self.get_logger().info('box: %s' % str(box))
                        self.box = box
                except (ValueError, TypeError):
                    self.box = []
                    msg = String()
                    msg.data = self.vllm_result
                    self.tts_text_pub.publish(msg)
                self.vllm_result = ''
                self.action_finish = True
            else:
                time.sleep(0.02)
            if self.play_audio_finish and self.action_finish:
                self.play_audio_finish = False
                self.action_finish = False
                msg = SetBool.Request()
                msg.data = True
                self.send_request(self.awake_client, msg)
                # msg = SetInt32.Request()
                # msg.data = 1
                # self.send_request(self.set_mode_client, msg)
                self.stop = False
while self.running: ensures continuous data processing while the node is active.
if
self.vllm_result: checks whether a new VLLM response has been received.Json.loads(self.vllm_result): parses the received JSON-formatted string into a dictionary for easier data extraction.
Extracting response and xyxy:
response = self.vllm_result[‘response’]: retrieves the text message for TTS (Text-to-Speech) playback.
box = self.vllm_result[‘xyxy’]: retrieves the bounding box coordinates returned from object detection.
Processing Bounding Box Data: If a target is detected and the box is not empty, the method calls self.client.data_process to normalize the coordinates using a frame size of 640 by 480. It then converts the coordinates into the format [xmin, ymin, width, height], scales them based on the display window size, and stores the result in self.box for tracking.
Sending TTS Response: A String message is created and the extracted response is sent to the TTS node for speech playback.
Error Handling: If a ValueError or TypeError occurs during parsing or extraction, the target info is cleared, and the original vllm_result is sent to the TTS node as plain text.
State Updates:
self.vllm_result is reset to an empty string to indicate the response has been processed.
self.action_finish is set to True to mark that the action has been completed.
Loop Wait Mechanism: If no new vllm_result is received, the loop sleeps for 20 ms using time.sleep(0.02) to avoid high CPU usage.
Subsequent Service Request: when both self.play_audio_finish and self.action_finish are True,
related flags are reset.
A service request is sent via self.send_request(self.set_mode_client, msg) to set the mode to 2, allowing target tracking to begin.
self.stop is updated to False, lifting the pause on target tracking.
(12) track_thread
    def process(self):
        box = ''
        while self.running:
            if self.vllm_result:
                try:
                    # self.get_logger().info('vllm_result: %s' % self.vllm_result)
                    if self.vllm_result.startswith("```") and self.vllm_result.endswith("```"):
                        self.vllm_result = self.vllm_result.strip("```").replace("json\n", "").strip()
                    self.vllm_result = json.loads(self.vllm_result)
                    response = self.vllm_result['response']
                    msg = String()
                    msg.data = response
                    self.tts_text_pub.publish(msg)
                    box = self.vllm_result['xyxy']
                    if box:
                        if language == 'Chinese':
                            box = self.client.data_process(box, 640, 480)
                            self.get_logger().info('box: %s' % str(box))
                        else:
                            box = [int(box[0] * 640), int(box[1] * 480), int(box[2] * 640), int(box[3] * 480)]
                        box = [box[0], box[1], box[2] - box[0], box[3] - box[1]]
                        box[0] = int(box[0] / 640 * display_size[0])
                        box[1] = int(box[1] / 360 * display_size[1])
                        box[2] = int(box[2] / 640 * display_size[0])
                        box[3] = int(box[3] / 360 * display_size[1])
                        self.get_logger().info('box: %s' % str(box))
                        self.box = box
                except (ValueError, TypeError):
                    self.box = []
                    msg = String()
                    msg.data = self.vllm_result
                    self.tts_text_pub.publish(msg)
                self.vllm_result = ''
                self.action_finish = True
while self.running: controls the thread’s runtime, and the thread continuously processes image data as long as self.running is True.image, depth_image = self.image_queue.get(block=True): fetches the latest RGB and depth images from the thread-safe queue to ensure synchronized data processing.if box: checks if a new detection bounding box (box) is available. If available, the method calls self.track.set_track_target(self.box, image) to set the current tracking target in the image, sets self.start_track = True, and clears self.box.if self.start_track: verifies if target tracking has been initiated. If True, it calls self.track.track(image, depth_image) to obtain the tracking result, which is then stored in self.data.Use of self.data: the first two values in the tracking result usually represent control commands, such as linear and angular velocity. The last element is the image annotated with the tracking results, which is used for display.Construct and Publish Twist Messages: a Twist message is constructed using control commands extracted from self.data and published via self.mecanum_pub.publish(twist) to control the movement of the robot base.self.fps.updateandself.fps.show_fps: update the frame rate statistics and overlay the current FPS on the image for real-time performance monitoring.cv2.imshow: display the processed image in a window to provide a visual representation of the target tracking status.cv2.waitKey: wait for keyboard input. If the user presses the q or ESC key, the tracking thread is stopped and a stop-motion Twist message is sent to halt the robot.Window on Top Handling: The display window is repositioned using cv2.moveWindow, and the command os.system(“wmctrl -r image -b add,above”) sets the window to stay on top, ensuring it’s always visible.
cv2.destroyAllWindows:after the tracking thread exits, all OpenCV-created windows are closed to complete the cleanup process.
(13) main Method
def main():
    node = VLLMTrack('vllm_track')
    executor = MultiThreadedExecutor()
    executor.add_node(node)
    executor.spin()
    node.destroy_node()
Create a VLLMTrack node instance.
Use a multithreaded executor to handle the node’s tasks.
Call
executor.spin()to start processing ROS events.Upon shutdown, the node is properly destroyed using node.destroy_node().
25.2.6 Smart Home Assistant in Embodied AI Applications
The large model used in this lesson operates online, requiring a stable network connection for the main controller in use.
Overview of Operation
Once the program starts, Circular Microphone Array will announce: “I’m Ready.”
To activate the voice device, speak the designated wake words: “hello hi wonder.” Upon successful activation, the voice device will respond with “I’m Here.” Once activated, you can control the robot by voice—issue a command like “Go to the front desk, check whether the main door is closed, then come back and tell me.” Upon receiving a command, the terminal displays the recognized speech content. The voice device then verbally responds with a generated answer and the robot simultaneously executes the corresponding action.
Preparation
1. Version Confirmation
Before starting this feature, verify Version Confirmation that the correct microphone configuration is set in the system.
2. Configuring the Large Model API-KEY
Open a new command-line terminal and enter the following command to access the configuration file.
vim /home/ubuntu/ros2_ws/src/large_models/large_models/large_models/config.py
Refer to 25.1.1 Obtain and Configure the Large Model API Key to obtain the large-model API-KEY: paste the vision model (from the OpenRouter website) into the vllm_api_key parameter, and the LLM model (from the OpenAI website) into the llm_api_key parameter, as indicated by the red boxes in the figure below.
3. Navigation Map Construction
Before enabling this feature, a map must be created in advance. Please refer to “19 Mapping and Navigation / 19.1 Mapping Tutorial” for detailed instructions on how to build the map.
Enabling and Disabling the Feature
Note
Command input is case-sensitive and space-sensitive.
The robot must be connected to the Internet, either in STA (LAN) mode or AP (direct connection) mode via Ethernet.
Open the command line terminal from the left side of the system interface.
In the terminal window, enter the following command and press Enter to stop the auto-start serviceEnter the command to disable the auto-start service of the mobile app.
sudo systemctl stop start_app_node.service
Open the command line terminal from the left side of the system interface.
In the terminal window, enter the following command and press Enter to run the voice control feature.ros2 launch large_models_examples vllm_navigation.launch.py map:=map_01
After opening the map in RViz, click the “2D Pose Estimate” icon to set the robot’s initial position.
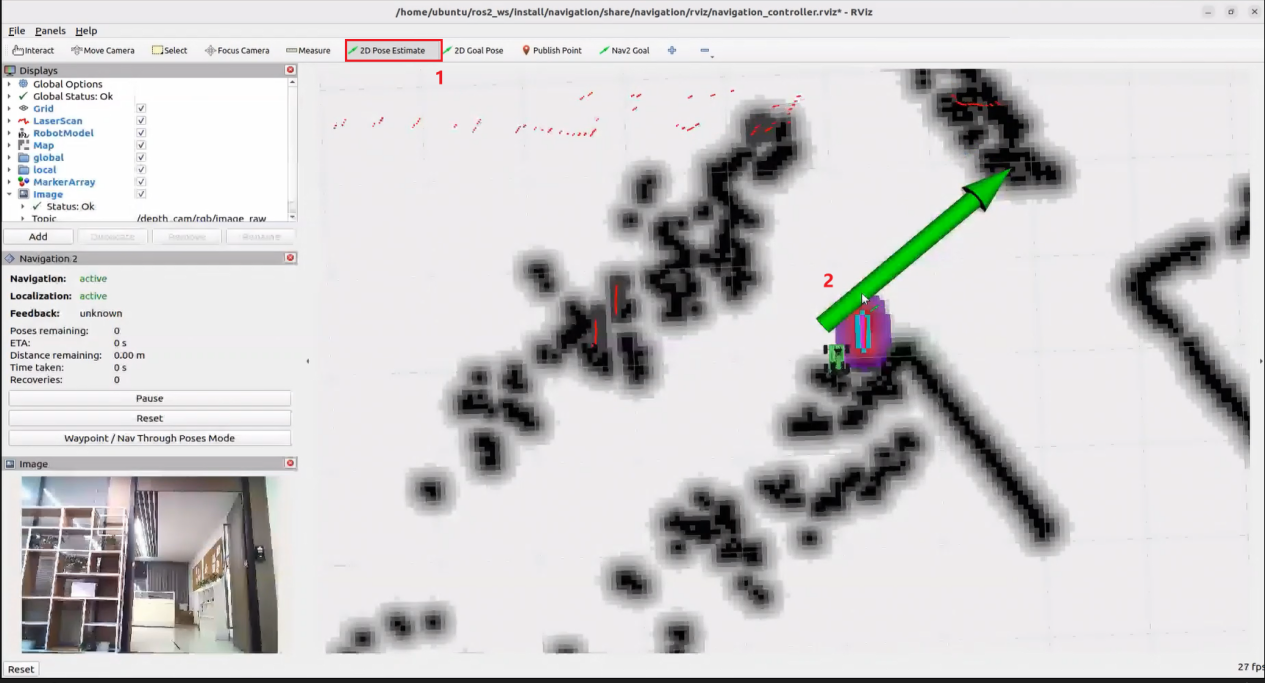
When the command line shows the output below and the device announces “Ready,” it means the microphone array has finished initializing and the YOLOv8 model has also been loaded. At this point you can say the wake word: “Hello, HiWonder.”
When the terminal displays the corresponding output shown in the figure and the voice device responds with “I’m here”, it indicates successful activation. The system will begin recording the user’s voice command.
When the terminal displays the next output as the reference image, it shows the recognized speech transcribed by the voice device.

Upon successful recognition by the speech recognition service of cloud-based large speech model, the parsed command will be displayed under the publish_asr_result output in the terminal.

Upon receiving user input shown in the figure, the terminal will display output indicating that the cloud-based large language model has been successfully invoked. The model will interpret the command, generate a language response, and execute a corresponding action based on the meaning of the command.
Note
The response is automatically generated by the model. While the semantic content is accurate, the wording and structure may vary due to randomness in language generation.
Arrive at the “front-desk” waypoint, detect the door status.
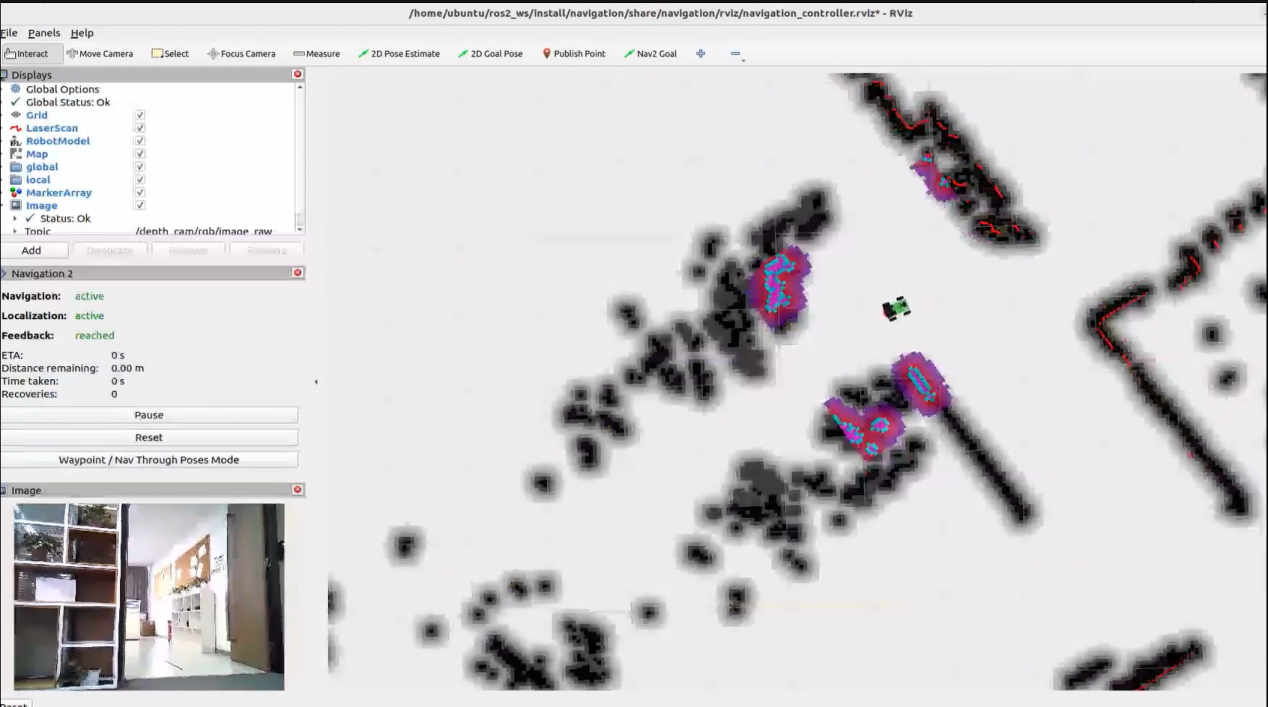
Then return to the start point and report—for example: “The door is open; please close it to keep everything secure and private.”
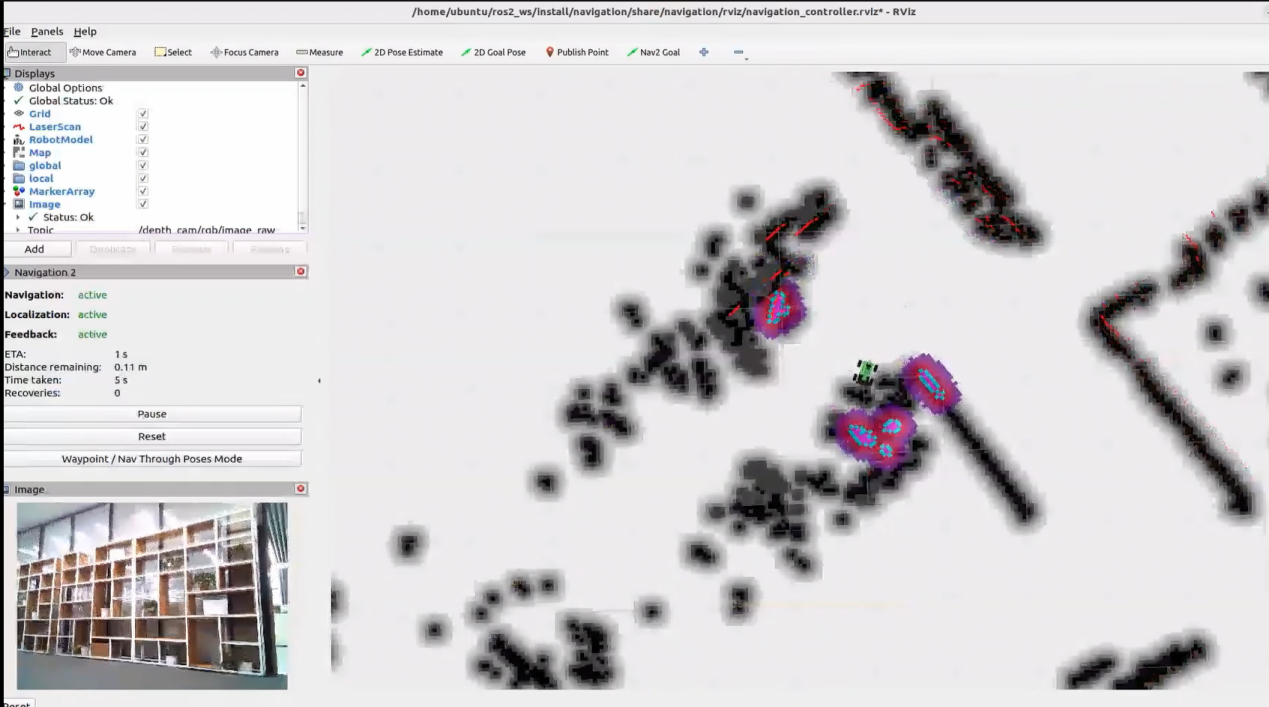
When the terminal shows the output shown in the figure indicating the end of one interaction cycle, the system is ready for the next round. To initiate another interaction, repeat step 5 by speaking the wake words again.
To exit the feature, press Ctrl+C in the terminal. If the feature does not exit immediately, press Ctrl+C multiple times.
Project Outcome
Once the mode is active you can phrase the order any way you like, e.g. “Go to the front desk, check if the main door is closed, then come back and tell me.” The robot will navigate to the preset front-desk location, inspect the door, return to the origin, and give you the result.
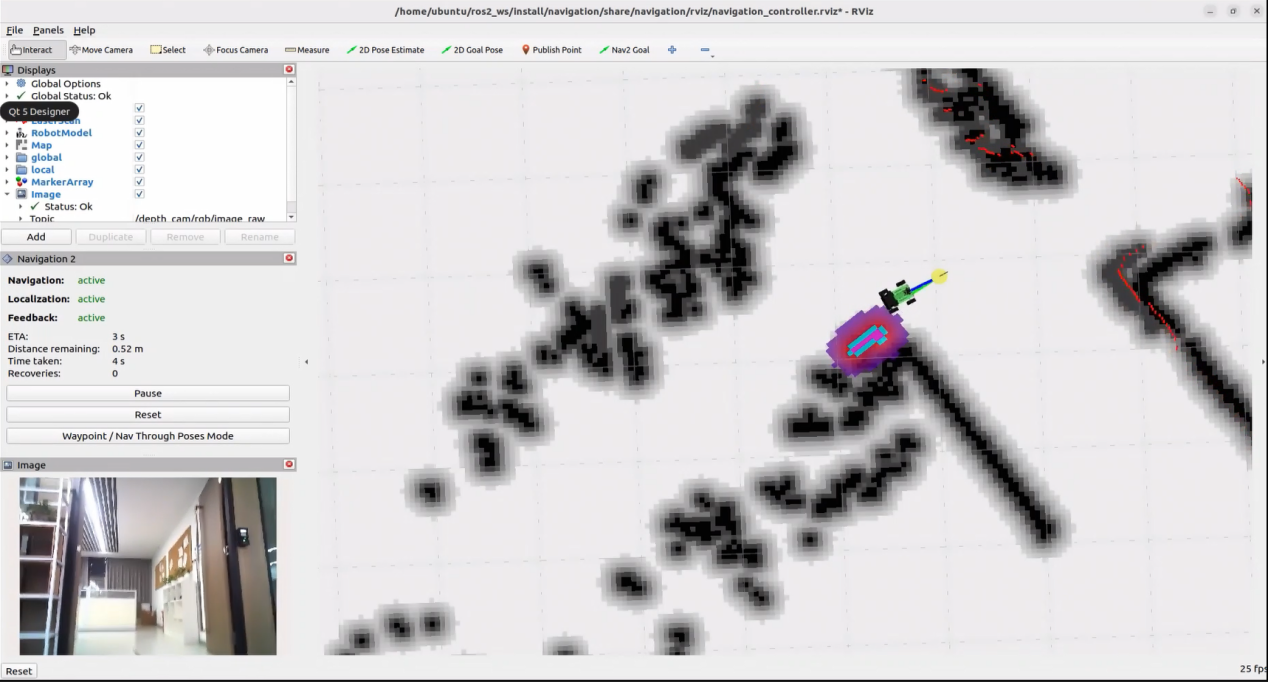
Modifying Navigation Location
To change the navigation points, edit the file at the path below:
~/ros2_ws/src/large_models_examples/large_models_examples/vllm_navigation.py
Follow the start/stop procedure to launch the program and open the RViz map display, then set a navigation goal: click “2D Goal Pose” and designate the target on the map.
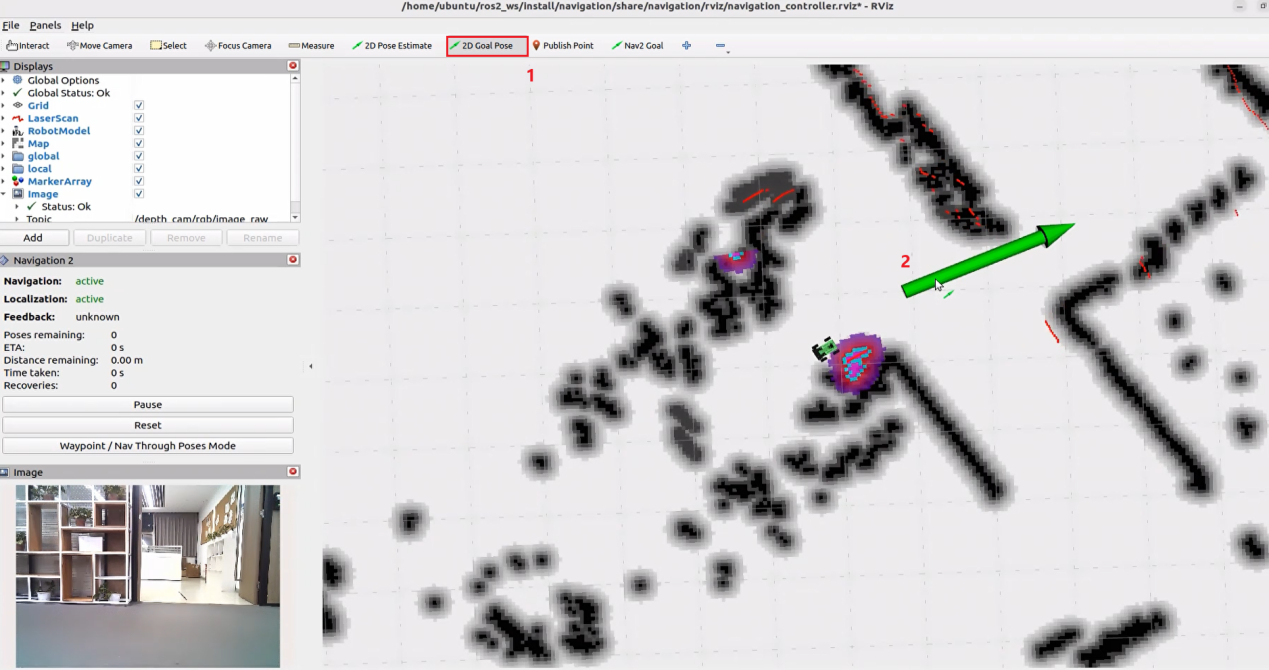
Return to the command terminal and check the target location parameter for the publication:

Locate the corresponding section of the code shown below, and fill in your target location parameters after the appropriate location name.
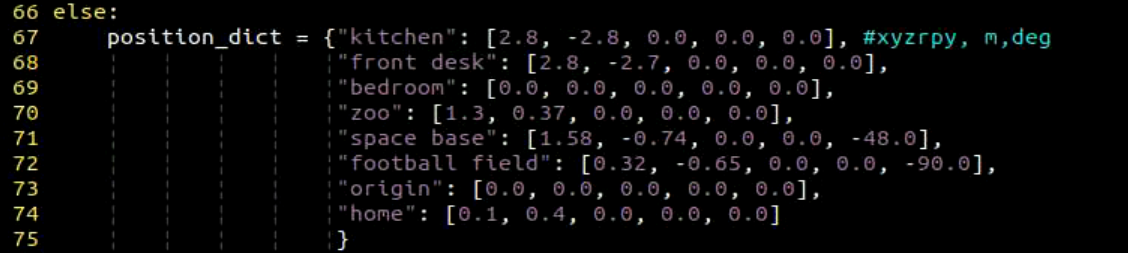
In the program, each location is defined as a target navigation point relative to the map’s origin, which corresponds to the robot’s starting position during the mapping process. Each navigation point includes five parameters:
x: position on the x-axis (meters)
y: position on the y-axis (meters)
roll: rotation around the x-axis (degrees)
pitch: rotation around the y-axis (degrees)
yaw: rotation around the z-axis (degrees)
For example, to define the position of “front desk,” the parameters can be set to [2.8, -2.7, 0.0, 0.0, 0.0], indicating that the robot will navigate to a location offset from the map origin by those values.
For example, given the quaternion: Quaternion(x=0.0, y=0.0, z=-0.5677173914973032, w=0.8232235197025761). After conversion to Euler angles (roll, pitch, yaw), the result is approximately: roll ≈ 0°, pitch ≈ 0°, yaw ≈ -69.3°
Program Brief Analysis
1. Launch File Analysis
File Path:
/home/ubuntu/ros2_ws/src/large_models_examples/large_models_examples/vllm_navigation.launch.py
(1) Import Libraries
import os
from ament_index_python.packages import get_package_share_directory

from launch_ros.actions import Node
from launch_ros.actions import PushRosNamespace
from launch import LaunchDescription, LaunchService
from launch.substitutions import LaunchConfiguration
from launch.launch_description_sources import PythonLaunchDescriptionSource
from launch.actions import DeclareLaunchArgument, IncludeLaunchDescription, GroupAction, OpaqueFunction, TimerAction, ExecuteProcess
os: used for handling file paths and operating system-related functions.
ament_index_python.packages.get_package_share_directory: retrieves the share directory path of ROS 2 package.launch_ros.actions.Node: used to define ROS 2 nodes.LaunchDescription, LaunchService: used to define and start the Launch file.launch_description_sources PythonLaunchDescriptionSource: enables the inclusion of other Launch files.launch.actions.IncludeLaunchDescription, DeclareLaunchArgument, OpaqueFunction: used to define actions and arguments within the Launch file.
(2) Definition of the launch_setup Function
def launch_setup(context):
    slam_package_path = get_package_share_directory('slam')
    navigation_package_path = get_package_share_directory('navigation')
    large_models_package_path = get_package_share_directory('large_models')

    mode = LaunchConfiguration('mode', default=1)
    mode_arg = DeclareLaunchArgument('mode', default_value=mode)
    map_name = LaunchConfiguration('map', default='map_01').perform(context)
    robot_name = LaunchConfiguration('robot_name', default=os.environ['HOST'])
    master_name = LaunchConfiguration('master_name', default=os.environ['MASTER'])

    map_name_arg = DeclareLaunchArgument('map', default_value=map_name)
    master_name_arg = DeclareLaunchArgument('master_name', default_value=master_name)
    robot_name_arg = DeclareLaunchArgument('robot_name', default_value=robot_name)

    navigation_launch = IncludeLaunchDescription(
        PythonLaunchDescriptionSource(os.path.join(navigation_package_path, 'launch/navigation.launch.py')),
        launch_arguments={
            'sim': 'false',
            'map': map_name,
            'robot_name': robot_name,
            'master_name': master_name,
            'use_teb': 'true',
        }.items(),
    )

    navigation_controller_node = Node(
        package='large_models_examples',
        executable='navigation_controller',
        output='screen',
        parameters=[{'map_frame': 'map', 'nav_goal': '/nav_goal'}]
    )

    rviz_node = ExecuteProcess(
            cmd=['rviz2', 'rviz2', '-d', os.path.join(navigation_package_path, 'rviz/navigation_controller.rviz')],
            output='screen'
        )

    large_models_launch = IncludeLaunchDescription(
        PythonLaunchDescriptionSource(
            os.path.join(large_models_package_path, 'launch/start.launch.py')),
        launch_arguments={'mode': mode}.items(),
    )

    vllm_navigation_node = Node(
        package='large_models_examples',
        executable='vllm_navigation',
        output='screen',
    )

    return [
            mode_arg,
            map_name_arg,
            master_name_arg,
            robot_name_arg,
            navigation_launch,
            navigation_controller_node,
            rviz_node,
            large_models_launch,
            vllm_navigation_node
            ]
This function is used to configure and initialize launch actions.
mode = LaunchConfiguration(‘mode’, default=1) defines a launch argument named mode with a default value of 1.
mode_arg = DeclareLaunchArgument(‘mode’, default_value=mode) declares the mode argument and includes it in the launch description.
navigation_package_path、large_models_package_path: retrieves the shared directory path of the navigation and large_models package.navigation_launch: includes the robot.launch.py file and the bringup.launch.py file using IncludeLaunchDescription.large_models_launch: includes the start.launch.py Launch file from the large_models package using IncludeLaunchDescription and passes the mode argument to it.vllm_navigation_node: defines a ROS 2 node from the large_models_examples package, executes the executable files from the vllm_navigation.py, and prints the node’s output to the screen.vllm_navigation_node: defines a ROS 2 node from the large_models_examples package, executes the executable files from the vllm_navigation.py, and prints the node’s output to the screen.navigation_controller_node: defines a ROS 2 node from the large_models_examples package, executes the executable files from the navigation_controller.py to enable navigation control.rviz_node: defines a ROS 2 node from the navigation package, executes the navigation_controller.rviz files, and enables displaying the navigation control.The function returns a list of all defined launch actions.
(3) Definition of the generate_launch_description Function
def generate_launch_description():
    return LaunchDescription([
        OpaqueFunction(function = launch_setup)
    ])
This function is responsible for generating the complete launch description.
The
launch_setupfunction is incorporated using OpaqueFunction.
(4) Main Program Entry
if __name__ == '__main__':
    # Create a LaunchDescription object(创建一个LaunchDescription对象)
    ld = generate_launch_description()

    ls = LaunchService()
    ls.include_launch_description(ld)
    ls.run()
ld = generate_launch_description()generates the launch description object.ls = LaunchService()creates the launch service object.ls.include_launch_description(ld)adds the launch description to the service.ls.run()starts the service and execute all launch actions.
2. Python File Analysis
File Path:
/home/ubuntu/ros2_ws/src/large_models_examples/large_models_examples/vllm_navigation.py
(1) Import the Necessary Libraries
import os
import re
import time
import json
import rclpy
import threading
from speech import speech
from rclpy.node import Node
from sensor_msgs.msg import Image
from std_msgs.msg import String, Bool
from std_srvs.srv import Trigger, SetBool, Empty

from large_models.config import *
from large_models_msgs.srv import SetModel, SetContent, SetString, SetInt32

from interfaces.srv import SetPose2D
from rclpy.executors import MultiThreadedExecutor
from servo_controller_msgs.msg import ServosPosition
from rclpy.callback_groups import ReentrantCallbackGroup
from servo_controller.action_group_controller import ActionGroupController
json: used for handling data in JSON format.time: manages execution delays and time-related operations.rclpy: provides tools for creating and communicating between ROS 2 nodes.threading: enables multithreading for concurrent task processing.speech: handles modules related to large model voice interaction.std_msgs.msg:contains standard ROS message types.rclpy.callback_groups.ReentrantCallbackGroup: supports concurrent callback handling.rclpy.executors.MultiThreadedExecutor: multithreaded executor in ROS 2 for handling concurrent tasks.large_models_msgs.srv: custom service types for large models.Large_models.config: configuration file for large models.
(2) PROMPT String
    '''
else:
    position_dict = {"kitchen": [2.8, -2.8, 0.0, 0.0, 0.0], #xyzrpy, m,deg
                     "front desk": [2.8, -2.7, 0.0, 0.0, 0.0],
                     "bedroom": [0.0, 0.0, 0.0, 0.0, 0.0],
                     "zoo": [1.3, 0.37, 0.0, 0.0, 0.0],
                     "space base": [1.58, -0.74, 0.0, 0.0, -48.0],
                     "football field": [0.32, -0.65, 0.0, 0.0, -90.0],
                     "origin": [0.0, 0.0, 0.0, 0.0, 0.0],
                     "home": [0.1, 0.4, 0.0, 0.0, 0.0]
                     }

    LLM_PROMPT = '''
**Role
You are a smart navigation vehicle equipped with a camera and speaker. You can move to different places, analyze visual input, and respond by playing audio. Based on user input, you need to generate the corresponding JSON command.

**Requirements
- For any user input, look up corresponding functions from the Action Function Library, and generate the proper JSON output.
- For each action sequence, include a concise (5–20 characters) and witty, varied response to make the interaction lively and engaging.
- Output only the JSON result, no analysis or extra text.
- Output format:
{
  "action": ["xx", "xx"],
  "response": "xx"
}

**Special Notes
The "action" field contains an ordered list of function names to be executed in sequence. If no matching function is found, return: "action": [].
The "response" field should contain a carefully crafted, short, humorous, and varied message (5–20 characters).

**Action Function Library
Move to a specified place: move('kitchen')
Return to starting point: move('origin')
Analyze current view: vision('What do you see?')
Play audio response: play_audio()

**Example
Input: Go to the front desk to see if the door is closed, and then come back and tell me
Output:
{
  "action": ["move('front desk')", "vision('Is the door closed?')", "move("origin")", "play_audio()"],
  "response": "On it, reporting soon!"
}
    '''
(3) VLLMNavigation Class
class VLLMNavigation(Node):
    def __init__(self, name):
        rclpy.init()
        super().__init__(name)

        self.action = []
        self.response_text = ''
        self.llm_result = ''
        self.play_audio_finish = False
        # self.llm_result = '{\'action\':[\'move(\"前台\")\', \'vision(\"大门有没有关\")\', \'move(\"原点\")\', \'play_audio()\'], \'response\':\'马上!\'}'
        self.running = True
        self.play_delay = False
        self.reach_goal = False
        self.interrupt = False

        timer_cb_group = ReentrantCallbackGroup()
        self.tts_text_pub = self.create_publisher(String, 'tts_node/tts_text', 1)
        # self.create_subscription(Image, 'depth_cam/rgb/image_raw', self.image_callback, 1)
        self.create_subscription(String, 'agent_process/result', self.llm_result_callback, 1)
        self.create_subscription(Bool, 'vocal_detect/wakeup', self.wakeup_callback, 1)
        self.create_subscription(Bool, 'tts_node/play_finish', self.play_audio_finish_callback, 1, callback_group=timer_cb_group)
        self.create_subscription(Bool, 'navigation_controller/reach_goal', self.reach_goal_callback, 1)
        self.awake_client = self.create_client(SetBool, 'vocal_detect/enable_wakeup')
        self.awake_client.wait_for_service()
        self.set_mode_client = self.create_client(SetInt32, 'vocal_detect/set_mode')
        self.set_mode_client.wait_for_service()
        self.set_model_client = self.create_client(SetModel, 'agent_process/set_model')
        self.set_model_client.wait_for_service()
        self.set_prompt_client = self.create_client(SetString, 'agent_process/set_prompt')
        self.set_prompt_client.wait_for_service()
        self.set_vllm_content_client = self.create_client(SetContent, 'agent_process/set_vllm_content')
        self.set_vllm_content_client.wait_for_service()
        self.set_pose_client = self.create_client(SetPose2D, 'navigation_controller/set_pose')
        self.set_pose_client.wait_for_service()
(4) get_node_state Method
	    def get_node_state(self, request, response):
        return response
return response: returns a response object.
(5) init_process Method
	    def init_process(self):
        self.timer.cancel()

        msg = SetModel.Request()
        msg.model = llm_model
        msg.model_type = 'llm'
        msg.api_key = api_key
        msg.base_url = base_url
        self.send_request(self.set_model_client, msg)

        msg = SetString.Request()
        msg.data = LLM_PROMPT
        self.send_request(self.set_prompt_client, msg)

        init_finish = self.create_client(Empty, 'navigation_controller/init_finish')
        init_finish.wait_for_service()
        speech.play_audio(start_audio_path)
        threading.Thread(target=self.process, daemon=True).start()
        self.create_service(Empty, '~/init_finish', self.get_node_state)
        self.get_logger().info('\033[1;32m%s\033[0m' % 'start')
        self.get_logger().info('\033[1;32m%s\033[0m' % LLM_PROMPT)
self.timer.cancel(): cancels the timer.SetModel.Request(): creates a request message to set the LLM model.SetModel.Request: creates a request for SetModel service.msg.model_type = 'llm': specifies the model type as ‘llm’.self.send_request(self.set_model_client, msg): sends the model configuration request through theset_model_client.SetString.Request(): creates a request message to set the prompt string.self.send_request(self.set_prompt_client,msg): sends the model configuration request through theset_prompt_client.Empty.Request: request message used to clear the current conversation history.self.send_request(self.clear_chat_client, msg): sends the request through theclear_chat_clientto reset chat context.self.create_client(Empty, 'object_transport/init_finish'): creates a service client for calling the object_transport/init_finish endpoint.init_finish.wait_for_service(): waits for the init_finish service to become available.self.send_request(self.enter_client, Trigger.Request()): sends a Trigger request through theenter_clientto initiate the process.speech.play_audio: plays an audio cue.threading.Thread: launches the main logic in a new thread.Self.create_service: registers a service to notify that the initialization process is complete.self.get_logger().info: prints log messages.
(6) send_request Method
    def send_request(self, client, msg):
        future = client.call_async(msg)
        while rclpy.ok():
            if future.done() and future.result():
                return future.result()
client.call_async(msg): makes an asynchronous service call.future.done()andfuture.result(): check if the service call is complete and retrieve the result.
(7) vllm_result_callback Method
	    def llm_result_callback(self, msg):
        self.llm_result = msg.data
This callback receives results from the agent_process/result topic and stores them in self.llm_result.
(8) wakeup_callback Method
	    def wakeup_callback(self, msg):
        self.get_logger().info('wakeup interrupt')
        self.interrupt = msg.data
This method is invoked when the user activates the system via voice to receive and process the wake-up signal from the vocal_detect/wakeup topic.
(9) move(self, position) Method
	    def move(self, position):
        self.get_logger().info('position: %s' % str(position))
        msg = SetPose2D.Request()
        if position not in position_dict:
            return False
        p = position_dict[position]
        msg.data.x = float(p[0])
        msg.data.y = float(p[1])
        msg.data.roll = p[2]
        msg.data.pitch = p[3]
        msg.data.yaw = p[4]
        self.send_request(self.set_pose_client, msg)
        return True
Parameter receiving: receives a location name, such as “kitchen” and “front desk”.
p = position_dict[position] Position Lookup: retrieves the corresponding coordinate and position data from the position_dict dictionary.
Message Construction: creates a
SetPose2D.Request()message and sets the values for x, y coordinates, and roll, pitch, yaw angles.self.send_request(self.set_pose_client, msg) Service Invocation: sends the request to the navigation controller using set_pose_client.
(10) play_audio(self) Method
	    def play_audio(self):
        msg = String()
        msg.data = self.response_text
        self.get_logger().info(f'{self.response_text}')
        while not self.play_audio_finish:
            time.sleep(0.1)
        self.play_audio_finish = False
        self.tts_text_pub.publish(msg)
        self.response_text = ''
        # time.sleep(20)
This method plays the text content stored in self.response_text.
msg = String() Message Creation: initializes a String type message.
msg.data = self.response_text Logging: logs the content to be played.
while not self.play_audio_finish Waiting: enters a loop that waits for the previous audio playback to complete.
self.play_audio_finish = False State Reset: resets the playback status with self.play_audio_finish = False.
Self.tts_text_pub.publish(msg) Publishing: Publishes the message to the tts_text_pub topic to trigger text-to-speech conversion.
self.response_text = ‘’: clears self.response_text. This method enables the robot to deliver voice feedback, allowing it to communicate with the user through speech.
(11) reach_goal_callback(self, msg) Method
	    def reach_goal_callback(self, msg):
        self.get_logger().info('reach goal')
        self.reach_goal = msg.data
Parameter Receiving: receives a Boolean message indicating whether the robot has reached its destination.
State Update: updates the internal navigation status by assigning the message data to
self.reach_goal.This callback handles feedback from the navigation controller and informs the system when the robot completes a movement task.
(12) vision(self, query) Method
	    def vision(self, query):
        self.controller.run_action('horizontal')
        msg = SetContent.Request()
        if language == 'Chinese':
            msg.api_key = stepfun_api_key
            msg.base_url = stepfun_base_url
            msg.model = stepfun_vllm_model
        else:
            msg.api_key = vllm_api_key
            msg.base_url = vllm_base_url
            msg.model = vllm_model
        msg.prompt = VLLM_PROMPT
        msg.query = query
        self.get_logger().info('vision: %s' % query)
        res = self.send_request(self.set_vllm_content_client, msg)
        self.controller.run_action('init')
        return res.message
This method processes visual queries using the Vision-Language Large Model (VLLM).
Parameter Receiving: accepts a query string such as “What do you see?”.
Message Construction: creates a
SetContent.Request()message containing the API key, base URL, model name, prompt string, and query content.Service Invocation: sends the request to the vision-language large model service via
set_vllm_content_client.Response Return: returns the response message from the VLLM.
This method equips the robot with visual perception capabilities, allowing it to understand and describe its visual surroundings.
(13) play_audio_finish_callback(self, msg) Method
	    def play_audio_finish_callback(self, msg):
        # msg = SetBool.Request()
        # msg.data = True
        # self.send_request(self.awake_client, msg)
        # msg = SetInt32.Request()
        # msg.data = 1
        # self.send_request(self.set_mode_client, msg)
        self.play_audio_finish = msg.data
This method handles the callback notification indicating the completion of audio playback.
Parameter Receiving: receives a Boolean message that indicates whether audio playback is complete.
State Update: updates the playback status by assigning the message data to self.play_audio_finish.
Wake-up Configuration: constructs a SetBool.Request() message to enable the wake-up function.
Mode Configuration: constructs a SetInt32.Request() message to set the interaction mode to 1.
This method handles post-playback processing and prepares the system for the next user command, supporting continuous interaction.
(14) process Method
    def process(self):
        first = True
        while self.running:
            if self.llm_result:
                self.interrupt = False
                msg = String()
                if 'action' in self.llm_result: # If a corresponding action is returned, extract and process it (如果有对应的行为返回那么就提取处理)
                    result = json.loads(self.llm_result[self.llm_result.find('{'):self.llm_result.find('}')+1])
                    if 'response' in result:
                        msg.data = result['response']
                        self.tts_text_pub.publish(msg)
                    if 'action' in result:
                        action = result['action']
                        self.get_logger().info(f'vllm action: {action}')
                        for a in action:
                            if 'move' in a:
                                self.reach_goal = False
                                res = eval(f'self.{a}')
                                if res:
                                    while not self.reach_goal:
                                        if self.interrupt:
                                            self.get_logger().info('interrupt')
                                            break
                                        # self.get_logger().info('waiting for reach goal')
                                        time.sleep(0.01)
                            elif 'vision' in a:
                                res = eval(f'self.{a}')
                                self.response_text = res
                                self.get_logger().info(f'vllm response: {res}')
                            elif 'play_audio' in a:
                                eval(f'self.{a}')
                                while not self.play_audio_finish:
                                    time.sleep(1)
Check LLM Result if self.llm_result: check whether self.llm_result contains content. If not empty, it indicates that a new result from the LLM needs to be processed. Otherwise, the system enters a short sleep to wait for new results.
Check for Action Commands if ‘action’ in self.llm_result: If the returned result contains the “action” field, it means that in addition to the response text, there are action commands to execute.
Extract and Parse JSON Data result = json.loads(self.llm_result[self.llm_result.find(‘{‘):self.llm_result.find(‘}’)+1]): use string search to locate the start and end of the JSON section, and parse it into a dictionary using json.loads to extract fields such as “response” and “action”.
Handle Text Response and Execute Actions If the parsed result contains “response”, assign the content to a message and publish it to the
tts_text_pubtopic to trigger TTS playback. If “action” is present, iterate through the action list: a. Move command: If the action string contains “move”, first setself.reach_goalto False, call the corresponding move function using eval to execute dynamically, and then loop untilself.reach_goalbecomes True, which indicats that the robot has reached the goal. During this period, monitor self.interrupt to allow interruption. b. Vision detection: If “vision” is present, execute the corresponding vision function, assign the returned result to self.response_text, and log the result. c. Audio playback: If “play_audio” is present, directly call the corresponding audio playback function.Interrupt Check During each action execution, continuously monitor the self.interrupt flag. If an interrupt is triggered while waiting or executing an action, the current action is interrupted and the corresponding loop is exited in time.
Mark as Complete and Switch Mode Regardless of whether actions are included, after processing the current LLM result, set self.action_finish to True and clear self.llm_result. Later in the loop, when both self.play_audio_finish and self.action_finish are True, reset these two flags and send a mode-switch request (via set_mode_client), entering the next state. Finally, when self.running becomes False, the loop exits and the ROS system is shut down.
(15) main Method
	def main():
    node = VLLMNavigation('vllm_navigation')
    executor = MultiThreadedExecutor()
    executor.add_node(node)
    executor.spin()
    node.destroy_node()
Create an instance of the VLLMObjectTransport node.
A multithreaded executor is used to handle the node’s tasks.
Call
executor.spin()to start processing ROS events.Upon shutdown, the node is properly destroyed using
node.destroy_node().
25.2.7 Intelligent Transport in Embodied AI Applications
The large model used in this lesson operates online, requiring a stable network connection for the main controller in use.
Overview of Operation
Once the program starts, Circular Microphone Array(here after called the voice device.) will announce: “I’m Ready.”
To activate the voice device, speak the designated wake words: “hello hiwonder.” Upon successful activation, the voice device will respond with “I’m Here.” Once activated, you can control the robot by voice—issue a command like “Put the red block into the blue box.” Upon receiving a command, the terminal displays the recognized speech content. The voice device then verbally responds with a generated answer and the robot simultaneously executes the corresponding action.
Preparation
1. Version Confirmation
Before starting this feature, verify Version Confirmation that the correct microphone configuration is set in the system.
2. Configuring the Large Model API-KEY
Open a new command-line terminal and enter the following command to access the configuration file.
vim /home/ubuntu/ros2_ws/src/large_models/large_models/large_models/config.py
Refer to 25.1.1 Obtain and Configure the Large Model API Key to obtain the large-model API-KEY: paste the vision model (from the OpenRouter website) into the vllm_api_key parameter, and the LLM model (from the OpenAI website) into the llm_api_key parameter, as indicated by the red boxes in the figure below.
3. Grasp and Placement Calibration
Before starting the intelligent handling process, you need to adjust the grasping behavior to ensure accurate performance. If the robotic arm fails to pick up the colored blocks during the demo or operation, you can follow the steps below to perform grasp calibration. This allows you to adjust the pickup area using program commands.
Open a new command-line terminal and run the following command to stop the auto-start service of the app:
sudo systemctl stop start_app_node.service
Enter the command to start grip-position calibration:
ros2 launch large_models_examples automatic_pick.launch.py debug:=pick
Wait until the program finishes loading and you hear the voice prompt “I’m Ready.”
The robotic arm will perform a calibration grasping action and place the object at the gripper’s pickup location. Once the robotic arm returns to its original posture, use the mouse to left-click and drag a bounding box around the target object on the screen. Once the object is correctly identified, the system will automatically calibrate the pickup position for that specific target.
The calibration process for placing objects is the same as for grasping. To begin placement calibration, run the following command:
ros2 launch large_models_examples automatic_pick.launch.py debug:=place
4. Navigation Map Construction
Before enabling this feature, a map must be created in advance. Please refer to “19 Mapping and Navigation / 19.1 Mapping Tutorial” for detailed instructions on how to build the map.
Enabling and Disabling the Feature
Note
Command input is case-sensitive and space-sensitive.
The robot must be connected to the Internet, either in STA (LAN) mode or AP (direct connection) mode via Ethernet.
Double-click
to launch the command bar, enter the command, and press Enter to disable the auto-start service.Enter the command to disable the auto-start service of the mobile app.
sudo systemctl stop start_app_node.service
Click the command-line terminal on the left side of the system interface and enter the command in the launch bar. If no map exists yet, first build one by following “19. Mapping & Navigation Course / 19.1 Mapping Course.” After the map is created, re-compile the slam package with the command below.
cd ~/ros2_ws && colcon build --event-handlers console_direct+ --cmake-args -DCMAKE_BUILD_TYPE=Release --symlink-install --packages-select slam
Enter the following command and press Enter to launch the real-time detection feature.
ros2 launch large_models_examples vllm_navigation_transport.launch.py map:=map_01
After opening the map in RViz, click the “2D Pose Estimate” icon to set the robot’s initial position.
When the command line shows the output below and the device announces “Ready,” it means the microphone array has finished initializing and the YOLOv8 model has also been loaded. At this point you can say the wake word: “Hello, HiWonder.”
When the terminal displays the corresponding output shown in the figure and the voice device responds with “I’m here”, it indicates successful activation. The system will begin recording the user’s voice command.
Speak a command such as “Put the red square in the blue box.” The voice device will capture the speech, and the large language model will process the command.

Upon successful recognition by the speech recognition service of cloud-based large speech model, the parsed command will be displayed under the
publish_asr_resultoutput in the terminal.
Upon receiving user input shown in the figure, the terminal will display output indicating that the cloud-based large language model has been successfully invoked. The model will interpret the command, generate a language response, and execute a corresponding action based on the meaning of the command.
Note
The response is automatically generated by the model. While the semantic content is accurate, the wording and structure may vary due to randomness in language generation.
The robot first moves to the “red square,” picks it up.
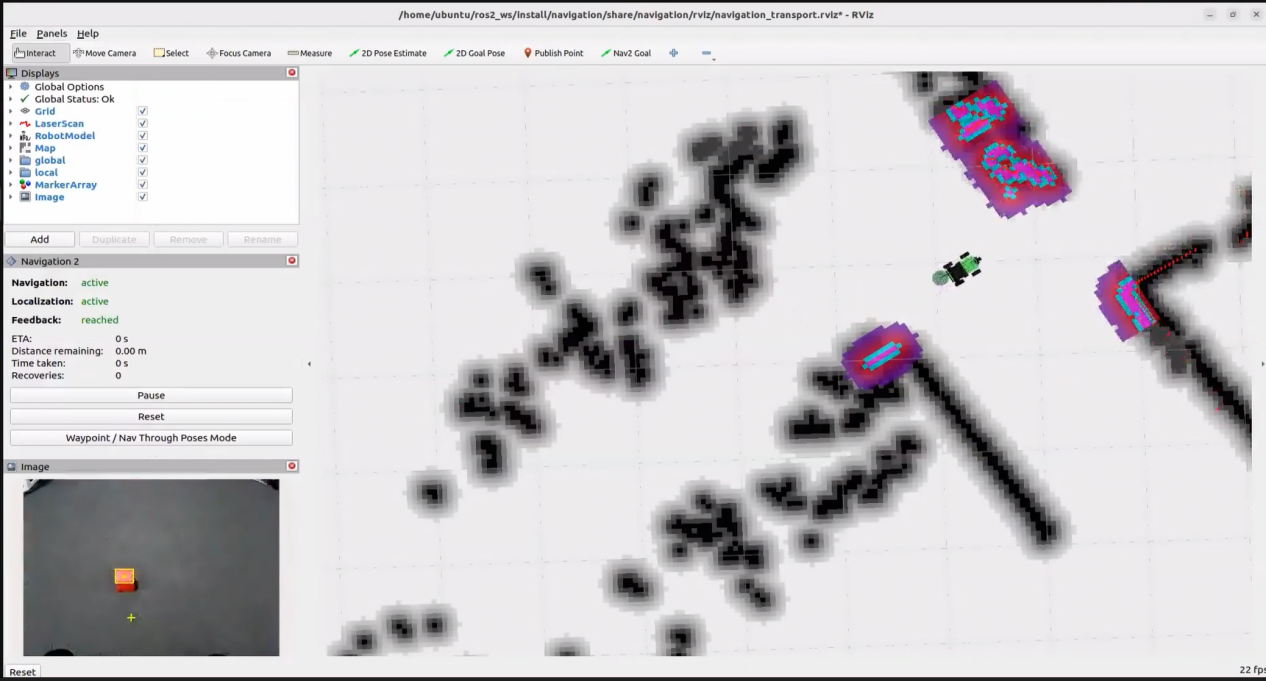
Then travels to the “blue box” and drops the square inside.
When the terminal shows the output shown in the figure indicating the end of one interaction cycle, the system is ready for the next round. To initiate another interaction, repeat step 4 by speaking the wake words again.
To exit the feature, press Ctrl+C in the terminal. If the feature does not exit immediately, press Ctrl+C multiple times.
Project Outcome
Once the mode is active you can phrase the command however you like—for example, “Put the red square into the blue box.” The robot will navigate to the red square, grasp it, continue to the blue-box waypoint, and place the square inside.
Modifying Navigation Location
To change the navigation points, edit the file at the path below:
~/ros2_ws/src/large_models_examples/large_models_examples/navigation_transport/vllm_navigation_transport.py
Begin by launching the program and displaying the map in rviz. Then, click on “2D Goal Pose” in the rviz interface to set the desired navigation target on the map.
Return to the command terminal and check the target location parameter for the publication:
Locate the corresponding section of the code shown below, and fill in your target location parameters after the appropriate location name.
In the program, each location is defined as a target navigation point relative to the map’s origin, which corresponds to the robot’s starting position during the mapping process. Each navigation point includes five parameters:
x: position on the x-axis (meters)
y: position on the y-axis (meters)
roll: rotation around the x-axis (degrees)
pitch: rotation around the y-axis (degrees)
yaw: rotation around the z-axis (degrees)
For example, to define the position of “green square,” the parameters can be set to [0.0, 0.45, 0.0, 0.0, 90.0], indicating that the robot will navigate to a location offset from the map origin by those values.
For example, given the quaternion: Quaternion(x=0.0, y=0.0, z=-0.5677173914973032, w=0.8232235197025761). After conversion to Euler angles (roll, pitch, yaw), the result is approximately: roll ≈ 0°, pitch ≈ 0°, yaw ≈ -69.3°
Program Brief Analysis
1. Launch File Analysis
File Path:
/home/ubuntu/ros2_ws/src/large_models_examples/large_models_examples/navigation_transport/vllm_navigation_transport.launch.py
(1) Import Libraries
import os
from ament_index_python.packages import get_package_share_directory

from launch_ros.actions import Node
from launch_ros.actions import PushRosNamespace
from launch import LaunchDescription, LaunchService
from launch.substitutions import LaunchConfiguration
from launch.launch_description_sources import PythonLaunchDescriptionSource
from launch.actions import DeclareLaunchArgument, IncludeLaunchDescription, GroupAction, OpaqueFunction, TimerAction, ExecuteProcess
os: used for handling file paths and operating system-related functions.
ament_index_python.packages.get_package_share_directory: retrieves the share directory path of ROS 2 package.launch_ros.actions.Node: used to define ROS 2 nodes.launch.substitutions.LaunchConfiguration: retrieves parameter values defined in the Launch file.LaunchDescription, LaunchService: used to define and start the Launch file.launch_description_sources PythonLaunchDescriptionSource: enables the inclusion of other Launch files.launch.actions.IncludeLaunchDescription, DeclareLaunchArgument, OpaqueFunction: used to define actions and arguments within the Launch file.
(2) Definition of the launch_setup Function
def launch_setup(context):
    slam_package_path = get_package_share_directory('slam')
    navigation_package_path = get_package_share_directory('large_models_examples')
    large_models_package_path = get_package_share_directory('large_models')

    mode = LaunchConfiguration('mode', default=1)
    mode_arg = DeclareLaunchArgument('mode', default_value=mode)
    map_name = LaunchConfiguration('map', default='map_01').perform(context)
    robot_name = LaunchConfiguration('robot_name', default=os.environ['HOST'])
    master_name = LaunchConfiguration('master_name', default=os.environ['MASTER'])

    map_name_arg = DeclareLaunchArgument('map', default_value=map_name)
    master_name_arg = DeclareLaunchArgument('master_name', default_value=master_name)
    robot_name_arg = DeclareLaunchArgument('robot_name', default_value=robot_name)

    navigation_controller_launch = IncludeLaunchDescription(
        PythonLaunchDescriptionSource(os.path.join(navigation_package_path, 'large_models_examples/navigation_transport/navigation_transport.launch.py')),
        launch_arguments={
            'map': map_name,
            'debug': 'false',
            'robot_name': robot_name,
            'master_name': master_name,
        }.items(),
    )

    large_models_launch = IncludeLaunchDescription(
        PythonLaunchDescriptionSource(
            os.path.join(large_models_package_path, 'launch/start.launch.py')),
        launch_arguments={'mode': mode}.items(),
    )

    vllm_navigation_transport_node = Node(
        package='large_models_examples',
        executable='vllm_navigation_transport',
        output='screen',
    )

    return [
            mode_arg,
            map_name_arg,
            master_name_arg,
            robot_name_arg,
            navigation_controller_launch,
            large_models_launch,
            vllm_navigation_transport_node
            ]
This function includes the navigation_transport.launch.py file from the large_models_examples package, which launches the navigation-to-goal functionality.
Large_models_launch: includes the start.launch.py Launch file from the large_models package using IncludeLaunchDescription and passes the mode argument to it.vllm_navigation_transport_node: defines a ROS 2 node from the large_models package, executes the executable files fromvllm_navigation_transport, and prints the node’s output to the screen.The function returns a list of all defined launch actions.
(3) Definition of the generate_launch_description Function
def generate_launch_description():
    return LaunchDescription([
        OpaqueFunction(function = launch_setup)
    ])
This function is responsible for generating the complete launch description.
The
launch_setupfunction is incorporated using OpaqueFunction.
(4) Main Program Entry
if __name__ == '__main__':
    # Create a LaunchDescription object(创建一个LaunchDescription对象)
    ld = generate_launch_description()

    ls = LaunchService()
    ls.include_launch_description(ld)
    ls.run()
ld = generate_launch_description()generates the launch description object.ls = LaunchService()creates the launch service object.ls.include_launch_description(ld)adds the launch description to the service.ls.run()starts the service and execute all launch actions.
2. Python File Analysis
File Path:
/home/ubuntu/ros2_ws/src/large_models_examples/large_models_examples/navigation_transport/vllm_navigation_transport.py
(1) Import the Necessary Libraries
import re
import cv2
import time
import json
import rclpy
import queue
import threading
import numpy as np
from speech import speech
from rclpy.node import Node
from cv_bridge import CvBridge
from sensor_msgs.msg import Image
from std_msgs.msg import String, Bool
from std_srvs.srv import Trigger, SetBool, Empty

from large_models.config import *
from large_models_msgs.srv import SetModel, SetContent, SetString, SetInt32

from interfaces.srv import SetPose2D, SetPoint, SetBox
from rclpy.executors import MultiThreadedExecutor
from rclpy.callback_groups import ReentrantCallbackGroup
cv2: Utilized for image processing and display using OpenCV.json: used for handling data in JSON format.time: manages execution delays and time-related operations.queue: handles image queues between threads.rclpy: provides tools for creating and communicating between ROS 2 nodes.threading: enables multithreading for concurrent task processing.numpy (np): supports matrix and vector operations.std_srvs.srv: contains standard ROS service types, used to define standard service.**
std_msgs.msg:**contains standard ROS message types.rclpy: provides tools for creating and communicating between ROS 2 nodes.rclpy.node.Node: base class for ROS 2 nodes.rclpy.callback_groups.ReentrantCallbackGroup: supports concurrent callback handling.rclpy.executors.MultiThreadedExecutor: multithreaded executor in ROS 2 for handling concurrent tasks.rclpy.node: node class in ROS 2.speech: module related to large model voice interaction.
large_models_msgs.srv: custom service types for large models.large_models.config: configuration file for large models.
(2) PROMPT String
    '''
else:
    position_dict = {
            "green cube": [0.0, 0.45, 0.0, 0.0, 90.0],
            "red box": [1.2, 0.55, 0.0, 0.0, 0.0],
            "red cube": [0.25, 0.35, 0.0, 0.0, 90.0],
            "green box": [1.2, -0.9, 0.0, 0.0, -62.0],
            "blue cube": [0.0, 0.5, 0.0, 0.0, -180.0],
            "blue box": [-0.2, -0.75, 0.0, 0.0, -90.0],
            "origin": [0.0, 0.0, 0.0, 0.0, 0.0]}

    LLM_PROMPT = '''
You are a language expert who precisely interprets user commands.

**Skills
- Treat each pick-and-place as one composite action.
- Strong logical reasoning; understand object descriptors.
- Accurately decompose which objects to pick and which to place.

**Requirements & Constraints
- Map the user’s request to the available functions and output those calls.
- Bundle multiple actions into a JSON array.
- Add a concise (10–30 characters), witty, ever-changing feedback message for the sequence.
- Each transport has two phases: move to the pick location, then move to the place location.
- If no move target is specified, omit the move call.
- Valid locations: blue cube, blue box, red cube, red box, green cube, green box, origin.
- Only cubes with red, green, or blue faces count as "cubes"; ignore the ground.
- Don’t include any extra text (e.g. “task complete”).
- Output only this JSON structure:
{"action":"xx", "response":"xx"}

**Available Functions
- pick('red cube')
- place('red box')
- move('origin')

**Example
Input: Put the red cube into its matching box
Output:
{"action": ["move('red cube')", "pick('red cube')", "move('red box')", "place('red box')"], "response": "Right away—on the move!"}
Input: Put the blue cube into the blue box
Output: {"action": ["move('blue cube')","pick('blue cube')", "move('blue box')", "place('blue box')"], "response": "OK, start the task"}
    '''
It defines three prompt strings (PROMPT) used to guide how user commands and image data are processed. It specifies the recognition task logic and expected output format.
(3) VLLMObjectTransport Class
	class VLLMNavigation(Node):
    def __init__(self, name):
        rclpy.init()
        super().__init__(name)

        self.action = []
        self.response_text = ''
        self.llm_result = ''
        self.action_finish = False
        self.transport_action_finish = False
        self.play_audio_finish = False
        # self.llm_result = '{\'action\':[\'move(\"前台\")\', \'vision(\"大门有没有关\")\', \'move(\"原点\")\', \'play_audio()\'], \'response\':\'马上!\'}'
        self.running = True
        self.reach_goal = False
        self.interrupt = False
        self.bridge = CvBridge()
        self.image_queue = queue.Queue(maxsize=2)
        timer_cb_group = ReentrantCallbackGroup()
        self.client = speech.OpenAIAPI(api_key, base_url)
        self.tts_text_pub = self.create_publisher(String, 'tts_node/tts_text', 1)
        self.create_subscription(Image, 'automatic_pick/image_result', self.image_callback, 1)
        self.create_subscription(String, 'agent_process/result', self.llm_result_callback, 1)
        self.create_subscription(Bool, 'vocal_detect/wakeup', self.wakeup_callback, 1)
        self.create_subscription(Bool, 'tts_node/play_finish', self.play_audio_finish_callback, 1, callback_group=timer_cb_group)
        self.create_subscription(Bool, 'navigation_controller/reach_goal', self.reach_goal_callback, 1)
        self.create_subscription(Bool, 'automatic_pick/action_finish', self.action_finish_callback, 1)
        self.awake_client = self.create_client(SetBool, 'vocal_detect/enable_wakeup')
        self.awake_client.wait_for_service()
        self.set_mode_client = self.create_client(SetInt32, 'vocal_detect/set_mode')
        self.set_mode_client.wait_for_service()
        self.set_model_client = self.create_client(SetModel, 'agent_process/set_model')
        self.set_model_client.wait_for_service()
        self.set_prompt_client = self.create_client(SetString, 'agent_process/set_prompt')
        self.set_prompt_client.wait_for_service()
        self.set_vllm_content_client = self.create_client(SetContent, 'agent_process/set_vllm_content')
        self.set_vllm_content_client.wait_for_service()
        self.set_pose_client = self.create_client(SetPose2D, 'navigation_controller/set_pose')
        self.set_pose_client.wait_for_service()
        # self.set_target_client = self.create_client(SetPoint, 'automatic_pick/set_target_color')
        # self.set_target_client.wait_for_service()
        self.set_box_client = self.create_client(SetBox, 'automatic_pick/set_box')
        self.set_box_client.wait_for_service()
        self.set_pick_client = self.create_client(Trigger, 'automatic_pick/pick')
        self.set_pick_client.wait_for_service()
        self.set_place_client = self.create_client(Trigger, 'automatic_pick/place')
        self.set_place_client.wait_for_service()
        self.timer = self.create_timer(0.0, self.init_process, callback_group=timer_cb_group)
rclpy.init(): initializes the ROS 2 system.super().init(name): calls the initializer of the parent class (Node) to create a ROS 2 node.self.llm_result:stores results returned from LLM.self.running: used to control the runtime state of the program.self.transport_finished:indicates whether the transport task has been completed.self.tts_text_pub: publishes TTS (Text-to-Speech) text to a ROS topic.self.create_subscription: subscribes to LLM results and the transport completion status.self.lock: threading lock used for synchronization in multi-threaded operations.self.client: speech API client used to communicate with the voice service.self.tts_text_pub: publishes TTS messages to a ROS topic.self.asr_pub: publishes speech recognition results to a ROS topic.self.create_subscription: subscribes to LLM result and transport status topics.self.create_client: creates multiple service clients for calling various functionalities.self.timer: creates a timer used to trigger the initialization process.
(4) get_node_state Method
	    def get_node_state(self, request, response):
        return response
return response: returns a response object.
(5) init_process Method
	    def init_process(self):
        self.timer.cancel()

        msg = SetModel.Request()
        msg.model = llm_model
        msg.model_type = 'llm'
        msg.api_key = api_key
        msg.base_url = base_url
        self.send_request(self.set_model_client, msg)

        msg = SetString.Request()
        msg.data = LLM_PROMPT
        self.send_request(self.set_prompt_client, msg)

        init_finish = self.create_client(Empty, 'navigation_controller/init_finish')
        init_finish.wait_for_service()
        speech.play_audio(start_audio_path)
        threading.Thread(target=self.process, daemon=True).start()
        self.create_service(Empty, '~/init_finish', self.get_node_state)
        self.get_logger().info('\033[1;32m%s\033[0m' % 'start')
self.timer.cancel(): cancels the timer.SetModel.Request(): creates a request message to set the LLM model.SetModel.Request: creates a request for SetModel service.msg.model_type = ‘llm’: specifies the model type as ‘llm’.
self.send_request(self.set_model_client, msg): sends the model configuration request through theset_model_client.SetString.Request: creates a request message to set the prompt string.self.send_request(self.set_prompt_client,msg): sends the model configuration request through the set_prompt_client.Empty.Request: request message used to clear the current conversation history.self.send_request(self.clear_chat_client, msg): sends the request through theclear_chat_clientto reset chat context.self.create_client(Empty, 'object_transport/init_finish'): creates a service client for calling the object_transport/init_finish endpoint.init_finish.wait_for_service(): waits for theinit_finishservice to become available.self.send_request(self.enter_client, Trigger.Request()): sends a Trigger request through the enter_client to initiate the process.speech.play_audio: plays an audio cue.threading.Thread: launches the main logic in a new thread.
self.create_service: creates a service to signal the completion of initialization.self.get_logger().info: prints log messages.
(6) send_request Method
	    def send_request(self, client, msg):
        future = client.call_async(msg)
        while rclpy.ok():
            if future.done() and future.result():
                return future.result()
client.call_async(msg): makes an asynchronous service call.
future.done()andfuture.result(): check if the service call is complete and retrieve the result.
(7) vllm_result_callback Method
	    def llm_result_callback(self, msg):
        self.llm_result = msg.data
This callback receives results from the agent_process/result topic and stores them in self.vllm_result.
(8) get_object_position Method
	    def get_object_position(self, query, image):
        msg = SetContent.Request()
        if language == 'Chinese':
            msg.model = stepfun_vllm_model
            msg.api_key = stepfun_api_key
            msg.base_url = stepfun_base_url
        else:
            msg.api_key = vllm_api_key
            msg.base_url = vllm_base_url
            msg.model = vllm_model
        msg.prompt = VLLM_PROMPT
        msg.query = query
        msg.image = self.bridge.cv2_to_imgmsg(image, "bgr8")

        self.get_logger().info('vision: %s' % query)
        self.get_logger().info('send image')
        res = self.send_request(self.set_vllm_content_client, msg)
        vllm_result = res.message
        self.get_logger().info('vllm_result: %s' % vllm_result)
        if 'object' in vllm_result:
            if vllm_result.startswith("```") and vllm_result.endswith("```"):
                vllm_result = vllm_result.strip("```").replace("json\n", "").strip()
            # self.get_logger().info('vllm_result: %s' % vllm_result)
            vllm_result = json.loads(vllm_result[vllm_result.find('{'):vllm_result.find('}')+1])
            box = vllm_result['xyxy']
            if box:
                h, w = image.shape[:2]
                if language == 'Chinese':
                    box = self.client.data_process(box, w, h)
                    self.get_logger().info('box: %s' % str(box))
                else:
                    box = [int(box[0] * w), int(box[1] * h), int(box[2] * w), int(box[3] * h)]
                cv2.rectangle(image, (box[0], box[1]), (box[2], box[3]), (255, 0, 0), 2, 1)
            return box
        else:
            msg = String()
            msg.data = vllm_result
            self.tts_text_pub.publish(vllm_result)
            return []
query:a query request.image: the input image data.offset: offset of the placement position.SetContent.Request: request message used to set the LLM content.self.get_logger().info: prints log messages.self.send_request: sends the service request.res.message: extracts the message content from the service response.if 'object' in vllm_result: checks whether the result contains object-related information.if vllm_result.startswith(“```”) and vllm_result.endswith(“```”): checks the message format.
vllm_result.strip(“```”).replace(“json\n”, “”).strip()**: cleans up the message content, removes the code block markers (```), strips the “json\n” prefix, trims leading and trailing whitespace, and extracts a pure JSON string.
json.loads(message): parses the cleaned JSON string into a Python dictionary.vllm_result.message: extracts the message the response.box = self.client.data_process(box, w, h): processes the bounding box for the placement position.
self.tts_text_pub.publish(msg): publishes the final message.
(9) pick Method
Trigger Pick Preparation
self.send_request(self.set_pick_client, Trigger.Request()): sends a trigger request to the pick service,
which may cause the robotic arm to enter pick-ready status.
Acquire Image
image = self.image_queue.get(block=True): retrieves the latest image from the image queue.
block=True: means the method will wait until an image is available before proceeding.
Detect Target Object
box = self.get_object_position(query, image): calls the get_object_position method to detect the object
based on the query and input image, returning bounding box coordinates.
Handle Detection Result
if box: checks whether the object was successfully detected.
If successful, the bounding box data is recorded for further processing.
Create Bounding Box Request
msg = SetBox.Request(): creates a request to set the bounding box coordinates.
Set the bounding box coordinates:
msg.x_min = box[0]
msg.y_min = box[1]
msg.x_max = box[2]
msg.y_max = box[3]
Send Bounding Box to Pick Node
self.log_info("Step 5: Sending bounding box to automatic_pick node"): logs the operation of sending the bounding box.
self.send_request(self.set_box_client, msg): sends the bounding box request to the pick node
so it knows where the object is located for grasping.
(10) place Method
The logic and structure are analogous to the pick method.
(12) process Method
    def process(self):
        while self.running:
            if self.llm_result:
                self.interrupt = False
                msg = String()
                if 'action' in self.llm_result: # If a corresponding action is returned, extract and process it (如果有对应的行为返回那么就提取处理)
                    result = eval(self.llm_result[self.llm_result.find('{'):self.llm_result.find('}')+1])
                    if 'response' in result:
                        msg.data = result['response']
                        self.tts_text_pub.publish(msg)
                    if 'action' in result:
                        action = result['action']
                        self.get_logger().info(f'vllm action: {action}')
                        for a in action:
                            if 'move' in a:
                                self.reach_goal = False
                                res = eval(f'self.{a}')
                                if res:
                                    while not self.reach_goal:
                                        # if self.interrupt:
                                            # self.get_logger().info('interrupt')
                                            # break
                                        # self.get_logger().info('waiting for reach goal')
                                        time.sleep(0.01)
                                else:
                                    self.get_logger().info('cannot move to %s' % a)
                                    break
                            elif 'pick' in a or 'place' in a:
                                time.sleep(3.0)
                                eval(f'self.{a}')
                                self.transport_action_finish = False
                                while not self.transport_action_finish:
                                    # if self.interrupt:
                                        # self.get_logger().info('interrupt')
                                        # break
                                    time.sleep(0.01)
                            # if self.interrupt:
                                # self.get_logger().info('interrupt')
                                # break
                else: # If there is no corresponding action, only respond (没有对应的行为,只回答)
                    msg.data = self.llm_result
                    self.tts_text_pub.publish(msg)
                self.action_finish = True
                self.llm_result = ''
            else:
                time.sleep(0.01)
            if self.play_audio_finish and self.action_finish:
                self.play_audio_finish = False
                self.action_finish = False
                msg = SetBool.Request()
                msg.data = True
                self.send_request(self.awake_client, msg)
                # msg = SetInt32.Request()
                # msg.data = 2
                # self.send_request(self.set_mode_client, msg)
        rclpy.shutdown()
while self.running: this loop keeps running as long as self.running is set to True.
if
self.vllm_result: checks whether self.vllm_result is empty, which is the result from vllm model.self.interrupt= False: resets the interrupt flag.if ‘action’ in self.llm_result: checks if the result contains an action command.
result = eval(self.llm_result[…]): parses the JSON result.
if ‘response’ in result: checks if the result includes a response message.
msg.data = result[‘response’]: set response text.
self.tts_text_pub.publish(msg): publishes the response text.if ‘action’ in result: checks whether the result contains an action list.
action = result[‘action’]: retrieves the action list.
if ‘move’ in a: checks whether it is a move action.
self.reach_goal = False: resets the “goal reached” flag.eval(f'self.{a}'): executes the move command.while not
self.reach_goal: waits until the target is reached.elif ‘pick’ in a or ‘place’ in a: checks whether it is a pick or place action.
eval(f’self.{a}’): executes the pick or place command.
self.transport_action_finish = False: resets the transport action completion flag.while not
self.transport_action_finish: waits until the action is completed.Interrupt Handling: if self.interrupt checks whether the process has been interrupted.
No action response handling else: # No corresponding action found, only respond. handling process when no action is found.
Finish Handlling
self.action_finish = True: marks the action as completed.Waiting Handling else: time.sleep(0.01): short sleep.
Mode Switching if
self.play_audio_finishandself.action_finish: checks if both audio playback and action execution are complete.Shutdown Handling
rclpy.shutdown(): shut down the ROS 2 system.for a in action: iterates over the action list and execute each action.
(13) main Method
	def main():
    node = VLLMNavigation('vllm_navigation')
    executor = MultiThreadedExecutor()
    executor.add_node(node)
    executor.spin()
    node.destroy_node()
Create an instance of the VLLMObjectTransport node.
A multithreaded executor is used to handle the node’s tasks.
Call
executor.spin()to start processing ROS events.Upon shutdown, the node is properly destroyed using
node.destroy_node().