7 ROS1-Multi-robot Formation Manual
7.1 Muti-robot Communication Configuration
If you need to control several JetRover cars simultaneously, you need to connect the robots to the same network. The instruction of multi-robot communication configuration is given below.
7.1.1 Definition of the Master and Slave
Master: receive the commands sent by the user and perform corresponding action. Then send the obtained command to the slave. And there is only one master device.
Slave: obtain commands from the master, and perform the corresponding action. And you can set one slave, or multiple slaves.
7.1.2 Preparations
2 or above JetRover cars are required
Prepare your own wireless router (optional). And wireless router of 5GHz is recommended. (If the router’s performance is poor, group control may be choppy, actions may not be synchronized, and there may be delays.)
7.1.3 Network Connection Configuration
Prepare a router and enable its WIFI function, and then connect all the robots to the same network.
Note
Note: the robot is set as AP direct connection mode by default. For more detailed information, please refer to “1. Quick Start Guide”. If there are more than two robots, it’s not recommended to use the hotspot generated by the robot as it will result in lag and effect the experience. To control more robots, you must connect to a wireless router, preferably one with the 5GHz frequency band and high performance.
Connect all the robots to the prepared WiFi.
7.1.4 Install & Import Virtual Machine
After installing the virtual machine, extract the configured virtual machine image file, which is located in “6. Virtual Machine”
Please ensure your computer and the robot are connected to the same network.

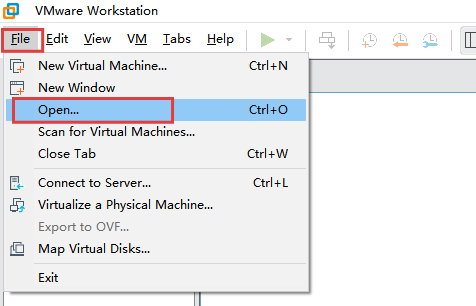
Open the virtual machine software “VMware Workstation”. Click “File” on the menu bar to select “Open”, or you can directly the shortcut keys “Ctrl+O”.
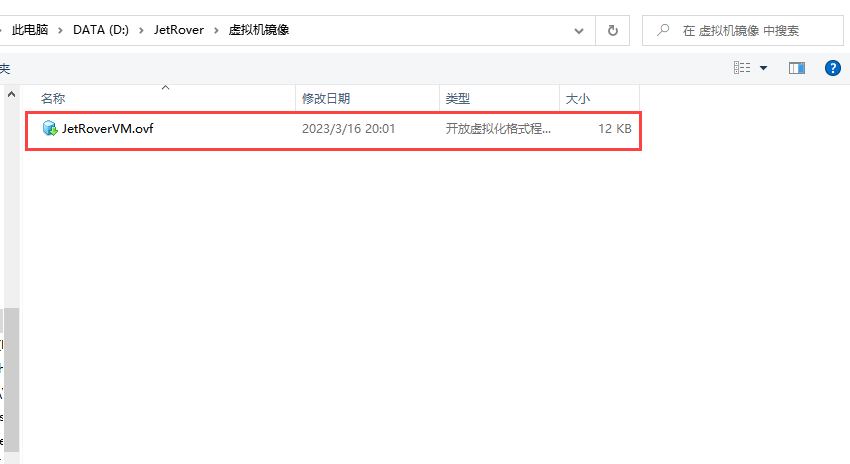
Access the directory where the virtual machine file is stored. Select and open the virtual machine file, and then the file is imported into the software.
7.1.5 Configure Virtual Machine
Configure Network
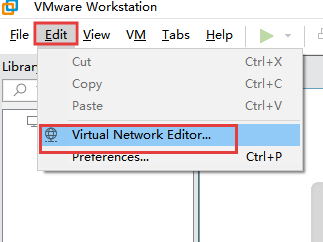
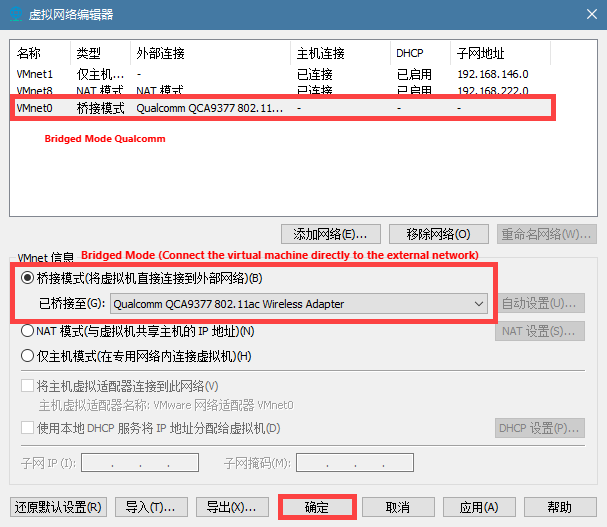
Connect the wireless network card to your computer. Click “Edit” on the virtual machine’s menu bar and select “Virtual Network Editor”.
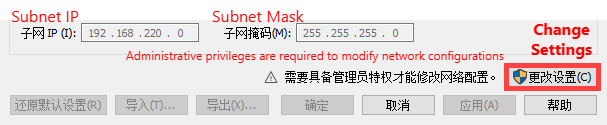
Click “Change Settings” to obtain permission for modifications.
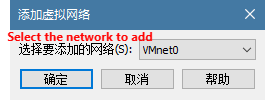
Click “Add network”.

Select the network. Take “Vmnet0” as example and click “OK”.
Select the added network “VMnet0”, and set it as the bridge mode. Then set the the bridge device to the network card. After making the modifications, click “Yes”.
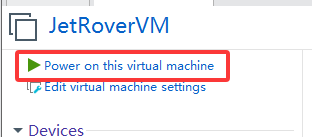
Click “Power on this virtual machine”. Wait for the system to boot up.
Configure Virtual Machine Name
Note
Note: the entered commands should be case sensitive, and the “Tab” key can be used to complement the key words.
Please first check if the virtual machine has the same name as the master name. Open the virtual machine and click
 to open the command line terminal.
Enter command “vim .typerc” ot open the basic configuration file.
vim .typerc
Change “vim .typerc” to “HOST=ubuntu”. “Master” remains unchanged and press “Esc”, and then enter “:wq” to save and exit.

Configure Virtual Machine Publishing Node Address
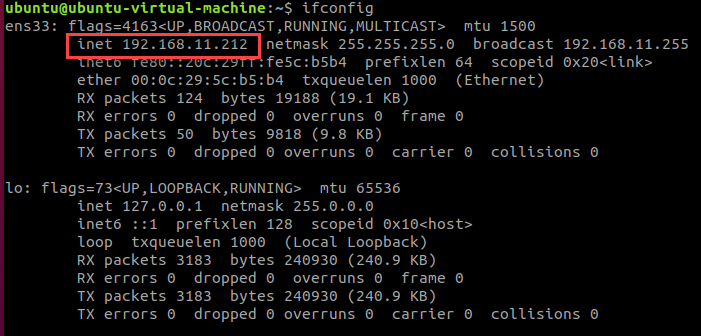
Enter command “ifconfig” and press “Enter” to view IP address.
ifconfigRecord the IP in red box as pictured.
Note
Note: if the corresponding IP does not appear, you need to enter the command “sudo dhclient ens33” to refresh the WI-Fi.
Enter command “vim .hiwonderrc” and press “Enter” to open the virtual machine configuration file.
vim .hiwonderrc
Set “MASER_IP=$IP” as “MASER_IP=(virtual machine IP)” , then press “Esc” and enter “:wq” to save and exit.
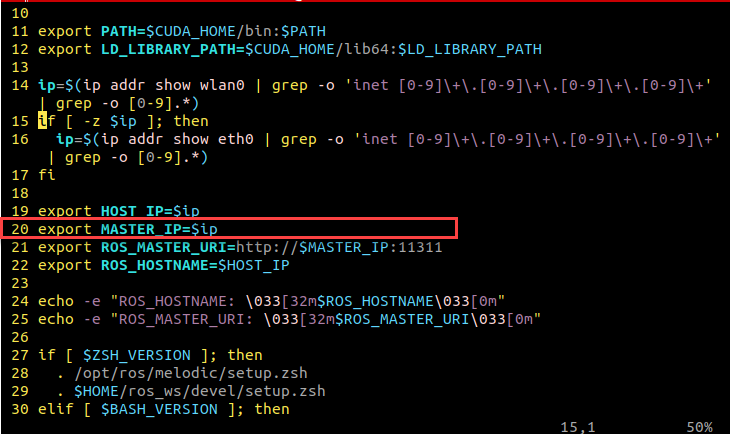
Enter command “source .bashrc” to update the virtual machine configuration file to make the settings come into effective
source .bashrc
7.1.6 Configure Master
You can connect to the robot for modification using either NoMachine or an SSH tool. The connection can be established in the following two ways:
Obtain the robot IP through app or router management interface.
Connect the robot using USB cable and adopting the Static IP “192.168.55.1”.
It’s recommended to use the second method for the stable connection. Even if the configuration make mistakes earlier, you can still connect and view. The operation steps are as follow:
After powering on the robot, connect the robot and computer using USB cable.
Open NoMachine, and input “192.168.55.1” in the search bar, then press Enter

Double click “Double click “JetRover-desktop” device to enter the robot system.
Double click
 to open the command line terminal.
Configure Master Network
Enter command “vim ./hiwonder-toolbox/hiwonder_wifi_conf.py” and press Enter to open the network configuration file.
vim ./hiwonder-toolbox/hiwonder_wifi_conf.py
From the top to the bottom as shown in the figure below. Change the content in the first red box to “HW_WIFI_MODE = 2”, the second red box to “HW_WIFI_STA_SSID = ‘(WIFI Name)” and “HW_WIFI_STA_PASSWORD = ‘(WiFi Password)”. Press “Esc” and enter “:wq” to save and exit.

Enter command “sudo systemctl restart hw_wifi.service” to restart the robot’s WIFI service.
Note
Note: it is mandatory to restart robot’s WIFI service, otherwise, the network configuration won’t take effect.
sudo systemctl restart hw_wifi.service
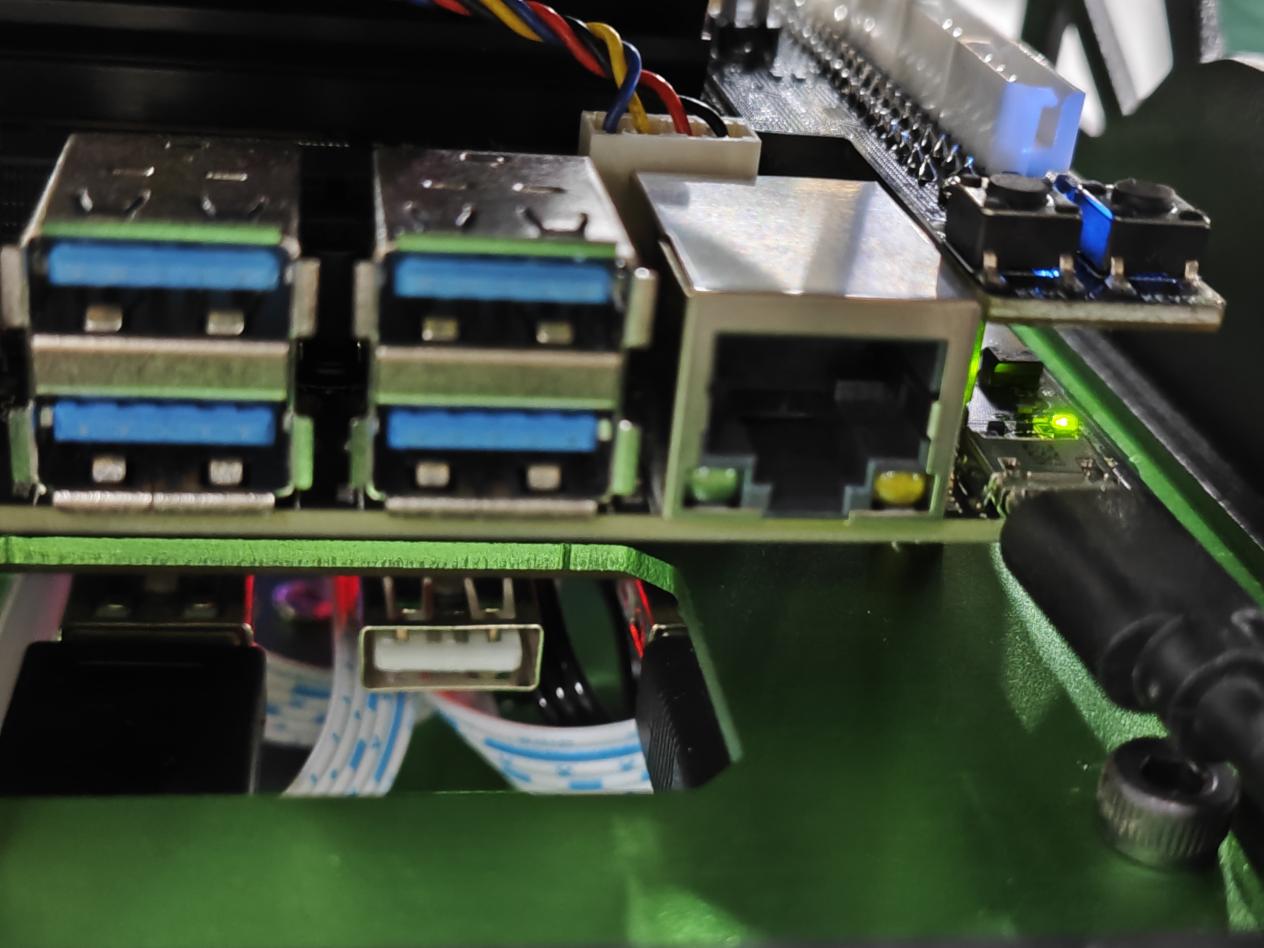
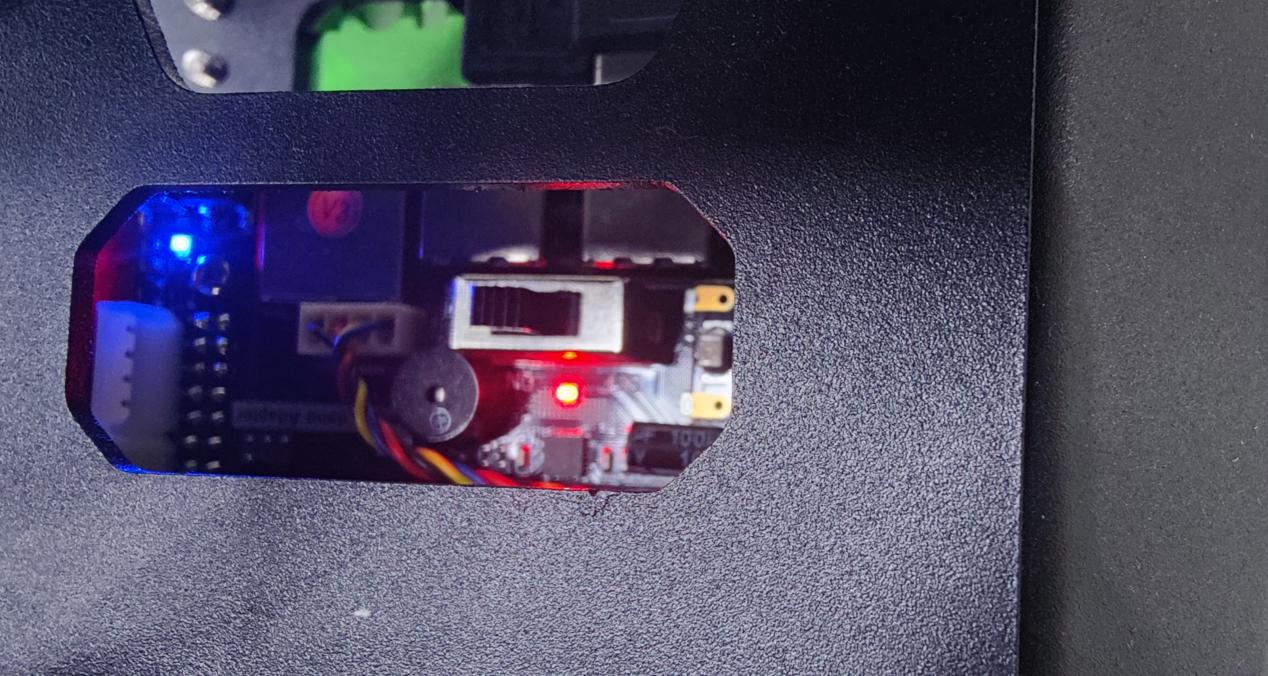
After the configuration is complete, the LED indicator on Jetson expansion board turns into solid blue, indicating that the configuration has taken effect.
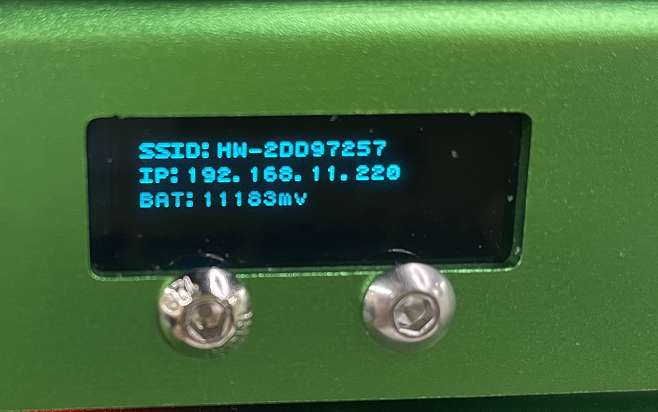
The robot’s new IP address can also be viewed through the OLED screen located at the front of the robot (this step requires restarting the robot to refresh).
Configure Master Name
Note
Note: the entered commands should be case sensitive, and the “Tab” key can be used to complement the key words.
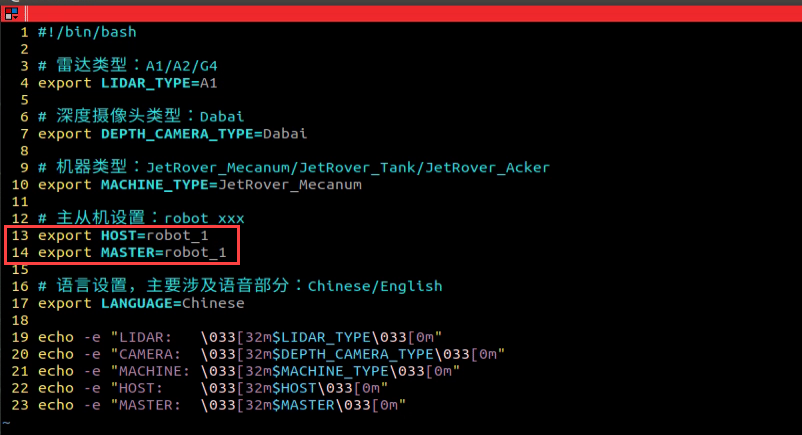
Enter command “vim ros_ws/.typerc” to open the basic information configuration file.
vim ros_ws/.typerc
Check if the robot set as the master has been configured as shown in the red box. Press the “Esc” key, then enter “:wq” to save and exit.
Configure Master Publishing Node Address
Enter command “vim ros_ws/.hiwonderrc” and press Enter to open the robot configuration file.
vim ros_ws/.hiwonderrc
Set “MASER_IP=$IP” to “MASER_IP=(virtual machine IP)”, then press the “Esc” key and enter “:wq” to save and exit.
Enter command “source .zshrc” to update the robot configuration file.
source .zshrc
7.1.7 Configure Slave
Configure Slave Name
Note
Note: the entered commands should be case sensitive, and the “Tab” key can be used to complement the key words.
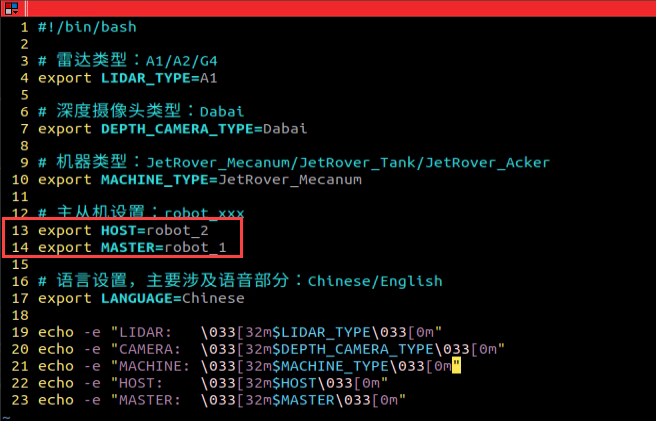
Enter command “vim ros_ws/.typerc” to open the basic information configuration file.
vim ros_ws/.typerc
Check if the robot set as the slave has configured the content in the red box as “HOST=(robot name, example: robot_2)”, “MASTER=robot_1”, then press the “Esc” key, type “:wq” to save and exit.
Note
Note:
The master must be robot_1.
The slave robot name can be set as robot_2, robot_3, and so on, but please do not set it as robot_1, as this may cause conflicts with the master and lead to errors.
Configure Slave Publishing Node Address
Enter command “vim ros_ws/.hiwonderrc” and press Enter to open the robot configuration file.
vim ros_ws/.hiwonderrc
Set “MASER_IP=$IP” to “MASER_IP=(virtual machine IP)”, then press the “Esc” key and enter “:wq” to save and exit.
Enter command “source .zshrc” to update the robot configuration file.
source .zshrc
Configure Slave Network
Enter command “vim ./hiwonder-toolbox/hw_wifi.py” and press Enter to open the network configuration file.
vim ./hiwonder-toolbox/hw_wifi.py
From the top to the bottom as shown in the figure below. Change the content in the first red box to “HW_WIFI_MODE = 2”, the second red box to “HW_WIFI_STA_SSID = ‘(WIFI Name)” and “HW_WIFI_STA_PASSWORD = ‘(WiFi Password)”. Press “Esc” and enter “:wq” to save and exit.
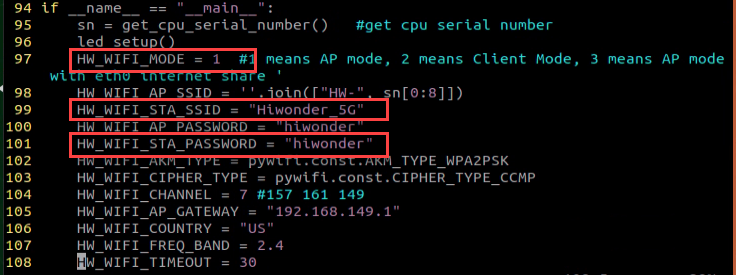
Enter command “sudo systemctl restart hw_wifi.service” to restart the robot’s WIFI service.
sudo systemctl restart hw_wifi.service
7.1.8 Configure Communication Between Virtual Machine and Robot
Connect Robot via Virtual Machine
Using the SSH protocol, you can achieve centralized management of other nodes by the master node, such as parameter settings, testing, and debugging.
Note
Note: the entered commands should be case sensitive, and the “Tab” key can be used to complement the key words.
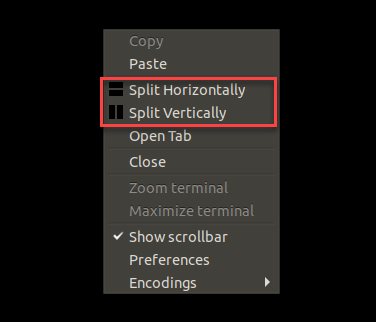
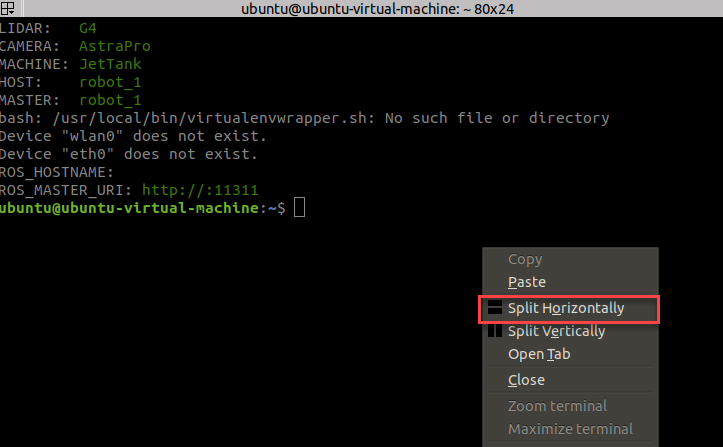
In the virtual machine terminal interface, you can right-click
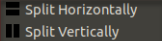 to split the terminal. “Split Horizontally” and “Split Vertically” respectively represent horizontal and vertical splits.
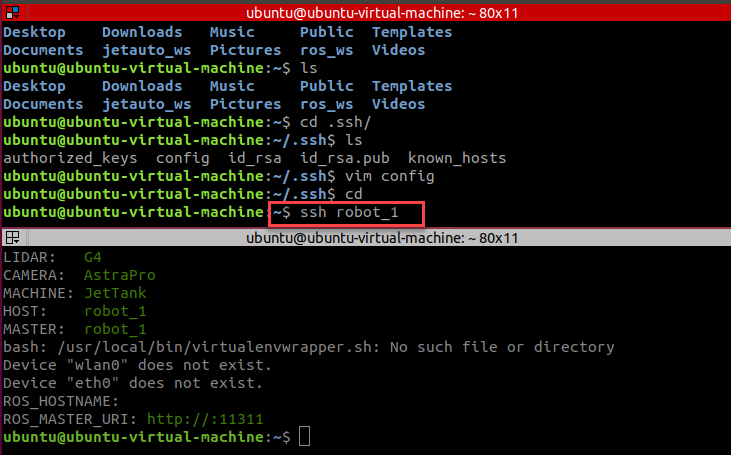
After splitting, enter the commands “ssh robot_1” and “ssh robot_2” respectively. Then input the remote password “hiwonder” to establish a remote connection.
ssh robot_1
ssh robot_2
If you need to connect to other slaves, modify “robot_X” accordingly
Configure Virtual Machine SSH Communication
Enter command “ssh-keygen” to initialize the SSH service. Follow the on-screen prompts, and press Enter or input “y” as instructed
ssh-keygen

Enter command “ssh-copy-id -i ubuntu@192.168.11.212” to configure the SSH service. Here, the IP “192.168.11.212” is the IP of the virtual machine itself (modify the IP according to your own virtual machine environment, this is just an example). Press Enter, then enter the password when prompted. The password is “ubuntu”
ssh-copy-id -i ubuntu@192.168.11.212
Configure SSH Communication Between the Master and Slave
Here, taking the master as an example, the steps and commands required for both the master and the slaves are the same. You need to configure as many as the number of slaves you have.
Go back to the terminal interface of the robot, enter command “ssh-keygen” to initialize the SSH service. Press Enter continuously when prompted.

Enter command “ssh-copy-id -i ubuntu@192.168.11.212”to configure SSH service. Replace the IP address “192.168.11.212” with the actual IP address of your virtual machine (the IP address depends on your own virtual machine environment, this text is just an example). After entering pressing Enter, you will be prompted to enter the password. The password is “ubuntu”.
ssh-copy-id -i ubuntu@192.168.11.212
Configure Virtual Machine SSH Communication Parameters
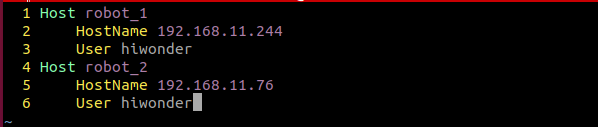
Enter the command “vim .ssh/config” to configure the SSH parameters.
vim .ssh/config
Fill in the config file according to the below figure, where “robot_1” and “robot_2” are the names of the robots, HostName is the IP address of the robot and User is the username of the robot. You can add more robots following the same format according the number of robots you need to control. Press “Esc” key, then type “:wq” to save and exit.
7.1.9 Synchronize Time (Must-read!!)
Time synchronization is particularly crucial to ROS robot group control system. If the clocks are not synchronized, it can result in incorrect message transmission or processing out of order. Robots need to confirm and perform time synchronization every time they restart or boot up.
Open virtual machine and click
to open the command line terminal.Right-click the terminal to select “Split Horizontally”.
In the first split column, type command “ssh robot_1” to connect the master and host respectively according to “7.1.8 Configure Communication Between Virtual Machine and Robot->Connect Robot via Virtual Machine”.
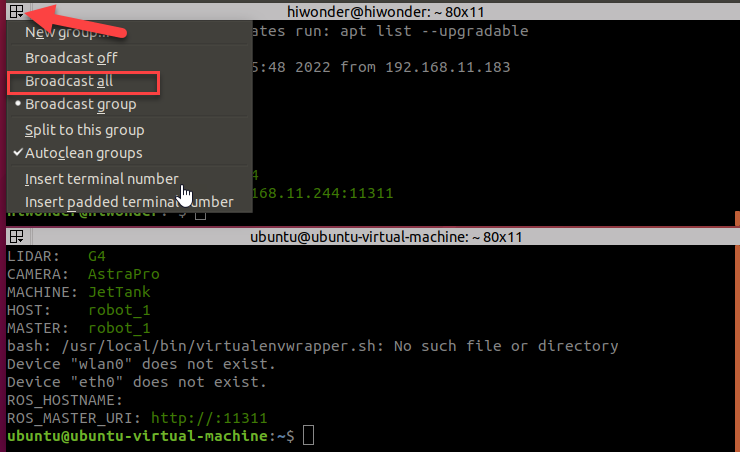
Click on the position where the below arrow is pointing. Then select “Broadcast all” to activate the broadcast mode to both columns.
In the first command, type the command “sudo date -s “2022/12/6 19:42:7”” to synchronize time between the virtual machine and the robot connected via SSH. The time specified in the command “”2022/12/6 19:42:7””, can be customized by users.

After settings, enter the command “date” to check if the time is synchronized successfully.

After synchronization, click
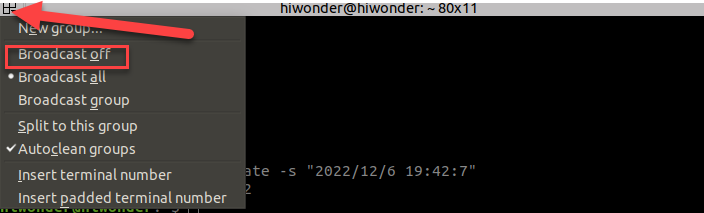
 on the upper left of the terminal to select “Broadcast off” to cancel the command broadcast mode.
7.2 Group Control
In group control, you can use one wireless handle to control multiple JetRover robots to perform actions simultaneously.
7.2.1 Preparations
Prepare two and above JetRover robots
Install the virtual machine
Configure communication for the both master and slave.
Plug the USB handle receiver into the master,while the slave does not require a receiver. All slaves should unplug the handle receiver.
7.2.2 Enable Service
Enable Virtual Machine Node Controller
Open the command line terminal, and enter the command “roscore” to enable the nodes communication service.
roscore
Enable Handle Control Service of the Master (robot_1)
Input command “roslaunch hiwonder_multi multi_control.launch” and press Enter to enable group control service.
roslaunch hiwonder_multi multi_control.launch
Enable Handle Control Service of the Slave (robot_2)
Waif for the master service to start completely, then enter the command “roslaunch hiwonder_multi multi_control.launch” in the connected terminal to activate the group control service.
roslaunch hiwonder_multi multi_control.launch
If there are more slave robots, please individually enable the handle control service on each slave robot.
7.3 Multi-robot Mapping
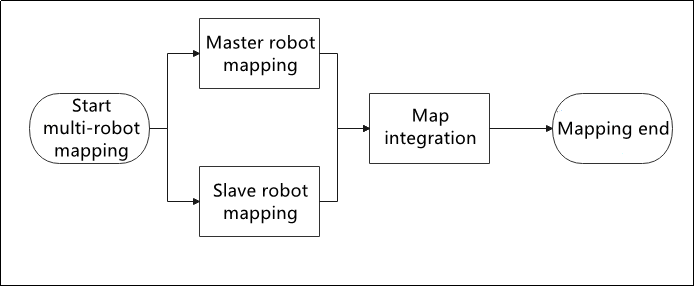
Multi-robot Mapping means that use one wireless handle to control multiple JetRover robots to move synchronously so as to map the surroundings together.
The working logic of multi-robot mapping is as follow.
7.3.1 Preparation
Prepare two and above JetRover robots.
Install the virtual machine.
Configure communication for the both master and slave.
Place the robots in the place to be mapped. It is recommended to let the robot map in the indoor, because the light and distance of the outdoor will affect the mapping effect.
Place the robots side by side on a wide platform. From the perspective of the robot, position the master on the right and the slave on the left, with a distance of 1 meter between them.
7.3.2 Map with Gmapping Algorithm
Note
Note: The entered command should be case sensitive, and the keyword can be complemented by “Tab” key.
Start JetRover, and connect the robot to the computer through USB cable after the LED1 on expansion board lights up.
Connect the master and slave robots using SSH in the virtual machine according to “7.1.8 Configure Communication Between Virtual Machine and Robot->Connect Robot via Virtual Machine”.
Start Virtual Machine Node Controller
Open the command line terminal and enter the command “roscore” to enable the nodes communication service.
roscore
Enable Mapping Service for the Master (robot_1)
In the connected command line terminal, enter the command “roscd hiwonder_multi/launch/multi_slam && roslaunch master_node.launch” to enable the mapping service on the master.
roscd hiwonder_multi/launch/multi_slam && roslaunch master_node.launch
Enable Mapping Service for the Slave (robot_2)
Wait for the master service to enable, then enter the command “Enable Mapping Service on the Master (robot_1)” in the connected terminal to enable the mapping service on the slave
Enable Mapping Service on the Master (robot_1)
View Mapping Process on RIVZ
Enter the command “roslaunch hiwonder_multi multi_slam_rviz.launch” and press Enter to access the specific directory. Open RVIZ to view mapping process.
roslaunch hiwonder_multi multi_slam_rviz.launch
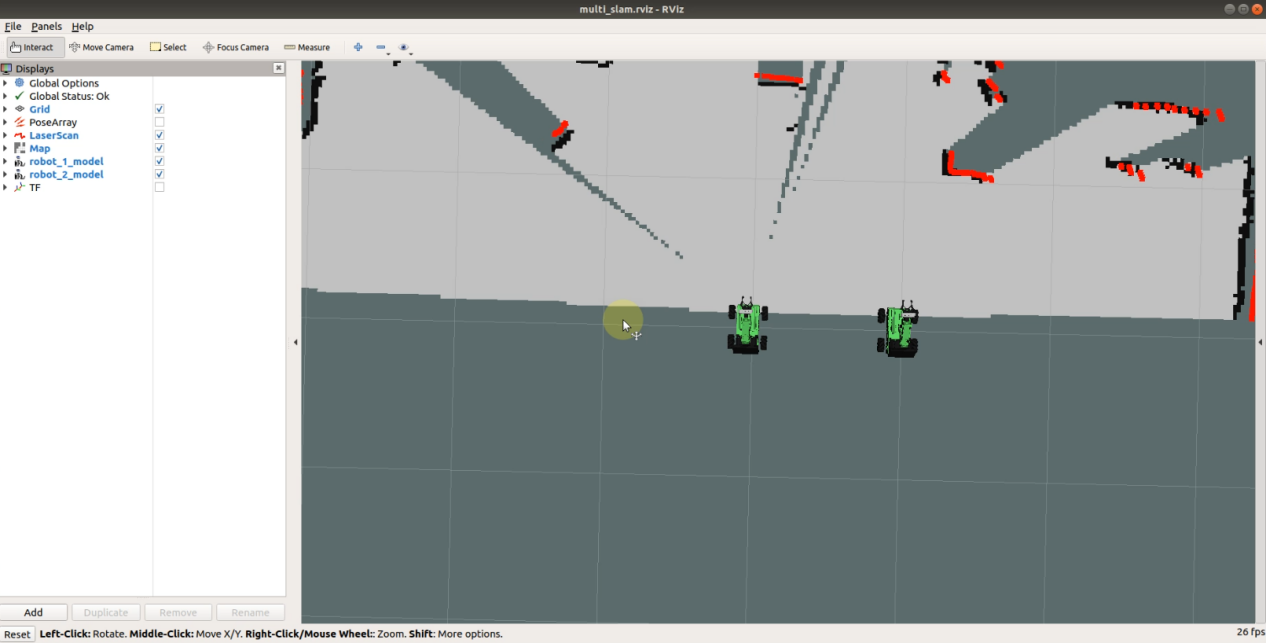
After all robots are configured, turn on the first handle switch. Wait for the handle to connect to the master, then you can use the handle to control the matter to move and construct the map of the current area. Turn on the second handle. Once the handle connects to the slave, you can use the handle to control the slave to move and construct the map of the current area.
The above example uses two robot to perform mapping process. If there are more robots, the corresponding numbers of handles are required to control the robots.
Save Map
Take “master (robot_1)” as an example. Users can follow the same steps to save map on the slave.
Enter the command “roscd hiwonder_slam/maps && rosrun map_server map_saver map:=/robot_1/map -f map_01” and press Enter to save the map.

The “map_01” in command is the map name. It can be customized. The below prompt indicates that the map is saved successfully.

7.4 Multi-robot Formation
Multi-robot formation means that you can use one handle to control multiple JetRover cars to move in fixed formation as pictured, including row, column and triangle (the robot cars will adjust their position based on navigation and localization information to ensure their relative positions).
robot_1 the master robot,and robot_2 and robot_3 are slave robots.
| Formation type | Picture |
|---|---|
| row | 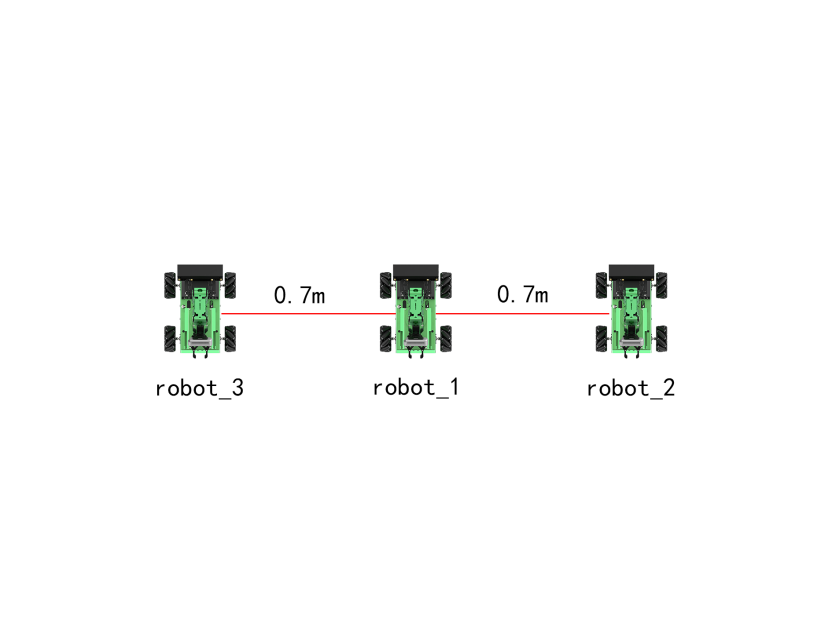 |
| column | 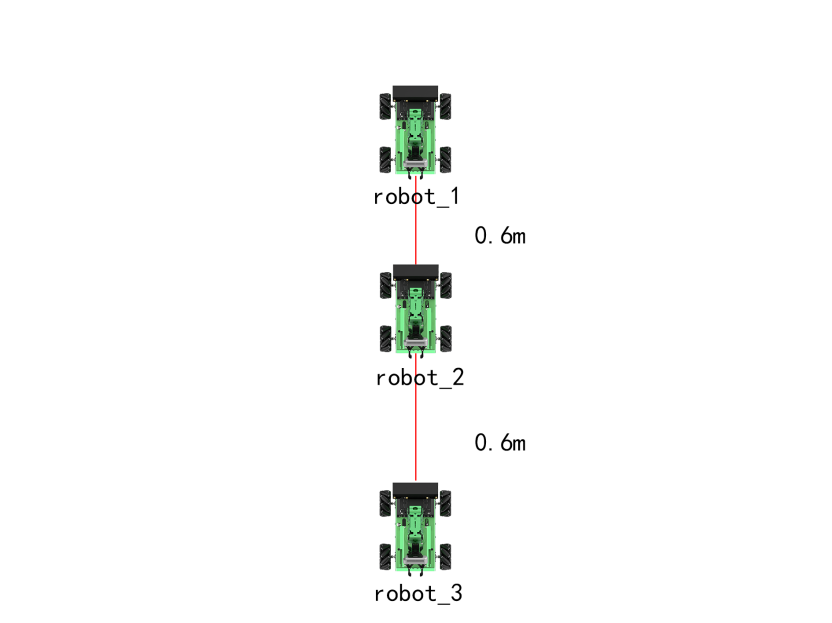 |
| triangle | 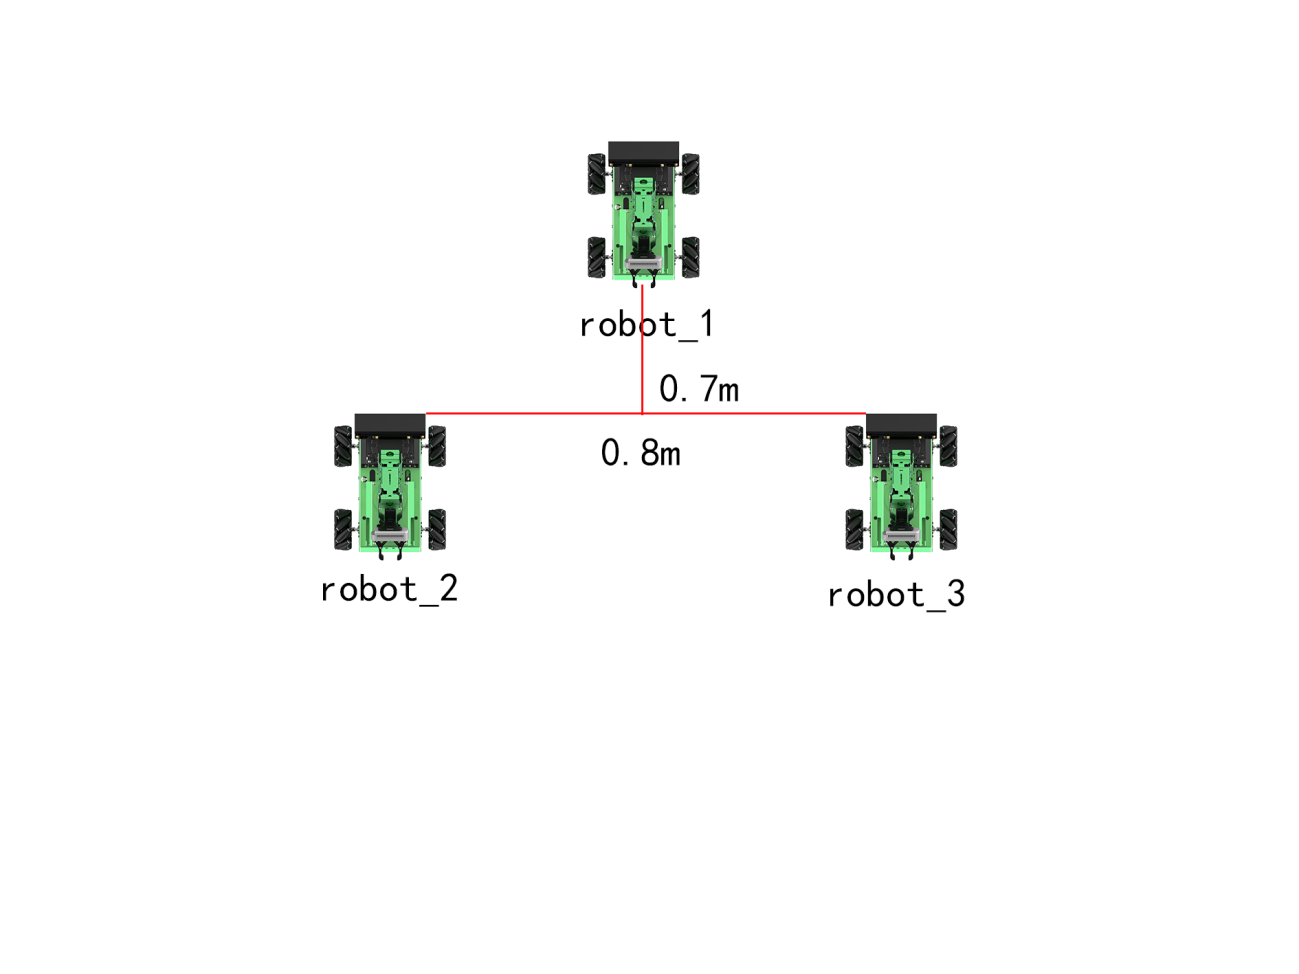 |
7.4.1 Preparation
Prepare two and above JetRover robots
Install the virtual machine
Configure communication for the both master and slave.
Build a map of the current area where robot is located. If you need to understand the mapping method, please refer to the above content “7.3 Multi-robot Mapping”.
Note
Note: The map of each robot must be stored under the directory “ros_ws/src/hiwonder_multi/maps”.
Place the robot according to the selected formation type within the map.
7.4.2 Enable Formation Service
Note
Note: The entered command should be case sensitive, and the keyword can be complemented by “Tab” key.
Start JetRover, and connect the robot to the computer through USB cable after the LED1 on expansion board lights up.
Connect the master and slave robots using SSH in the virtual machine according to “7.1.8 Configure Communication Between Virtual Machine and Robot->Connect Robot via Virtual Machine”.
Start Virtual Machine Node Controller
Open the command line terminal and enter the command “roscore” to enable the nodes communication service.
roscore
Enable Formation Service for the Master (robot_1)
Enter the corresponding command for the master robot formation service in the terminal according to the following formation commands.
Row:“roscd hiwonder_multi/launch/multi_formation && roslaunch master_node.launch map:=map_01 multi_mode:=row”
Column:“roscd hiwonder_multi/launch/multi_formation && roslaunch master_node.launch map:=map_01 multi_mode:=column”
Triangle:“roscd hiwonder_multi/launch/multi_formation && roslaunch master_node.launch map:=map_01 multi_mode:=triangle”
Enable the master formation service.
Enable Formation Service for the Slave (robot_2)
Wait for the mater service to start, then enter the command “roscd hiwonder_multi/launch/multi_formation && roslaunch slave_node.launch” in the connected terminal to enable the formation service for the slave.
roscd hiwonder_multi/launch/multi_formation && roslaunch slave_node.launch
Check Navigation on RIVZ
Enter the command “roslaunch hiwonder_multi multi_formation_rviz.launch” and press Enter to open RIVZ tool.
roslaunch hiwonder_multi multi_formation_rviz.launch
7.5 Multi-robot Navigation
Multi-robot navigation means that after several JetRover cars collaborate with each other to construct one map, they will navigate together and can avoid hitting the front cars within 240-degree.
7.5.1 Preparation
Prepare two and above JetRover robots.
Install the virtual machine.
Configure communication for the both master and slave.
Place the robots in the place to be mapped. It is recommended to let the robot map in the indoor, because the light and distance of the outdoor will affect the mapping effect.
Note
Note: The map of each robot must be stored under the directory “ros_ws/src/hiwonder_multi/maps”.
7.5.2 Enable Navigation Service
Note
Note: The entered command should be case sensitive, and the keyword can be complemented by “Tab” key.
Start JetRover, and connect the robot to the computer through USB cable after the LED1 on expansion board lights up.
Connect the master and slave robots using SSH in the virtual machine according to “7.1.8 Configure Communication Between Virtual Machine and Robot-> Connect Robot via Virtual Machine”.
Enable Virtual Machine Node Controller
Open the command line terminal and enter the command “roscore” to enable the nodes communication service.
roscore
Enable Navigation Service for the Master (robot_1)
In the connected command terminal, enter the command “roscd hiwonder_multi/launch/multi_navigation && roslaunch master_node.launch map:=map_01” to enable the mapping service for the master.
roscd hiwonder_multi/launch/multi_navigation && roslaunch master_node.launch map:=map_01
Enable Navigation Service for the Slave (robot_2)
Wait for the master service to enable, then enter the command “roscd hiwonder_multi/launch/multi_navigation && roslaunch slave_node.launch” in the connected terminal to enable the mapping service for the slave.
roscd hiwonder_multi/launch/multi_navigation && roslaunch slave_node.launch
Check Navigation on RIVZ
Enter the command “roslaunch hiwonder_multi multi_navigation_rviz.launch” and press Enter to open RIVZ tool.
roslaunch hiwonder_multi multi_navigation_rviz.launch
After starting the navigation, it’s necessary to calibrate the robot’s position on the map to correspond to its real location. You can refer to  in “Usage Instruction of RIVZ” for guidance.
7.5.3 Usage Instruction of RIVZ
RVIZ is a 3D visualizer for the Robot Operating System (ROS) framework. RVIZ allows you to visualize the information, and send message to the object to monitor and control it.
The functions of the keys are listed below.
| Icon | Functions |
 |
Select the robot or designate the position where the angle should be adjusted |
 |
Select this tool and left press your mouse without release to adjust the camera angle |
 |
Select this tool and left press your mouse without release to select the model |
 |
Select this tool and left click one point on the 3D model area randomly to set it as the center of the map. |
 |
Select this tool, and respectively click the starting point and end point on the 3D model area to range the distance between them |
|
Set the initial position of the robot on 3D model area. This tool is only applicable to navigation. When the actual position of the robot is not in line with that on 3D model area, you need to reset the position of the robot on 3D model area. After clicking this tool, left click any point on 3D model area to set it as the initial position of the robot. |
 |
Publish single target point. After clicking this tool, left click any point on 3D model area to set it as the target destination. After the point is set, robot will design a path toward the target point automatically. |
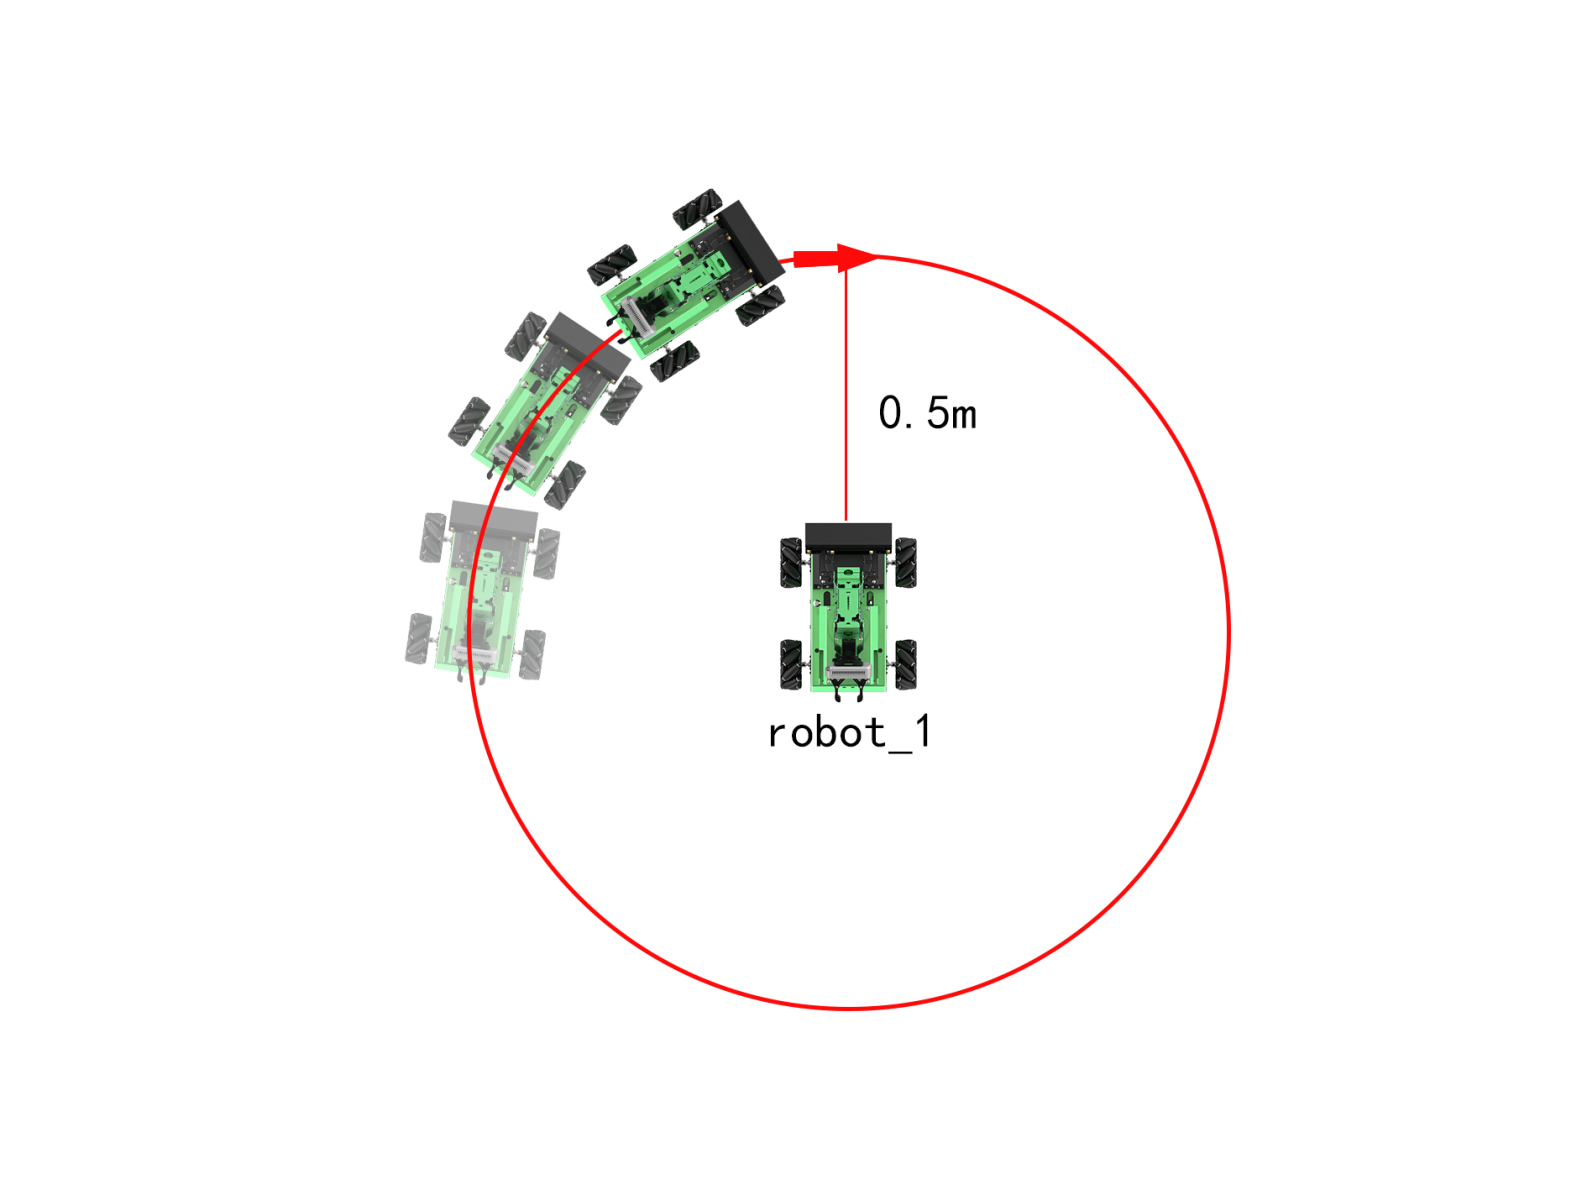
7.6 Multi-robot Surrounding
In multi-robot surrounding game, you can use one handle to control one robot to drive around other robot.
robot_1 is the master robot, and robot_2 is the slave robot.
7.6.1 Preparation
Prepare two and above JetRover robots.
Install the virtual machine.
Configure communication for the both master and slave.
Place the robots in the place to be mapped. It is recommended to let the robot map in the indoor, because the light and distance of the outdoor will affect the mapping effect.
Note
Note: The map of each robot must be stored under the directory “ros_ws/src/hiwonder_multi/maps”.
Place the robots side by side on a wide platform. From the perspective of the robot, position the master on the right and the slave on the left, with a distance of 0.5 meter between them.
7.6.2 Enable Surrounding Service
Note
Note: The entered command should be case sensitive, and the keyword can be complemented by “Tab” key.
Start JetRover, and connect the robot to the computer through USB cable after the LED1 on expansion board lights up.
Connect the master and slave robots using SSH in the virtual machine according to “7.1.8 Configure Communication Between Virtual Machine and Robot->Connect Robot via Virtual Machine”.
Enable Virtual Machine Node Controller
Open the command line terminal and enter the command “roscore” to enable the nodes communication service.
roscore
Enable the Master Service (robot_1)
In the connected command terminal, enter the command “roscd hiwonder_multi/launch/multi_surround && roslaunch master_node.launch map:=map_01” to enable the mapping service for the master.
roscd hiwonder_multi/launch/multi_surround && roslaunch master_node.launch map:=map_01
Enable the Slave Service (robot_2)
Wait for the master service to enable, then enter the command “roscd hiwonder_multi/launch/multi_surround && roslaunch slave_node.launch” in the connected terminal to enable the mapping service for the slave.
roscd hiwonder_multi/launch/multi_surround && roslaunch slave_node.launch
Check Performance on RVIZ
Enter the command “roslaunch hiwonder_multi multi_surround_rviz.launch” and press Enter to open RVIZ tool.
roslaunch hiwonder_multi multi_surround_rviz.launch